Acura RL (1996-2004 year). Manual — part 574
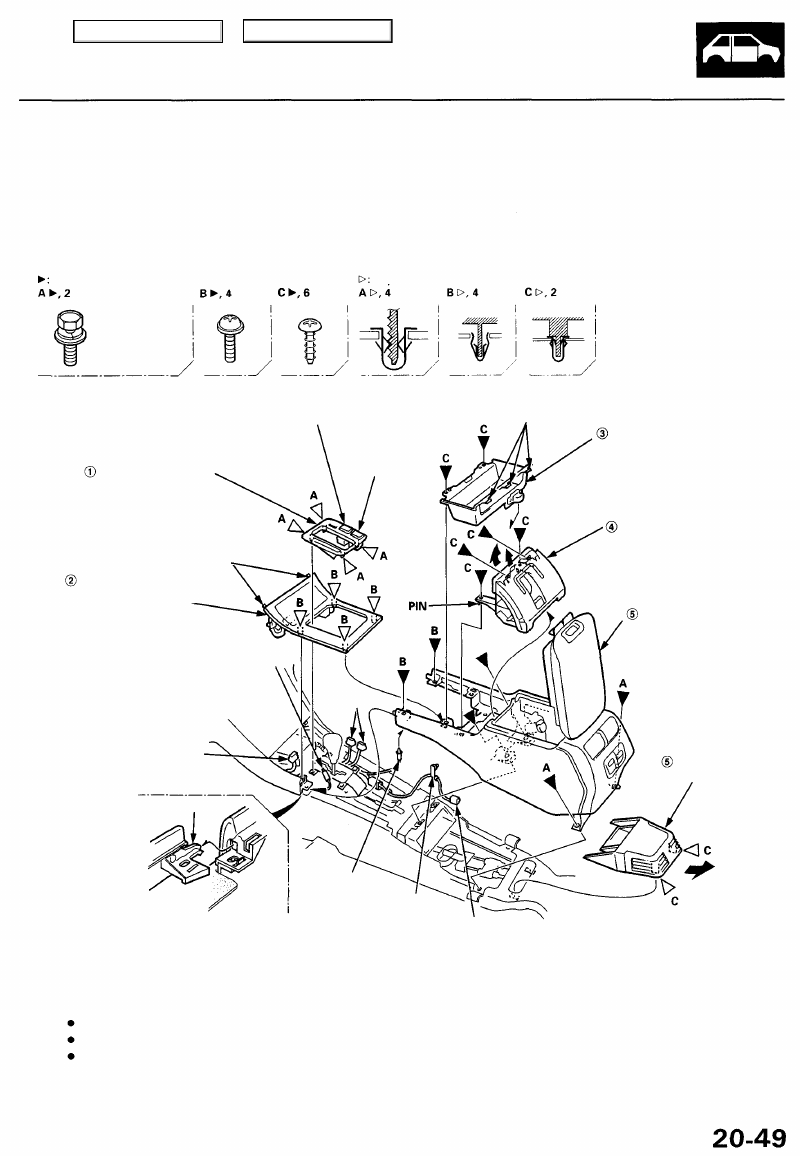
Removal — '99 - 01 Models
CAUTION: When prying with a flat-tip screwdriver, wrap it with protective tape to prevent damage.
NOTE: Take care not to scratch the console panel, rear console, front seat, and related parts.
Disassemble in numbered sequence.
Bolt, screw locations
6 x 1.0 mm
9.8 N-m (1.0 kgf-m,
7.2 Ibf-ft)
Clip locations
SEAT HEATER
SWITCH
(driver's)
HOOKS
CIGARETTE
LIGHTER
CONNECTOR
ACCESSORY
POWER SOCKET
Installation is the reverse of the removal procedure.
NOTE:
If necessary, replace any damaged clips.
Make sure the wire harnesses are not pinched.
Make sure the connectors and bulb socket are connected properly.
BEVERAGE
HOLDER TRAY
Disconnect the beverage holder
bulb socket.
BEVERAGE HOLDER
REAR CONSOLE
Disconnect the accessory
power socket, and detach
the harness clip.
REAR HEATER
COVER
CONSOLE PANEL
Disconnect the cigarette
lighter connector.
HOOKS
A/T GEAR POSITION
INDICATOR TRIM
Disconnect the seat
heater switch connectors
and indicator light bulb
socket.
INDICATOR LIGHT
BULB SOCKET
CONNECTORS
HOOK
BEVERAGE
HOLDER
BULB SOCKET
HARNESS
CLIP
SEAT HEATER
SWITCH
(passenger's)
Main Menu
Table of Contents
Dashboard
Component Removal/Installation
CAUTION: When prying with a flat-tip screwdriver, wrap
it with protective tape, and apply protective tape around
the related parts, to prevent damage.
NOTE: Take care not to scratch the dashboard and related
parts.
Instrument panel:
1. Remove the center air vent.
2. Remove the climate control unit and audio unit as an
assembly ('96 - 98 models see page
, '99 - 01
).
NOTE: Do not disconnect the connectors.
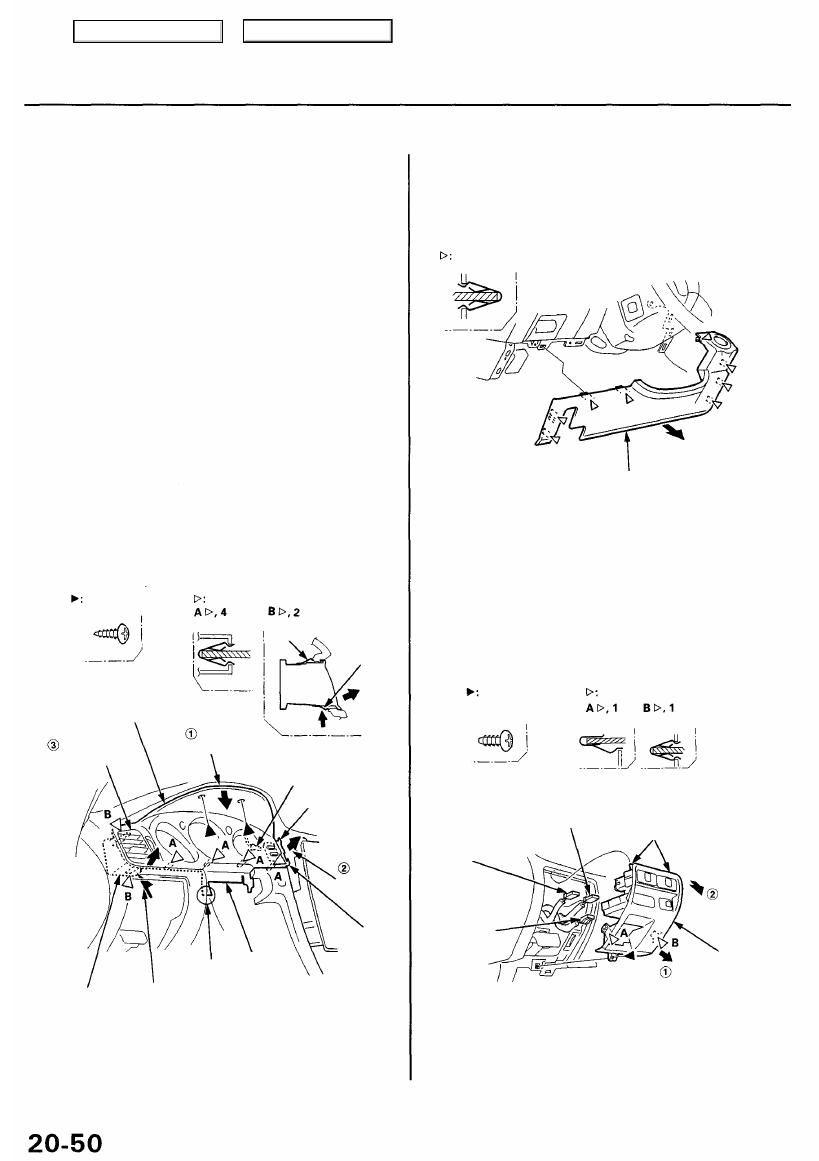
3. Remove the dashboard lower cover and driver's
switch trim.
4. Remove the screws, detach the clips, then carefully
pull out the instrument panel in the numbered
sequence. Disconnect the connector, then remove it.
NOTE: Release the adhesive at the left side of the
skirt carefully.
CLIP
INSTRUMENT
PANEL
Remove left
side by rolling
upward.
Pull top
down.
SELECT/RESET
SWITCH
CONNECTOR
HOOK
Pull right
side straight
out.
HOOK
SIDE
AIR
VENT
Push the clip from
driver's switch trim
opening.
5. Installation is the reverse of the removal procedure.
NOTE: Make sure the connectors are connected
properly.
Dashboard lower cover:
Detach the clips, then remove the dashboard lower
cover.
DASHBOARD
LOWER COVER
Installation is the reverse of the removal procedure.
Driver's switch trim:
1. Remove the dashboard lower cover.
2. Remove the screw, detach the clips, then pull out
the driver's switch trim. Disconnect the connectors,
then remove it.
CRUISE CONTROL
MASTER SWITCH
CONNECTOR
DASH LIGHTS
BRIGHTNESS
CONTROLLER
TCS SWITCH
CONNECTOR
(for some models)
HOOKS
DRIVER'S
SWITCH
TRIM
3. Installation is the reverse of the removal procedure.
NOTE: Make sure the connectors are connected
properly.
Screw locations, 2
Clip locations
CLIP
Push.
SKIRT
ADHESIVE
Clip locations
Screw location, 1
Clip locations, 8
Main Menu
Table of Contents
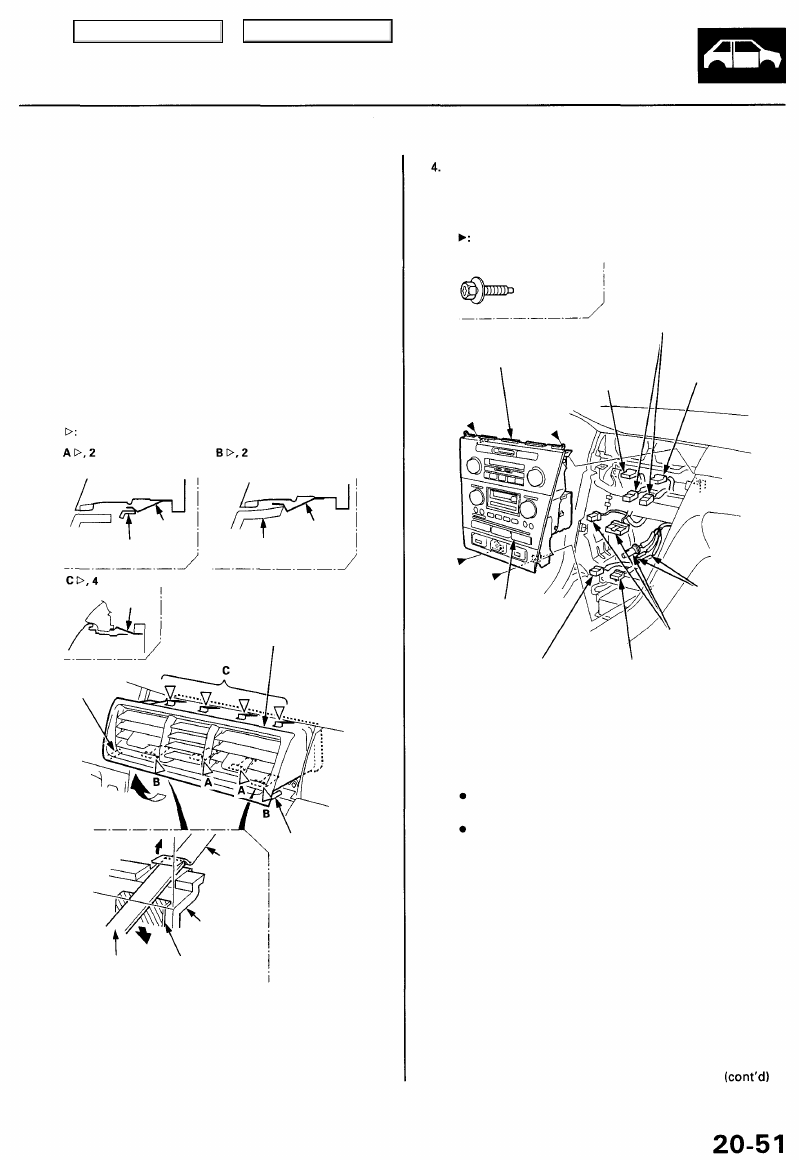
Climate control unit and audio unit ('96 - 98 models):
SRS components are located in this area. Review the SRS
component locations, precautions, and procedures in the
Restraints (
) before performing repairs or ser-
vice.
1. Remove the console panel (see page
).
2. Remove the center air vent.
NOTE: Insert a flat metal plate under the B clips,
then detach the B clips by prying up. Pull the center
air vent backward while prying the clips.
CENTER AIR
VENT
3.
METAL PROTECTIVE
PLATE SEAT
Make sure you have the anti-theft code for the
radio, then write down the frequencies for the
radio's preset buttons.
Remove the bolts, then pull out the climate control
unit and audio unit as an assembly. Disconnect the
connectors and antenna leads, then remove it.
Bolt locations, 4
6 x 1.0 mm
9.8 N-m
(1.0 kgf-m,
7.2 Ibf-ft)
CLIMATE
CONTROL UNIT
CONNECTORS
CLIMATE
CONTROL UNIT
HAZARD
WARNING
SWITCH
CONNECTOR
CLOCK
CONNECTOR
AUDIO UNIT
FRONT FOG
LIGHT SWITCH
CONNECTOR
ANTENNA
LEADS
AUDIO UNIT
CONNECTORS
REAR WINDOW
DEFOGGER SWITCH
CONNECTOR
5. Installation is the reverse of the removal procedure.
NOTE:
Make sure the connectors and antenna lead are
connected properly.
Enter the anti-theft code for the radio, then enter
the customer's radio station presets.
Clip locations
CLIP
CLIP
CLIMATE CONTROL
UNIT
DASHBOARD
UPPER BRACKET
CLIP
PIN
PIN
CLIP
CLIMATE
CONTROL
UNIT
Main Menu
Table of Contents
Dashboard
Component Removal/Installation (cont'd)
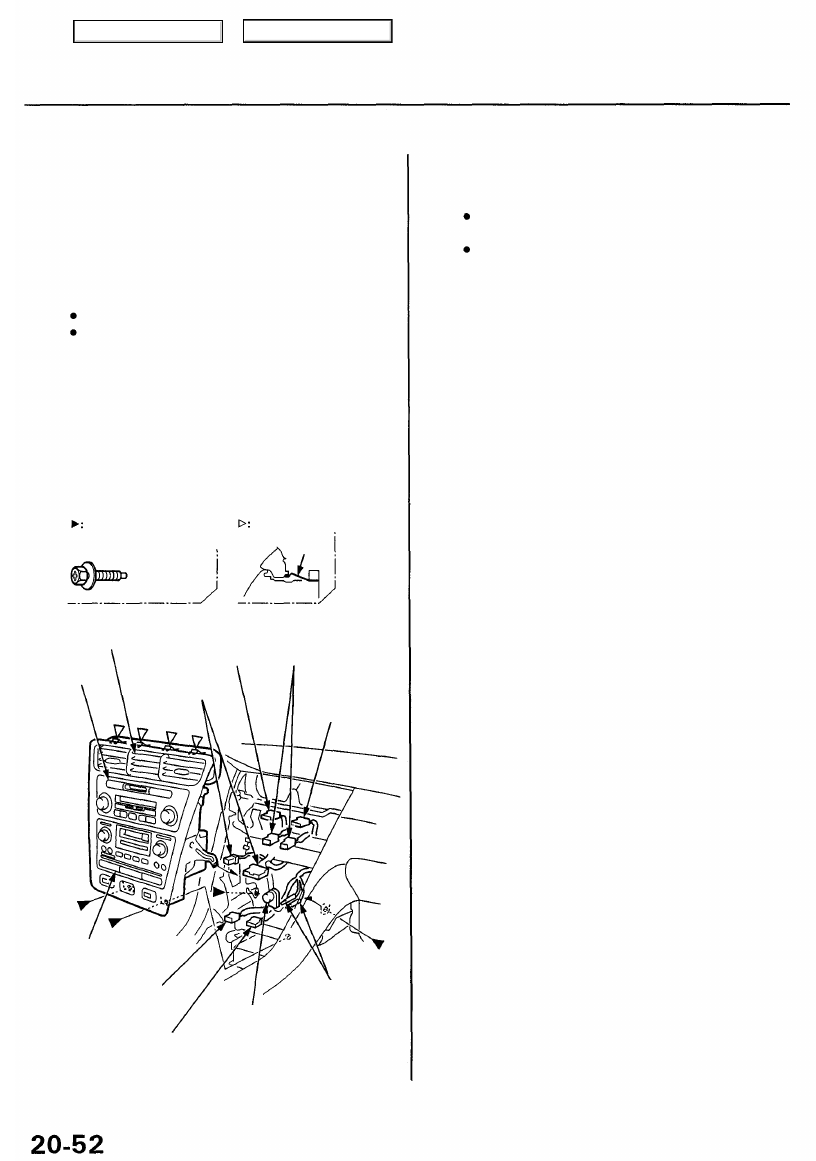
Climate control unit, audio unit and center air vent ('99
- 01 models):
SRS components are located in this area. Review the
SRS component locations, precautions, and procedures
in the Restraints (
) before performing repairs
or service.
1. Remove:
Console lower carpet, both sides (see page
2.
3.
Make sure you have the anti-theft code for the
radio, then write down the frequencies for the
radio's preset buttons.
Remove the bolts. Pull out the bottom of the climate
control unit, audio unit, and center air vent as an
assembly, and carefully detach the clip at the center
air vent. Disconnect the connectors and antenna
leads, then remove it.
Bolt locations, 4
6 x 1.0 mm
9.8 N-m
(1.0 kgf-m,
7.2 Ibf-ft)
Clip locations, 4
CLIP
CENTER
AIR VENT
CLIMATE
CONTROL
UNIT
HAZARD
WARNING CLIMATE
SWITCH CONTROL UNIT
CONNECTOR CONNECTORS
CLOCK
CONNECTOR
AUDIO UNIT
FRONT FOG
LIGHT SWITCH
CONNECTOR
REAR WINDOW
DEFOGGER SWITCH
CONNECTOR
ANTENNA
LEADS
AUDIO UNIT
CONNECTOR
4. Installation is the reverse of the removal procedure.
NOTE:
Make sure the connectors and antenna lead are
connected properly.
Enter the anti-theft code for the radio, then enter
the customer's radio station presets.
AUDIO UNIT
CONNECTORS
Main Menu
Table of Contents
Нет комментариевНе стесняйтесь поделиться с нами вашим ценным мнением.
Текст