Acura RL (1996-2004 year). Manual — part 575

Glove box:
1. Remove the dashboard lower cover.
HOOKS
DASHBOARD LOWER
COVER
2. Remove the glove box stop from each side.
Bolt locations, 2
5 x 0.8 mm
9 N-m (0.9 kgf-m,
7 Ibf-ft)
TRUNK LID
OPENER MAIN
SWITCH
CONNECTOR
DAMPER
CLIP
DAMPER
CLIP
GLOVE BOX
STOPS
GLOVE BOX
3. Detach the damper clip while holding the glove box,
and disconnect the connector.
4. Remove the bolts, then remove the glove box.
5. Remove the glove box back cover.
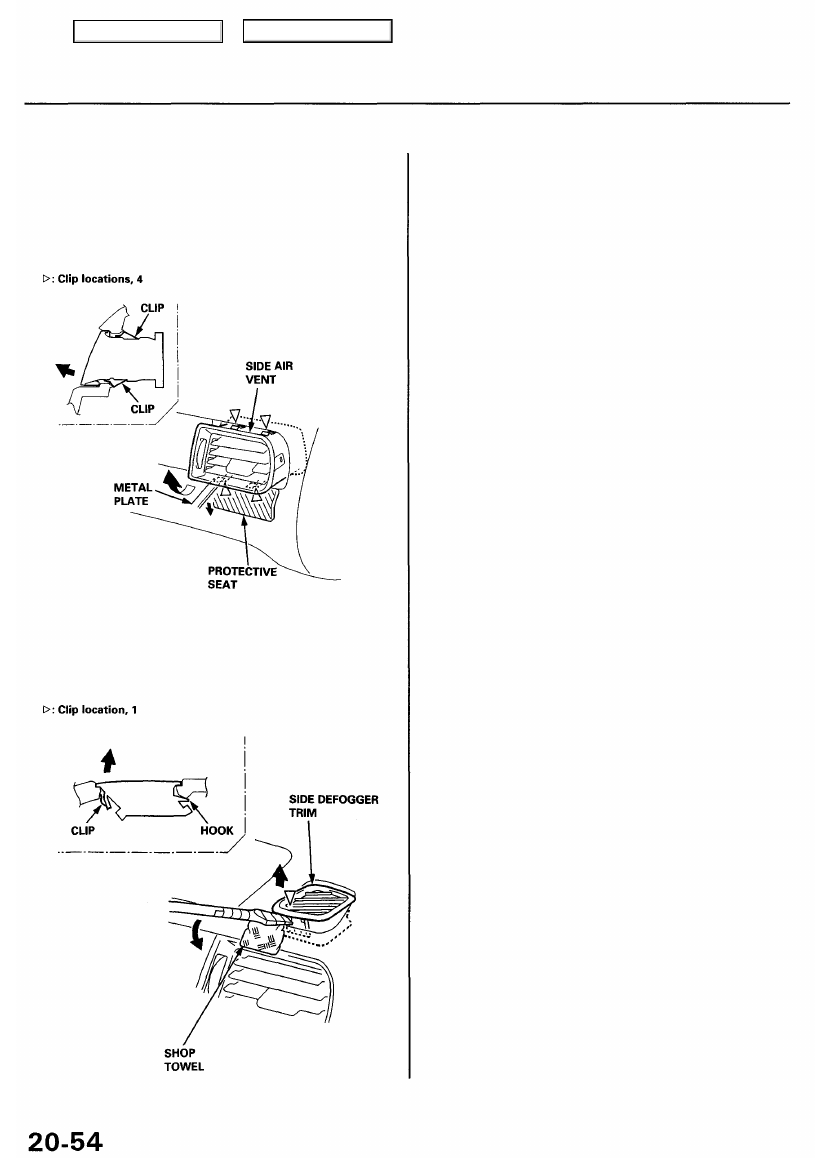
Clip locations, 4
GLOVE BOX
BACK COVER
6. Installation is the reverse of the removal procedure.
Passenger's dashboard panel:
1. Remove the side air vent.
2. Carefully detach the clips, then pull out the passen-
ger's dashboard panel.
PASSENGER'S
DASHBOARD PANEL
3. Installation is the reverse of the removal procedure.
CLIPS
Clip locations, 3
Detach the
connector.
Screw locations, 3
Clip locations, 3
Main Menu
Table of Contents
Component Removal/Installation
(cont'd)
Side air vent (passenger's):
Insert a flat metal plate under the clips, then detach the
clips by prying up. Pull the side air vent backward while
prying the clips.
Side defogger trim:
Carefully pry the side defogger trim at the rear edge,
then remove it.
Dashboard
Main Menu
Table of Contents
Removal
SRS components are located in this area. Review the SRS
component locations, precautions, and procedures in the
Restraints (
) before preforming repairs or ser-
vice.
NOTE:
• An assistant is helpful when removing and installing
the dashboard.
• Take care not to scratch the dashboard, body, and
related parts.
1. Make sure you have the anti-theft code for the
radio, then write down the frequencies for the
radio's preset buttons.
2. Disconnect the negative cable from the battery.
3. Remove:
• Console panel and rear console, '96 - 98 models
• Console panel and rear console, '99 - 01 models
• Center air vent, '96 - 98 models (see page
• Climate control unit and audio unit, '96 - 98 models
(see page
• Climate control unit, audio unit, and center air vent,
• Dashboard lower cover (passenger's), glove box
and glove box back cover (see page
• Console lower carpet (see page
• Dashboard lower cover (driver's) (see page
4. Lower the steering column (see
).
To avoid accidental deployment and
possible injury/ always disconnect the driver's airbag
connector before lowering the steering column (see
).
NOTE: To prevent damage to the steering column, wrap it
with a shop towel.
5. Remove the front passenger's airbag (see
).
To avoid accidental deployment and
possible injury, always disconnect the front passen-
ger's airbag connector when the SRS main harness
is disconnected (see
).
Dashboard
Main Menu
Table of Contents
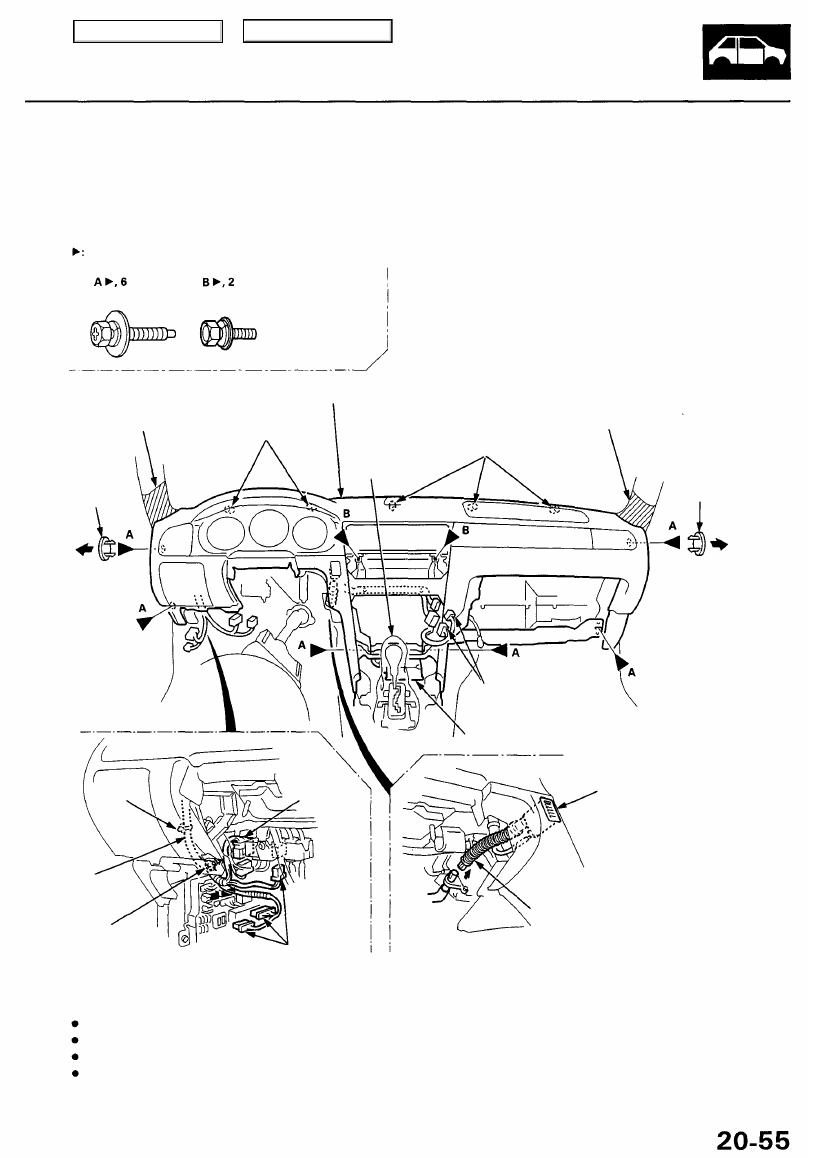
6. Disconnect the dashboard wire harness connectors, the clip and the air hose. Remove the bolts and the self-tapping
screw, then lift and remove the dashboard.
CAUTION: Use protective plates on the bottom of the front pillar trim.
Bolt locations
PROTECTIVE
TAPE
ACCESS
CAP
6 x 1.0 mm
9.8 N-m (1.0 kgf-m,
1.2 Ibf-ft)
DASHBOARD
GUIDE
PINS
PROTECTIVE
PLATE
ACCESS
CAP
IN-CAR
TEMPERATURE
SENSOR
7. Installation is the reverse of the removal procedure.
NOTE:
Make sure the dashboard fits onto the guide pins correctly.
Before tightening the bolts, make sure the dashboard wire harnesses are not pinched.
Make sure the connectors and air hose are connected properly.
Enter the anti-theft code for the radio, then enter the customer's radio station presets.
SELF-TAPPING
SCREW
CONNECTORS
AIR HOSE
CONNECTOR
CLIP
DASHBOARD
WIRE HARNESS
SRS UNIT
CONNECTORS
GUIDE
PINS
SHOP
TOWEL
Main Menu
Table of Contents
Нет комментариевНе стесняйтесь поделиться с нами вашим ценным мнением.
Текст