Discovery 2. Manual — part 239
INTERIOR TRIM COMPONENTS
REPAIRS 76-3-19
Carpet - rear
$% 76.49.03
Remove
1. Models with premium ICE: Remove power
2. Remove RH front seat.
3. Remove both 'B' post lower trim panels.
REPAIRS, Trim casing - lower - 'B' post.
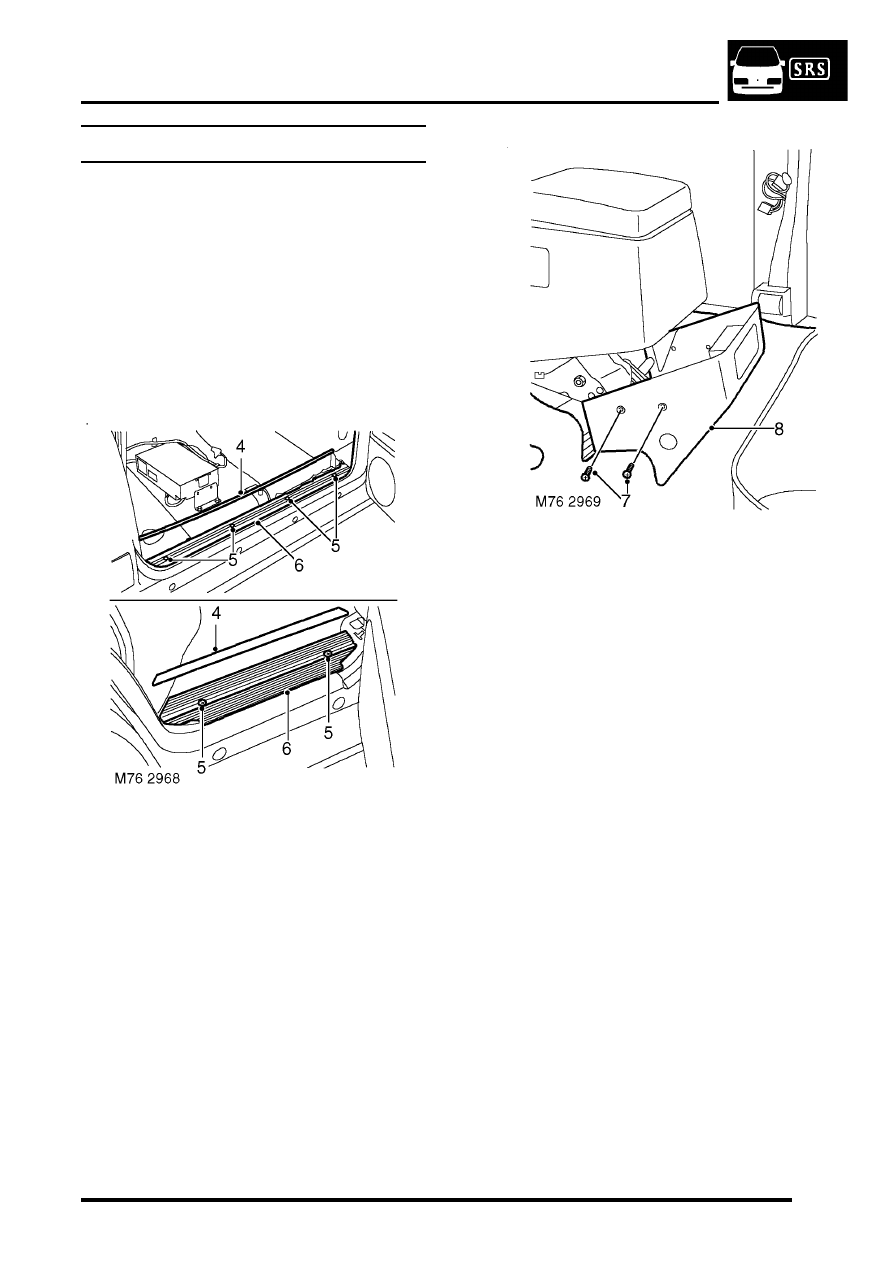
4. Remove finishers from front and rear carpet
retainers.
5. Remove 12 screws securing front and rear
carpet retainers to floor.
6. Remove front and rear carpet retainers.
7. Remove 4 screws securing trim panel to rear of
centre console.
8. Remove trim panel.
9. Position harnesses clear of rear carpet.
10. Remove rear carpet.
Refit
1. Position new rear carpet.
2. Fit front and rear carpet retainers to floor and
secure with screws.
3. Fit finishers to front and rear carpet retainers
4. Position trim panel to rear of centre console
and secure with screws.
5. Fit lower 'B' post trim panels.
REPAIRS, Trim casing - lower - 'B' post.
6. Fit RH front seat to floor.
7. Models with premium ICE: Fit power
INTERIOR TRIM COMPONENTS
76-3-20 REPAIRS
Carpet - loadspace
$% 76.49.04
Remove
1. Remove both rear seat belt lower fixings.
2. Models with third row seats: Remove both
SEATS, REPAIRS, Seat - third row.
3. Remove both loadspace side trim casings.
REPAIRS, Trim casing - side - loadspace.
4. Models with third row seats: Remove 4
screws and remove both seat lower mounting
escutcheons.
5. Recline rear seats fully forward.
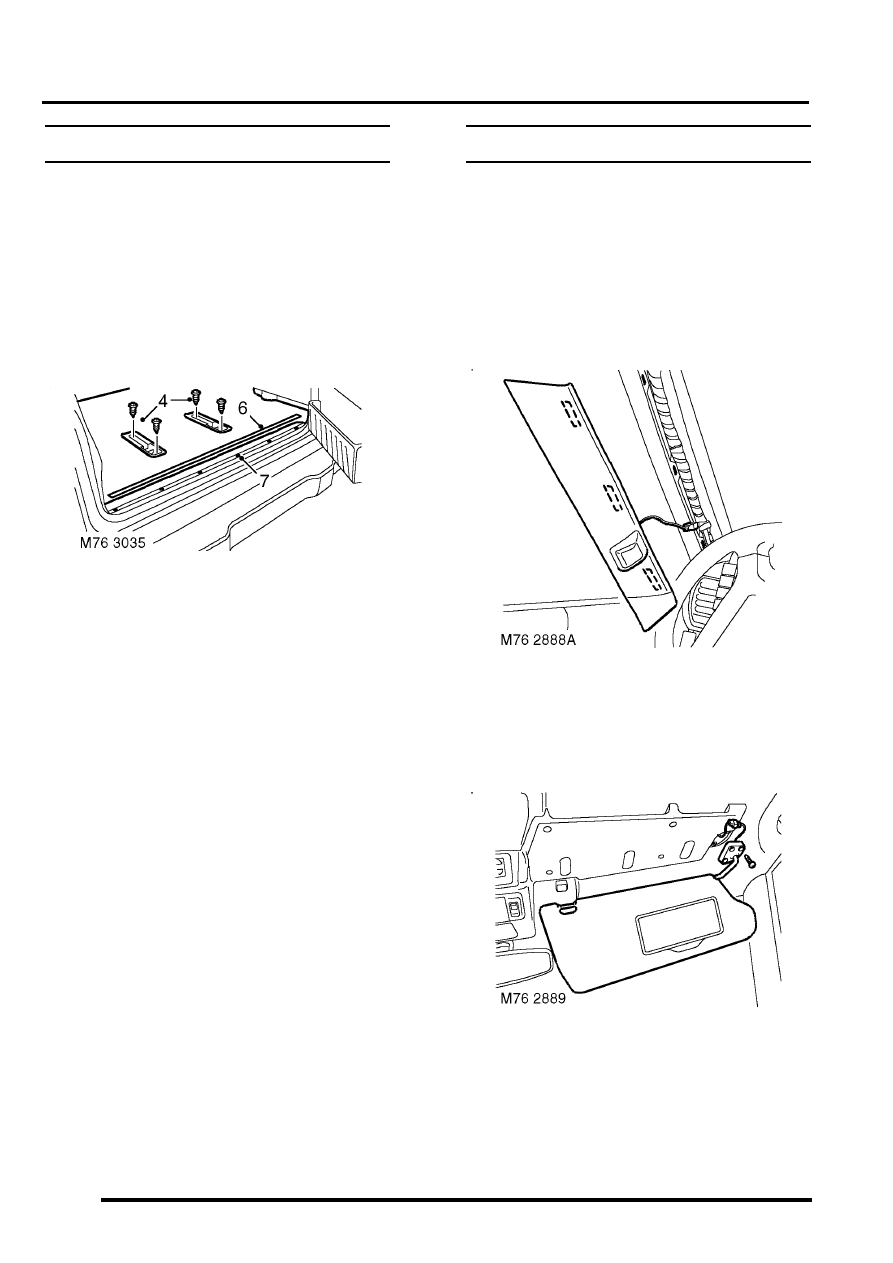
6. Remove finisher from loadspace carpet
retainer.
7. Remove 6 screws securing loadspace carpet
retainer to floor and remove retainer.
8. Remove loadspace carpet.
Refit
1. Position loadspace carpet to floor.
2. Position loadspace carpet retainer to floor and
secure with screws.
3. Fit finisher to loadspace carpet retainer
4. Return rear seats to their normal position.
5. Models with third row seats: Position both
third row seats lower mounting escutcheons to
floor and secure with screws.
6. Fit both loadspace side trim casings.
REPAIRS, Trim casing - side - loadspace.
7. Models with third row seats: Fit both third row
SEATS, REPAIRS, Seat - third row.
8. Position both rear seat belt lower mountings
and secure with bolts tightened to 32 Nm (24
lbf.ft).
Headlining
$% 76.64.15.21
Remove
1. Remove both 'D' post trim casings.
REPAIRS, Trim casing - 'D' post.
2. Remove both 'B' post upper trim casings.
REPAIRS, Trim casing - upper - 'B' post.
3. Release clips securing both 'A' post trim
casings.
4. Models with premium ICE: Disconnect
multiplugs from 'A' post speakers.
5. Remove both 'A' post trim casings.
6. Remove 3 screws securing sun visor to
headlining.
7. Release sun visor from clip.
8. Disconnect multiplug from sun visor.
9. Remove sun visor.
10. Repeat process for second sun visor.
INTERIOR TRIM COMPONENTS
REPAIRS 76-3-21
11. Remove access panel from front edge of front
stowage pocket.
12. Remove screw securing front stowage pocket
to headlining.
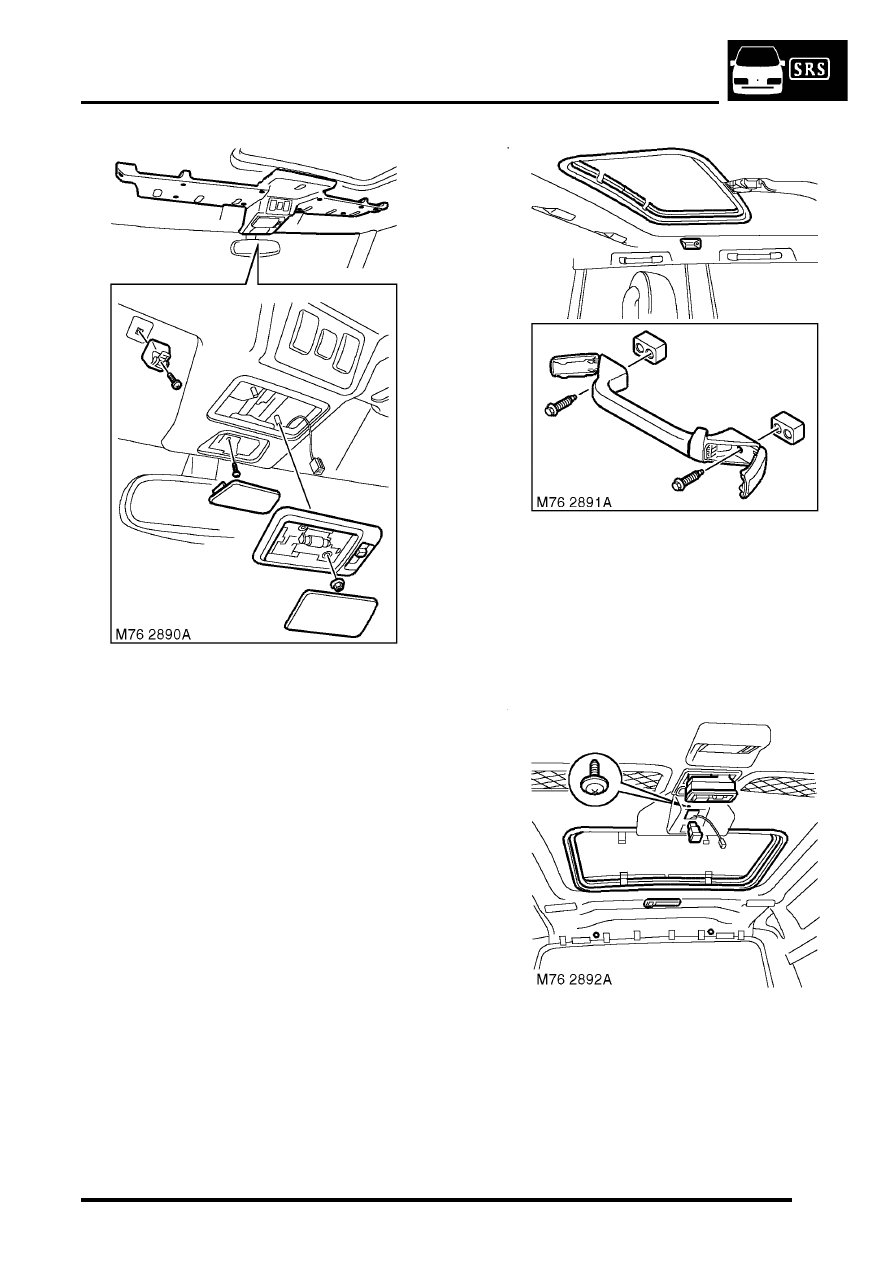
13. Remove lens from front interior lamp.
14. Remove 2 nuts securing front interior lamp to
headlining.
15. Disconnect multiplug from front interior lamp.
16. Remove front interior lamp.
17. Remove 10 screws securing front stowage
pocket to headlining.
18. Disconnect 3 multiplugs from sunroof switches.
19. Remove front stowage pocket.
20. Remove caps from sun visor clips.
21. Remove screws and release both sun visor
clips.
22. Remove tail door aperture upper trim casing.
23. Remove rear sunroof aperture trim.
24. Remove front sunroof aperture trim.
25. Release end caps from all grab handles.
26. Remove 2 bolts securing each grab handle to
roof.
27. Remove all 4 grab handles.
28. Models with volumetric alarm: Release front
volumetric sensor from headlining and
disconnect multiplug.
29. Models with rear A/C:
a Release rear A/C control panel from
headlining.
b Disconnect 2 multiplugs and 2 Lucar
connectors from rear A/C control panel.
c Remove rear A/C control panel.
30. Release rear interior lamp from headlining and
disconnect multiplug.
31. Remove rear interior lamp.
INTERIOR TRIM COMPONENTS
76-3-22 REPAIRS
32. Remove 2 clips securing rear of headlining to
roof.
33. Release rear sunroof switch from headlining.
34. Disconnect multiplug and remove rear sunroof
switch.
35. Remove screw securing headlining to roof.
36. With assistance, remove headlining.
37. Models with rear A/C:
a Remove foam pads from air vents.
b Release 2 rear air vents from headlining.
c Release 3 central air vents from headlining.
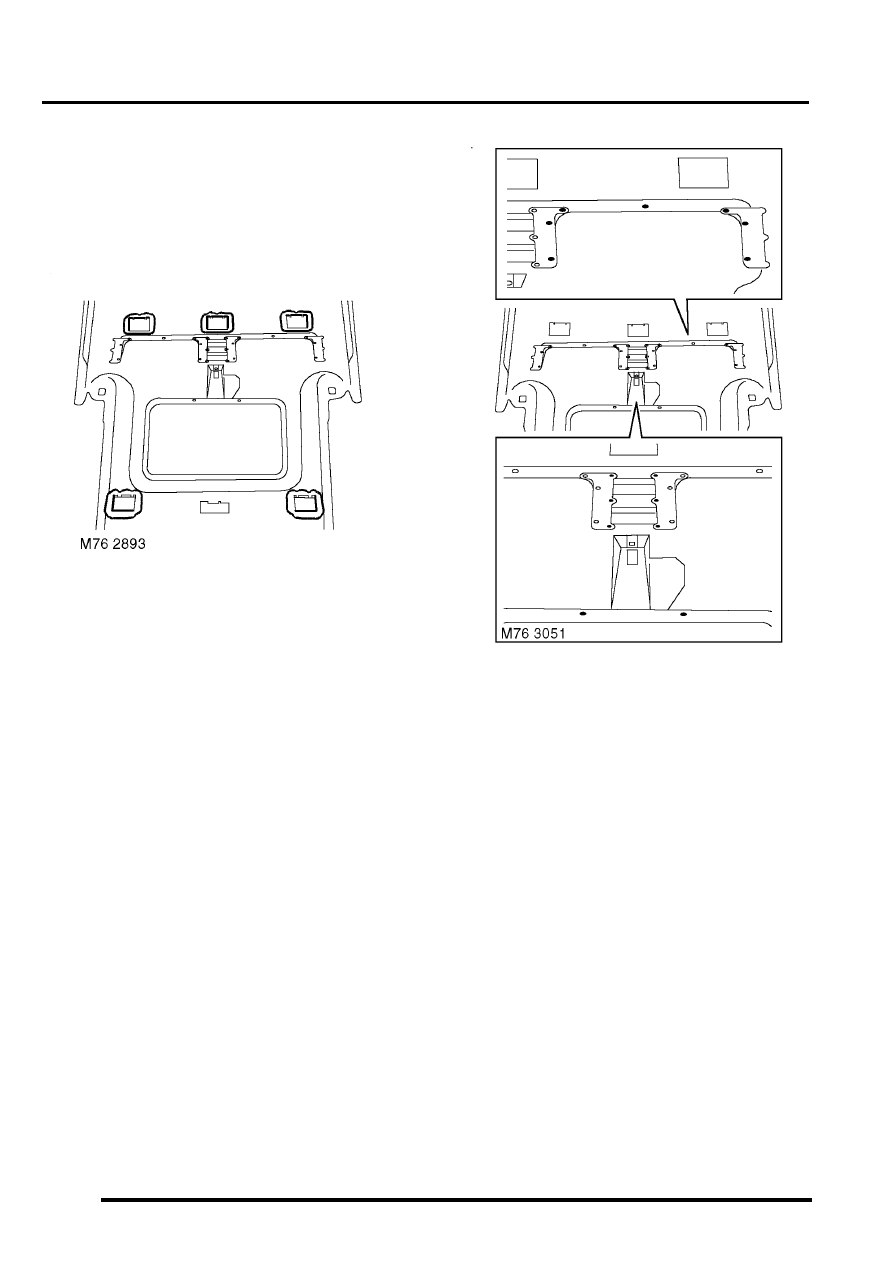
38. Remove 7 nuts securing each stowage pocket
to headlining and collect mounting plates.
39. Remove both pockets from headlining.
40. Remove 8 screws securing rear console to
headlining and collect 3 mounting plates.
41. Remove rear console from headlining.
Refit
1. Fit rear console and mounting plates to
headlining.
2. Fit and tighten nuts securing rear console to
headlining.
3. Fit both stowage pockets and mounting plates
to headlining.
4. Fit and tighten nuts securing stowage pockets
to headlining.
5. Models with rear A/C:
a Fit 3 central air vents to headlining.
b Fit 2 rear air vents to headlining.
c Fit foam pads to air vents.
6. With assistance, position headlining in vehicle.
7. Fit and tighten screw securing centre of
headlining to roof.
8. Connect multiplug to rear sunroof switch.
9. Fit rear sunroof switch to rear console.
10. Fit clips securing rear edge of headlining to
sunroof.
Нет комментариевНе стесняйтесь поделиться с нами вашим ценным мнением.
Текст