Discovery 2. Manual — part 240

INTERIOR TRIM COMPONENTS
REPAIRS 76-3-23
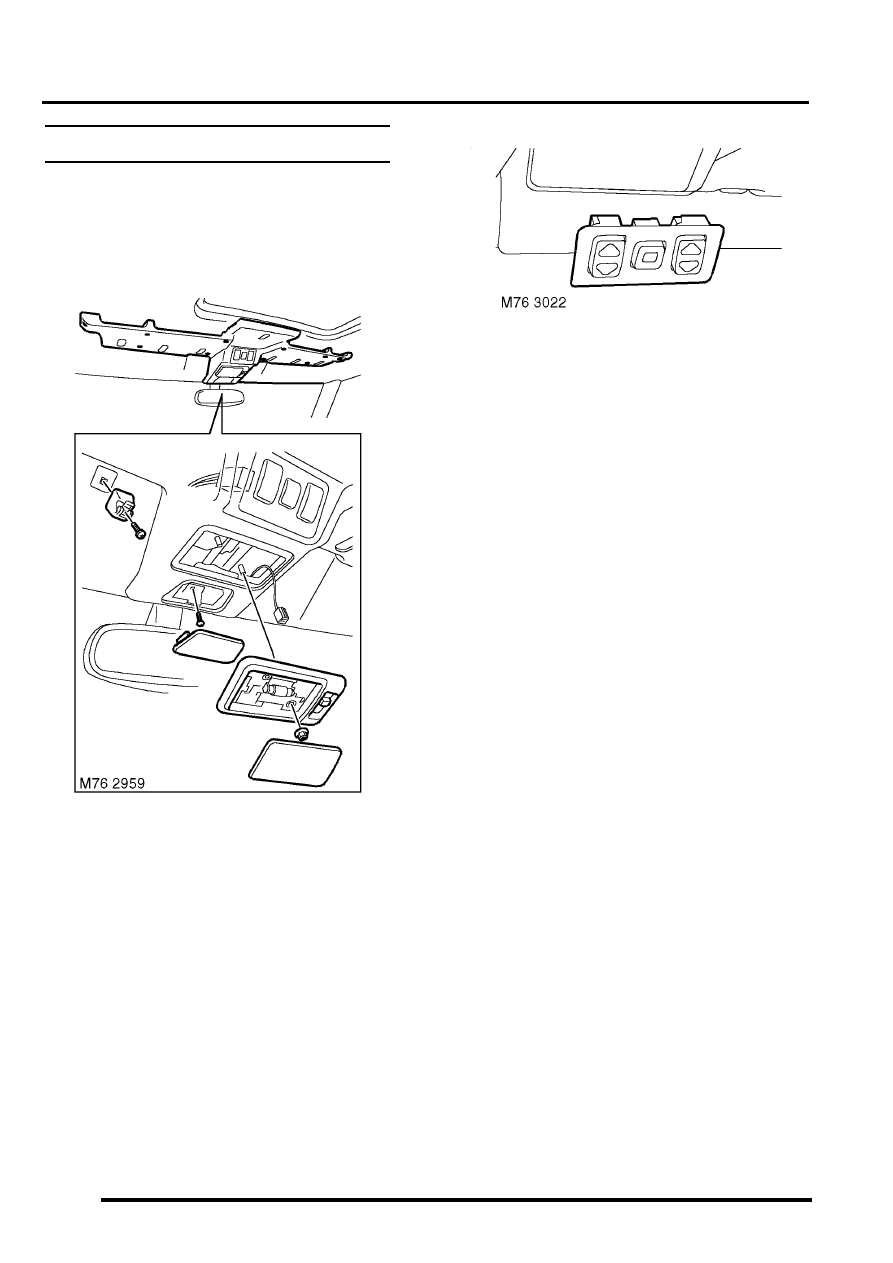
11. Position rear interior lamp to headlining and
connect multiplug.
12. Fit rear interior lamp to headlining.
13. Models with rear A/C:
a Position rear A/C control panel to headlining
and connect multiplugs and Lucar
connectors.
b Fit rear A/C control panel to headlining.
14. Models with volumetric alarm: Connect
multiplug to front volumetric sensor and fit
sensor to headlining.
15. Fit grab handles to headlining and secure with
bolts.
16. Fit end caps to grab handles.
17. Fit front sunroof aperture trim.
18. Fit rear sunroof aperture trim.
19. Fit tail door aperture upper trim casing.
20. Fit sun visor clips to headlining and secure with
screws.
21. Fit caps to sun visor clips.
22. Position front stowage pocket to headlining and
connect multiplugs to sunroof switches.
23. Fit and tighten 10 screws securing front
stowage pocket to headlining.
24. Connect multiplug to front interior lamp.
25. Fit front interior lamp to headlining and secure
with nuts.
26. Fit lens to front interior lamp.
27. Fit and tighten screw securing front stowage
pocket to headlining.
28. Fit access panel to front edge of front stowage
pocket.
29. Position sun visor to headlining and secure to
clip.
30. Connect multiplug to sun visor.
31. Fit and tighten screws securing sun visor to
headlining.
32. Repeat process for second sun visor.
33. Models with premium ICE: Position both 'A'
post trim casings and connect multiplugs to
speakers.
34. Fit both trim casings to 'A' posts and secure
with clips.
35. Fit both 'B' post upper trim casings.
REPAIRS, Trim casing - upper - 'B' post.
INTERIOR TRIM COMPONENTS
76-3-24 REPAIRS
Stowage pocket - front
$% 76.67.26
Remove
1. Remove access panel from front edge of front
stowage pocket.
2. Remove screw securing front stowage pocket
to headlining.
3. Remove lense from front interior lamp.
4. Remove 2 nuts securing front interior lamp to
headlining.
5. Disconnect multiplug from front interior lamp.
6. Remove front interior lamp.
7. Remove 10 screws securing front stowage
pocket to headlining.
8. Disconnect 3 multiplugs from sunroof
switches.
9. Remove front stowage pocket.
10. Release clips securing sunroof switch pack.
11. Remove switch pack.
Refit
1. Fit sunroof switch pack to front stowage pocket
and secure with clips.
2. Position front stowage pocket to headlining
and connect multiplugs to sunroof switches.
3. Fit and tighten 10 screws securing front
stowage pocket to headlining.
4. Connect multiplug to front interior lamp.
5. Fit front interior lamp to headlining and secure
with nuts.
6. Fit lense to front interior lamp.
7. Fit and tighten screw securing front of front
stowage pocket to headlining.
8. Fit access panel to front stowage pocket.
SCREENS
REPAIRS
76-4-1
SCREENS
REPAIRS
Glass/sealing rubber - tail door
$% 76.31.22
Remove
1. Remove spare wheel from rear door.
2. Remove centre high mounted stop lamp.
LIGHTING, REPAIRS, Lamp - stop -
3. Pull the rear wiper arm away from the glass.
4. Disconnect leads from rear window heater.
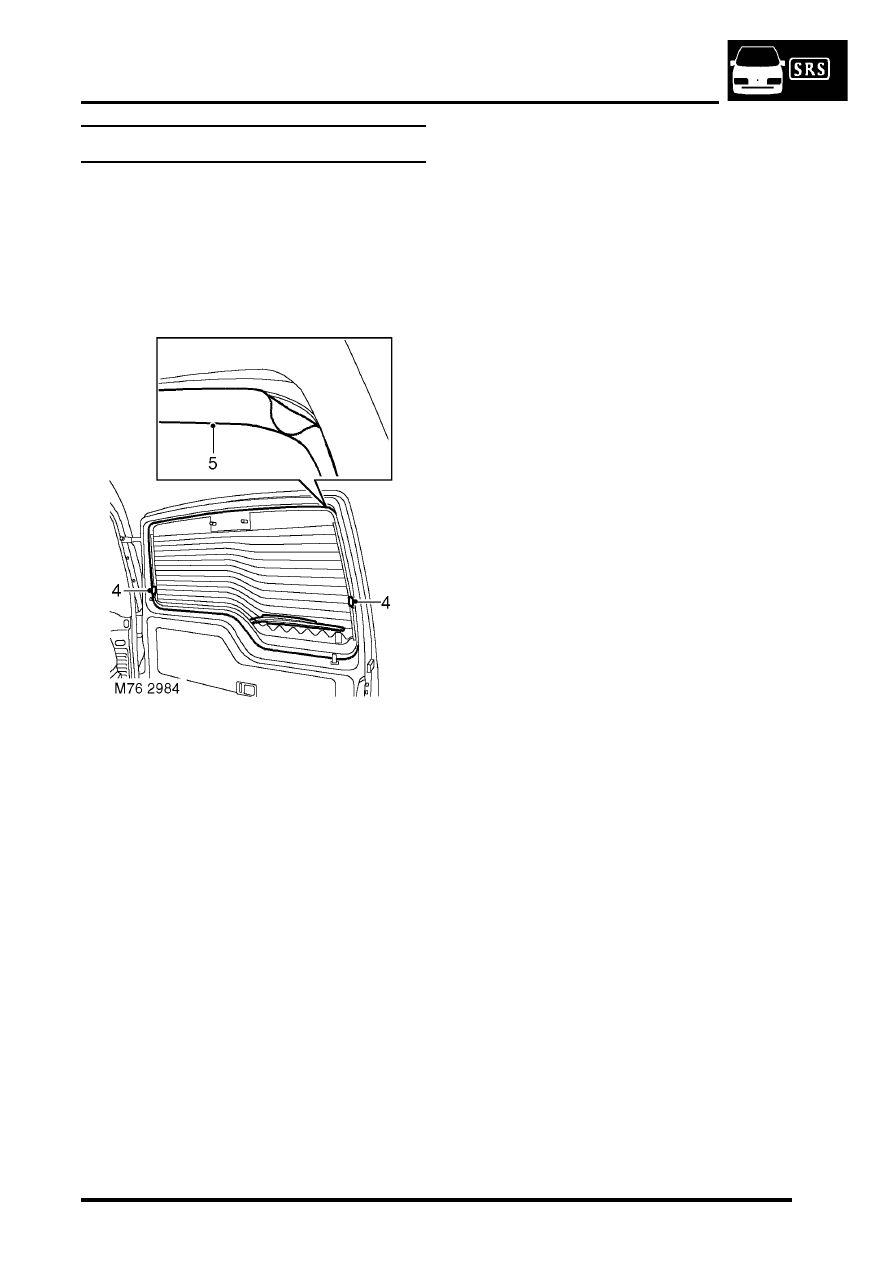
5. Ease glass sealing rubber from tail door flange
and with assistance, from inside push the glass
and sealing rubber out.
6. Remove sealing rubber from glass.
Refit
1. Thoroughly clean the tail door glass mounting
flange.
2. Clean glass and fit sealing rubber. Ensure
sealing rubber is fully located onto glass.
3. Fit a draw cord into the outside groove of the
sealing rubber with cord ends situated on top
corner of bend at bottom of glass.
4. To aid assembly, lubricate the tail door glass
mounting flange with liquid soap.
5. Position the assembled glass and rubber to
outside of flange.
6. With assistance from second operator pushing
glass into door, hold one end of cord and pull
the other end carefully around the aperture,
easing the rubber seal over the flange.
7. Connect leads to rear window heater.
8. Fit centre high mounted stop lamp.
LIGHTING, REPAIRS, Lamp - stop -
9. Fit rear wiper onto glass.
10. Fit spare wheel.

SCREENS
76-4-2
REPAIRS
Windscreen
$% 76.81.01
Introduction
The following equipment is required:
l
Cutting wire and handles.
l
Kent cutting knife.
l
Glazing knife.
l
Windscreen repair kit.
l
Sealant applicator gun.
l
Suction cups.
l
A felt covered table or stand to support glass.
WARNING: Wear protective gloves when
handling glass, solvents and primers.
WARNING: Wear suitable eye protection when
removing and refitting glass.
WARNING: If glass has splintered, protect eyes
and operate demister blower to remove glass
from heater ducts. Use a vacuum cleaner to
remove glass from fascia, carpet and seats.
Remove
1. Remove air intake plenum.
2. If fitted, disconnect screen heater multiplugs.
3. Remove top corner trim finishers from body.
4. Remove windscreen top finisher and discard.
5. Release interior mirror from slug and tie aside.
6. Fit protection to exterior body work adjacent to
screen.
7. Cover body panels adjacent to glass.
8. Cover heater ducts with masking tape.
9. Cover interior of vehicle with protective sheet.
Нет комментариевНе стесняйтесь поделиться с нами вашим ценным мнением.
Текст