Chrysler 300M, Dodge Interpid. Manual — part 94
UNDERHOOD LAMP - POLICE
REMOVAL
(1) Open hood, disconnect and isolate the battery
negative remote terminal or pull fuse Y in the PDC.
(2) Insert a small flat blade in access slot between
the lamp base and lamp lens.
(3) Lift the lamp lens upward and remove the
lamp lens (Fig. 64).
(4) Depress bulb terminal inward (Fig. 65) to
release bulb.
INSTALLATION
(1) Engage the replacement bulb wire loop to ter-
minal closest to lamp base wire connector.
(2) Depress the opposite terminal inward and
engage the remaining bulb wire loop.
(3) Position the lamp lens on the lamp base and
press into place.
(4) Connect the battery negative remote cable or
reinsert fuse Y in the PDC.
(5) Verify system and vehicle operation.
UNDERHOOD LAMP UNIT -
POLICE
REMOVAL
(1) Open hood, disconnect and isolate the battery
negative remote terminal or pull fuse Y in the PDC.
(2) Disconnect the wire harness connector from
lamp unit.
(3) Remove the push-pin fastener attaching under-
hood lamp unit to inner hood panel (Fig. 66).
(4) Remove the underhood lamp unit from the
vehicle.
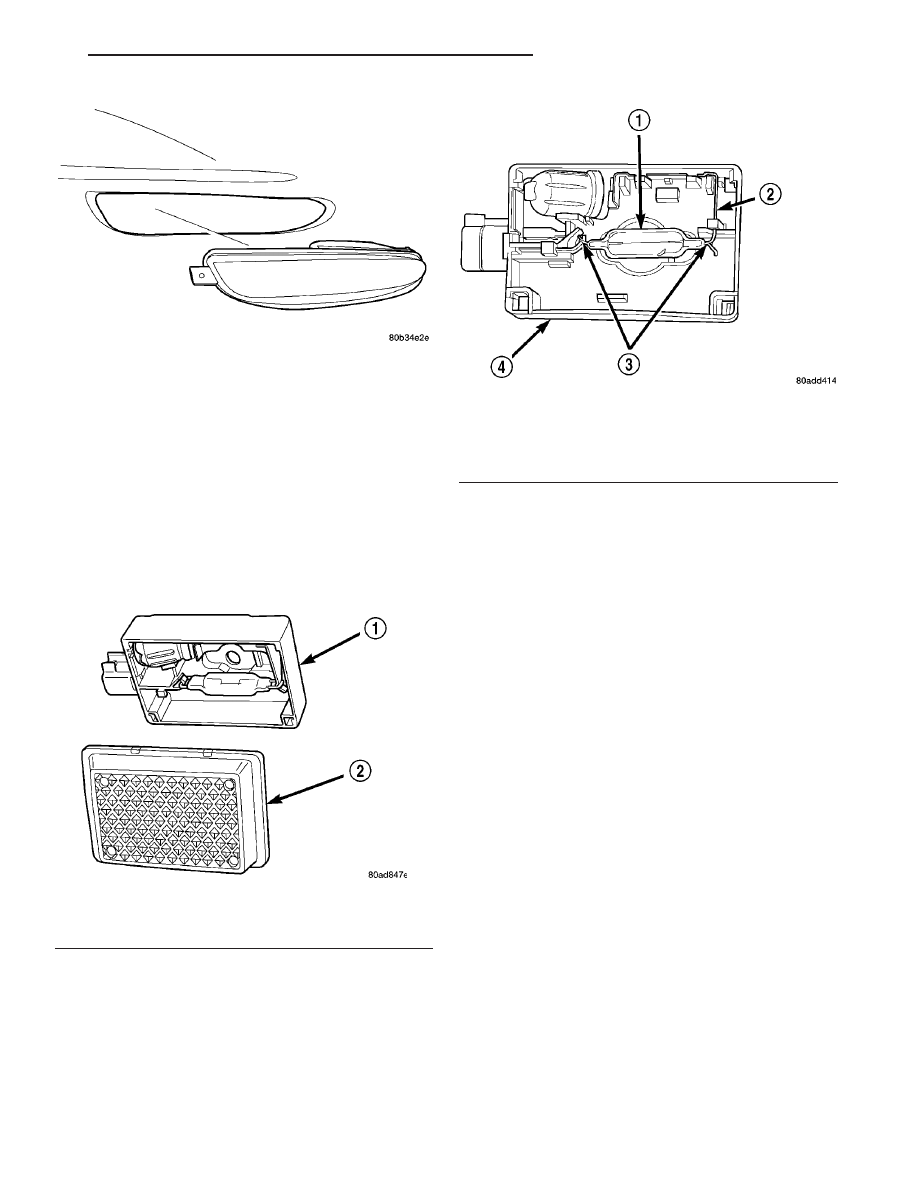
Fig. 63 FRONT PARKING, SIDE MARKER/TURN
SIGNAL LAMP UNIT
Fig. 64 UNDERHOOD LAMP LENS
1 - LAMP
2 - LAMP LENS
Fig. 65 UNDERHOOD LAMP
1 - BULB
2 - DEPRESS TERMINAL INWARD
3 - BULB WIRE LOOP
4 - LAMP BASE
LH
LAMPS/LIGHTING - EXTERIOR
8L - 45
TURN SIGNAL LAMP UNIT - CONCORDE/300M (Continued)
INSTALLATION
(1) Position the underhood lamp unit on the hood
inner panel.
(2) Install the push-pin fastener attaching the
lamp unit base to the inner hood panel.
(3) Install the lamp unit and press into place.
(4) Connect the wire harness connector.
(5) Connect the battery negative remote cable or
reinsert fuse Y in the PDC.
(6) Verify system and vehicle operation.
(7) Close hood.
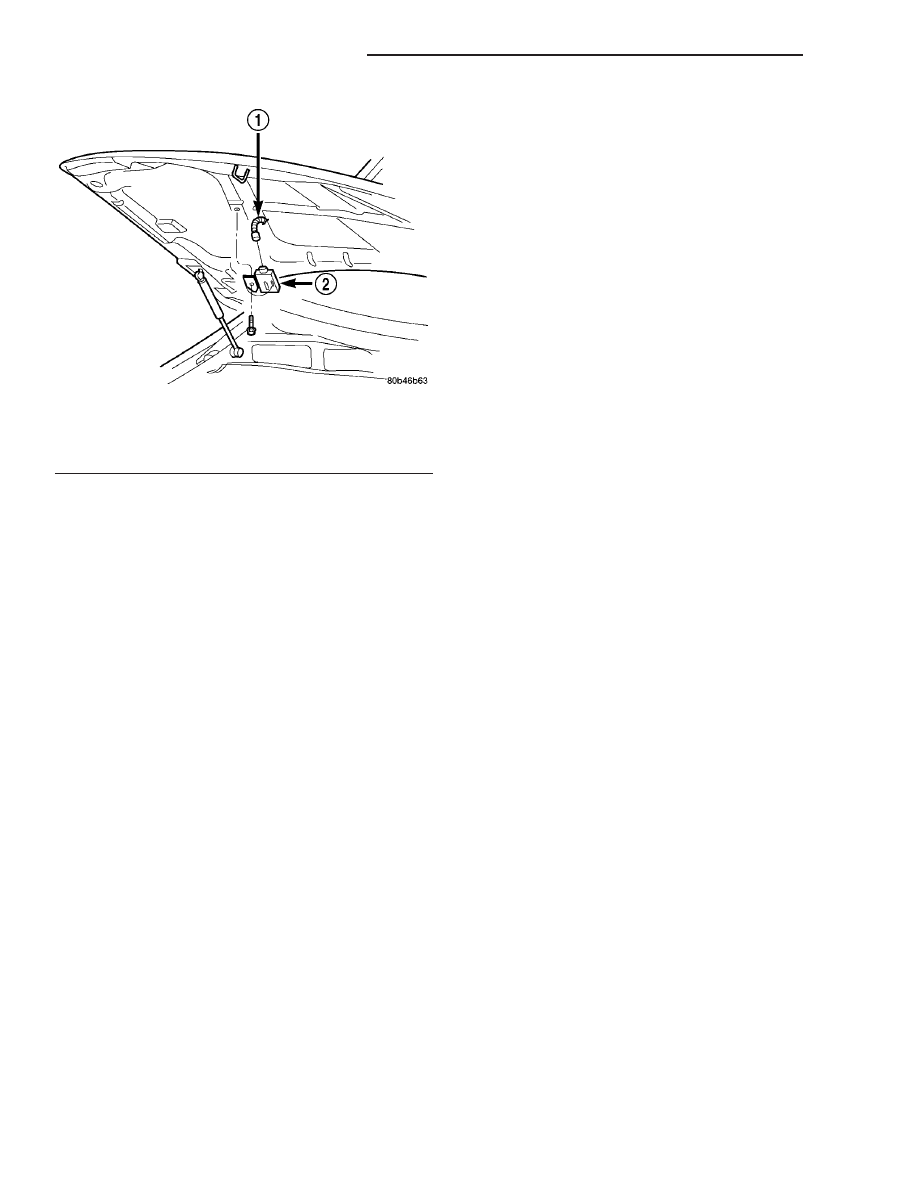
Fig. 66 UNDERHOOD LAMP UNIT LOCATION -
TYPICAL - POLICE
1 - CONNECTOR
2 - UNDERHOOD LAMP UNIT
8L - 46
LAMPS/LIGHTING - EXTERIOR
LH
UNDERHOOD LAMP UNIT - POLICE (Continued)
LAMPS/LIGHTING - INTERIOR
TABLE OF CONTENTS
page
page
LAMPS/LIGHTING - INTERIOR
. . . . . . . . . . . . . . . . . . . . . 47
CLUSTER LAMPS
. . . . . . . . . . . . . . . . . . . . . . . . . . . . . 48
. . . . . . . . . . . . . . . . . . . . . . . . . 48
COURTESY LAMP
. . . . . . . . . . . . . . . . . . . . . . . . . 49
GLOVE BOX LAMP
. . . . . . . . . . . . . . . . . . . . . . . . . . . . . 49
. . . . . . . . . . . . . . . . . . . . . . . . . 49
GLOVE BOX LAMP SWITCH
. . . . . . . . . . . . . . . . . . . . . . . . . . . . . 49
. . . . . . . . . . . . . . . . . . . . . . . . . 49
ILLUMINATED ENTRY
. . . . . . . . . . . . . . . . . . . . . . . . . 49
. . . . . . . . . . . . . . . . . . . . . . . . . . . 49
DIAGNOSIS AND TESTING - ILLUMINATED
. . . . . . . . . . . . . . . . . . . . . . . . . . . . . 50
TRANSMISSION RANGE INDICATOR
ILLUMINATION
DESCRIPTION
. . . . . . . . . . . . . . . . . . . . . . . . . 50
LAMPS/LIGHTING - INTERIOR
SPECIFICATIONS
INTERIOR LAMPS
DIMMER CONTROLLED INTERIOR LAMPS
Service procedures for most of the lamps in the
instrument panel, Instrument cluster and switches
are located in Electrical, Instrument Cluster. Some
components have lamps that can only be serviced by
an Authorized Service Center (ASC) after the compo-
nent is removed from the vehicle. Contact local
dealer for location of nearest ASC.
DIMMER CONTROLLED LAMP APPLICATION
TABLE
LAMP
BULB
A/C HEATER CONTROL
330
INSTRUMENT CLUSTER
PC194
RADIO
ASC
ANALOG CLOCK
A9625
INDICATOR LAMPS
Service procedures for most of the lamps in the
instrument cluster are located in Electrical, Instru-
ment Cluster.
CAUTION: Do not use bulbs other than those listed
in the Bulb Application Table. Damage to lamp can
result.
CAUTION: Do not touch halogen bulbs with fingers
or other oily surfaces. Bulb life will be reduced.
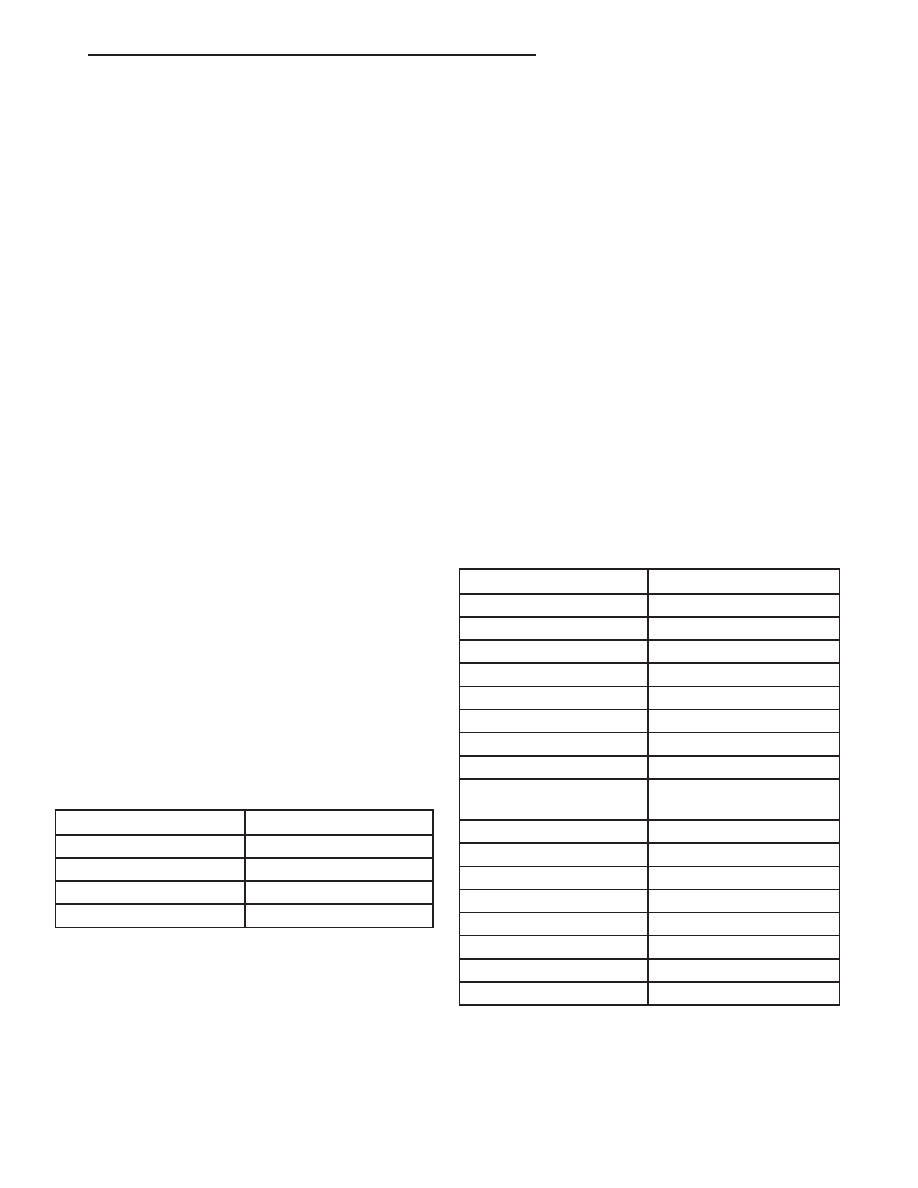
INDICATOR LAMP APPLICATION TABLE
INDICATOR
BULB
AIR BAG
LED
ANTI-LOCK BRAKE
LED
BRAKE WARNING
LED
CHARGING SYSTEM
LED
CHECK ENGINE
LED
CRUISE
74
DOOR OPEN
LED
ENGINE OIL PRESSURE
LED
ENGINE
TEMPERATURE
LED
HIGH BEAM
74
LOW FUEL
LED
LOW WASHER FLUID
LED
SEAT BELT
LED
DECK LID OPEN
LED
TURN SIGNAL
PC194
TRAC ON
74
TRAC OFF
LED
LH
LAMPS/LIGHTING - INTERIOR
8L - 47
INTERIOR LAMPS
Service procedures for most of the lamps in the fol-
lowing list can be found in Body. Some components
have lamps that can only be serviced by an Autho-
rized Service Center (ASC) after the component is
removed from the vehicle. Contact local dealer for
location of nearest ASC.
INTERIOR LAMP APPLICATION TABLE
LAMP LOCATION
BULB
DOOR COURTESY
212-2
GLOVE COMPARTMENT
194
OVERHEAD CONSOLE
192
OVERHEAD
INFORMATION CENTER
4437661
READING LAMP
(FRONT/REAR)
192
TRUNK
906
VISOR VANITY
A6220
CLUSTER LAMPS
REMOVAL
To service instrument cluster lamps, the cluster
must be removed from the instrument panel (Refer to
8
-
ELECTRICAL/INSTRUMENT
CLUSTER
-
REMOVAL).
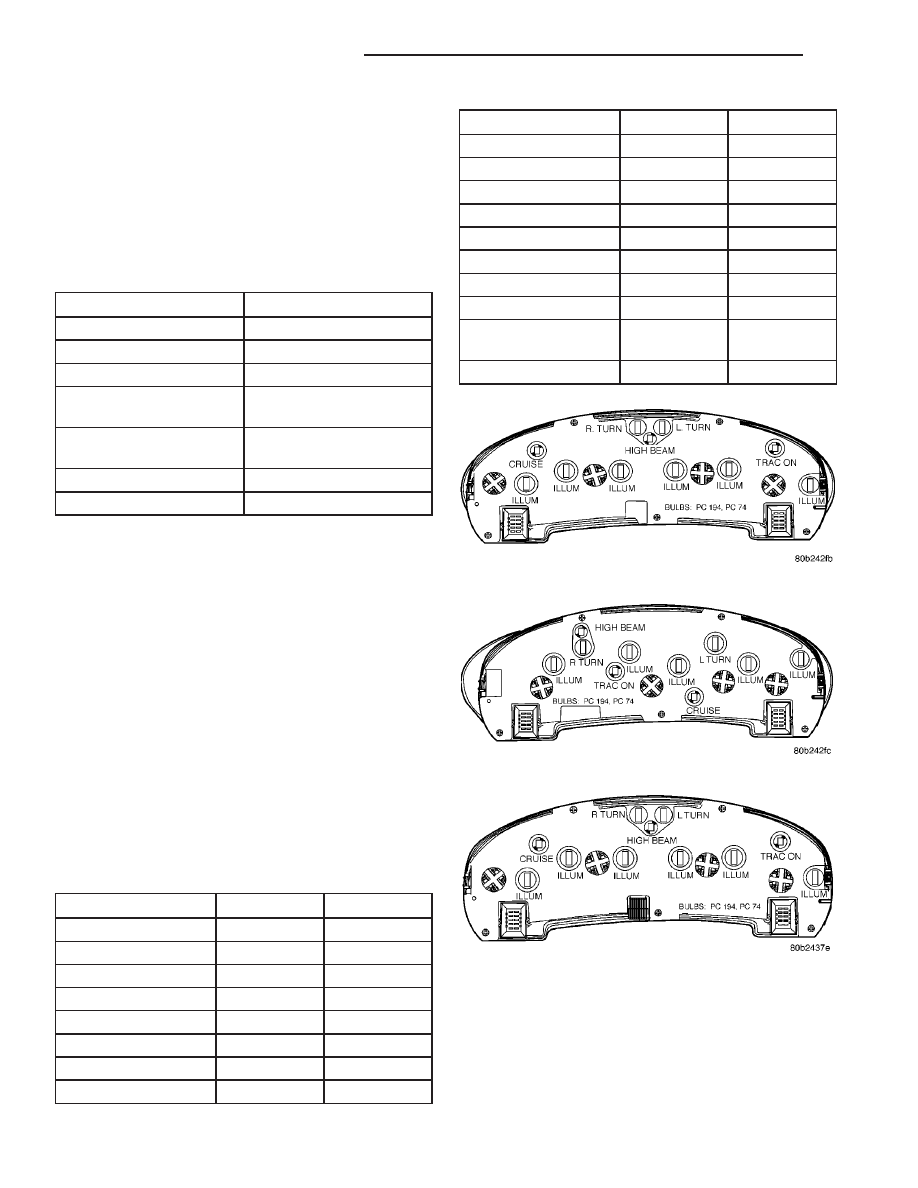
Refer to (Fig. 1), (Fig. 2), and (Fig. 3) for cluster
lamp locations.
The illumination/indicator lamps that ARE replace-
able are called out on the back cover of the instru-
ment cluster. All other indicators are Light Emitting
Diodes (LED’s), and are serviced with the cluster
assembly. If a LED is non-functional, the entire
instrument cluster must be replaced. Refer to the
INDICATORS - BULBS table for applications.
INDICATORS - BULBS
INDICATOR
COLOR
BULB #/LED
BATTERY
RED
LED
BRAKE
RED
LED
AIRBAG
RED
LED
LOW OIL
RED
LED
SEATBELT
RED
LED
TEMPERATURE
RED
LED
DOOR AJAR
RED
LED
DECKLID AJAR
RED
LED
INDICATOR
COLOR
BULB #/LED
HIGH BEAM
BLUE
74
TURN SIGNALS
GREEN
194
CRUISE
GREEN
74
TRAC ON
GREEN
74
TRAC OFF
AMBER
LED
CHECK ENGINE
AMBER
LED
ABS
AMBER
LED
LOW FUEL
AMBER
LED
LOW WASHER
FLUID
AMBER
LED
ILLUMINATION
BLUEGREEN
194
INSTALLATION
(Refer to 8 - ELECTRICAL/INSTRUMENT CLUS-
TER - INSTALLATION).
Fig. 1 CLUSTER LAMPS - INTREPID
Fig. 2 CLUSTER LAMPS - CONCORDE
Fig. 3 CLUSTER LAMPS - 300M
8L - 48
LAMPS/LIGHTING - INTERIOR
LH
LAMPS/LIGHTING - INTERIOR (Continued)
Нет комментариевНе стесняйтесь поделиться с нами вашим ценным мнением.
Текст