Subaru Impreza 3 / Impreza WRX / Impreza WRX STI. Service manual — part 699
GW-29
Rear Gate Glass
GLASS/WINDOWS/MIRRORS
5) Insert the glass locating pin into the hole on rear
gate panel and push on the area around the locat-
ing pin to secure it.
NOTE:
Insert the locating pin into the lower hole of the rear
gate panel.
6) Push lightly all around the locating pin to seal it.
7) After completion of all work, allow the vehicle to
stand for about 24 hours.
NOTE:
• When door is opened/closed after glass is bond-
ed, always lower the door glass first, and then
open/close it carefully.
• Move the vehicle slowly.
• For minimum drying time and vehicle standing
time before driving after bonding, follow instruc-
tions or instruction manual from the adhesive man-
ufacturer.
8) Connect the rear defogger terminals.
9) Install the rear wiper motor. <Ref. to WW-21, IN-
STALLATION, Rear Wiper Motor.>
10) Install the roof spoiler. <Ref. to EI-41, INSTAL-
11) After curing of adhesive, pour the water on ex-
ternal surface of vehicle to check that there are no
water leaks.
NOTE:
When a vehicle is returned to the user, tell him or
her that the vehicle should not be subjected to
heavy impact for at least three days.
C: REPLACEMENT
When replacing only the molding, perform work ac-
cording to the following procedures. (when reusing
the rear gate glass)
1) Remove the rear gate glass from the vehicle.
<Ref. to GW-28, REMOVAL, Rear Gate Glass.>
2) From the removed rear gate glass, completely
remove the adhesive and molding.
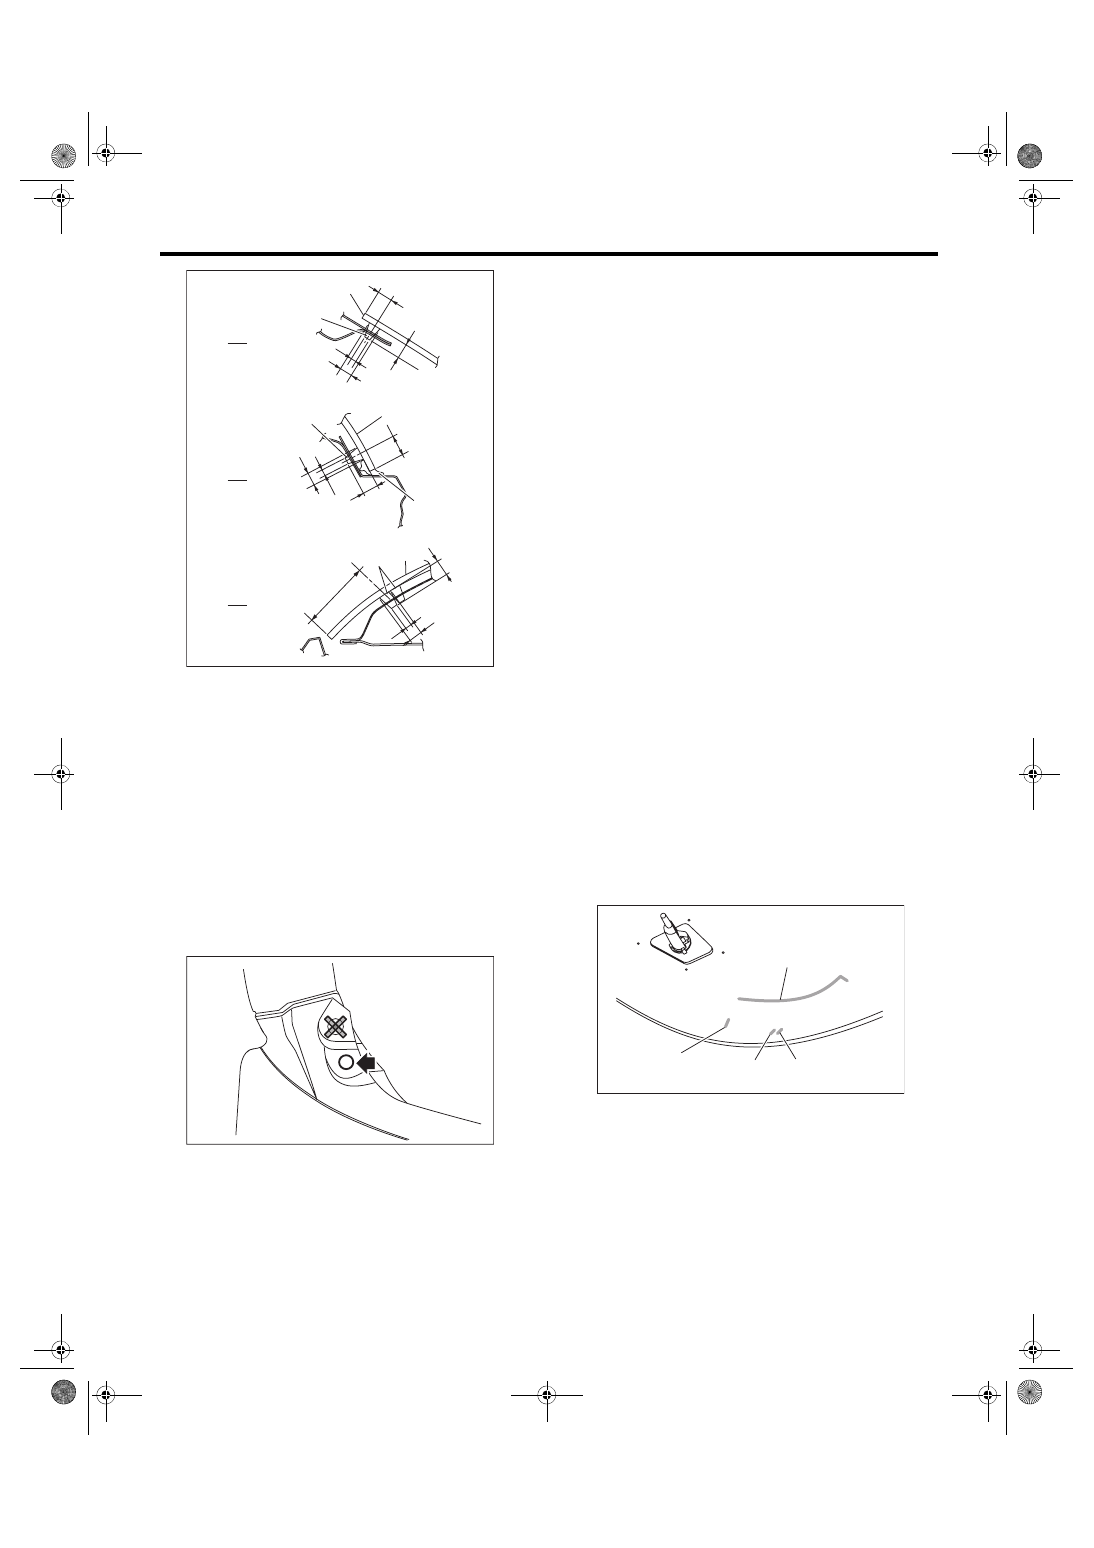
3) Check the silver print (1) (2) (3) (4) of the rear
gate glass on the passenger room side surface.
A Upper end
B Lower end
C Side end
(1) Glass
(2) Adhesive
(3) Molding
(1)
(2)
(2)
(1)
(1)
A
B
C
(2)
10 mm (0.39 in)
8 mm
(0.31 in)
4 mm (0.16 in)
10 mm (0.39 in)
8 mm
(0.31 in)
4 mm
(0.16 in)
10 mm
(0.39 in)
13 mm (0.51 in)
(3)
8 mm
(0.31 in)
4 mm (0.16 in)
10 mm
(0.39 in)
45 mm
(1.77 in)
GW-00733
GW-00765
GW-00707
(3)
(4)
(1)
(2)
GW-30
Rear Gate Glass
GLASS/WINDOWS/MIRRORS
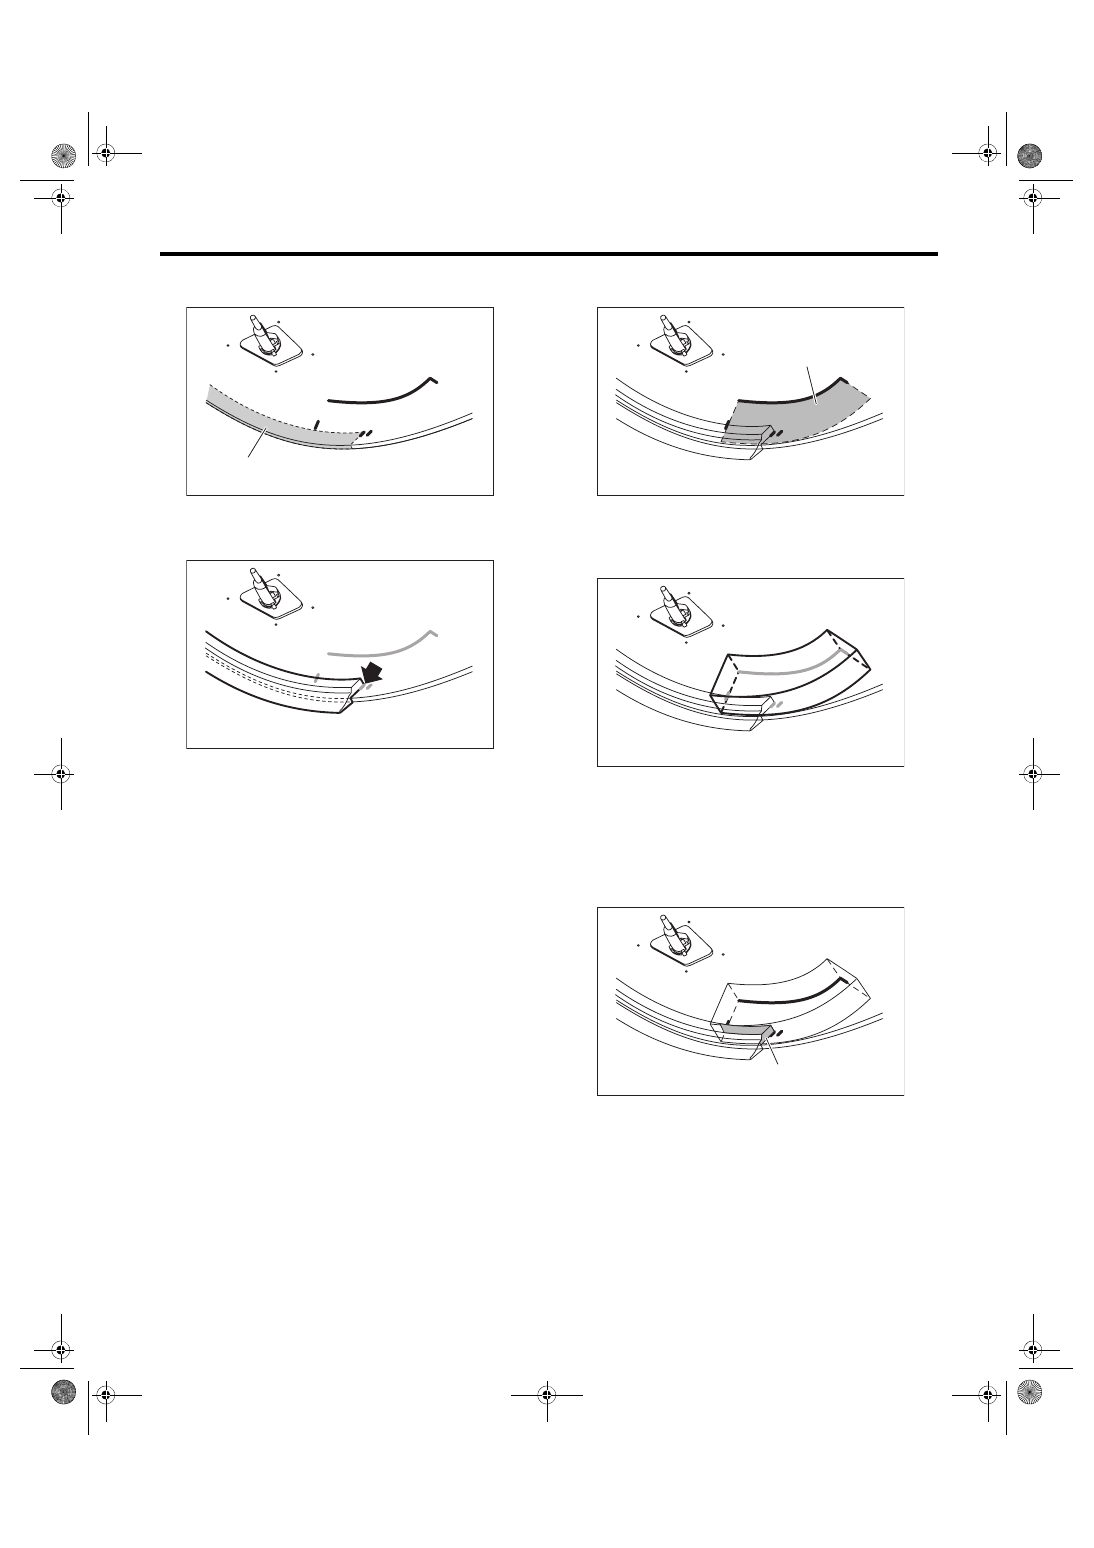
4) Degrease the rear gate glass (passenger room
side) molding adhesive surface (A) with a primer.
5) Remove the backing paper of the molding, and
match the silver print (1) and the end of the mold-
ing.
6) Match the corner of the molding to the corner of
the glass end surface, and adhere the molding to
be within the silver print (1) on both sides.
CAUTION:
• Apply the molding without pulling it, and
while applying pressure.
• After applying, push on the molding lightly to
affix securely.
• Temporarily mount the glass, and make sure
that there are no gaps between the molding and
the rear gate panel.
NOTE:
When application of the molding is finished, if there
is protrusion from the silver print (1) on the other
side, cut with a razor blade so that the left and right
are symmetric, and so that it fits between the silver
print (1) and (2).
7) Degrease the rear gate glass seal adhesion sur-
face (B) with primer.
8) Remove the backing sheet of the sticker, and
apply the sealer based on the positions of the silver
print (3) and (4) of the rear gate glass (passenger
room side).
CAUTION:
• Because the seal is applied on top of the
molding, make sure to apply so that there is no
gap at side face (C) of the molding.
• Apply so that the end of the seal does not
protrude from the end of the glass. If it pro-
trudes from the glass, reapply.
GW-00709
(A)
GW-00708
GW-00710
(B)
GW-00711
GW-00712
(C)
GW-31
Rear Window Glass
GLASS/WINDOWS/MIRRORS
15.Rear Window Glass
A: REMOVAL
1) Disconnect the ground cable from battery.
2) Remove the rear wiper motor. <Ref. to WW-21,
3) Disconnect the connectors from rear defogger
terminal.
4) Remove the rear window glass in the same pro-
cedure as for windshield glass. <Ref. to GW-23,
B: INSTALLATION
1) Apply the primer to the glass and body sides in
the same procedure as for windshield glass. <Ref.
to GW-24, INSTALLATION, Windshield Glass.>
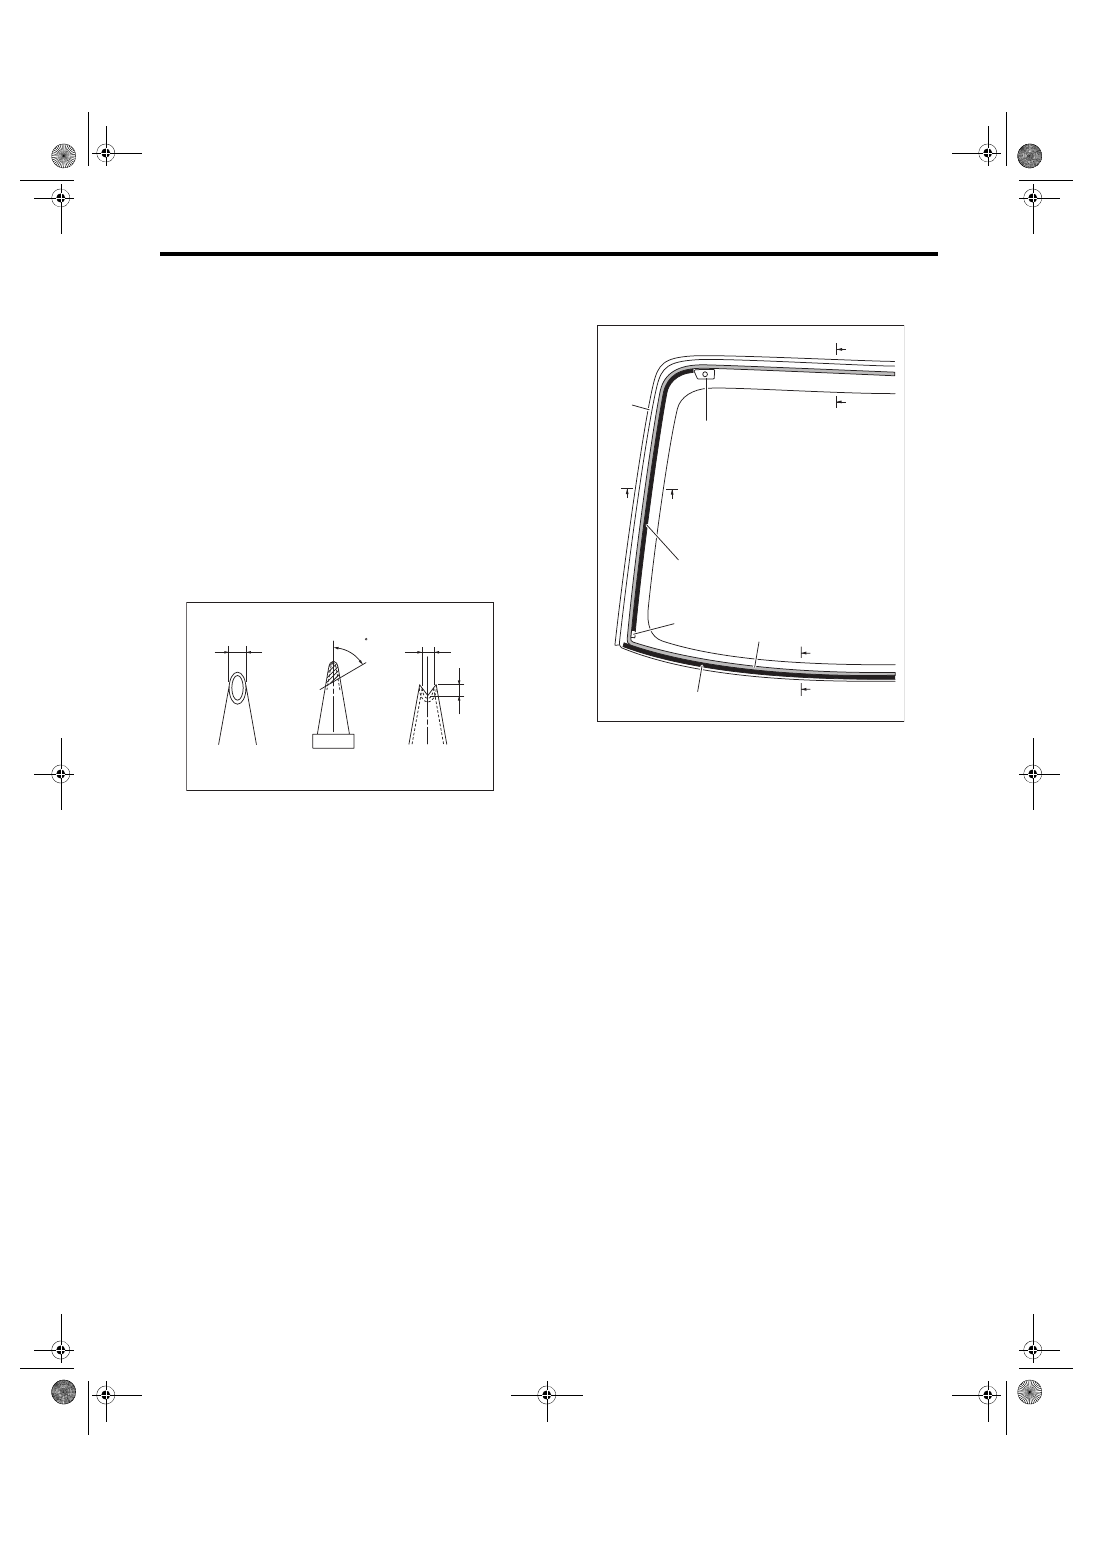
2) Fabricate the cartridge nozzle tip as shown and
set the sealant gun with the adhesive.
3) Apply adhesive with the dam rubber installed in
the same procedure as for windshield glass. <Ref.
to GW-24, INSTALLATION, Windshield Glass.>
(1) 10 mm (0.39 in)
(2) 8 mm (0.31 in)
GW-00494
(1)
(2)
(2)
60
(1) Molding
(2) Locating pin (adhered)
(3) Dam rubber
(4) Adhesive
(5) Spacer
(2)
(3)
(3)
C
C
B
B
A
A
(4)
(1)
GW-00814
(5)
GW-32
Rear Window Glass
GLASS/WINDOWS/MIRRORS
4) Install the glass in the same procedure as for
windshield glass. <Ref. to GW-24, INSTALLA-
5) After completion of all work, allow the vehicle to
stand for about 24 hours.
NOTE:
• When door is opened/closed after glass is bond-
ed, always lower the door glass first, and then
open/close it carefully.
• Move the vehicle slowly.
• For minimum drying time and vehicle standing
time before driving after bonding, follow instruc-
tions or instruction manual from the adhesive man-
ufacturer.
6) Connect the rear defogger terminals.
7) Install the rear wiper motor. <Ref. to WW-21, IN-
STALLATION, Rear Wiper Motor.>
8) After curing of adhesive, pour the water on exter-
nal surface of vehicle to check that there are no wa-
ter leaks.
NOTE:
When a vehicle is returned to the user, tell him or
her that the vehicle should not be subjected to
heavy impact for at least three days.
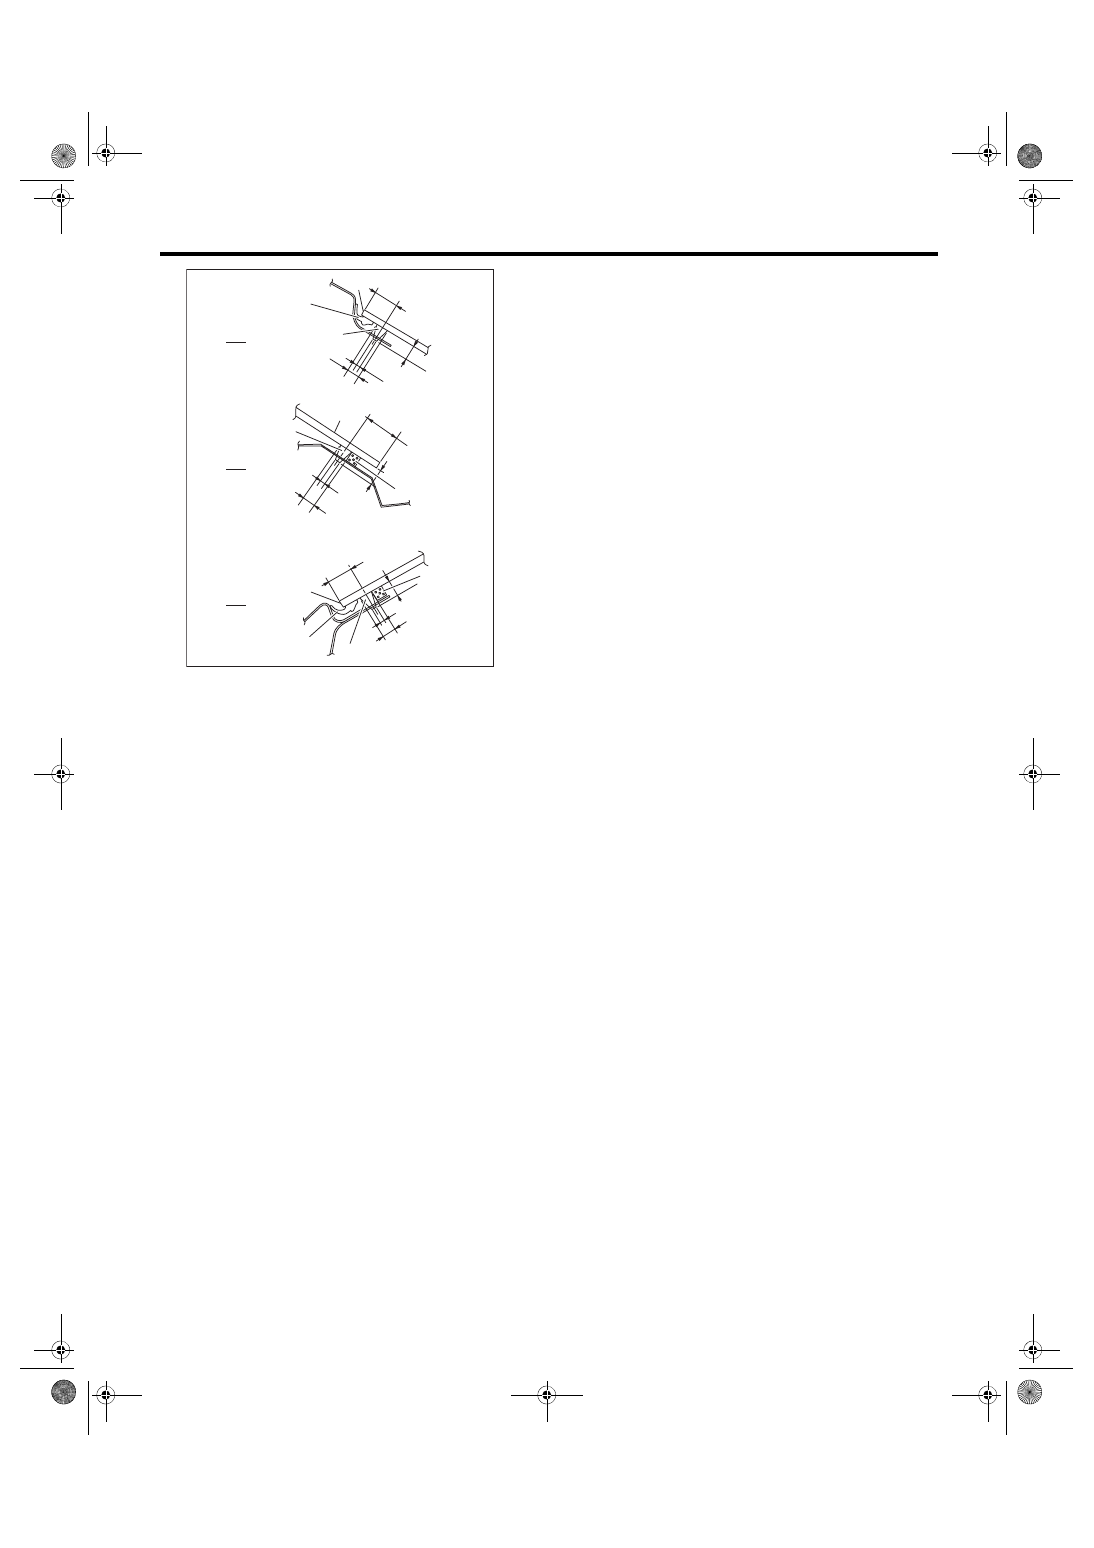
A Upper end
B Lower end
C Side end
(1) Glass
(2) Adhesive
(3) Dam rubber
(4) Molding
GW-00815
(1)
(2)
(1)
A
B
C
8 mm
(3)
8 mm
2 mm (0.08 in)
9.5 mm (0.37 in)
(3)
(4)
(2)
(1)
9.5 mm (0.37 in)
8 mm
(4)
(2)
(0.31 in)
(0.31 in)
2 mm
(0.08 in)
(0.31 in)
9 mm (0.35 in)
9 mm (0.35 in)
2 mm (0.08 in)
18 mm (0.71 in)
9 mm (0.35 in)
Нет комментариевНе стесняйтесь поделиться с нами вашим ценным мнением.
Текст