Subaru Impreza 3 / Impreza WRX / Impreza WRX STI. Service manual — part 698
GW-25
Windshield Glass
GLASS/WINDOWS/MIRRORS
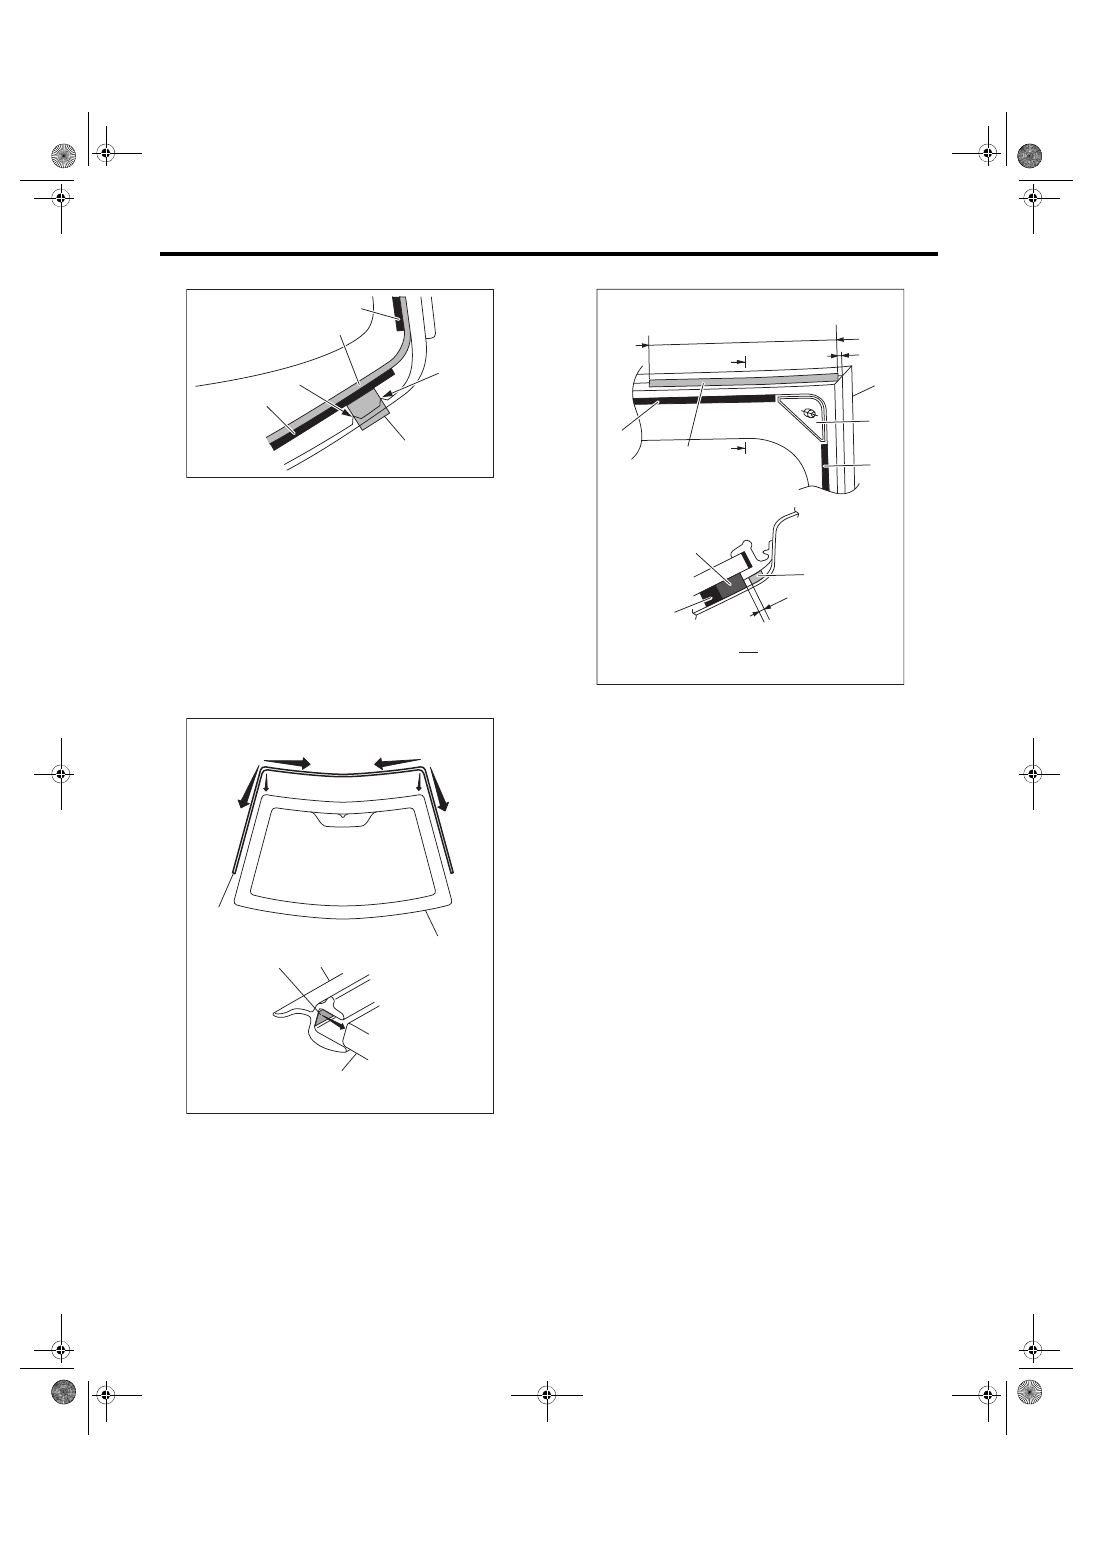
6) Apply the seal to the glass. (driver’s side only)
NOTE:
Apply the sticker between the cut out (3) at the ce-
ramic print on the bottom part of the glass (driver’s
side).
Attach the seal and dam rubber so that there are no
gap by pressing on them.
7) Install the molding to the glass.
(1) Align the molding (A) with both ends of the
upper edge of the windshield glass (C).
(2) Install the molding from both corners of the
upper edge toward the center.
(3) Install the molding from both corners of the
upper edge toward the lower side.
(4) Apply the double-sided tapes (B) of the
molding uniformly on both sides of the glass.
8) Apply the seal to the molding.
NOTE:
Apply so that the sticker does not overlap out to the
adhesive side (5).
9) Apply the primer to the adhesive surface of glass
side and body side using sponge.
Glass primer:
Dow Automotive’s
ESSEX U-401, U-402 or equivalent
Painted surface primer:
Dow Automotive’s
ESSEX U-413 or equivalent
NOTE:
• Primer once attached to the painted surface of
the body and internal trim is hard to wipe off. Mask
the circumference of such area.
• Let primer dry for about ten minutes before in-
stalling the glass.
(1) Adhesive
(2) Dam rubber
(3) Ceramic print cutout portion
(4) Seal
GW-00681
(1)
(2)
(2)
(4)
(3)
(3)
(2)
(2)
(3)
(1)
(1)
(3)
(B)
(A)
(A)
(C)
(4)
(C)
GW-00566
(1) Locating pin
(2) Dam rubber
(3) Seal
(4) Molding
(5) 3 mm (0.12 in)
(6) 165 mm (6.50 in)
(7) Adhesive
GW-00819
(1)
(5)
(6)
(3)
(4)
(2)
(2)
(7)
(2)
A
A
A-A
(5)
(3)
GW-26
Windshield Glass
GLASS/WINDOWS/MIRRORS
• Do not touch the surface coated with primer.
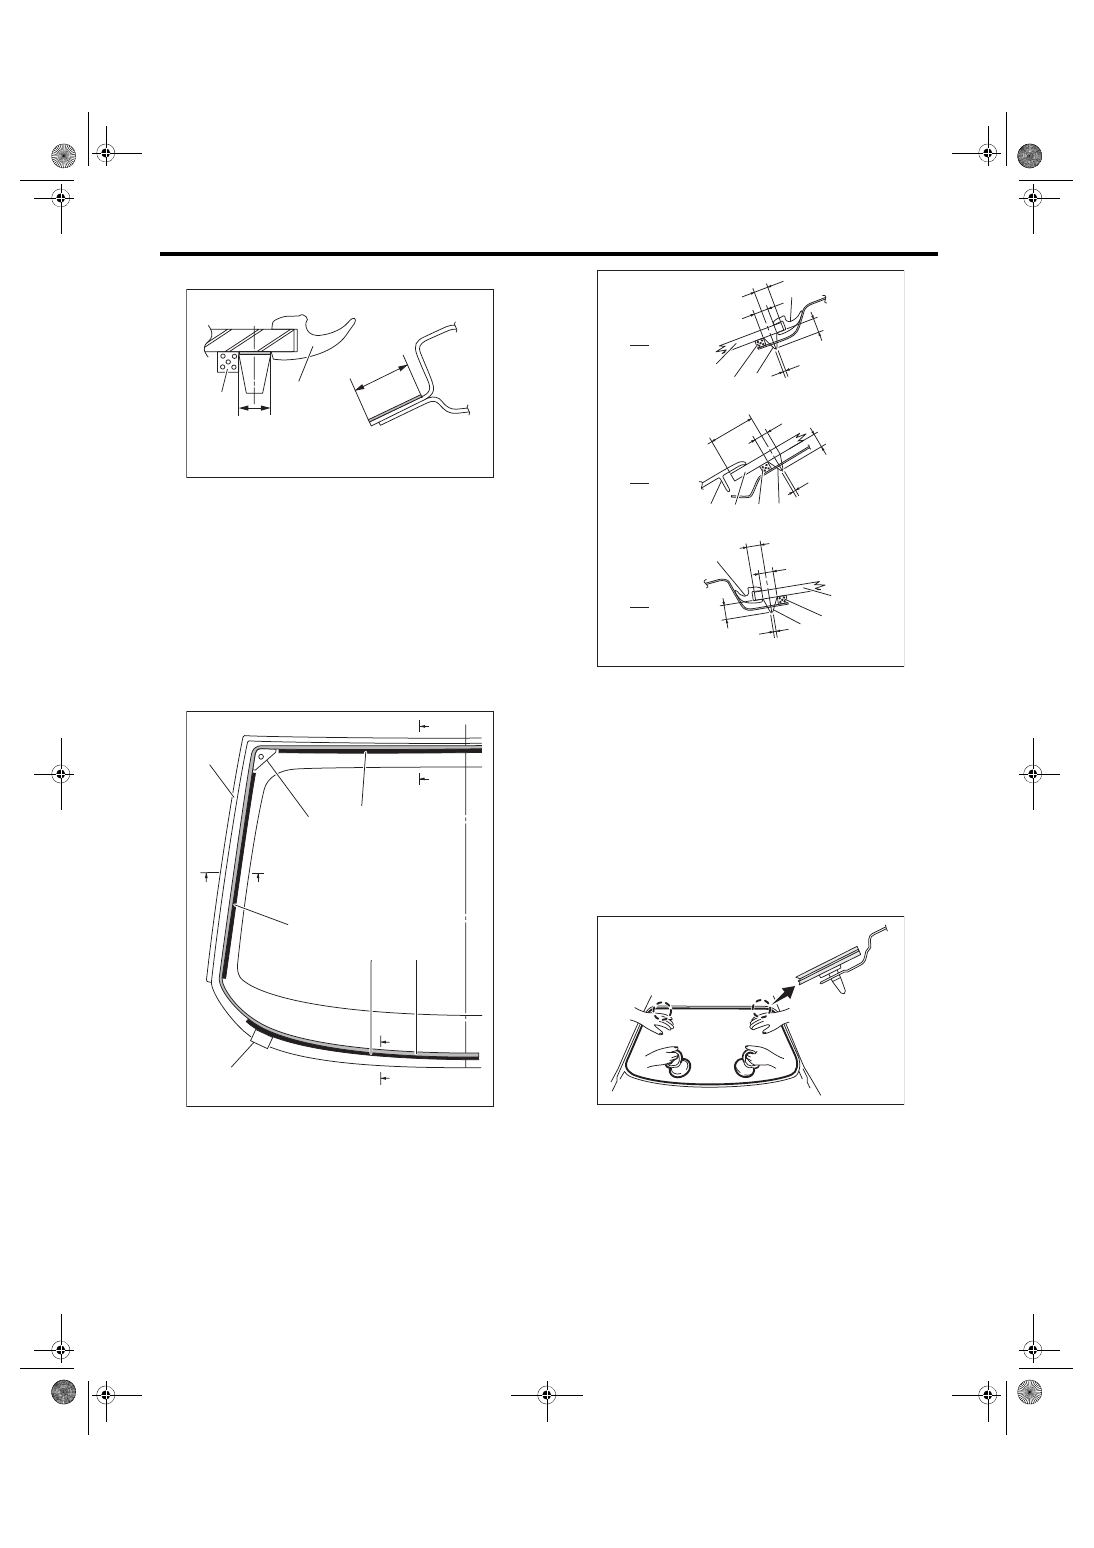
10) Apply adhesive to the glass end surface as
shown.
Adhesive:
Dow Automotive’s
ESSEX U-400HV or equivalent
11) Fit the locating pins to vehicle body using suc-
tion rubber cup to install the windshield glass.
12) Lightly press the windshield glass for tight fit.
13) Make flush the adhesive surface jutted out us-
ing spatula.
(1) Application of primer
(2) Glass side
(3) Body side
(4) Molding
(5) Dam rubber
(1) Molding
(2) Locating pin
(3) Dam rubber
(4) Adhesive
(5) Seal (driver’s side only)
GW-01065
(3)
(2)
(1)
(1)
(5)
(4)
(2)
(3)
GW-01066
(1)
(3)
(3)
(4)
(5)
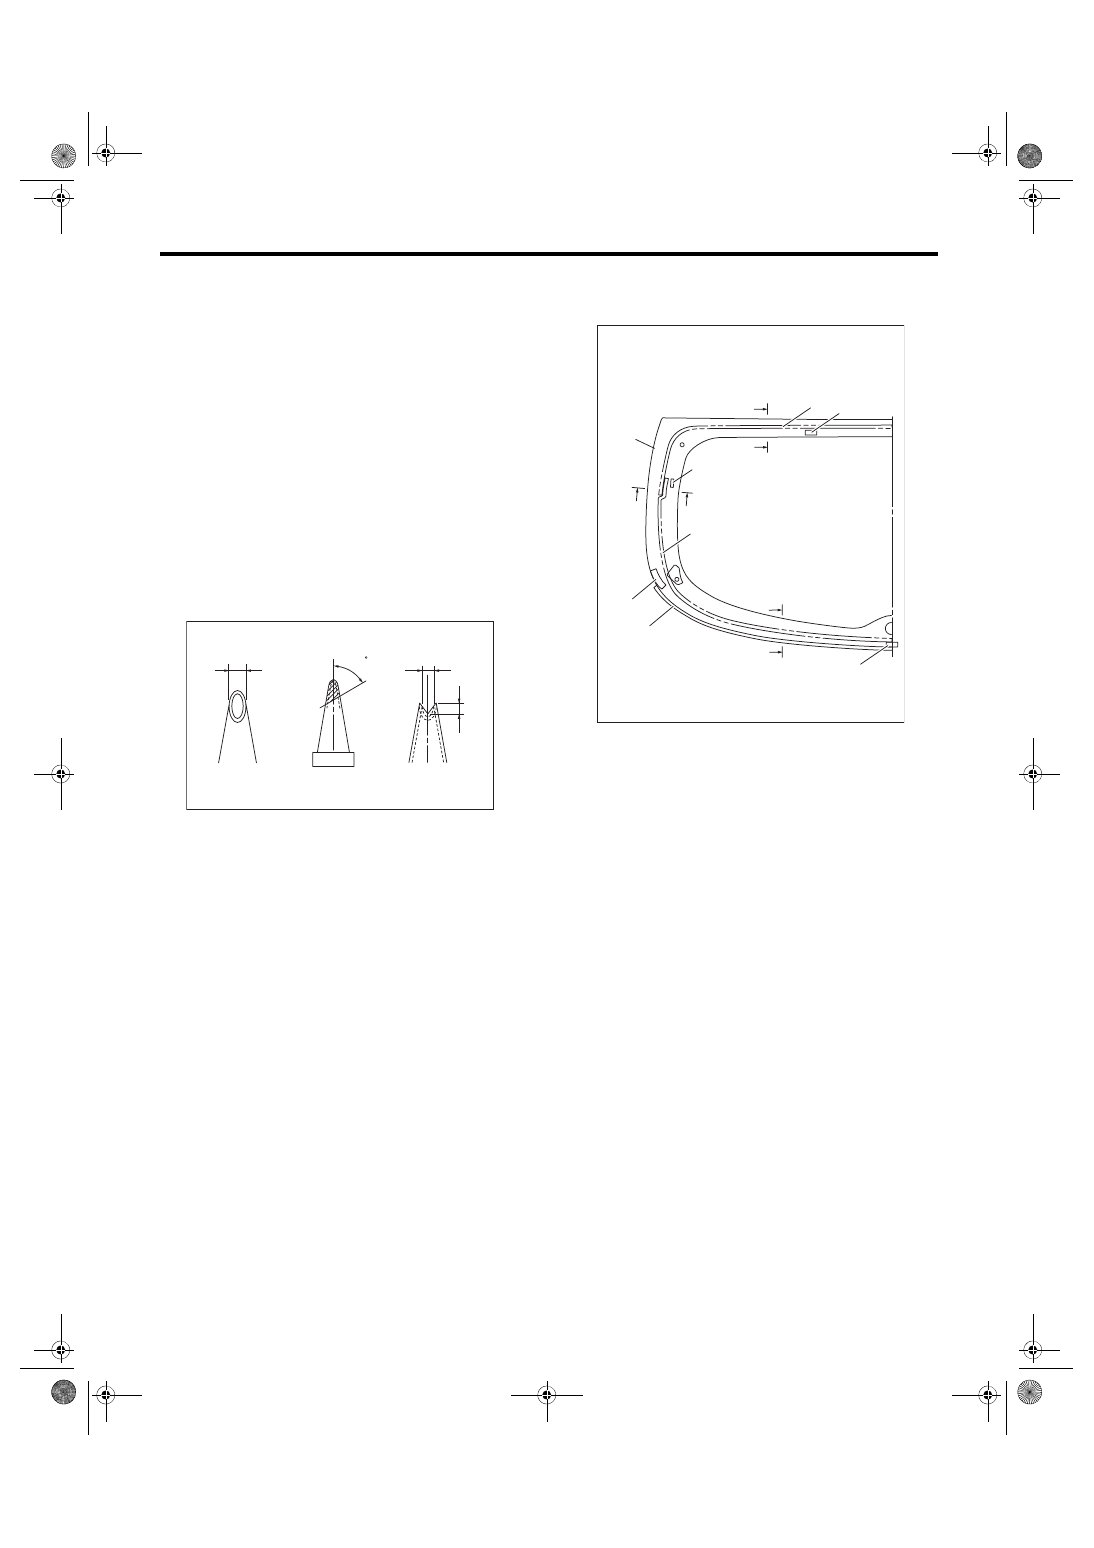
C
C
B
B
A
A
A Upper end
B Lower end
C Side end
(1) Glass
(2) Molding
(3) Adhesive
(4) Dam rubber
(5) Cowl panel
9 mm
(0.35 in)
2 mm
(0.08 in)
(4)
(2)
8 mm
(0.31 in)
B
A
C
(3)
(1)
7 mm
(0.28 in)
9 mm
(0.35 in)
2 mm (0.08 in)
8 mm (0.31 in)
23.5 mm
(0.93 in)
(4)
(5)
(3)
(1)
GW-01067
(4)
(2)
(3)
(1)
9 mm
(0.35 in)
2 mm
(0.08 in)
8 mm
(0.31 in)
7 mm
(0.28 in)
GW-00045
GW-27
Windshield Glass
GLASS/WINDOWS/MIRRORS
14) After completion of all work, allow the vehicle to
stand for about 24 hours.
NOTE:
• When door is opened/closed after glass is bond-
ed, always lower the door glass first, and then
open/close it carefully.
• Move the vehicle slowly.
• For minimum drying time and vehicle standing
time before driving after bonding, follow instruc-
tions or instruction manual from the adhesive man-
ufacturer.
15) After curing of adhesive, pour the water on ex-
ternal surface of vehicle to check that there are no
water leaks.
NOTE:
When a vehicle is returned to the user, tell him or
her that the vehicle should not be subjected to
heavy impact for at least three days.
16) Install the cowl panel. <Ref. to EI-40, INSTAL-
17) Connect the wiper deicer connector. (Models
with wiper deicer)
GW-28
Rear Gate Glass
GLASS/WINDOWS/MIRRORS
14.Rear Gate Glass
A: REMOVAL
1) Remove the roof spoiler. <Ref. to EI-41, RE-
2) Remove the rear wiper motor. <Ref. to WW-21,
3) Disconnect the connectors from rear defogger
terminal.
4) Remove the rear gate glass in the same proce-
dure as for windshield glass. <Ref. to GW-23, RE-
B: INSTALLATION
1) Apply the primer to the glass and body sides in
the same procedure as for windshield glass. <Ref.
to GW-24, INSTALLATION, Windshield Glass.>
2) Fabricate the cartridge nozzle tip as shown and
set the sealant gun with the adhesive.
3) Install the molding.
4) Apply adhesive in the same procedure as for
windshield glass. <Ref. to GW-24, INSTALLA-
(1) 10 mm (0.39 in)
(2) 8 mm (0.31 in)
GW-00494
(1)
(2)
(2)
60
(1) Glass
(2) Adhesive
(3) Molding
(4) Spacer
(5) Heat wire terminal
(6) Seal
(4)
(5)
(1)
A
A
C
C
B
B
(3)
(2)
(2)
GW-00713
(4)
(6)
Нет комментариевНе стесняйтесь поделиться с нами вашим ценным мнением.
Текст