Subaru Impreza 3 / Impreza WRX / Impreza WRX STI. Service manual — part 601
AC(diag)-9
Diagnostic Chart for Self-Diagnosis
HVAC SYSTEM (AUTO A/C) (DIAGNOSTICS)
5. Diagnostic Chart for Self-Diagnosis
A: OPERATION
1. A/C CONTROL MODULE SELF-DIAGNOSIS
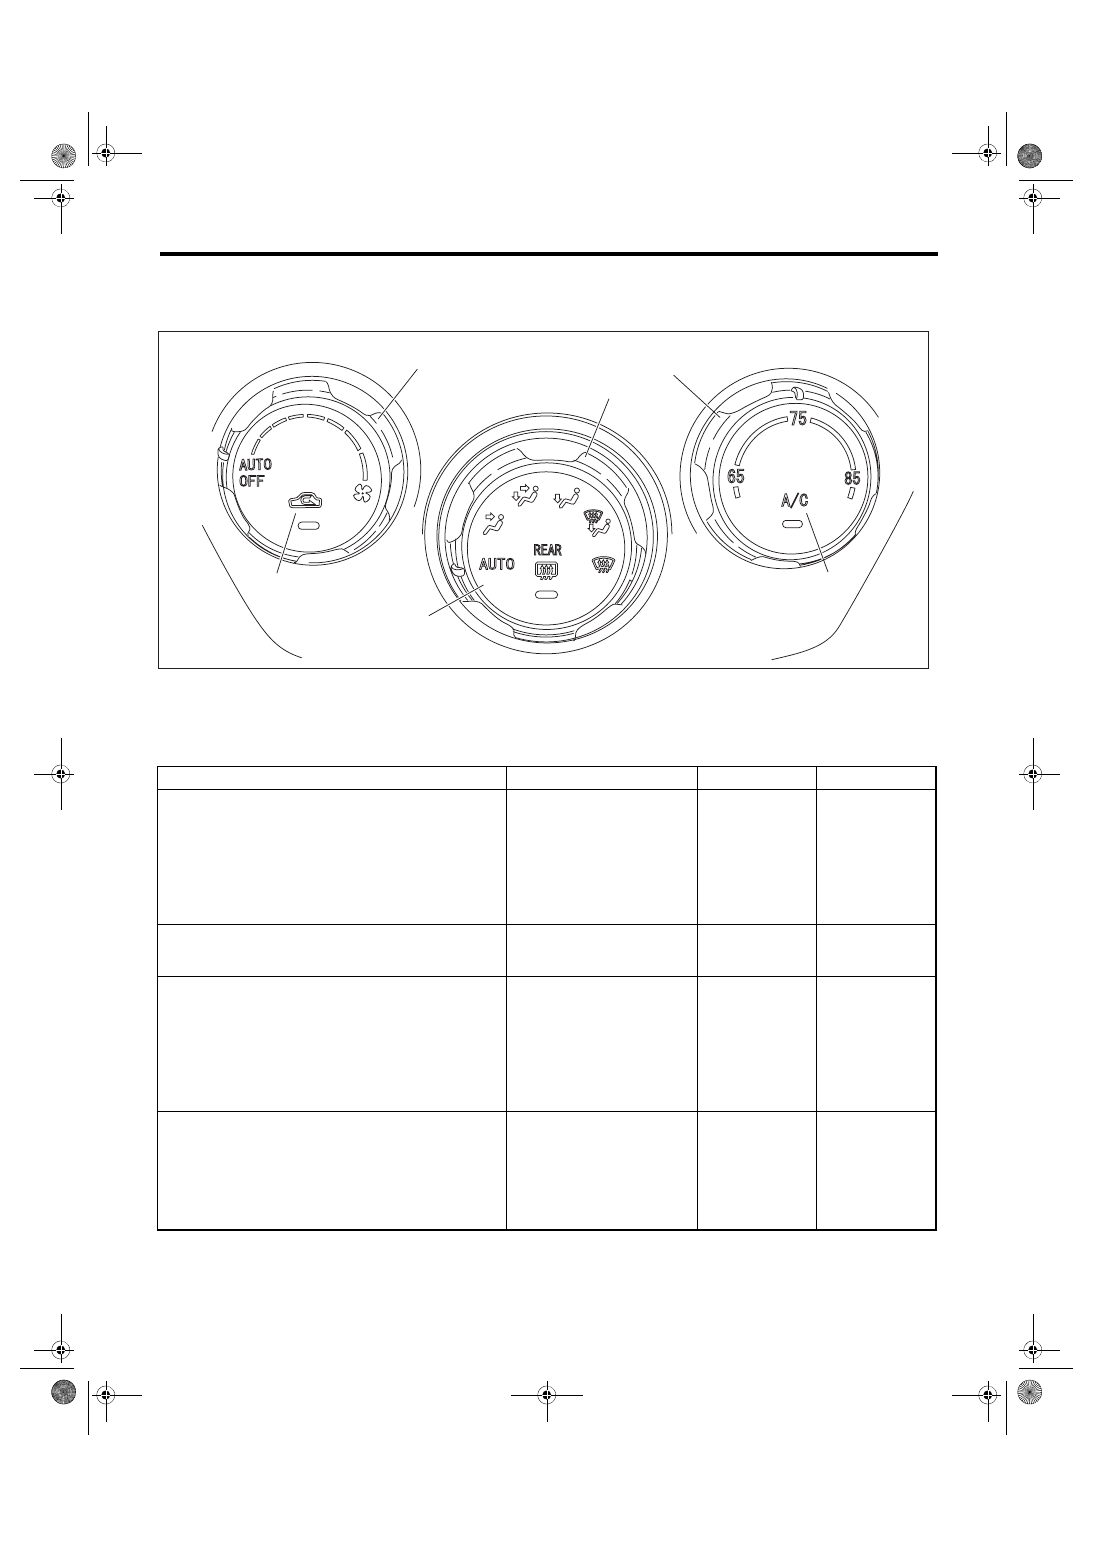
(1)
Fan dial
(3)
Temperature adjustment dial
(5)
Rear window defogger switch
(2)
Air flow control dial
(4)
FRESH/RECIRC switch
(6)
A/C switch
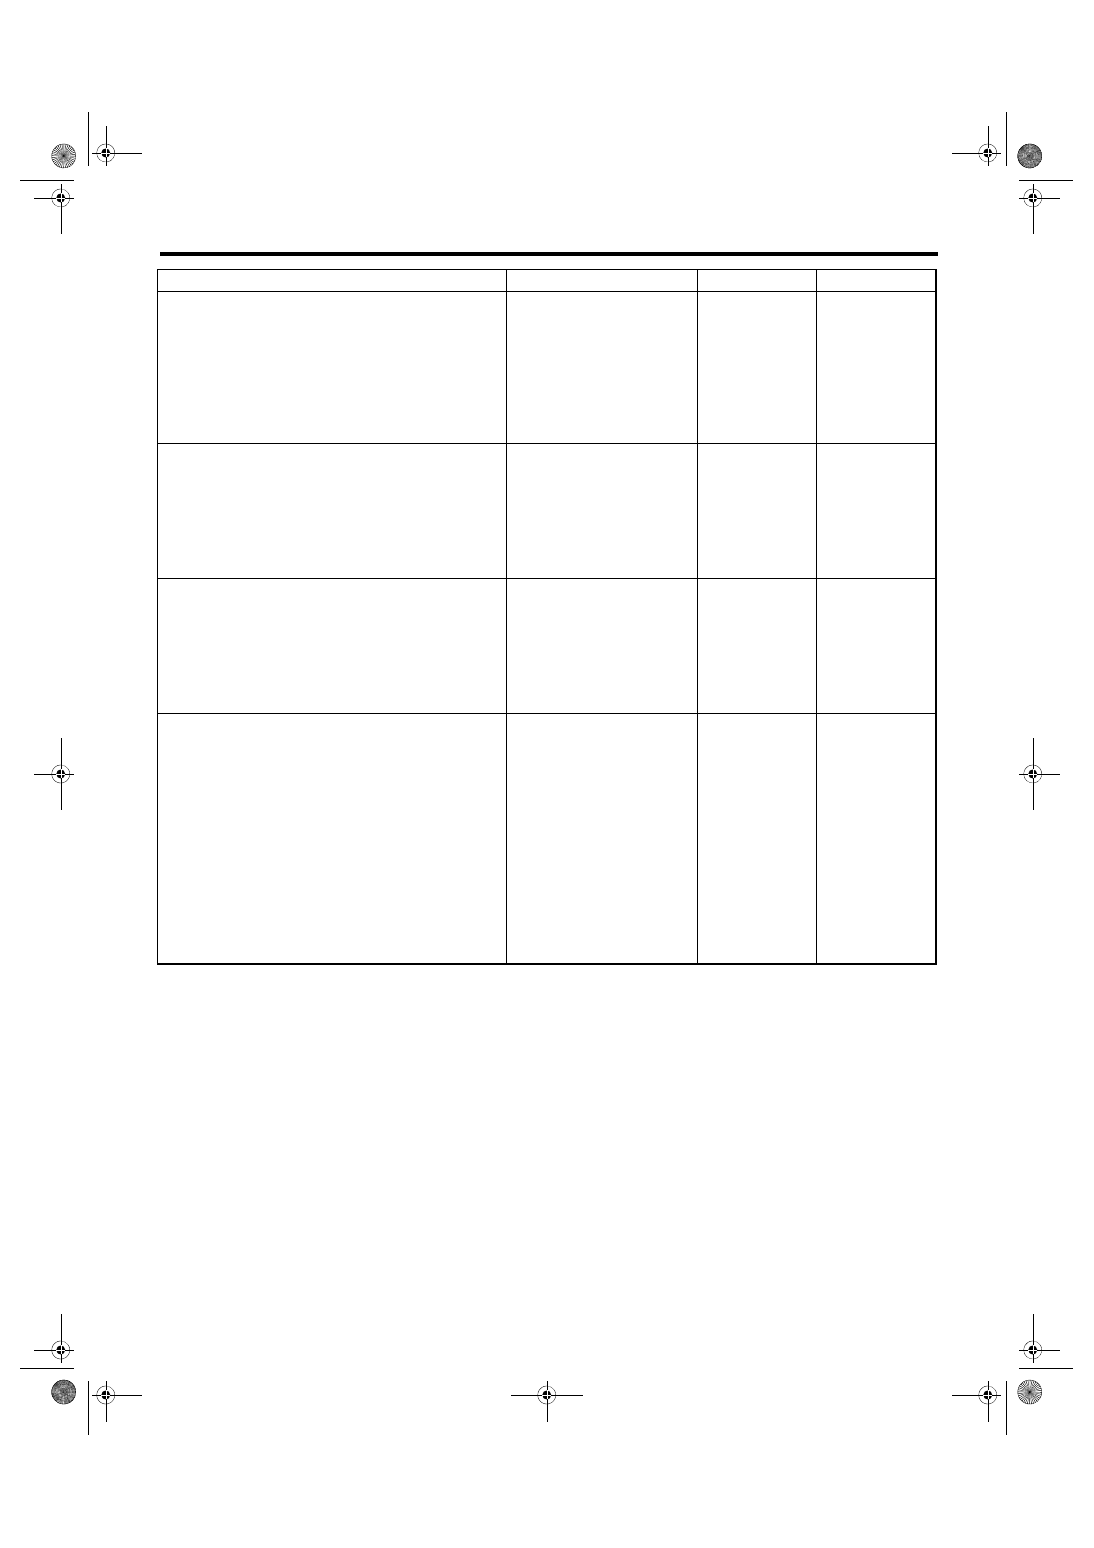
Step
Check
Yes
No
1
SELECT SELF-DIAGNOSIS MODE IN THE
CONTROL MODULE.
1) Set the air flow control dial and fan dial to the
AUTO position.
2) Start the engine with the A/C switch and the
FRESH/RECIRC switch pressed.
Does the self-diagnosis mode
operate?
2
CHECK THE LIGHTING OF THE LED.
Make sure that all switch LEDs on the control
module illuminate.
Do all LEDs blink eight times? Go to step
Replace the con-
trol module.
3
CHECK SENSOR MALFUNCTION.
1) Set the air flow control dial and fan dial to the
AUTO position.
2) If the system has trouble for each sensor,
the FRESH/RECIRC switch LED blinks or is
turned off.
3) If the system has no malfunctions, the
FRESH/RECIRC switch LED is illuminated.
Does the FRESH/RECIRC
switch LED illuminate?
4
CONFIRM MALFUNCTIONING SENSOR.
1) Set the air flow control dial to AUTO.
2) Turn the fan dial to each mode position, and
check each switch LED illumination according
to sensor check table. <Ref. to AC(diag)-11,
SENSOR CHECK TABLE, OPERATION, Diag-
nostic Chart for Self-Diagnosis.>
When turning the fan dial to
each mode position, does the
FRESH/RECIRC switch LED
go off?
Repair the defec-
tive sensor. <Ref.
to AC(diag)-29,
Diagnostic Proce-
dure for Sensors.>
(5)
(2)
(6)
(1)
(4)
(3)
AC-02014
AC(diag)-10
Diagnostic Chart for Self-Diagnosis
HVAC SYSTEM (AUTO A/C) (DIAGNOSTICS)
5
CHECK AIR MIX DOOR AND MODE DOOR
POSITION SIGNALS.
1) Set the air flow control dial to FACE.
2) Turn the fan dial to AUTO.
3) If there is a system malfunction in the air mix
door signal or the mode door position signal, the
FRESH/RECIRC switch LED goes off or blinks.
4) If the system has no malfunctions, the
FRESH/RECIRC switch LED is illuminated.
Does the FRESH/RECIRC
switch LED illuminate?
6
CHECK AIR MIX DOOR POSITION DRIVE
SIGNALS.
1) Set the air flow control dial to FACE.
2) Place the fan dial in each position and then
check each LED illumination conditions. <Ref.
to AC(diag)-12, DRIVE SIGNAL CHECK
TABLE, OPERATION, Diagnostic Chart for
Self-Diagnosis.>
Do the LEDs illuminate in
accordance with operation sig-
nal table?
7
CHECK MODE DOOR POSITION DRIVE SIG-
NAL.
1) Press the A/C switch.
2) Place the fan dial in each position and then
check each LED illumination conditions. <Ref.
to AC(diag)-12, DRIVE SIGNAL CHECK
TABLE, OPERATION, Diagnostic Chart for
Self-Diagnosis.>
Do the LEDs illuminate in
accordance with operation sig-
nal table?
8
CHECK OPERATION OF EACH ACTUATOR,
BLOWER FAN AND COMPRESSOR
CLUTCH.
1) Set the air flow control dial to B/L.
2) Turn the fan dial from AUTO to 7th, and
select operating modes.
3) Check the operation of each mode accord-
ing to operating mode table. <Ref. to AC(diag)-
12, OPERATING MODE TABLE, OPERATION,
Diagnostic Chart for Self-Diagnosis.>
• FRESH/RECIRC door
• Air flow control door
• Air mix door
• Blower fan
• A/C compressor
Does the operation of each
mode match to operating mode
table?
Turn the fan dial to
OFF or the ignition
switch to OFF in
order to complete
self-diagnosis.
Repair the mal-
functioning part in
accordance with
each diagnostic
chart.
Step
Check
Yes
No
AC(diag)-11
Diagnostic Chart for Self-Diagnosis
HVAC SYSTEM (AUTO A/C) (DIAGNOSTICS)
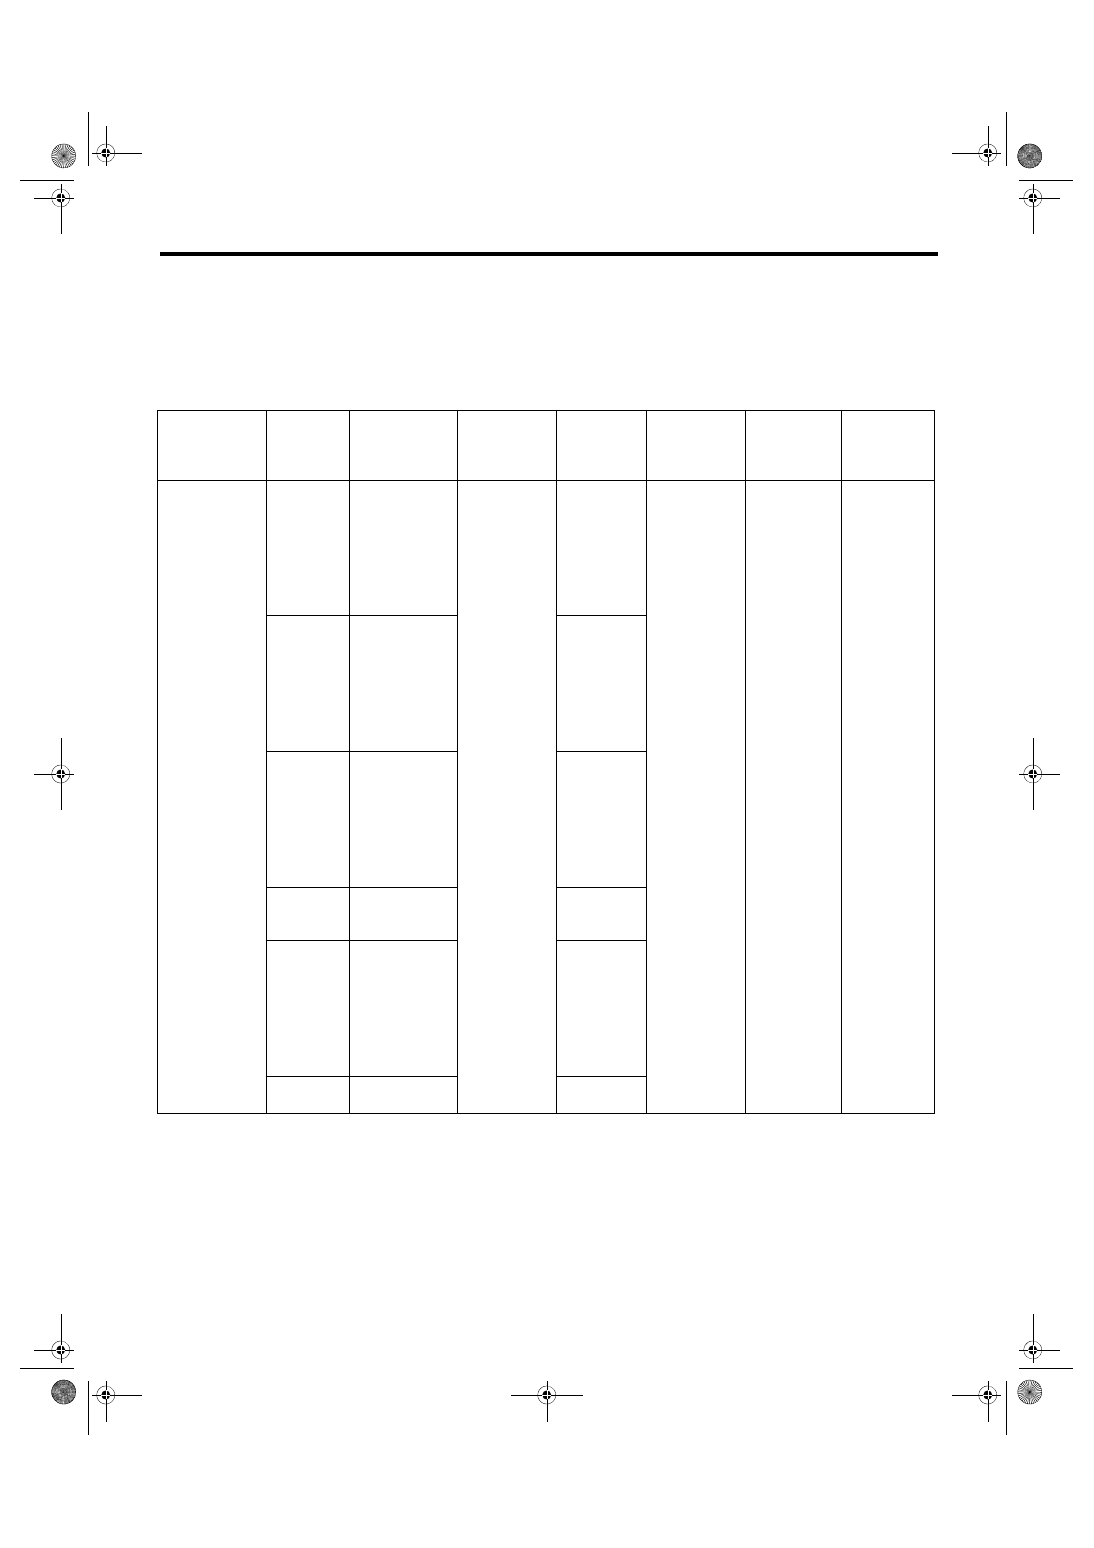
2. SENSOR CHECK TABLE
NOTE:
• When the sunload sensor check is performed indoors or in the shade, it could be diagnosed as having an
open circuit. Always check the sunload sensor at a location exposed to direct sunlight.
• LED illuminates to warn the past malfunction if it was detected four times or more in the past.
• To clear the past malfunction, disconnect the ground cable from the battery, or press and hold the FRESH/
RECIRC switch for five seconds or more when performing the self-diagnosis Step 3 to Step 7.
Air flow control
dial position
Fan dial
position
Sensor
No trouble
Short circuit
Open circuit
When cur-
rently mal-
functioning
When hav-
ing malfunc-
tioned in the
past
AUTO
AUTO
In-vehicle sen-
sor
FRESH/
RECIRC
switch LED is
turned off
FRESH/
RECIRC
switch LED
blinks (Illumi-
nates for 0.2
sec. ←→
turns off for
0.2 sec.)
FRESH/
RECIRC
switch LED
blinks (Illumi-
nates for 1
sec. ←→
turns off for 1
sec.)
Rear window
defogger
switch LED is
turned off
Rear window
defogger
switch LED
illuminates
1st
Ambient sensor
FRESH/
RECIRC
switch LED
blinks (Illumi-
nates for 0.2
sec. ←→
turns off for
0.2 sec.)
2nd
Evaporator sen-
sor
FRESH/
RECIRC
switch LED
blinks (Illumi-
nates for 0.2
sec. ←→
turns off for
0.2 sec.)
3rd
Engine coolant
temperature
sensor
—
4th
Sunload sensor
FRESH/
RECIRC
switch LED
blinks (Illumi-
nates for 0.2
sec. ←→
turns off for
0.2 sec.)
5th — 7th
CAN communi-
cation
—
AC(diag)-12
Diagnostic Chart for Self-Diagnosis
HVAC SYSTEM (AUTO A/C) (DIAGNOSTICS)
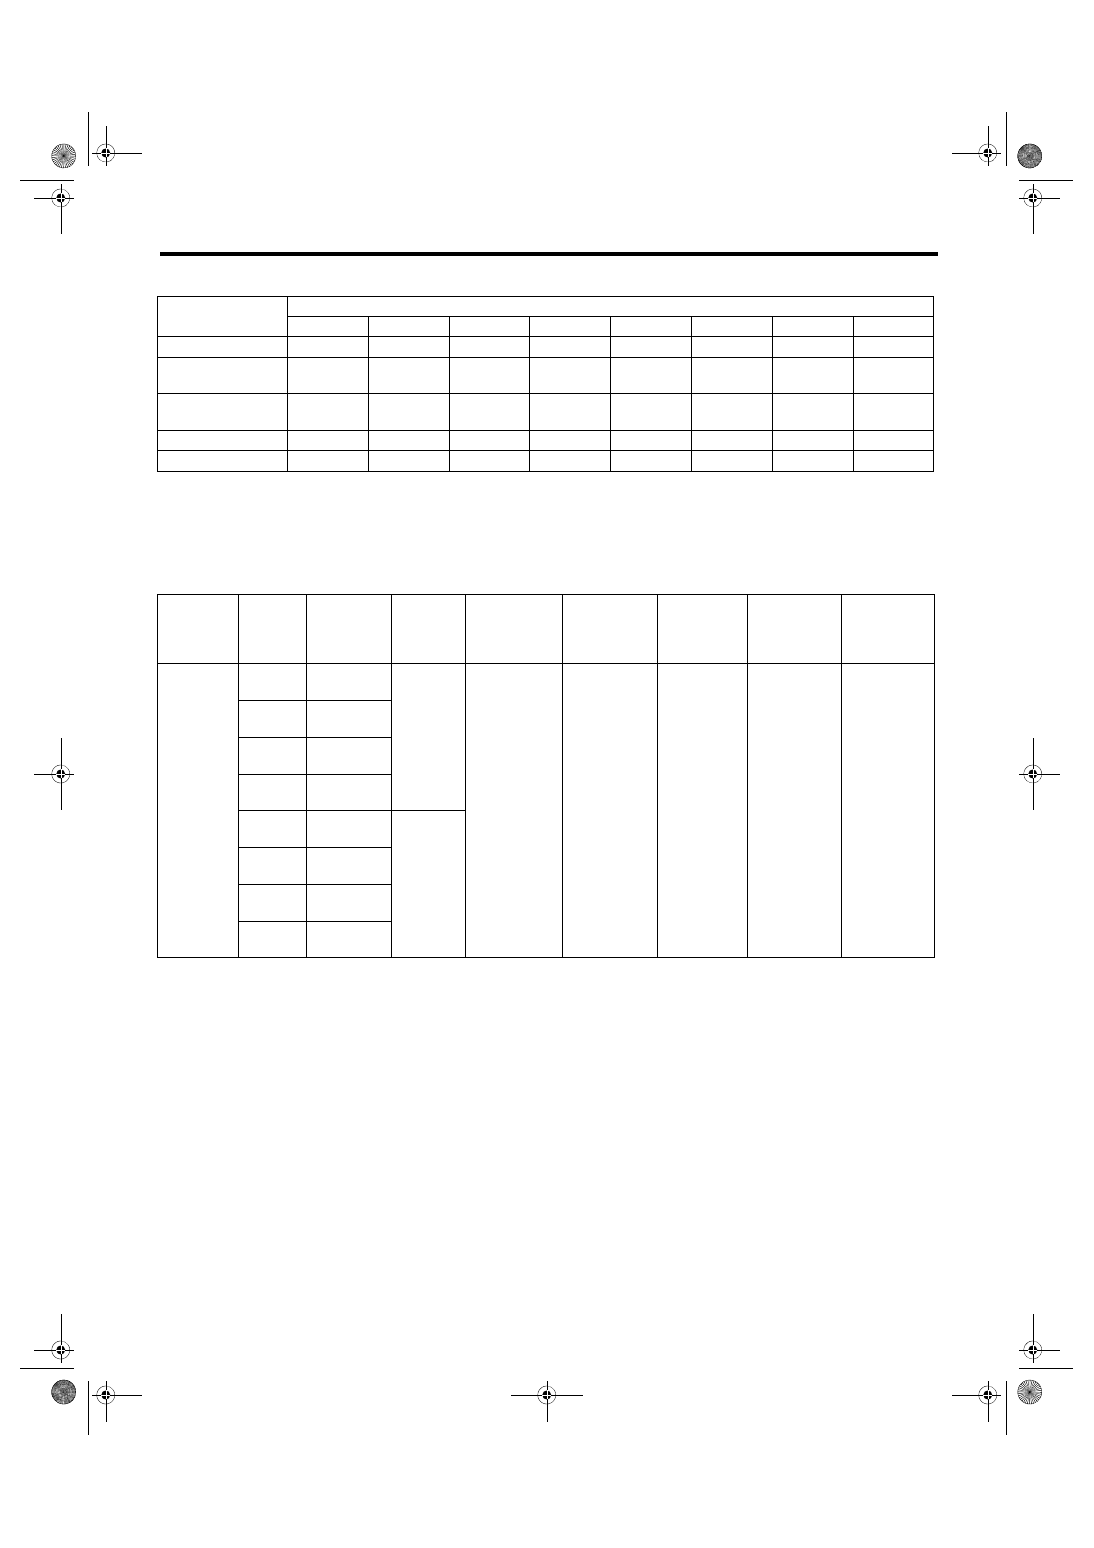
3. OPERATING MODE TABLE
4. DRIVE SIGNAL CHECK TABLE
NOTE:
• LED illuminates to warn the past malfunction if it was detected four times or more in the past.
• To clear the past malfunction, disconnect the ground cable from the battery, or press and hold the FRESH/
RECIRC switch for five seconds or more when performing the self-diagnosis Step 3 to Step 7.
Operation
Fan dial position
AUTO
1st
2nd
3rd
4th
5th
6th
7th
Blower fan
4 V
4 V
4.9 V
5.9 V
7.0 V
8.3 V
9.8 V
14 V
FRESH/RECIRC
door
RECIRC
RECIRC
MIX
FRESH
FRESH
FRESH
FRESH
FRESH
Air flow control
door
FACE
FACE
FACE
B/L
HEAT
HEAT
D/H
DEF
Air mix door
0%
0%
0%
50%
50%
100%
100%
100%
A/C compressor
OFF
ON
ON
ON
ON
ON
ON
ON
Air flow
control dial
position
Fan dial
position
Drive signal
to check
A/C
switch
LED
No trouble
Short circuit
Open circuit
When cur-
rently mal-
functioning
When hav-
ing malfunc-
tioned in the
past
FACE
AUTO
MIX
#1
Blinking
(Illumi-
nates for
0.2 sec.
←→ turns
off for 0.2
sec.)
FRESH/
RECIRC
switch LED is
turned off
FRESH/
RECIRC
switch LED
blinks (Illumi-
nates for 0.2
sec. ←→
turns off for
0.2 sec.)
FRESH/
RECIRC
switch LED
blinks (Illumi-
nates for 1
sec. ←→
turns off for
1 sec.)
Rear window
defogger
switch LED is
turned off
Rear window
defogger
switch LED
illuminates
1st
MIX
#2
2nd
MIX
#3
3rd —
7th
MIX
#4
AUTO
MODE
#1
Blinking
(Illumi-
nates for
1 sec.
←→ turns
off for 1
sec.)
1st
MODE
#2
2nd
MODE
#3
3rd —
7th
MODE
#4
Нет комментариевНе стесняйтесь поделиться с нами вашим ценным мнением.
Текст