Subaru Legacy III (2000-2003 year). Service manual — part 881

AC-60
HVAC SYSTEM (AUTO A/C) (DIAGNOSTICS)
DIAGNOSTIC PROCEDURE WITH DIAGNOSTIC TROUBLE CODE (DTC) (LHD
MODEL)
6
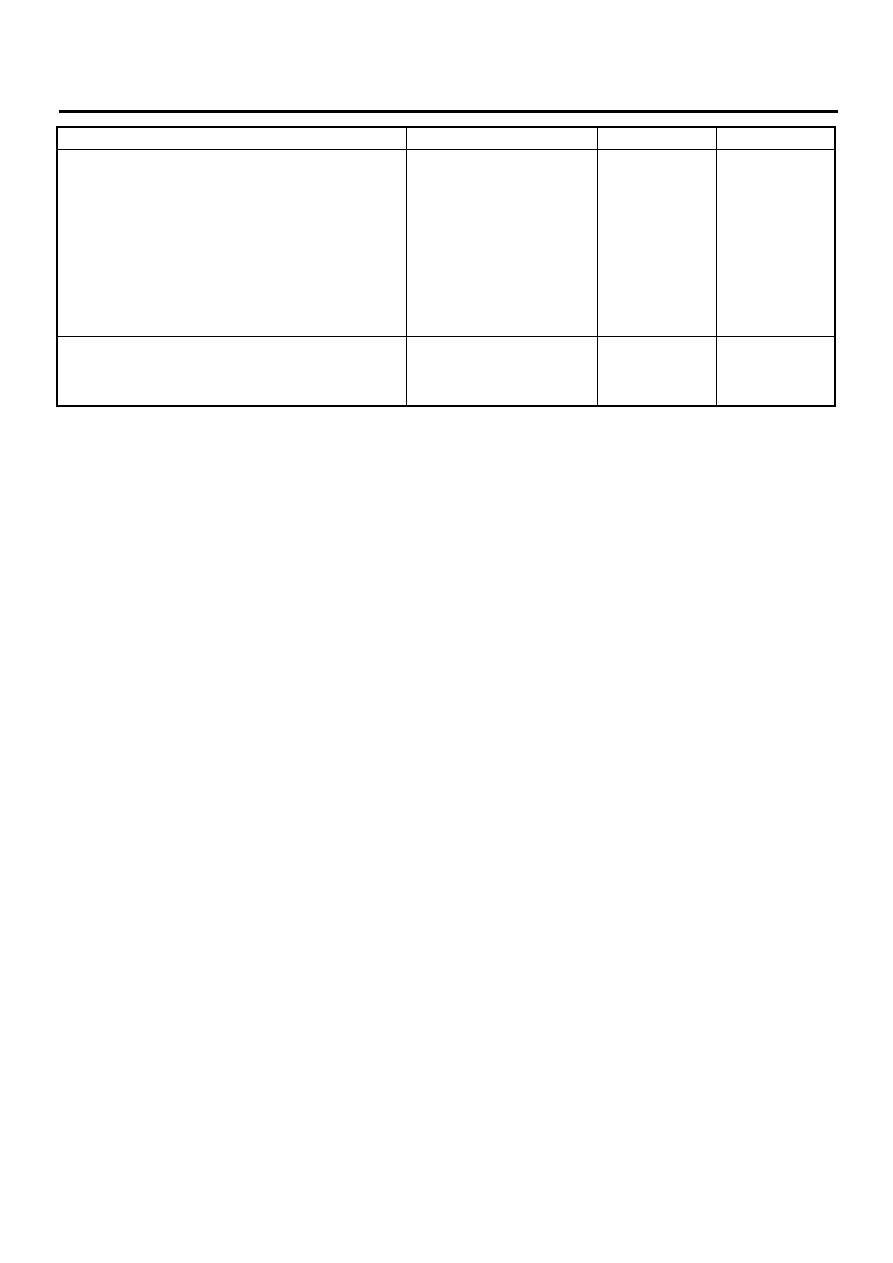
CHECK AUTO A/C CONTROL MODULE SIG-
NAL VOLTAGE.
1) Turn the ignition switch to ON.
2) Turn the mode control dial and measure
voltage between auto A/C control module
harness connector and chassis ground for
each mode.
Connector & terminal
(i48) No. 2 (+) — Chassis ground (
−−−−
):
Is the measured value within specified
value?
HEAT, D/H, DEF: 5 V, VENT,
BI-LEVEL: 0 V
7
CHECK AUTO A/C CONTROL MODULE SIG-
NAL POWER SUPPLY.
1) Turn the ignition switch to OFF.
2) Disconnect the connector from mode door
actuator.
3) Turn the ignition switch to ON.
4) Measure the voltage between mode door
actuator harness connector and chassis
ground.
Connector & terminal
(B77) No. 5 (+) — Chassis ground (
−−−−
):
Is the measured value within specified
value?
5 V
8
CHECK HARNESS BETWEEN AUTO A/C
CONTROL MODULE AND MODE DOOR AC-
TUATOR.
1) Turn the ignition switch to OFF.
2) Disconnect the connectors from auto A/C
control module and mode door actuator.
3) Measure the resistance of harness
between auto A/C control module and
mode door actuator.
Connector & terminal
(i48) No. 2 — (B77) No. 5:
Is the measured value less than specified
value?
1
Ω
Replace the auto
A/C control mod-
ule.
Repair the har-
ness between auto
A/C control mod-
ule and mode door
actuator.
9
CHECK AUTO A/C CONTROL MODULE SIG-
NAL VOLTAGE.
1) Turn ignition switch to ON.
2) Press the mode control dial and measure
voltage between auto A/C control module
harness connector and chassis ground for
each mode.
Connector & terminal
(i48) No. 10 (+) — Chassis ground (
−−−−
):
Is the measured value within specified
value?
VENT, D/H: 5 V, BI-LEVEL,
HEAT, DEF: 0 V
Step
Value
Yes
No

AC-61
HVAC SYSTEM (AUTO A/C) (DIAGNOSTICS)
DIAGNOSTIC PROCEDURE WITH DIAGNOSTIC TROUBLE CODE (DTC) (LHD
MODEL)
10
CHECK AUTO A/C CONTROL MODULE SIG-
NAL POWER SUPPLY.
1) Turn the ignition switch to OFF.
2) Disconnect the connector from mode door
actuator.
3) Turn the ignition switch to ON.
4) Measure the voltage between mode door
actuator harness connector and chassis
ground.
Connector & terminal
(B77) No. 6, 9 (+) — Chassis ground (
−−−−
):
Is the measured value within specified
value?
5 V
11
CHECK HARNESS BETWEEN AUTO A/C
CONTROL MODULE AND MODE DOOR AC-
TUATOR.
1) Turn the ignition switch to OFF.
2) Disconnect the connectors from auto A/C
control module and mode door actuator.
3) Measure the resistance of harness
between auto A/C control module and
mode door actuator.
Connector & terminal
(i48) No. 10 — (B77) No. 6, 9:
Is the measured value less than specified
value?
1
Ω
Replace the auto
A/C control mod-
ule.
Repair the har-
ness between auto
A/C control mod-
ule and mode door
actuator.
12
CHECK AUTO A/C CONTROL MODULE SIG-
NAL VOLTAGE.
1) Turn ignition switch to ON.
2) Turn the mode control dial and measure
voltage between auto A/C control module
harness connector and chassis ground for
each mode.
Connector & terminal
(i48) No. 1 (+) — Chassis ground (
−−−−
):
Is the measured value within specified
value?
BI-LEVEL, DEF: 5 V, VENT,
HEAT, D/H: 0 V
13
CHECK AUTO A/C CONTROL MODULE SIG-
NAL POWER SUPPLY.
1) Turn the ignition switch to OFF.
2) Disconnect the connector from mode door
actuator.
3) Turn the ignition switch to ON.
4) Measure the voltage between mode door
actuator harness connector and chassis
ground.
Connector & terminal
(B77) No. 4, 7 (+) — Chassis ground (
−−−−
):
Is the measured value within specified
value?
5 V
Step
Value
Yes
No

AC-62
HVAC SYSTEM (AUTO A/C) (DIAGNOSTICS)
DIAGNOSTIC PROCEDURE WITH DIAGNOSTIC TROUBLE CODE (DTC) (LHD
MODEL)
14
CHECK HARNESS BETWEEN AUTO A/C
CONTROL MODULE AND MODE DOOR AC-
TUATOR.
1) Turn the ignition switch to OFF.
2) Disconnect the connectors from auto A/C
control module and mode door actuator.
3) Measure the resistance of harness
between auto A/C control module and
mode door actuator.
Connector & terminal
(i48) No. 1 — (B77) No. 4, 7:
Is the measured value less than specified
value?
1
Ω
Replace the auto
A/C control mod-
ule.
Repair the har-
ness between auto
A/C control mod-
ule and mode door
actuator.
15
CHECK AUTO A/C CONTROL MODULE SIG-
NAL VOLTAGE.
1) Turn ignition switch to ON.
2) Press the mode switch and measure volt-
age between auto A/C control module har-
ness connector and chassis ground for
each mode.
Connector & terminal
(i48) No. 9 (+) — Chassis ground (
−−−−
):
Is the measured value within specified
value?
VENT, BI-LEVEL, HEAT: 5V,
D/H, DEF: 0 V
16
CHECK AUTO A/C CONTROL MODULE SIG-
NAL POWER SUPPLY.
1) Turn the ignition switch to OFF.
2) Disconnect the connector from mode door
actuator.
3) Turn the ignition switch to ON.
4) Measure the voltage between mode door
actuator harness connector and chassis
ground.
Connector & terminal
(B77) No. 8 (+) — Chassis ground (
−−−−
):
Is the measured value within specified
value?
5 V
17
CHECK HARNESS BETWEEN AUTO A/C
CONTROL MODULE AND MODE DOOR AC-
TUATOR.
1) Turn the ignition switch to OFF.
2) Disconnect the connectors from auto A/C
control module and mode door actuator.
3) Measure the resistance of harness
between auto A/C control module and
mode door actuator.
Connector & terminal
(i48) No. 9 — (B77) No. 8:
Is the measured value less than specified
value?
1
Ω
Replace the auto
A/C control mod-
ule.
Repair the har-
ness between auto
A/C control mod-
ule and mode door
actuator.
Step
Value
Yes
No
AC-63
HVAC SYSTEM (AUTO A/C) (DIAGNOSTICS)
DIAGNOSTIC PROCEDURE WITH DIAGNOSTIC TROUBLE CODE (DTC) (LHD
MODEL)
18
CHECK ACTUATOR GROUND CIRCUIT.
1) Turn the ignition switch to OFF.
2) Disconnect the connector from mode door
actuator.
3) Measure the resistance of harness
between mode door actuator and chassis
ground.
Connector & terminal
(B77) No. 10 — Chassis ground:
Is the measured value less than specified
value?
1
Ω
Replace the mode
door actuator.
Repair the har-
ness between auto
A/C control mod-
ule and mode door
actuator.
19
CHECK POOR CONTACT.
Check poor contact in auto A/C control module
connector.
Is there poor contact in connector?
There is no poor contact.
Repair the poor
contact in auto A/C
control module.
Repair the con-
nector.
Step
Value
Yes
No
Нет комментариевНе стесняйтесь поделиться с нами вашим ценным мнением.
Текст