Infiniti QX56 (JA60). Manual — part 331

SIDE OIL SEAL
DLN-247
< ON-VEHICLE REPAIR >
[REAR FINAL DRIVE: R230]
C
E
F
G
H
I
J
K
L
M
A
B
DLN
N
O
P
SIDE OIL SEAL
Removal and Installation
INFOID:0000000005148933
REMOVAL
1. Remove the drive shaft from the rear final drive assembly. Refer to
RAX-10, "Removal and Installation"
2. Remove the side flange using Tools.
3. Remove the side oil seal using suitable tool.
CAUTION:
Do not to damage gear carrier.
INSTALLATION
1. Apply multi-purpose grease to the lips of the new side oil seal.
Then drive the new side oil seal in evenly until it becomes flush
with the gear carrier using Tool.
CAUTION:
• Do not reuse side oil seal.
• Do not incline the new side oil seal when installing.
• Apply multi-purpose grease to the lips of the new side oil
seal.
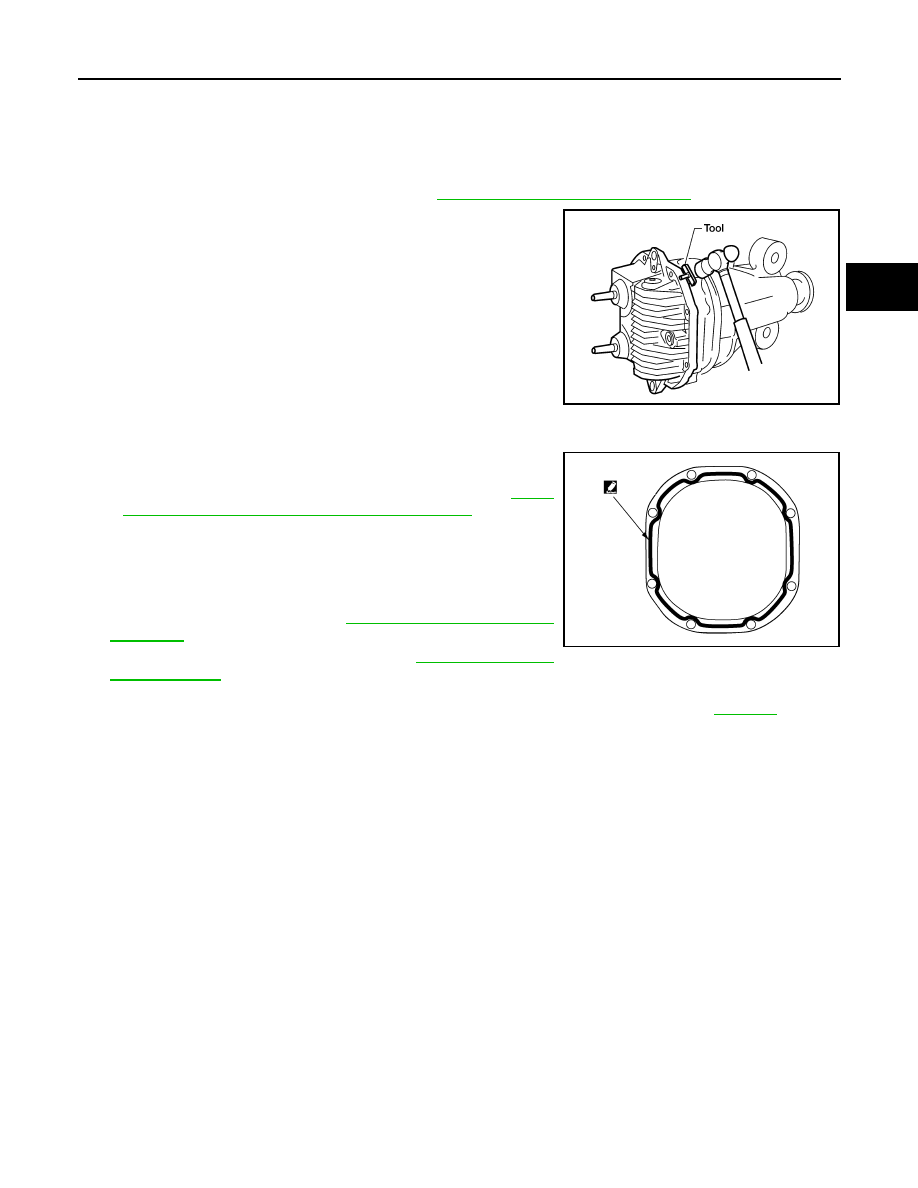
2. Install the side flange using Tool.
a. Install the Tool to the side oil seal as shown.
b. Insert the side flange until the serrated part of the side flange
has engaged the serrated part of the side gear and remove the
Tool.
c. Drive in the side flange using suitable tool.
NOTE:
Installation is completed when the driving sound of the side
flange turns into a sound which seems to affect the whole rear
final drive assembly.
3. Installation of the remaining components is in the reverse order of removal.
CAUTION:
Tool numbers
A: KV40104100 ( — )
B: ST36230000 (J-25840-A)
WDIA0115E
LDIA0109E
Tool number
: KV38100200 (J-26233)
LDIA0111E
Tool number
: KV38107900 (J-39352)
SDIA0822E
DLN-248
< ON-VEHICLE REPAIR >
[REAR FINAL DRIVE: R230]
SIDE OIL SEAL
Check the differential gear oil level after installation. Refer to
DLN-244, "Checking Rear Differential
.
CARRIER COVER
DLN-249
< ON-VEHICLE REPAIR >
[REAR FINAL DRIVE: R230]
C
E
F
G
H
I
J
K
L
M
A
B
DLN
N
O
P
CARRIER COVER
Removal and Installation
INFOID:0000000005148934
REMOVAL
1. Remove the rear final drive assembly. Refer to
DLN-250, "Removal and Installation"
.
2. Remove the carrier cover bolts and separate the carrier cover
from the gear carrier using Tool.
CAUTION:
• Do not damage the mating surface.
• Do not insert flat-bladed screwdriver, this will damage the
mating surface.
INSTALLATION
1. Apply a 3 mm (0.12 in) bead of sealant to the mating surface of
the carrier cover as shown.
• Use Genuine Silicone RTV or equivalent. Refer to
"Recommended Chemical Products and Sealants"
CAUTION:
Remove any old sealant adhering to the mating surfaces.
Also remove any moisture, oil, or foreign material adhering
to the application and mating surfaces.
2. Install the carrier cover to the gear carrier. Tighten the bolts to
the specified torque. Refer to
3. Install the rear final drive assembly. Refer to
CAUTION:
Fill the rear final drive assembly with recommended differential gear oil. Refer to
.
Tool number
: KV10111100 (J-37228)
WDIA0123E
WDIA0282E
DLN-250
< REMOVAL AND INSTALLATION >
[REAR FINAL DRIVE: R230]
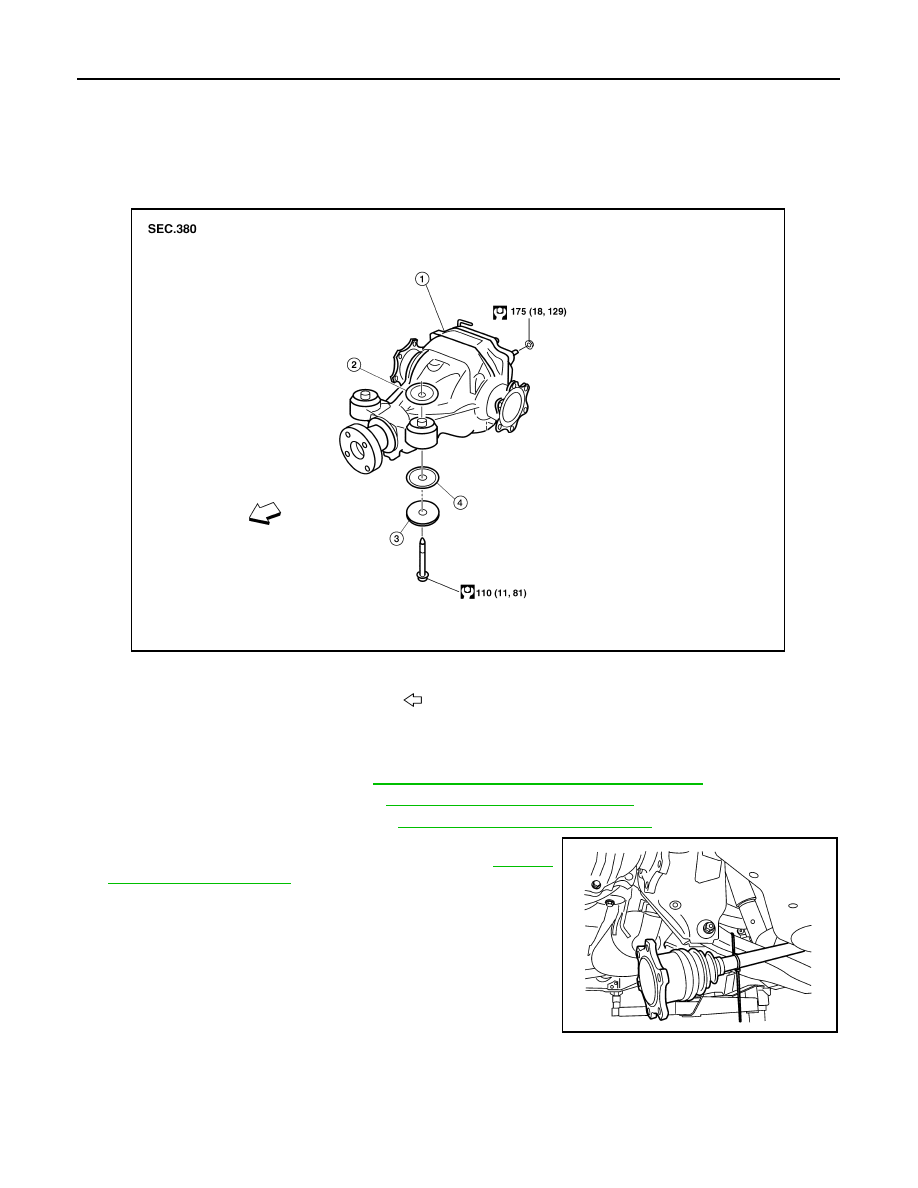
REAR FINAL DRIVE
REMOVAL AND INSTALLATION
REAR FINAL DRIVE
Removal and Installation
INFOID:0000000005148935
REMOVAL
1. Remove the spare tire.
2. Drain the differential gear oil. Refer to
DLN-244, "Changing Rear Differential Gear Oil"
.
3. Remove the rear stabilizer bar. Refer to
RSU-23, "Removal and Installation"
4. Remove the rear propeller shaft. Refer to
DLN-196, "Removal and Installation"
5. Remove the rear drive shafts from the rear final drive assembly
and support them using suitable wire. Refer to
6. Disconnect the breather hose from the rear final drive assembly.
1.
Rear final drive assembly
2.
Upper stopper
3.
Washer
4.
Lower stopper
Vehicle front
WDIA0383E
LDIA0164E
Нет комментариевНе стесняйтесь поделиться с нами вашим ценным мнением.
Текст