Infiniti QX56 (JA60). Manual — part 643
HEADLINING
INT-17
< ON-VEHICLE REPAIR >
C
D
E
F
G
H
I
K
L
M
A
B
INT
N
O
P
HEADLINING
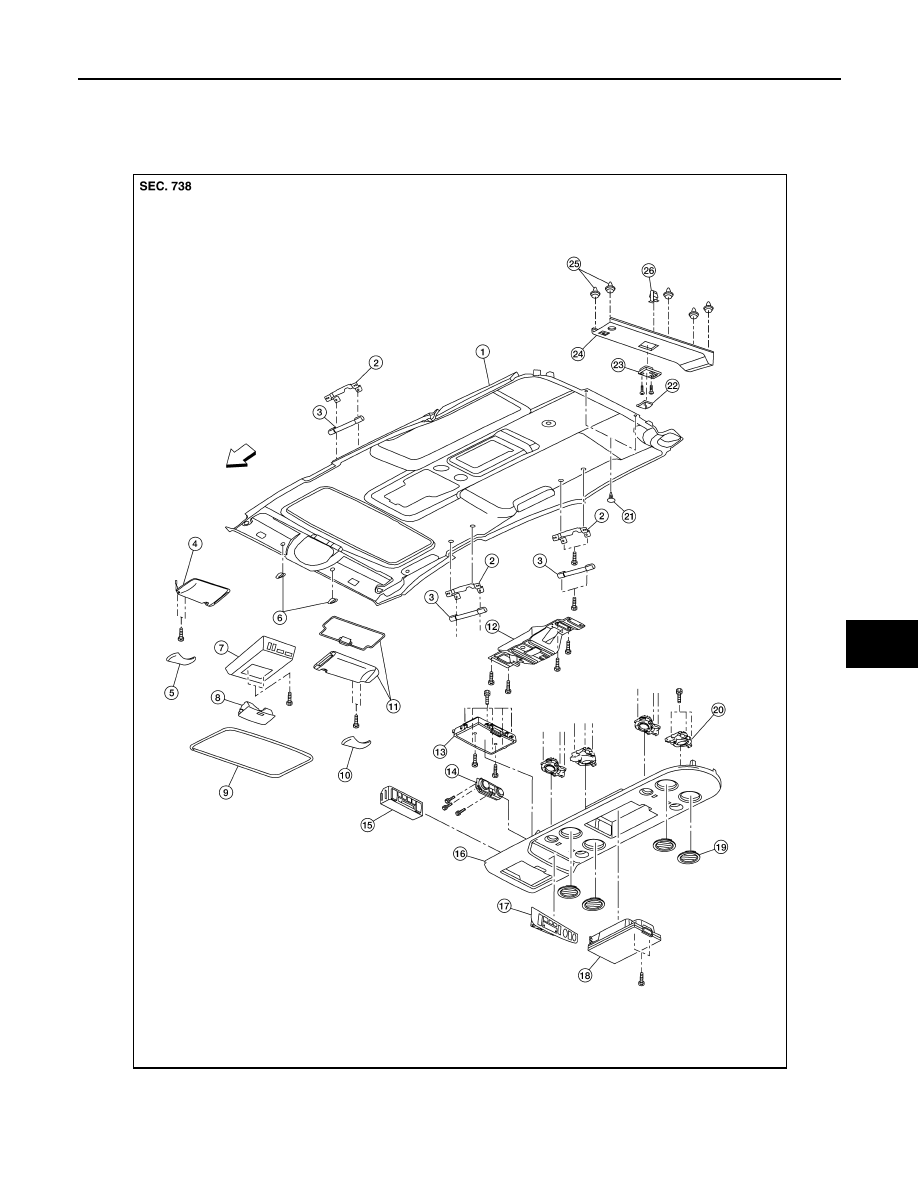
Removal and Installation
INFOID:0000000005147352
1.
Headlining
2.
Assist grip bracket
3.
Assist grip
4.
Sunvisor assembly LH
5.
Cap LH
6.
Sunvisor holder
7.
Front roof console
8.
Sunglass bin
9.
Sunroof welt
AWJIA0341GB

INT-18
< ON-VEHICLE REPAIR >
HEADLINING
CAUTION:
Disconnect both terminals from battery in advance.
REMOVAL
1. Remove the body side trim. Refer to
2. Remove the luggage floor trim. Refer to
.
3. Remove the sunvisor assemblies.
4. Remove the sunvisor clips.
5. Remove the sunroof welt.
6. Remove the front roof console.
• Disconnect the harnesses.
7. Remove the rear roof console.
• Disconnect the harnesses.
8. Remove the assist grips.
9. Remove the lamp assembly and the rear roof finisher.
• Disconnect the harness.
10. Remove the headlining.
• Remove the clips from the rear of headlining.
• Disconnect the harnesses.
11. Remove the rear air control.
• Disconnect the harness.
12. Remove the rear audio control assembly.
• Disconnect the harness.
13. Remove the lamp assemblies.
• Disconnect the harnesses.
14. Remove the air vents.
15. Remove the front roof console bracket.
16. Remove the rear roof console front bracket.
17. Remove the assist grip brackets from roof.
INSTALLATION
Installation is in the reverse order of removal.
10. Cap RH
11. Sunvisor assembly RH
12. Rear roof console bracket
13. Rear storage bin or DVD display
14. Rear air control
15. Rear audio control assembly
16. Rear roof console
17. Rear roof console finisher
18. Rear storage bin
19. Air vent
20. Lamp assembly
21. Plastic clip
22. Rear lamp lens
23. Rear lamp
24. Rear roof finisher
25. Plastic clip
26. Metal clip
Vehicle front
LUGGAGE FLOOR TRIM
INT-19
< ON-VEHICLE REPAIR >
C
D
E
F
G
H
I
K
L
M
A
B
INT
N
O
P
LUGGAGE FLOOR TRIM
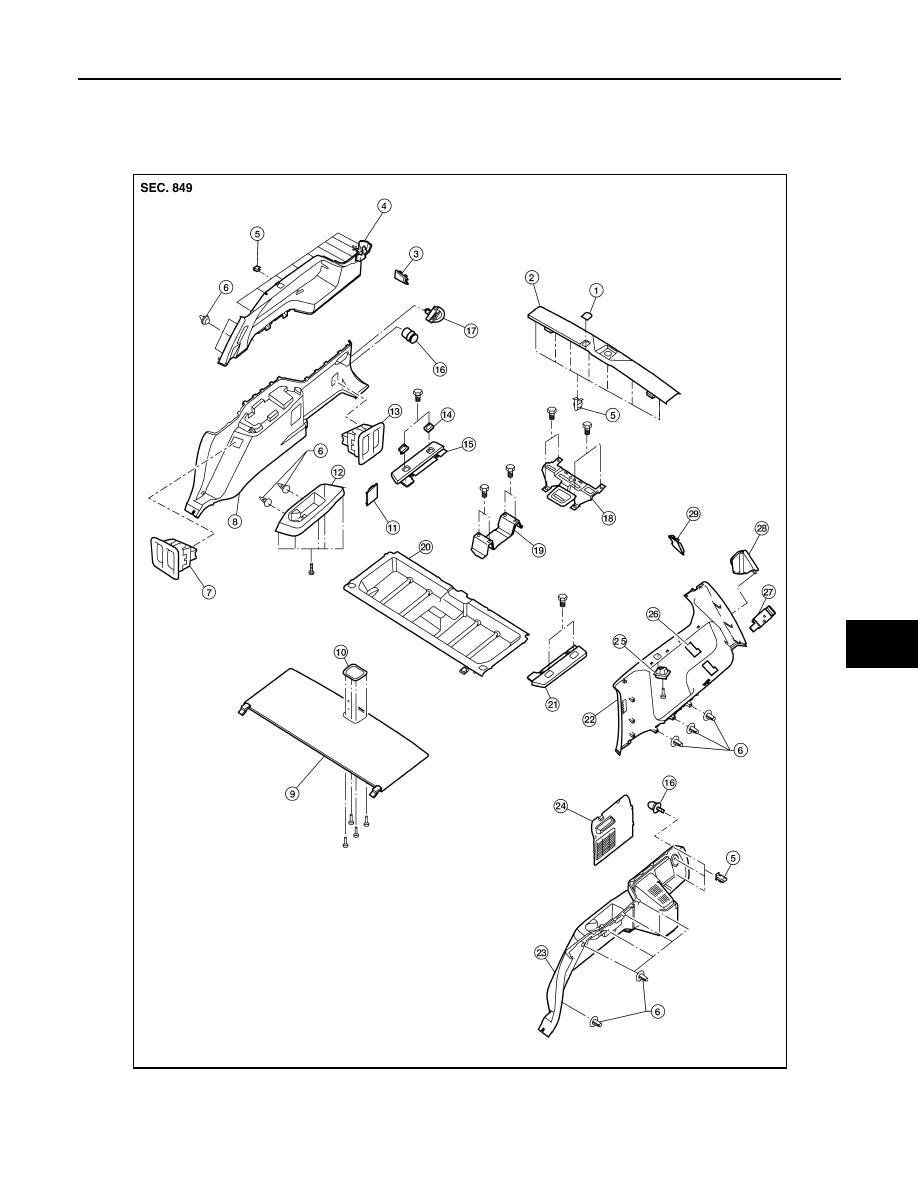
Removal and Installation
INFOID:0000000005147353
1.
Rear lower finisher cap
2.
Rear lower finisher
3.
Cap upper seat belt finisher RH
4.
Luggage side finisher RH
5.
Metal clip
6.
Plastic clip
7.
Third row seat switches
8.
Luggage side finisher lower RH
9.
Luggage floor board
AWJIA0216ZZ

INT-20
< ON-VEHICLE REPAIR >
LUGGAGE FLOOR TRIM
REMOVAL
1. Remove the 2nd and 3rd row seat belts. Refer to
SB-7, "Removal and Installation of Second Row Seat
SB-8, "Removal and Installation of Third Row Seat Belt"
.
2. Remove the third row seat belt buckles.
3. Remove the third row seat assembly. Refer to
4. Remove the back door weatherstrip. Refer to
5. Remove the rear luggage room lamp. Refer to
• Disconnect the harness from lamp.
6. Remove the rear upper finisher. Refer to
7. Remove the rear door kicking plates. Refer to
.
8. Remove the rear lower finisher.
9. Disconnect the door open/close link. Refer to
INT-21, "Removal and Installation"
.
10. Remove the cargo net hooks.
11. Remove the luggage side lower finishers LH/RH.
• Disconnect the power point and the third row seat harness connectors RH side, if equipped.
12. Remove the coat hooks.
13. Remove the luggage side upper finishers LH/RH.
• Disconnect the harness to door open/close switch, LH side.
14. Remove the tie down hooks LH/RH.
15. Remove the floor side finishers LH/RH.
16. Remove the luggage floor board.
17. Remove the storage box.
18. Remove the front luggage floor bracket.
19. Remove the rear luggage box bracket.
INSTALLATION
Installation is in the reverse order of removal.
10. Latch luggage floor board
11. Leak check cap
12. Cup holder
13. Third row seat switches
14. Tie down hook
15. Floor side finisher RH
16. Power point assembly
17. Cargo net hook
18. Rear luggage box bracket
19. Front luggage floor bracket
20. Storage box
21. Floor side finisher LH
22. Luggage side finisher upper LH
23. Luggage side finisher lower LH
24. Lid luggage side lower
25. Coat hook
26. Cap lower seat belt finisher
27. Back door open/close switch
28. Cap luggage side upper
29. Cap upper seat belt finisher LH
Нет комментариевНе стесняйтесь поделиться с нами вашим ценным мнением.
Текст