Mitsubishi Montero (1991+). Manual — part 293
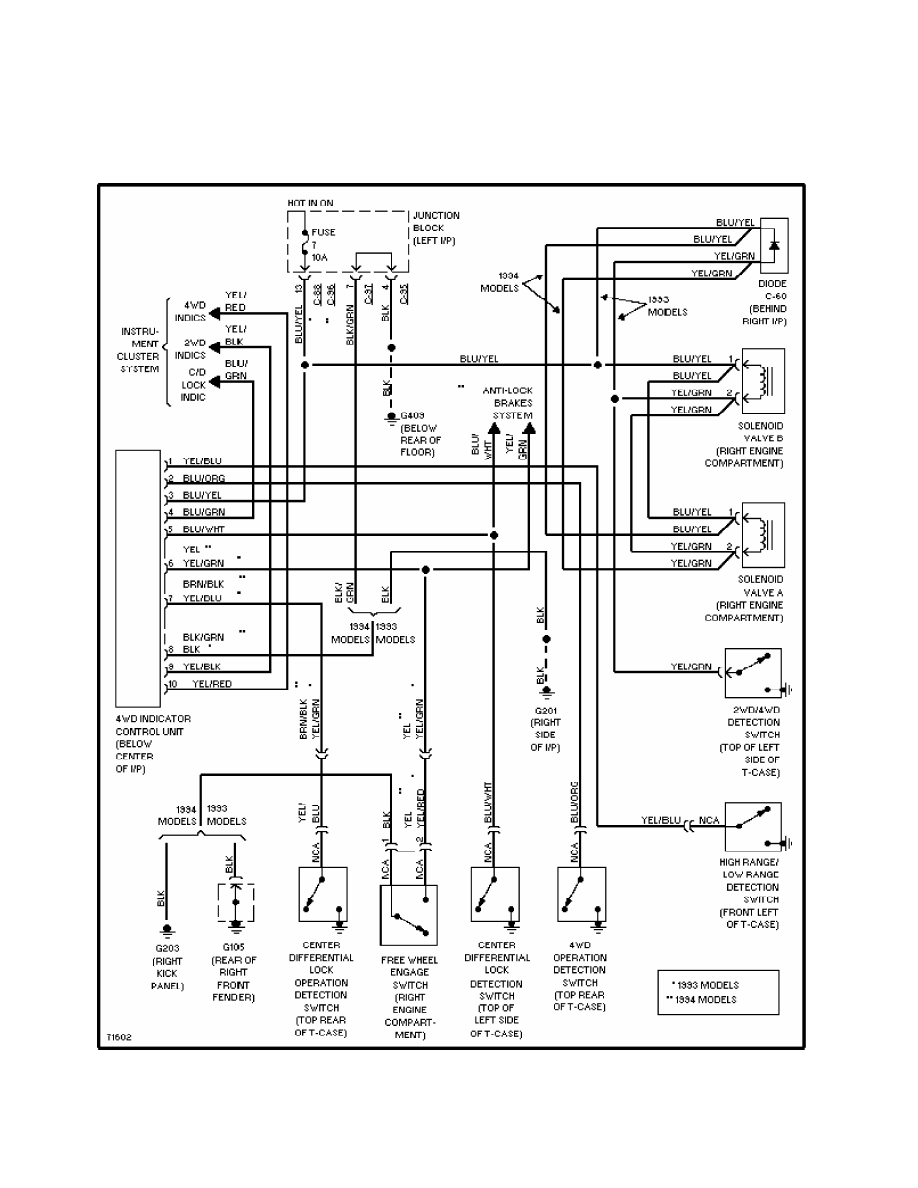
Fig. 14: Active Trac 4WD Circuit (Montero)
TRANSMISSION REMOVAL & INSTALLATION - A/T
1991 Mitsubishi Montero
1991 92 TRANSMISSION SERVICING
Transmission Removal & Installation
Mitsubishi: Eclipse, Galant, Mirage, Montero,
Pickup, Precis, 3000GT
MANUAL
NOTE: For manual transmission/transaxle replacement procedures,
see appropriate article in CLUTCHES.
AUTOMATIC FWD MODELS
REMOVAL
1) Remove battery and battery tray. On 3000GT, remove
undercover(s). On Eclipse turbo, drain and remove intercooler. On all
models, remove air cleaner and case. Raise and support vehicle. Remove
wheels. Disconnect control cables at transaxle. Drain transaxle fluid.
2) On Mirage 1.6L, disconnect tension rod. On all models,
disconnect neutral safety switch connector, oil cooler hoses and
electrical connectors from transaxle. Disconnect speedometer cable and
throttle control cable (if equipped). Remove starter motor.
3) On Galant models with electronically controlled
suspension, remove air compressor and bracket. Disconnect front height
sensor rod at lower control arm.
4) On all models, remove upper transaxle-to-engine bolts.
Remove engine undercover (if equipped). On all models, remove drive
axle shafts. See FWD AXLE SHAFTS article in DRIVE AXLES. Separate
lower control arms from struts for access to axle shafts (if
necessary).
5) Remove front exhaust pipe (if necessary). On Eclipse 4WD,
Galant 4WD and 3000GT, remove right member and gusset. On 4WD models,
separate transfer assembly from transaxle. Reference mark transfer
assembly-to-drive shaft and remove transfer assembly.
6) On all models, remove transmission inspection (dust)
cover. Place index mark on torque converter and drive plate for
reassembly reference. Remove torque converter-to-drive plate bolts.
Push torque converter away from engine into transaxle.
7) Support transaxle with jack. Remove transaxle mounts
bolts, mounting brackets and remaining transaxle-to-engine bolts.
Slide transaxle assembly to right and lower to remove.
CAUTION: Ensure torque converter is fully seated in transaxle before
installation. Always install new snap rings on inner
constant velocity joints.
INSTALLATION
1) To install, reverse removal procedure. Tighten transaxle-
to-engine bolts and torque converter-to-drive plate bolts to
specification. See TORQUE SPECIFICATIONS table at end of article.
2) Ensure reference marks on torque converter-to-drive plate
and transfer assembly-to-drive shaft align. Tighten mounting bolts
with weight of engine and transaxle on mounts. Refill transaxle fluid
to specified level. Adjust all control cables.
RWD MODELS
REMOVAL
1) Disconnect negative battery cable. Remove front exhaust
pipe. On Montero, remove transfer case shift lever knob, dust boot and
retainer plate or console. Remove transfer case gearshift assembly.
2) On all models, raise and support vehicle. Remove
undercarriage cover and/or skid plate(s). Drain transmission and
transfer case (if applicable). Place reference mark on drive shaft(s)
and remove. Disconnect all external solenoid and switch connections.
3) Disconnect speedometer cable and control cables at
transmission. Remove starter and bellhousing cover. Place reference
mark on torque converter and drive plate for reassembly reference.
Remove torque converter bolts.
4) Disconnect transmission cooler lines. Remove oil filler
tube. Secure transmission on a jack. Raise transmission slightly to
take weight off mount. Remove crossmember-to-mount bolts and
crossmember.
5) Remove transfer case mounting bracket and mount (if
equipped). Remove transmission-to-engine mounting bolts. Carefully
lower transmission from vehicle.
CAUTION: Ensure torque converter is fully seated in transmission
before installation.
INSTALLATION
1) To install, reverse removal procedure. Tighten
transmission-to-engine bolts and torque converter-to-drive plate bolts
to specification. See TORQUE SPECIFICATIONS table at end of article.
Tighten mount bolts with weight of engine and transmission on mounts.
Ensure reference marks on drive shaft(s) and torque converter-to-drive
plate align.
2) Apply sealant to transfer case gearshift assembly gasket
before installation. Coat transmission oil filler tube "O" ring with
transmission fluid before installation. Refill transmission fluid to
specified level. Adjust all control cables.
TORQUE SPECIFICATIONS
TORQUE SPECIFICATIONS
Applications Ft. Lbs. (N.m)
FWD Models
Torque Converter-To-Drive Plate Bolt
Precis . . . . . . . . . ... 53-55 (72-76)
All Others . . . . . . . . ... 34-38 (46-52)
Transaxle-To-Engine Block Bolt
Mirage
8-mm Bolt . . . . . . . . . . . (1)
10-mm Bolt . . . . . . . . . 22-25 (30-34)
12-mm Bolt . . . . . . . . . 31-40 (42-54)
Eclipse & Galant
8-mm Bolt . . . . . . . . . . . (1)
10-mm Bolt . . . . . . . . . 22-25 (30-34)
Precis
8-mm Bolt . . . . . . . . .. 22-25 (30-34)
10-mm Bolt . . . . . . . . . 31-40 (42-54)
3000GT
Upper Coupling Bolts . . . . . . . . 54 (73)
Lower Coupling Bolts . . . . . . . . 65 (88)
RWD Models
Torque Converter-To-Drive Plate Bolt
Montero . . . . . . . . . .. 25-30 (34-41)
Pickup . . . . . . . . . ... 33-38 (45-52)
Transmission-To-Engine Block Bolt
Montero
10x40-mm Bolt . . . . . . . .. 22-30 (30-41)
12x40-mm Bolt . . . . . . . .. 47-61 (64-83)
12x55-mm Bolt . . . . . . . .. 58-72 (79-98)
Pickup
10x16-mm Bolt . . . . . . . .. 22-30 (30-41)
10x50-mm Bolt . . . . . . . .. 31-40 (42-54)
10x70-mm Bolt . . . . . . . .. 31-40 (42-54)
(1) - Tighten to 84-108 INCH lbs. (10-12 N.m).
Нет комментариевНе стесняйтесь поделиться с нами вашим ценным мнением.
Текст