Mitsubishi Montero (1991+). Manual — part 294
TRANSMISSION SERVICING - A/T
1991 Mitsubishi Montero
1991 TRANSMISSION SERVICING
Automatic Transmission
Mitsubishi: Eclipse, Galant, Mirage,
Montero, Pickup, Precis, 3000GT
IDENTIFICATION
MITSUBISHI AUTOMATIC TRANSMISSION APPLICATIONS
Model Transmission/Transaxle
Eclipse
1.8 & 2.0L . . . . . . ... Model F4A22 Transaxle
2.0L Turbo . . . . . . ... Model F4A33 Transaxle
All-Wheel Drive (AWD) . . . . Model W4A33 Transaxle
Galant
AWD . . . . . . . . .. Model W4A32 Transaxle
DOHC . . . . . . . . . Model F4A22 Transaxle
SOHC . . . . . . Model KM175 or F4A22 Transaxle
Mirage
1.5L . . . . . . . . . Model F3A21 Transaxle
1.6L . . . . . . . . . Model F4A21 Transaxle
Montero . . . . . . . Model V4AW2 Transmission
Pickup . . . . . . . . Model R4AC1 Transmission
Precis . . . . . . . . Model KM176 Transaxle
3000GT . . . . . . . . Model F4A33 Transaxle
LUBRICATION
TRANSAXLE/TRANSMISSION SERVICE INTERVALS
Check fluid level every 12 months or 15,000 miles. Change
fluid and filter every 30,000 miles. If vehicle is operated under
severe condition, change fluid more often. If severe darkening of
fluid and strong odor are noted, bands should also be adjusted (if
equipped).
TRANSFER CASE SERVICE INTERVALS
On 4WD and AWD models, change transfer case fluid every 30,
000 miles.
CHECKING FLUID LEVEL
TRANSAXLE/TRANSMISSION
1) Park vehicle on level area. Ensure oil is at normal
operating temperature, parking brake is engaged, and engine is at
idle. Move gear selector through each position, stopping briefly in
each position.
2) Place gear selector in Neutral, and clean area around
dipstick tube. Ensure fluid level is between lower and upper marks,
but never over upper mark, in HOT range. Add or drain fluid if
necessary.
CAUTION: If severe darkening of fluid and strong odor are noted,
change fluid and filter, and adjust bands.
TRANSFER CASE (3000GT)
Lubricant level should be approximately .5" (13 mm) below
fill hole on side of transfer case.
TRANSFER CASE (ALL OTHERS)
Lubricant level should be to bottom of fill hole on side of
transfer case.
RECOMMENDED FLUID
TRANSAXLE/TRANSMISSION
Use Chrysler Plus/Mitsubishi Plus ATF, Dexron and Dexron-II
ATF.
TRANSFER CASES
Use SAE 75W-85 gear oil with API GL-4 rating or higher.
FLUID CAPACITY
TRANSAXLE/TRANSMISSION REFILL CAPACITIES
Refill Dry Fill
Application Qts. (L) Qts. (L)
Mirage . . . . . . 4.8 (4.5) . . . ... 13.0 (12.2)
Eclipse
F4A22 . . . . . 4.2 (4.0) . . . . . 6.4 (6.1)
F4A33 & W4A33 . . . 6.4 (6.1) . . . . . 8.0 (7.6)
Galant
2WD . . . . . .. 4.8 (4.5) . . . . . 6.4 (6.1)
AWD . . . . . .. 4.8 (4.5) . . . . . 6.9 (6.5)
Montero . . . . . 5.8 (5.5) . . . . . 7.4 (7.0)
Pickup . . . . ... 2.0 (1.9)(1) . . . ... 10.2 (9.7)
Precis . . . . . . 4.8 (4.5) . . . . . 6.4 (6.1)
3000GT . . . . . . 4.8 (4.5) . . . . . 7.9 (7.5)
(1) - Idle engine in Neutral, then add fluid to bring level between
notches at "H" mark.
TRANSFER CASE REFILL CAPACITIES
Application Pts. (L)
Eclipse & Galant . . . . . . . 1.3 (0.6)
Mirage . . . . . . . . . . . N/A
Montero & Pickup . . . . . . . 4.6 (2.2)
3000GT . . . . . . . . . . .6 (.3)
DRAINING & REFILLING
NOTE: Although manufacturer recommends changing only fluid, the
oil filter/screen may also require replacement. If replacing
oil filter/screen, note length and location of all bolts.
TRANSAXLE (EXCEPT MONTERO, PICKUP & RAM-50)
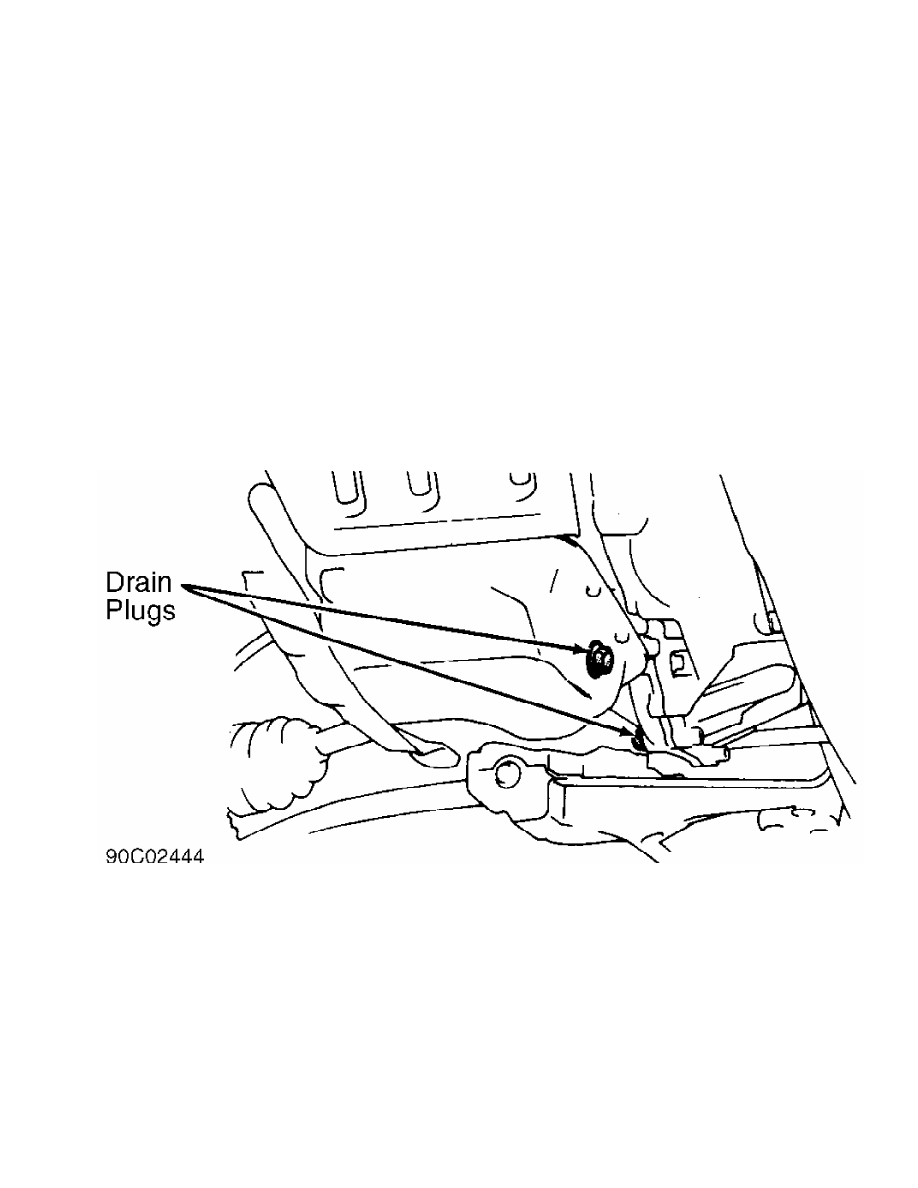
1) Remove drain plug(s), and drain fluid. See Fig. 1. Some
applications may contain a drain plug located in housing below drive
axle shaft, in oil pan. Remove oil pan. Remove oil filter/screen if
necessary.
2) If oil filter/screen is replaced, tighten bolts to
specification. See TORQUE SPECIFICATIONS table at end of article.
Clean oil pan, replace gasket, and install oil pan. Tighten oil pan
bolts and drain plug to specification. See TORQUE SPECIFICATIONS
table. Ensure dipstick hole area is clean, and pour approximately 4.2
qts. (4.0L) of Dexron-II fluid into dipstick hole.
3) Operate engine at idle for 2 minutes. Shift transaxle to
each position, ending in Neutral. Add sufficient fluid to reach lower
mark. After reaching normal operating temperature, fluid should be
between upper and lower marks of HOT range on dipstick.
Fig. 1: Locating Drain Plugs
Courtesy of Mitsubishi Motor Sales of America.
TRANSMISSION (MONTERO & PICKUP)
1) Remove drain plug (if equipped) from transmission pan, and
allow fluid to drain. On models without drain plug, remove oil pan
must to drain fluid. Remove oil filter/screen if necessary.
2) If oil filter/screen is replaced, tighten bolts to
specification. See TORQUE SPECIFICATIONS table at end of article.
Clean oil pan, replace gasket, and install oil pan. Tighten oil pan
bolts and drain plug to specification. See TORQUE SPECIFICATIONS
table. Fill transmission, through filler tube, with 5.3 qts. (5.0L) of
Dexron-II ATF on Montero, or 2.0 qts. (1.9L) on all others. Start
engine, and allow to idle for 2 minutes.
3) Shift transmission into each position, ending in Neutral.
Check fluid level with engine running at idle, and add sufficient
fluid to bring level to lower mark of dipstick if necessary. Recheck
fluid level after transmission is at normal operating temperature.
TRANSFER CASE
Drain plug is located on bottom of transfer case. Change
drain plug gasket whenever fluid is changed. On 3000GT, lubricant
level should be approximately .5" (13 mm) below fill hole on side of
transfer case. On all others models, lubricant level should be to
bottom of fill hole on side of transfer case.
HYDRAULIC CONTROL PRESSURE ADJUSTMENTS
LINE PRESSURE CHECK (EXCEPT MONTERO & PICKUP)
1) Set parking brake. Place shift lever in Neutral position.
Attach engine tachometer. Remove line pressure port plug located above
front transaxle shaft, forward of governor pressure port plug. On
Precis, line pressure port is located below bell housing, at front of
transaxle oil pan. Using appropriate adapter, attach pressure gauge.
2) Start engine, and bring to operating temperature. With
gear selector in Drive position, bring engine speed to 2500 RPM. Pull
throttle control cable (if equipped) wide open at transaxle side.
3) Line pressure should be 98-100 psi (6.9-7.0 kg/cm
) on
Mirage, or 124-127 psi (8.7-8.9 kg/cm
) on all others. If line
pressure is not to specification, proceed to LINE PRESSURE ADJUSTMENT.
LINE PRESSURE ADJUSTMENT (EXCEPT MONTERO & PICKUP)
1) Drain transaxle fluid. Remove oil pan. Disconnect throttle
control cable from throttle cam. Remove oil temperature sensor (if
equipped). Disconnect solenoid connector. On some models, it may be
necessary to push solenoid wire harness connector and grommet into
transaxle case.
2) Remove oil filter screen and plate. Noting location and
length of bolts, remove valve body. DO NOT drop internal parts. Adjust
line pressure by turning regulator valve adjusting screw.
3) Turn adjusting screw counterclockwise to increase pressure
or clockwise to decrease pressure. One complete turn of adjusting
screw changes line pressure as follows.
* 3.7 psi (.26 kg/cm
) on Mirage with F3A21 Transaxle
* 5.4 psi (.39 kg/cm
) on Precis
* 54 psi (3.8 kg/cm
) on all others
4) After adjustment, reverse removal procedure to install.
Refill transaxle.
LINE PRESSURE (MONTERO)
1) Remove plug from line pressure take-off port located
behind transmission shift control lever. Install Hydraulic Pressure
Meter (MD998330) with Adapter (MD998206).
2) Place vehicle on dynamometer. Apply parking brake and
start engine. With brake applied, place transmission in Drive. Note
pressure at idle. Pressure should be 74-85 psi (5.2-6.0 kg/cm
).
3) Raise engine RPM to stall speed (2100-2400 RPM). Note line
pressure. Pressure should be 156-185 psi (11.0-13.0 kg/cm
).
4) Shift transmission into Reverse with brake applied. At
idle, pressure should be 112-130 psi (7.9-9.1 kg/cm
). Raise engine
RPM to stall speed (2100-2400 RPM). Note line pressure. Pressure
should be 227-285 psi (16.0-20.0 kg/cm
). If readings are not to
Нет комментариевНе стесняйтесь поделиться с нами вашим ценным мнением.
Текст