Mitsubishi Montero (1991+). Manual — part 329
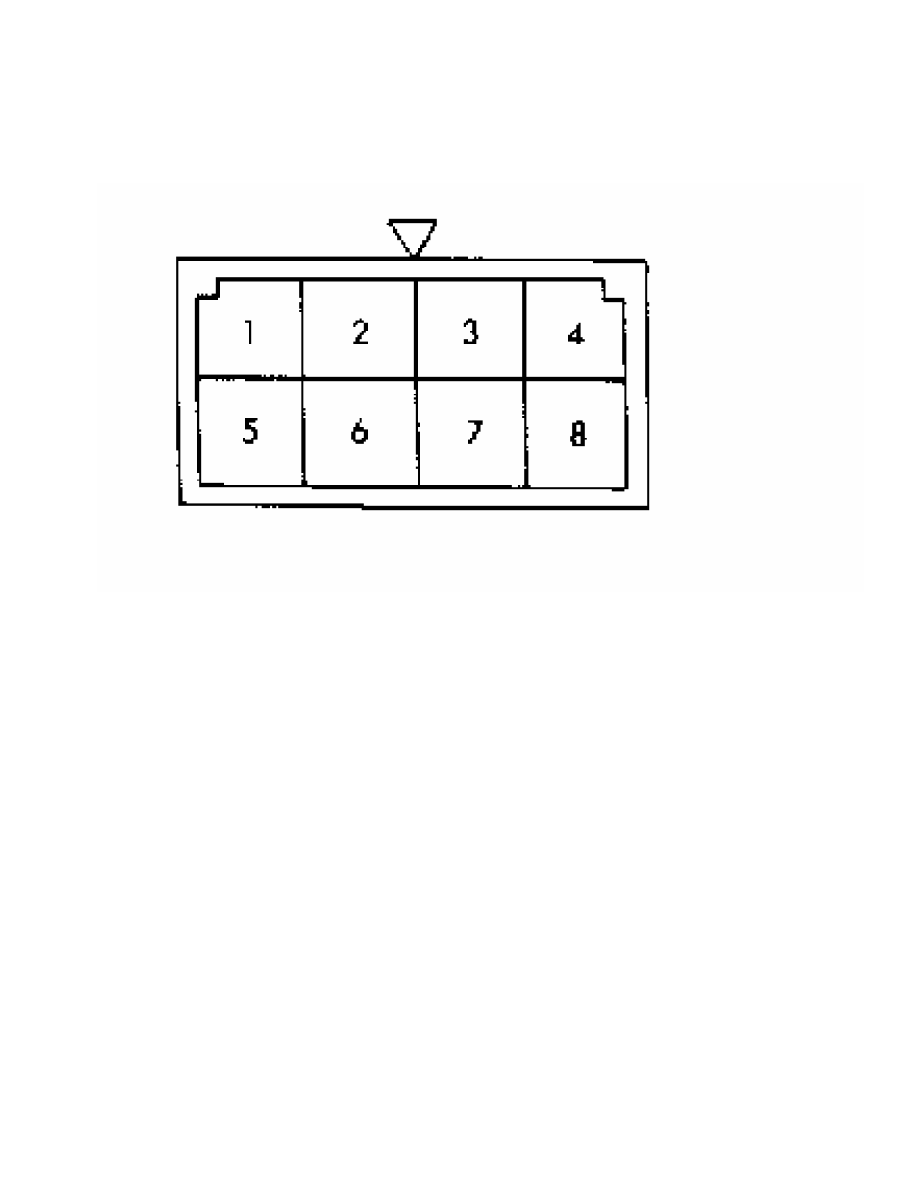
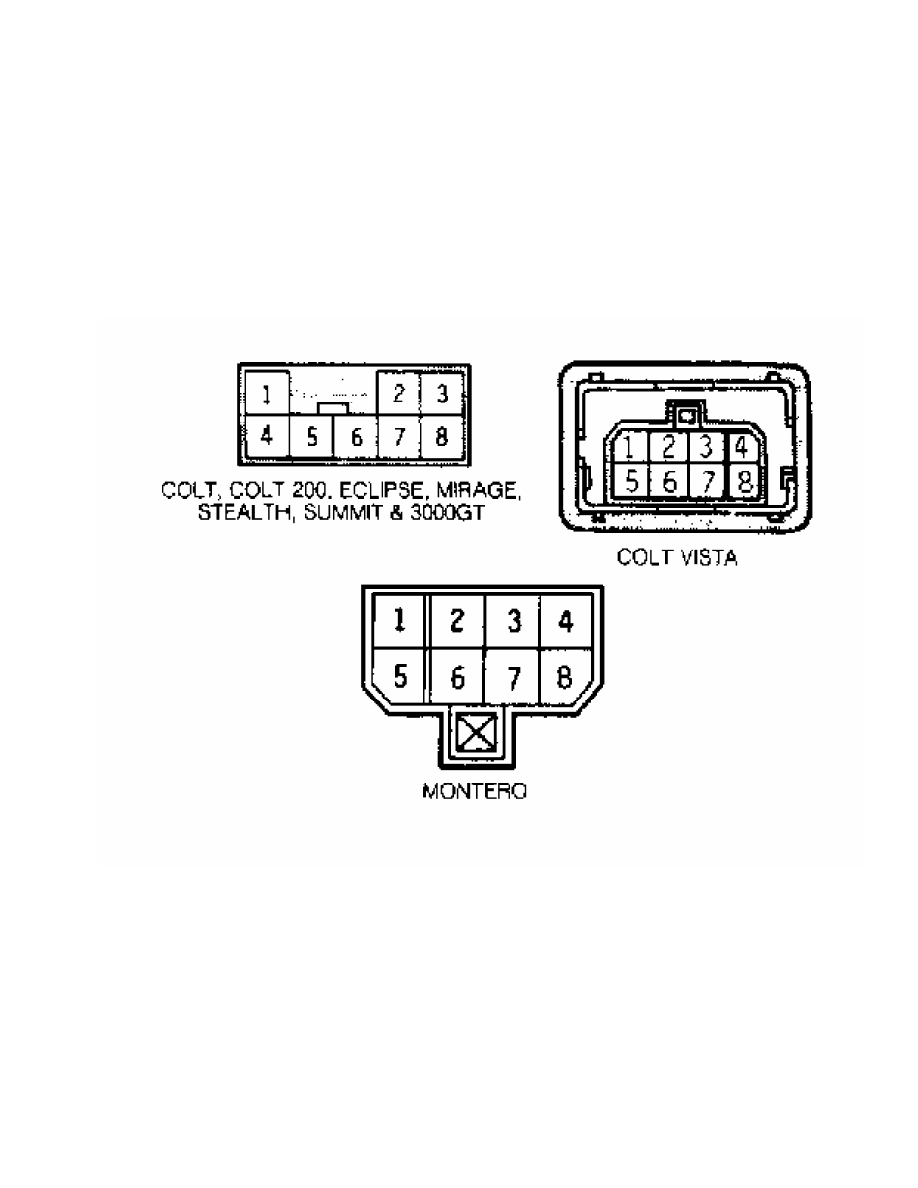
Fig. 2: Identifying Front Wiper Relay Terminals (Montero)
Courtesy of Mitsubishi Motor Sales of America.
Intermittent Operation Check (Montero)
1) Connect battery voltage to terminal No. 1 and ground
terminal No. 6. See Fig. 2. Connect a jumper wire with test light
between battery positive and terminal No. 2.
2) Connect one end of a jumper wire to terminal No. 3 and
touch the other end to negative terminal on battery. Test light should
illuminate briefly and then go out after terminal No. 3 is touched to
battery ground.
FRONT WIPER SWITCH
NOTE: Front wiper switch is located on steering column.
See STEERING COLUMN SWITCHES article in the
ACCESSORIES/SAFETY EQUIP Section.
REAR WIPER MOTOR
Operation Check (Montero)
Disconnect wiring connector from wiper motor. Connect battery
voltage to one terminal and ground to other terminal to ensure
automatic operation. See REAR WIPER MOTOR OPERATION CHECK table for
terminal numbers and model application. See Fig. 3.
REAR WIPER MOTOR OPERATION CHECK TABLE
Model Ground Pin No. Apply Voltage To Pin Nos.
Montero . . . . . 3 . . . . . . . . . 1

Fig. 3: Identifying Rear Wiper Motor Terminals (Montero)
Courtesy of Mitsubishi Motor Sales of America.
Automatic Stop Check (Montero)
1) Start motor operation by connecting battery voltage to one
terminal and grounding another terminal. See
REAR WIPER MOTOR OPERATION CHECK table. See Fig. 3. Disconnect wires
during operation to stop motor in mid-sweep.
2) Jumper terminals No. 2 and 3 together. Connect battery
voltage to remaining terminal and ground wiper motor bracket. Ensure
motor parks wiper arm.
REAR WIPER RELAY
Operation Check (Montero)
Relay is located to right of heater blower assembly. Leave
intermittent relay connected to wiring harness. Operate rear wiper and
check voltage at terminal No. 1. See Fig. 4. There should be 12 volts
when rear wiper stops. Zero volts should be present when rear wiper is
operating.
Fig. 4: Identifying Rear Wiper Relay Terminals
Courtesy of Mitsubishi Motor Sales of America.
REAR WIPER SWITCH
Montero
Remove wiper switch from instrument panel and disconnect
wiring connector. Place wiper switch in OFF position. Continuity
should exist between terminals No. 2 and 5. See Fig. 5. Place wiper
switch in ON position. Continuity should exist between terminals No. 2
and 7. Place wiper switch in INT position. Continuity should exist
between terminals No. 2 and 5, and 3 and 8. Depress washer switch.
Continuity should exist between terminals No. 6 and 7.
Fig. 5: Identifying Rear Wiper Switch Terminals
Courtesy of Mitsubishi Motor Sales of America.
REMOVAL & INSTALLATION
FRONT WIPER MOTOR
Removal & Installation
Remove wiper motor attaching bolts. Pull motor out just
slightly. Disconnect wiper linkage from motor assembly and remove
motor. To install, reverse removal procedure.
FRONT WIPER SWITCH
NOTE: Front wiper switch is integral with combination switch on
steering column. See appropriate STEERING COLUMN SWITCHES
article in the ACCESSORIES/SAFETY EQUIP Section.
REAR WIPER MOTOR
Removal & Installation
Remove wiper blade and arm assembly. Remove tailgate trim, 2
bolts and wiper motor. To install, reverse removal procedure. Ensure
grommet is in good condition.
REAR WIPER RELAY
Removal & Installation
Rear wiper relay (Except Montero), is located behind right
rear quarter trim. On Montero, relay is located to right of heater
blower housing.
REAR WIPER SWITCH
Removal & Installation
Using flat-bladed tool, pry rear wiper switch from instrument
panel and remove wiring connector. To install, connect wiring
connector, and push switch into instrument panel.
WIRING DIAGRAMS
See appropriate chassis wiring diagram in the WIRING DIAGRAMS
section.
Нет комментариевНе стесняйтесь поделиться с нами вашим ценным мнением.
Текст