Mitsubishi Montero (1991+). Manual — part 68
KNOCKING OR CLUNKING
Differential Side Gear Clearance . . . .. Check Clearance
Worn Pinion Shaft . . . . . . Replace Pinion Shaft
Axle Shaft End Play . . . . . . . Check End Play
Missing Gear Teeth . . . . ... Check Diff./Replace Gear
Wrong Axle Backlash . . . . . . . Check Backlash
Misaligned Driveline . . . . . . Realign Driveline
CLUNKING DURING ENGAGEMENT
Side Gear Clearance . . . . . Check Side Gear Clearance
Ring and Pinion Backlash . . . . . ... Check Backlash
Worn/Loose Pinion Shaft . . . . . Replace Shaft/Bearing
Bad "U" Joint . . . . . . . ... Replace "U" Joint
Sticking Slip Yoke . . . . . . . . Lube Slip Yoke
Broken Rear Axle Mount . . . . . . .. Replace Mount
Loose Drive Shaft Flange . . . . . . . Check Flange
CLICK/CHATTER ON TURNS
Differential Side Gear Clearance . . . .. Check Clearance
Worn Clutch Plates (1) . . . . .. Replace Clutch Plates
Wrong Diff. Lubricant (1) . . . . . Change Lubricant
RHYTHMIC KNOCK OR CLICK
Flat Spot on Rear Wheel Bearing . . . Replace Wheel Bearing
HUM/LOW VIBRATION AT ALL SPEEDS
Faulty Wheel Bearings . . . . . . Replace Bearings
Faulty "U" Joint . . . . . . . Replace "U" Joint
Faulty Drive Shaft . . . . . . Balance Drive Shaft
Faulty Companion Flange . . . . . . Replace Flange
Faulty Slip Yoke Flange . . . . . . Replace Flange
(1) - Limited slip differential only.
DRIVE AXLE (FWD)
DRIVE AXLE (FWD) TROUBLE SHOOTING
PROBLEM
Possible Cause Action
GREASE LEAKING
Ripped CV Boot . . . . . . . . ... Replace Boot
CLICKING NOISE WHILE CORNERING
Dry/Worn CV Joints . . . . . Replace Outer CV Joints
CLUNK ON ACCELERATION
Dry/Worn CV Joints . . . . . Replace Inner CV Joints
Worn Trans. Gears/Bearings . . . . . . Inspect Trans.
VIBRATION/SHUDDER ON ACCELERATION
Dry/Worn CV Joints . . . . . . .. Replace CV Joints
Alignment Out . . . . . . . . . Check Alignment
Incorrect Spring Height . . . . ... Check Spring Height
SQUEALING OR HUMMING
Dry/Worn CV Joints . . . . . . Lube/Replace CV Joints
Faulty Wheel Bearing . . . . . Replace Wheel Bearing
TESTING & INSPECTION
AXLE SHAFT END PLAY
Using dial indicator, check axle shaft end play. End play
must be .0020-.0079" (.05-.20 mm). If end play is not within
specification, change shims to obtain correct end play. See AXLE
SHAFTS under REMOVAL & INSTALLATION.
AXLE TOTAL BACKLASH
1) Raise and support rear axle. Place transmission in
Neutral. Apply parking brake. Rotate drive shaft clockwise. Place
reference marks on pinion dust cover and differential housing.
2) Rotate drive shaft counterclockwise and measure distance
between reference marks. Differential must be removed and backlash
adjusted if distance exceeds 0.2" (5.0 mm).
LIMITED SLIP DIFFERENTIAL PRELOAD
1) Place transmission in Neutral. Block front wheels. Raise
one rear wheel free of ground and remove wheel. Use Axle Puller
Adapter (MB990241) for Montero and Pickup models. Install adapter on
wheel studs. Release parking brake.
2) Using torque wrench, measure starting torque on Pickup
models while rotating wheel in forward direction. On Montero models,
measure rotating torque. This measurement is read once axle is
turning. Differential must be repaired if torque is less than
specification. See TESTING SPECIFICATIONS table.
TESTING SPECIFICATIONS
Application Ft. Lbs. (N.m)
Montero & Pickup . . . . . . . 25 (34)
REMOVAL & INSTALLATION
AXLE SHAFTS
Removal
1) Block front wheels. Raise and support rear axle housing.
Remove brake drum. See Fig. 1. Remove parking brake cable attaching
bolts. Remove connection for parking brake cable end and rear brake
assembly. Drain brake fluid from bleeder screw at left side of rear
brake and disconnect brake tubes.
2) On all models, remove flange nuts and rear axle shaft
assembly. Use Puller (MB990241) and Slide Hammer (MB990211) if
necessary. DO NOT damage oil seal. Remove shim(s) and "O" ring.
Replace if necessary.
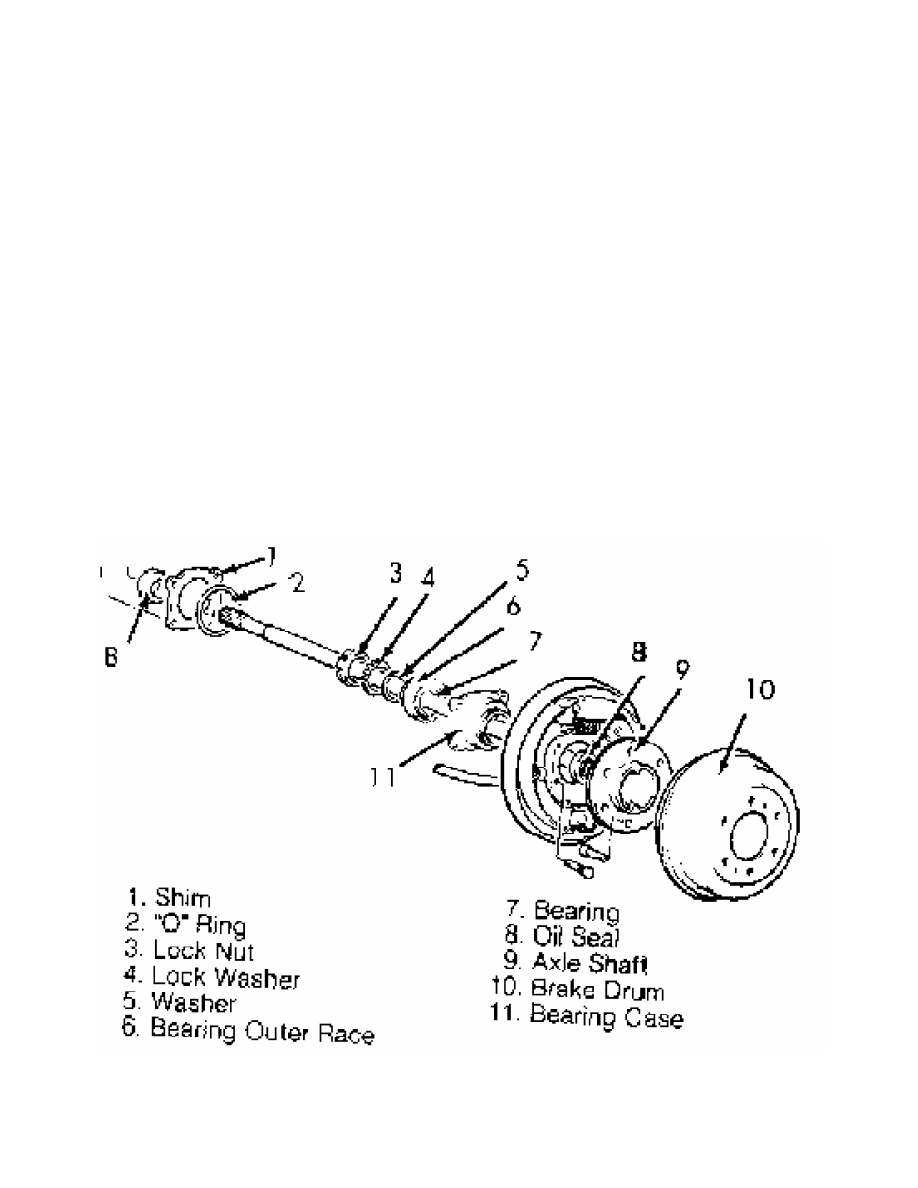
Fig. 1: Exploded View of Axle Shaft
Courtesy of Chrysler Motors.
Installation
1) Insert a new "O" ring and a shim of .04" (1.0 mm)
thickness into left side axle housing. Install left axle shaft
assembly into axle housing and tighten nuts to specification. See
TORQUE SPECIFICATIONS table at the end of this article.
2) Install right axle shaft assembly into axle housing
WITHOUT a shim or "O" ring. Temporarily tighten nuts in diagonal
sequence to 51.6 INCH lbs. (5.8 N.m) in 2 stages. Measure clearance
between bearing case and rear axle housing end with a feeler gauge.
3) Select shims equal to the sum of the thickness of the
measured clearance plus .0020-.0079" (.05-.20 mm). Remove right axle
shaft and install the selected shim(s) and "O" ring into right axle
housing end. Install right axle shaft assembly into rear axle housing.
Tighten nuts in diagonal sequence to specification. See TORQUE
SPECIFICATIONS table.
4) Using dial indicator, check end play of axle shaft. End
play must be .0020-.0079" (.05-.20 mm). If end play is not within
specification, change shim(s) to obtain correct end play. Reverse
removal procedure to install remaining components. Adjust parking
brake and bleed brake system.
DIFFERENTIAL CARRIER
Removal
Raise and support vehicle. Drain gear oil. Mark drive shaft
flange-to-pinion flange position. Remove drive shaft. Remove axle
shafts. See AXLE SHAFTS under REMOVAL & INSTALLATION. Support
differential carrier with jack. Remove differential carrier retaining
nuts. Remove differential carrier.
Inspection
Inspect for leakage at vent plug, differential carrier
companion flange and where carrier joins axle housing.
Installation
Apply sealant to axle housing surface. To install, reverse
removal procedure. Align marks on drive shaft and pinion flange.
DRIVE SHAFT
Removal
Make match marks on drive shaft yoke flange and pinion
flange. Remove bolts. Remove drive shaft from vehicle.
Installation
To install, reverse removal procedure. Ensure match marks are
aligned. Tighten bolts to specification. See TORQUE SPECIFICATIONS
table at end of article.
OVERHAUL
AXLE SHAFTS
Disassembly
1) Mount backing plate and axle shaft assembly in soft-jawed
vise. Bend over axle shaft bearing lock washer. Using Spanner Wrench
(MD990785), remove lock nut from axle shaft. Remove washers. Reinstall
lock nut on axle shaft approximately 3 turns.
2) Attach Bearing Puller (MB990787-01) to rear of backing
plate to remove bearing case from axle shaft. See Fig. 2. Using equal
pressure to avoid binding, tighten puller nuts diagonally to remove
bearing case. Using hammer and drift, remove bearing outer race from
bearing case. Remove oil seal from end of axle housing with Slide
Hammer and Adapter (MB990211).
Нет комментариевНе стесняйтесь поделиться с нами вашим ценным мнением.
Текст