Acura RL (1996-2004 year). Manual — part 445
NOTE: Do not position the check ball
in this hollow.
CHECK BALLS
CHECK BALLS
FILTERS
CHOKE
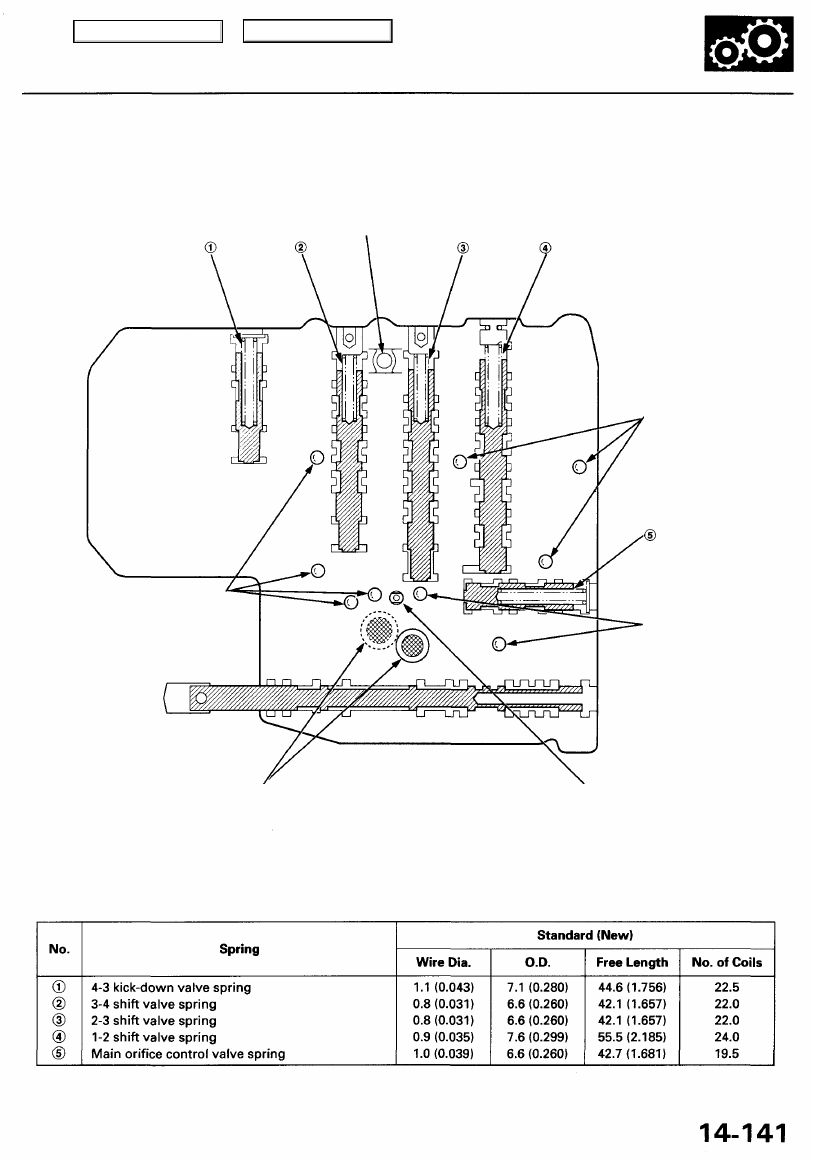
SPRING SPECIFICATIONS
Unit: mm (in)
CHECK BALLS
Main Menu
Table of Contents
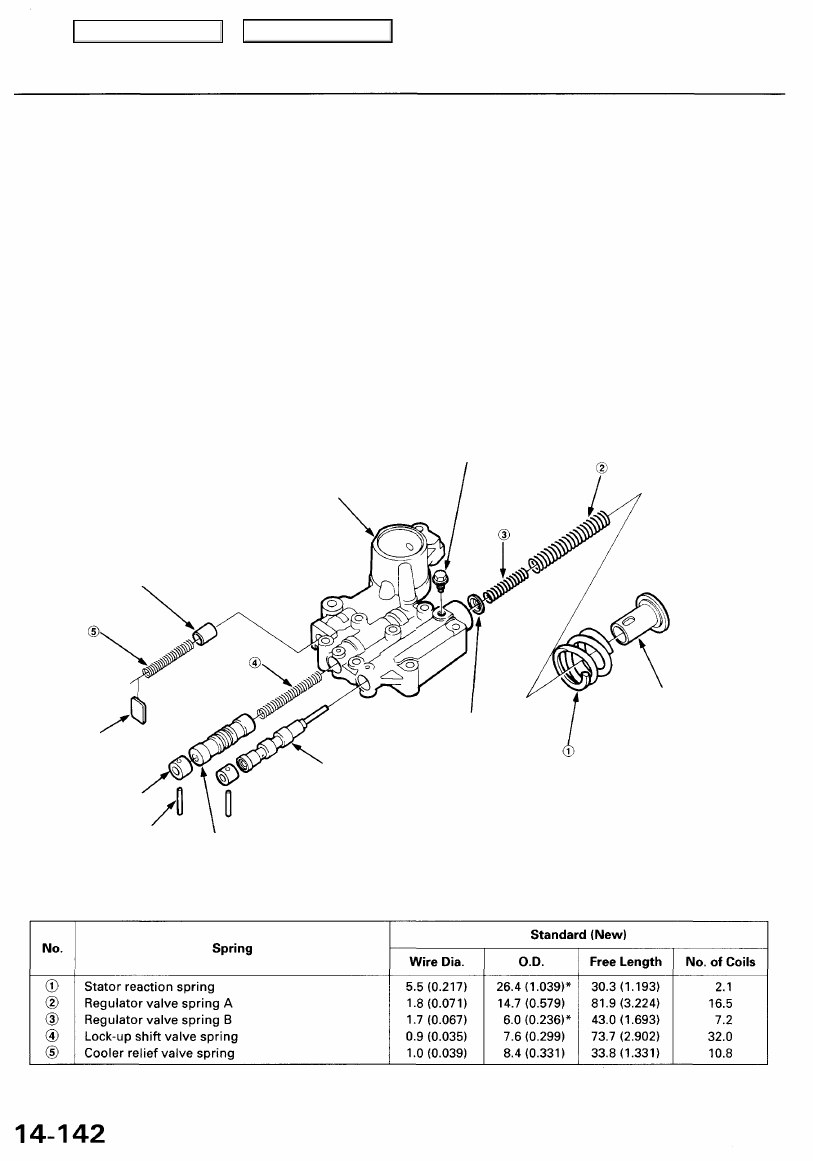
Regulator Valve Body
Disassembly/Inspection/Reassembly
NOTE:
• Clean all parts thoroughly in solvent or carburetor cleaner, and dry them with compressed air.
• Blow out all passages.
• Replace the valve body as an assembly if any parts are worn or damaged.
• Check all valves for free movement. If any fall to slide freely, see Valve Body Repair on page
1. Hold the regulator spring cap in place while removing the stop bolt. The regulator spring cap is spring loaded. Once the
stop bolt is removed, release the spring cap slowly so it does not pop out.
2. Reassembly is the reverse of disassembly.
NOTE:
• Coat all parts with ATP during assembly.
• Align the hole in the regulator spring cap with the hole in the valve body, then press the spring cap into the body
and tighten the stop bolt.
REGULATOR
VALVE BODY
Inspect for wear, scratches,
and scoring.
STOP BOLT
6 x 1.0 mm
12 N-m (1.2 kgf-m, 8.7 Ibf-ft)
COOLER RELIEF
VALVE
SPRING
SEAT
REGULATOR
SPRING CAP
VALVE CAP
LOCK-UP SHIFT VALVE
SPRING SPECIFICATIONS
Unit: mm (in)
*: Inside Diameter
REGULATOR
VALV E
REGULATO R
SPRING SEAT
ROLLER
Main Menu
Table of Contents
Accumulator Body
Disassembly/Inspection/Reassembly
NOTE:
• Clean all parts thoroughly in solvent or carburetor cleaner, and dry them with compressed air.
• Blow out all passages.
• Check all pistons for free movement. If any fail to slide freely, see Valve Body Repair on page
• Coat all parts with ATP during assembly.
• The 3rd accumulator and the 4th accumulator use the same size piston. The 3rd accumulator piston has the spring (3rd
accumulator spring C) at its bottom.
ATP FEED PIPE
8 x 57.5 mm
3 pcs.
ATP FEED PIPE 10 x 60 mm
ACCUMULATOR COVER
ATF FEED PIPE
8 x 40 mm
4 pcs.
ACCUMULATOR BODY
Inspect for wear, scratches,
and scoring.
3RD ACCUMULATOR PISTON
With spring (3rd accumulator spring)
at the bottom of the piston
DOWEL PIN
O-RING
Replace.
4TH ACCUMULATOR
PISTON
Without spring
O-RING
Replace.
3RD ACCUMULATOR
SPRING B
O-RING
Replace.
SPRING SPECIFICATIONS
Unit: mm (in)
O-RING
Replace.
Main Menu
Table of Contents
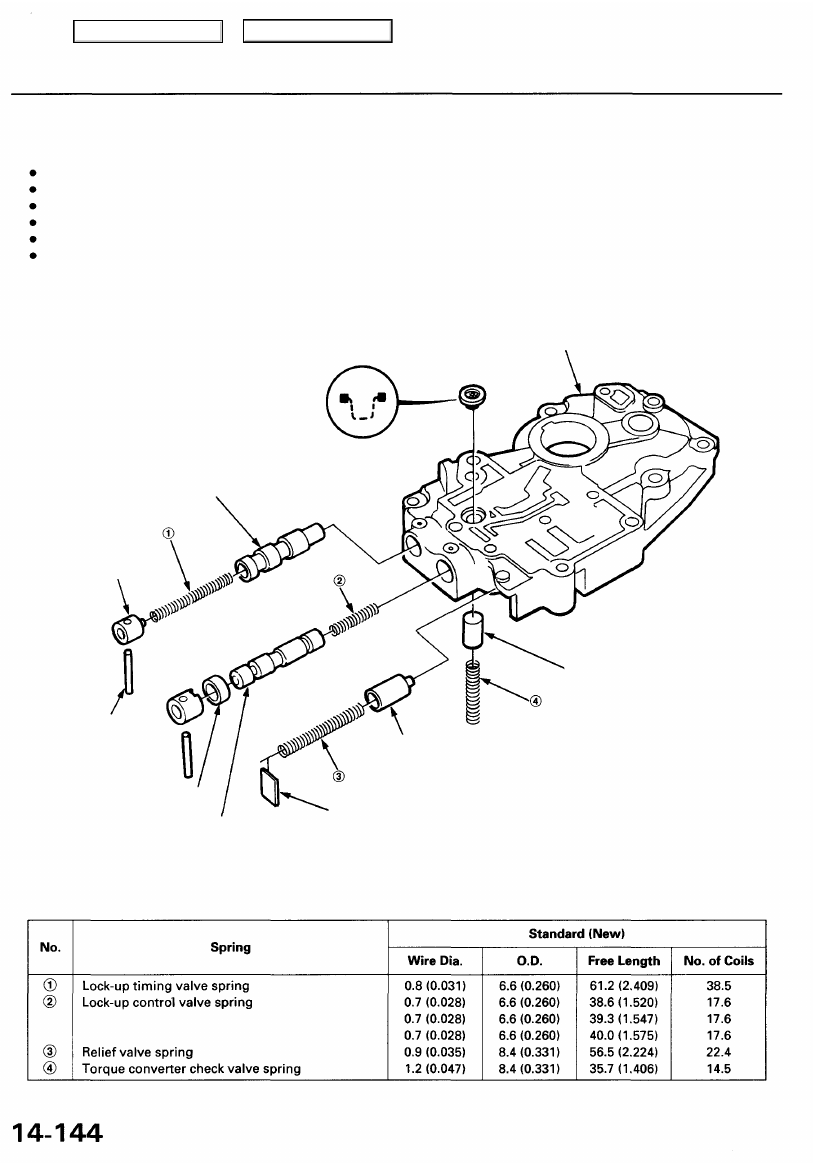
ATP Pump Body
Disassembly/Inspection/Reassembly
NOTE:
Clean all parts thoroughly in solvent or carburetor cleaner, and dry them with compressed air.
Blow out all passages.
Replace the valve body as an assembly if any parts are worn or damaged.
Check all valves for free movement. If any fail to slide freely, see Valve Body Repair on page
Coat all parts with ATP during assembly.
Install the filter in the direction shown.
FILTER
Replace.
ATP PUMP BODY
Inspect for wear, scratches,
and scoring.
LOCK-UP TIMING
VALVE
VALVE CAP
ROLLER
TORQUE CONVERTER
CHECK VALVE
SLEEVE
SPRING SEAT
LOCK-UP CONTROL VALVE
SPRING SPECIFICATIONS
Unit: mm (in)
RELIEF VALVE
Main Menu
Table of Contents
Нет комментариевНе стесняйтесь поделиться с нами вашим ценным мнением.
Текст