Acura RL (1996-2004 year). Manual — part 446

ATP Pump
Inspection
1. Install the ATP pump gears and ATP pump driven
gear shaft in the ATP pump body.
NOTE:
• Lubricate all parts with ATP during the inspec-
tion.
• Install the ATP pump driven gear with its grooved
and chamfered side facing up as shown.
ATP PUMP DRIVE
GEAR
ATF PUMP DRIVEN GEAR
Grooved and chamfered side
facing up.
ATF PUMP BODY
ATF PUMP DRIVEN
GEAR SHAFT
2. Measure the side clearance of the ATF pump drive
and driven gears.
ATF Pump Gears Side (Radial) Clearance:
Standard (New):
ATF Pump Drive Gear
0.210 - 0.265 mm (0.0083 - 0.0104 in)
ATF Pump Driven Gear
0.070 - 0.125 mm (0.0028 - 0.0049 in)
FEELER GAUGE
ATF PUMP
DRIVE GEAR
Inspect teeth for
wear or damage.
ATF PUMP
DRIVEN GEAR
Inspect teeth for
wear or damage.
3. Remove the ATF pump driven gear shaft. Measure
the thrust clearance of the ATF pump driven gear-
to-valve body, with a straight edge and a feeler
gauge.
ATF Pump Drive/Driven Gear Thrust (Axial) Clearance:
Standard (New): 0.03 - 0.05 mm (0.001 - 0.002 in)
Service Limit: 0.07 mm (0.003 in)
STRAIGHT
EDGE
FEELER
GAUGE
Main Menu
Table of Contents
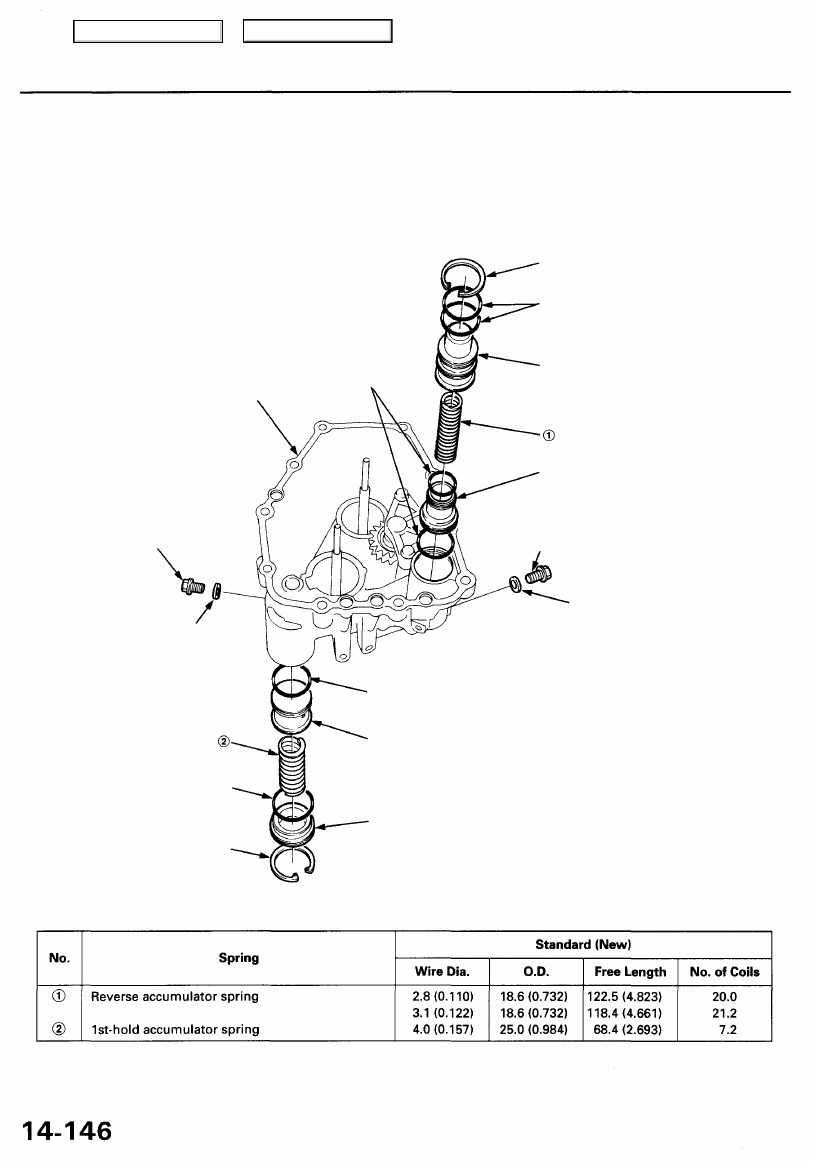
Reverse Accumulator/1st-hold Accumulator
Disassembly/Inspection/Reassembly
NOTE:
• Clean all parts thoroughly in solvent or carburetor cleaner, and dry them with compressed air.
• Blow out all passages.
• Replace the O-rings.
• Check all pistons for free movement. If any fail to slide freely, see Valve Body Repair on page
• Coat all parts with ATP during assembly.
SNAP RING
O-RINGS
Replace.
REAR COVER
SEALING BOLT
8 x 1.25 mm
18 N-m (1.8 kgf-m,
13 Ibf-ft)
SEALING WASHER
Replace.
O-RING
Replace.
SNAP RING
1ST-HOLD ACCUMULATOR
PISTON
1ST-HOLD ACCUMULATOR
SLEEVE
REVERSE ACCUMULATOR
SLEEVE
REVERSE ACCUMULATOR
PISTON
SEALING BOLT
8 x 1.25 mm
18 N-m (1.8 kgf-m, 13 Ibf-ft)
SEALING WASHER
Replace.
SPRING SPECIFICATIONS
Unit: mm (in)
O-RINGS
Replace.
O-RING
Replace.
Main Menu
Table of Contents
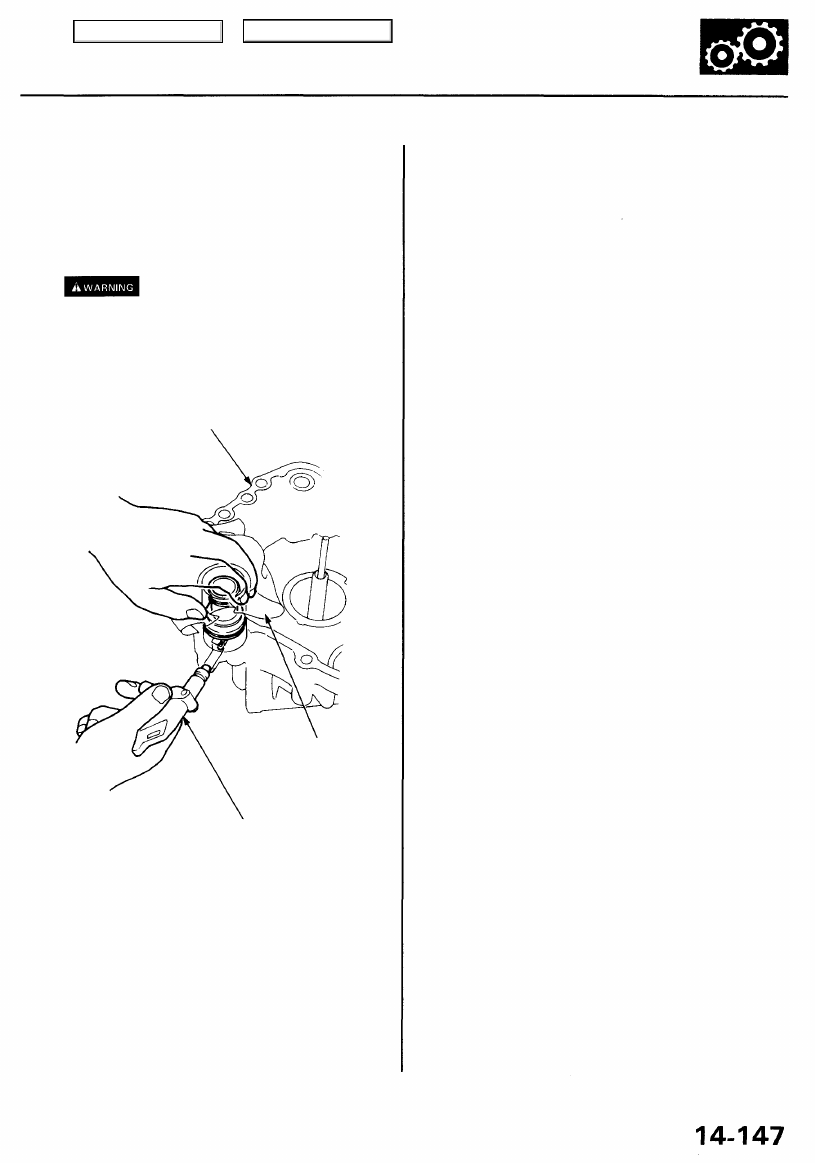
Accumulator Piston Removal
1. Remove the snap ring.
2. Remove the accumulator sleeve and spring.
3. Wrap a shop towel around the accumulator piston,
and apply air pressure to the fluid passage to remove
the piston.
• Do not place your fingers in front of piston.
• Do not use high air pressure; use an OSHA
approved 30 PSI nozzle.
REAR COVER
SHOP TOWEL
COMPRESSED AIR
HOSE NOZZLE
OSHA-Approved 30 psi
type only.
Main Menu
Table of Contents
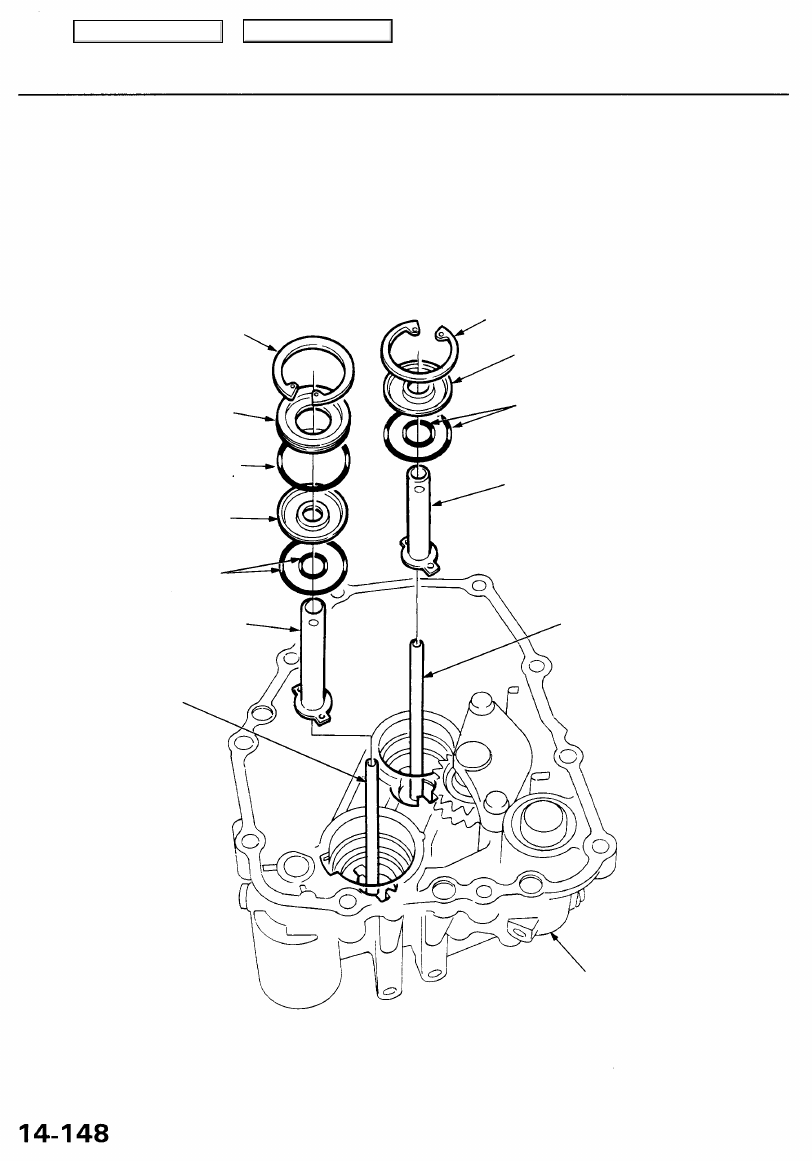
Rear Cover/Clutch Feed Pipes
Disassembly/Inspection/Reassembly
NOTE:
• Clean all parts thoroughly in solvent or carburetor cleaner, and dry with compressed air.
• Blow out all passages.
• Replace the O-rings.
• Coat all parts with ATF during assembly.
SNAP RING
ATF FEED
GUIDE
O-RING
Replace
FEED PIPE
GUIDE
1ST-HOLD CLUTCH
FEED PIPE
SNAP RING
FEED PIPE GUIDE
O-RINGS
Replace.
2ND CLUTCH
FEED PIPE
1ST CLUTCH
FEED PIPE
REAR COVER
REVERSE CLUTCH
FEED PIPE
O-RINGS
Replace.
Main Menu
Table of Contents
Нет комментариевНе стесняйтесь поделиться с нами вашим ценным мнением.
Текст