Acura RL (1996-2004 year). Manual — part 448
Mainshaft
Inspection (cont'd)
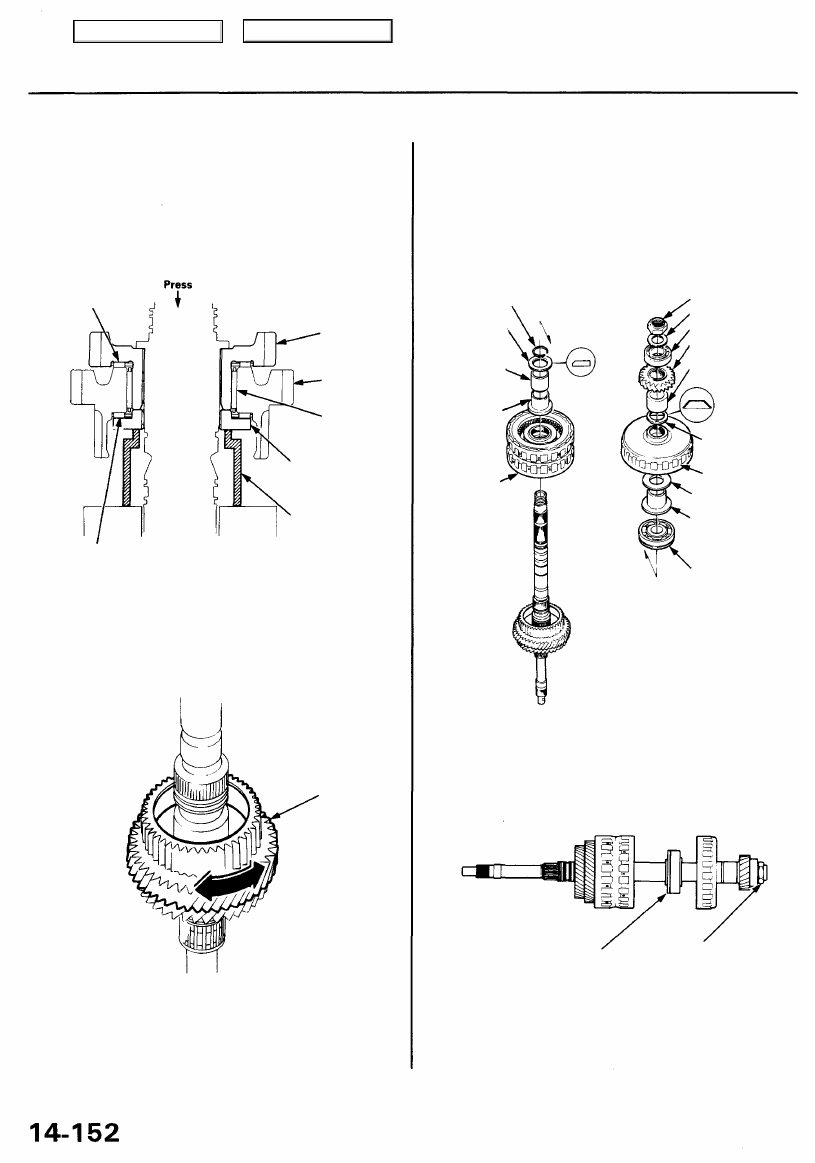
2. Assemble the thrust needle bearing, needle bear-
ing, and 4th gear, then install the 43 x 74 mm thrust
washer using the special tool and a press as shown.
NOTE: Replace the 43 x 74 mm thrust washer if you
can install it by pressing it with your hand.
THRUST
NEEDLE
BEARING
3RD GEAR
4TH GEAR
NEEDLE
BEARING
THRUST WASHER,
43 x 74 mm
ATTACHMENT,
45 x 55 mm I.D.
THRUST NEEDLE
BEARING
3. Spin the mainshaft 4th gear by hand to check for
clearance. The clearance is normal if the gear turns
freely without binding.
4TH GEAR
4. Remove the mainshaft bearing from the transmis-
).
5. Assemble the parts below on the mainshaft.
NOTE: Do not install the O-rings and the mainshaft
1st gear on the mainshaft during inspection.
1ST/4TH
CLUTCH
LOCKNUT
WASHER
BALL BEARING
REVERSE GEAR
REVERSE GEAR
DISTANCE COLLAR
CONICAL SPRING
WASHER
2ND GEAR COLLAR
TRANSMISSION
HOUSING BEARING
6. Torque the mainshaft locknut to 29 N-m (3.0 kgf-m,
22 Ibf-ft).
TRANSMISSION
HOUSING BEARING
LOCKNUT
29 N-m
(3.0 kgf-m, 22 Ibf-ft)
7. Move the 1st/4th clutch assembly to check the axial
clearances.
SNAP RING
THRUST
WASHER
1ST GEAR
DISTANCE
COLLAR
1ST GEAR
COLLAR
THRUST WASHER
2ND CLUTCH
Main Menu
Table of Contents
8. Measure the clearance between the 1st/4th clutch
guide and 1st gear collar with a feeler gauge.
STANDARD: 0 - 0.08 mm (0 - 0.003 in)
NOTE: Take measurements in at least three places,
and use the average as the actual clearance.
CLUTCH GUIDE
1ST GEAR COLLAR
1ST/4TH CLUTCH
ASSEMBLY
FEELER GAUGE
THRUST WASHER,
43 x 74 mm
1ST GEAR COLLAR
1ST/4TH CLUTCH
ASSEMBLY
FEELER GAUGE
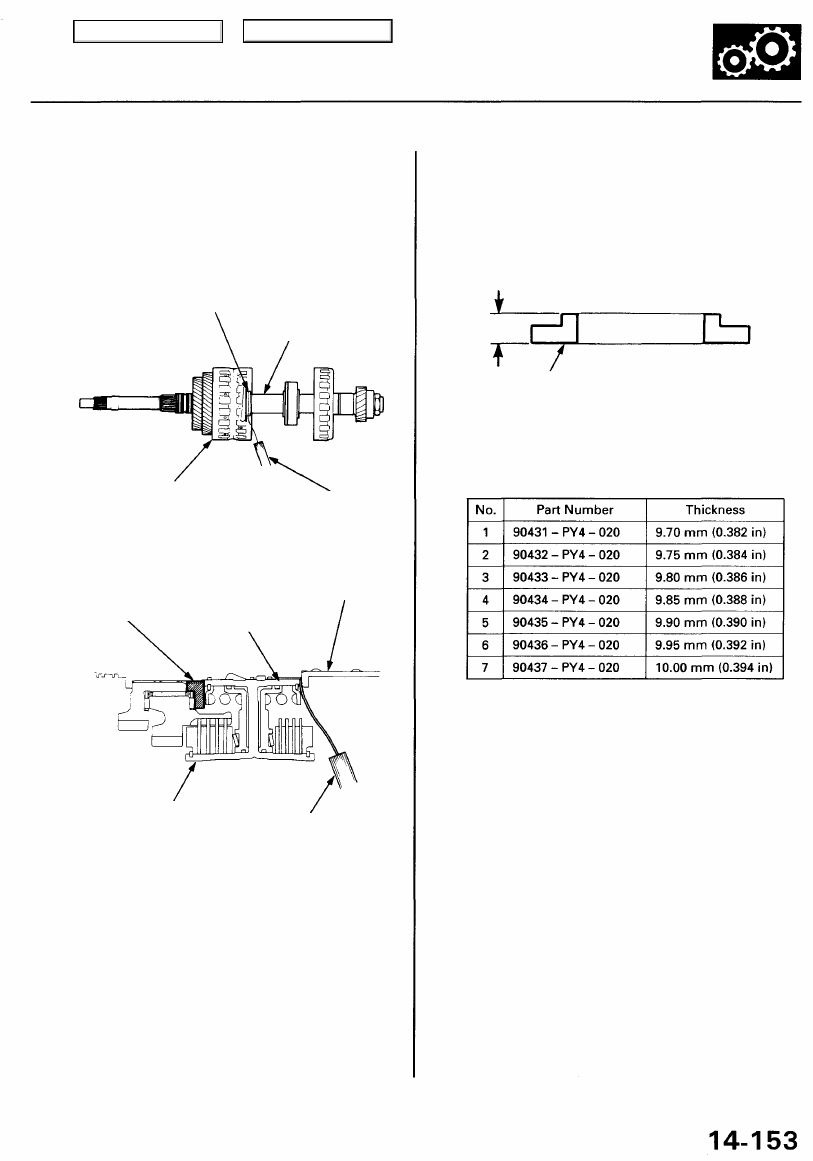
9. If the clearance is out of tolerance, remove the
43 x 74 mm thrust washer, and measure its thick-
ness.
NOTE: If the 0.08 mm (0.003 in) feeler gauge can be
inserted, perform this step.
Thickness
10. Select and install a new 43 x 74 mm thrust washer,
then recheck the clearance.
11. After replacing the 43 x 74 mm thrust washer, make
sure that the clearance is within the tolerance.
CLUTCH GUIDE
THRUST WASHER,
43 x 74 mm
THRUST WASHER, 43 x 74 mm
Main Menu
Table of Contents

Mainshaft
Sub-assembly
NOTE:
• Lubricate all parts with ATF during assembly.
• Before installing the O-rings, wrap the shaft splines
with tape to prevent damage to the O-rings.
• Assemble the mainshaft sub-assembly when assem-
bling the transmission.
and
, when installing the
3rd gear, 4th gear, and 43 x 74 mm thrust washer.
Assemble the parts below on the mainshaft.
THRUST WASHER
THRUST NEEDLE
BEARING
THRUST WASHER,
43 x 74 mm
MAINSHAFT
SNAP RING
1ST GEAR
NEEDLE BEARINGS
THRUST NEEDLE BEARING
1ST GEAR DISTANCE COLLAR
1ST GEAR COLLAR
1ST/4TH CLUTCH
ASSEMBLY
O-RINGS
Replace.
THRUST NEEDLE BEARING
4TH GEAR
NEEDLE BEARING
THRUST NEEDLE BEARING
3RD GEAR
Main Menu
Table of Contents
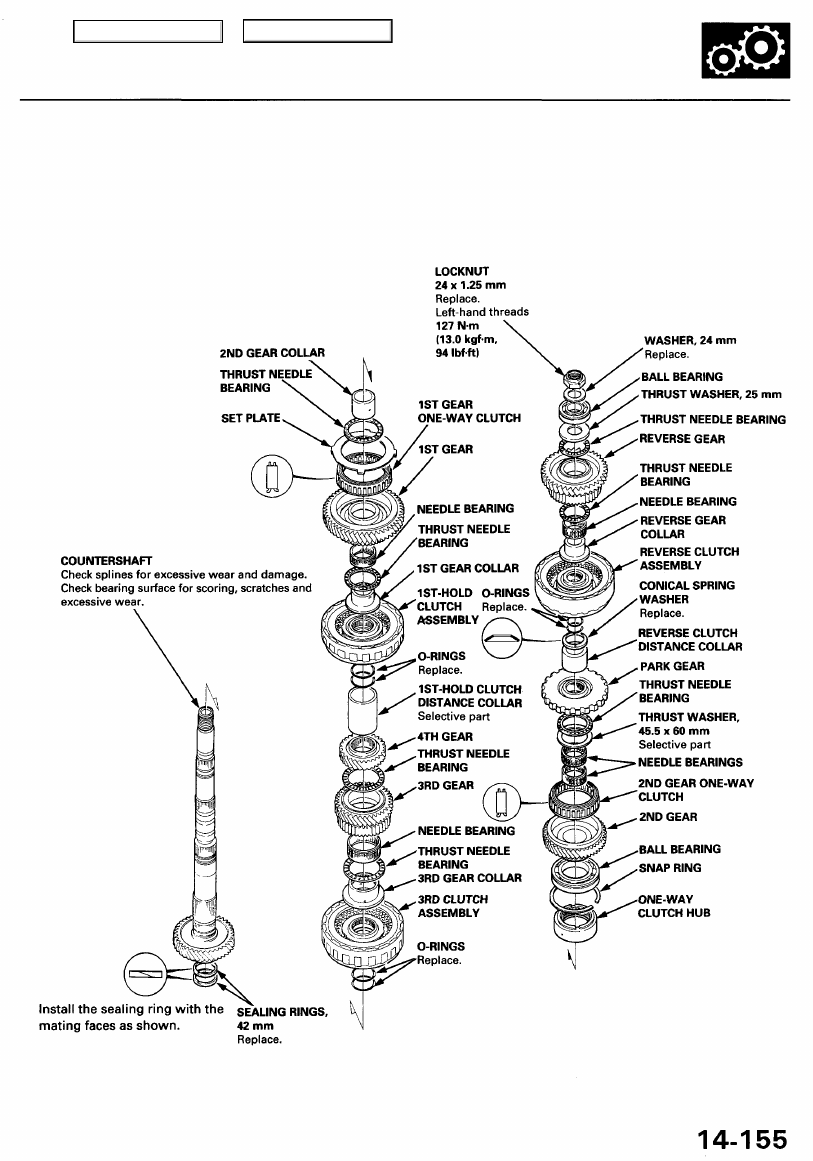
Countershaft
Disassembly/lnspection/Reassembly
NOTE:
• Lubricate all parts with ATF during reassembly.
• Inspect the thrust needle bearings and the needle bearings for galling and rough movement.
• Before installing the O-rings, wrap the shaft splines with tape to prevent damage to the O-rings.
• The locknut has left-hand threads.
Main Menu
Table of Contents
Нет комментариевНе стесняйтесь поделиться с нами вашим ценным мнением.
Текст