Acura RL (1996-2004 year). Manual — part 579

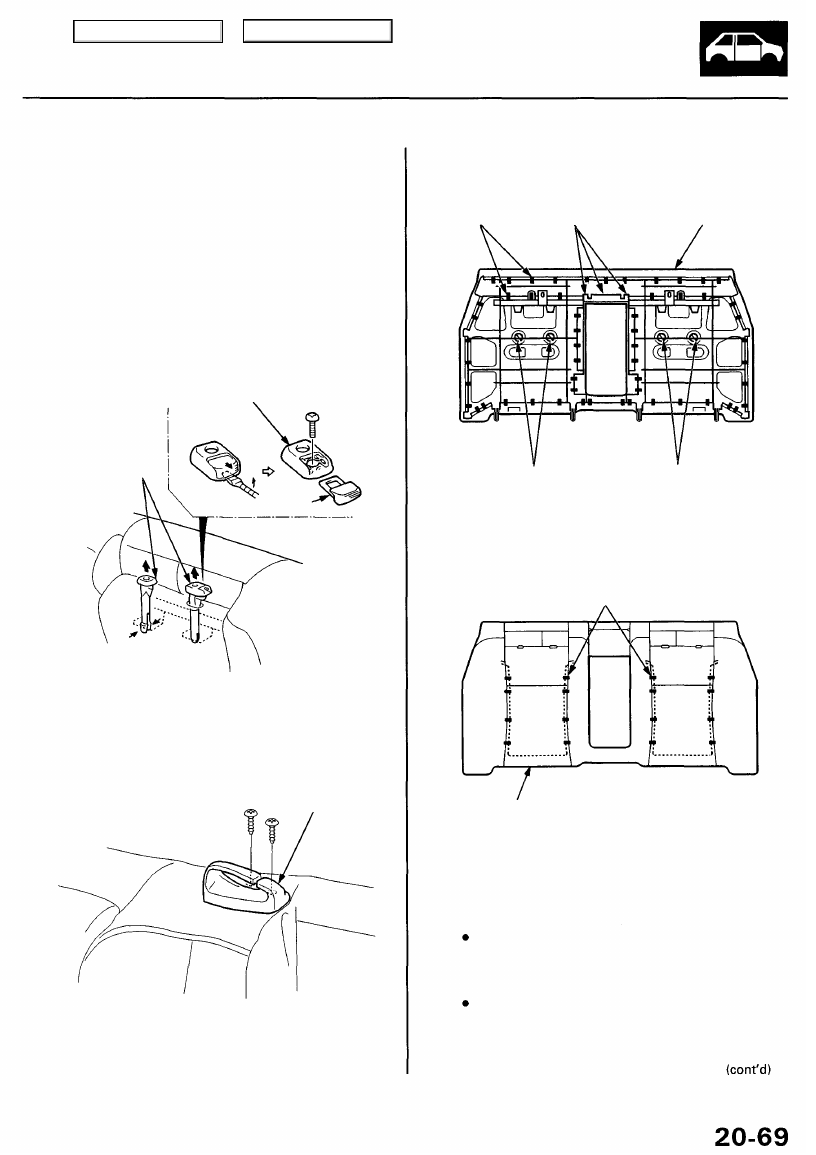
Rear Seat
Removal
NOTE: Take care not to scratch the seat covers and body.
Disassemble in numbered sequence.
: Bolt locations
HEADREST
CENTER SEAT
BELT GUIDE
('98 - 01 models)
4
6 x 1.0 mm
9.8 N-m (1.0 kgf-m,
7.2 Ibf-ft)
6 x 1.0 mm
9.8 N-m (1.0 kgf-m,
7.2 Ibf-ft)
: Hook, clip locations
HOOK
BUSHING
HEADREST
A
Remove the clips from
the trunk area.
SLITS
SEAT CUSHION
Armrest removal:
Installation is the reverse of the removal procedure.
NOTE:
Before attaching the seat-back and seat cushion,
make sure there are no twists or kinks in the rear
seat belts and center belt.
When installing the seat cushion, slip the seat belt
buckles through the slits in the seat cushion.
SEAT-BACK
TRUNK
HOOKS PASS-THROUGH
COVER
ARMREST
6 x 1.0 mm
9.8 N-m (1.0 kgf-m,
7.2 Ibf-ft)
SEAT-BACK
B
2
A
KNOB
COLLAR
2
B
HOOK
2
c
A
Main Menu
Table of Contents
Rear Seat
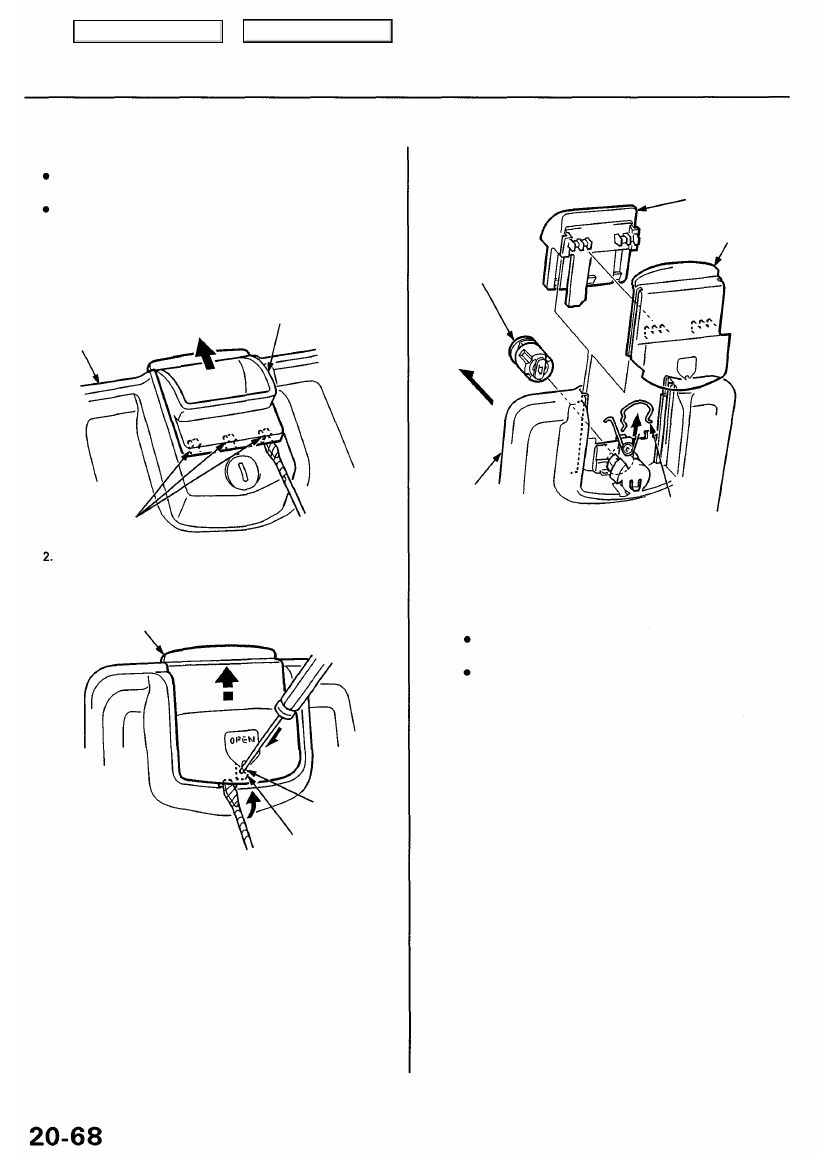
Trunk Pass-through Cover Key Cylinder Replacement
NOTE:
When prying with a flat-tip screwdriver, wrap it with
protective tape to prevent damage.
Take care not to scratch the cover.
1. Using a flat-tip screwdriver, pry the rear seat handle
up at either hook portion on forward side of the
trunk pass through cover. Then slide the handle
half-way up.
TRUNK
PASS-THROUGH
COVER
REAR SEAT HANDLE
HOOKS
From trunk compartment side of the cover, using a
small screwdriver, press the inside hook down
through the access hole.
TRUNK HANDLE
ACCESS
HOLE
3.
HOOK
While pressing the hook, pry the trunk handle up
with a flat-tip screwdriver.
4. Remove the trunk handle and rear seat handle
together at the same time.
REAR SEAT
HANDLE
TRUNK
PASS-THROUGH
COVER KEY
CYLINDER
Forward
TRUNK HANDLE
TRUNK
PASS-THROUGH
COVER
RETAINER
CLIP
5. Remove the retainer clip, then remove the trunk
pass-through cover key cylinder from the cover.
6. Install the key cylinder in the reverse order of
removal, and note these items:
Put the two handles together before installing
them on the trunk pass-through cover.
Make sure the trunk pass-through cover opens
properly and locks securely.
Main Menu
Table of Contents
Seat Cover Replacement
CAUTION: Put on gloves to protect your hands.
NOTE: Take care not to tear the seams or damage the
seat covers.
Seat-back cover:
1. Remove the seat-back (see page
).
2. Remove the armrest lid and armrest (see page
).
3. Remove the headrest guides.
HEADREST
GUIDES
HEADREST
GUIDE
4. Remove the center seat belt guide ('98 - 01 models).
CENTER SEAT
BELT GUIDE
5. Loosen the seat-back cover by releasing all the
clips, hooks, and inside springs.
CLIPS
HOOKS
SEAT-BACK
COVER
INSIDE
SPRINGS
INSIDE
SPRINGS
6. Pull back the edge of the seat-back cover all the way
around, release the clips, and remove the seat-back
cover.
CLIPS
SEAT-BACK
COVER
7. Installation is the reverse of the removal procedure.
NOTE:
To prevent wrinkles when installing a seat-back
cover, make sure the material is stretched evenly
over the pad before securing the hooks, clips and
inside springs.
Replace the released clips with new ones.
KNOB
Main Menu
Table of Contents
Rear Seat
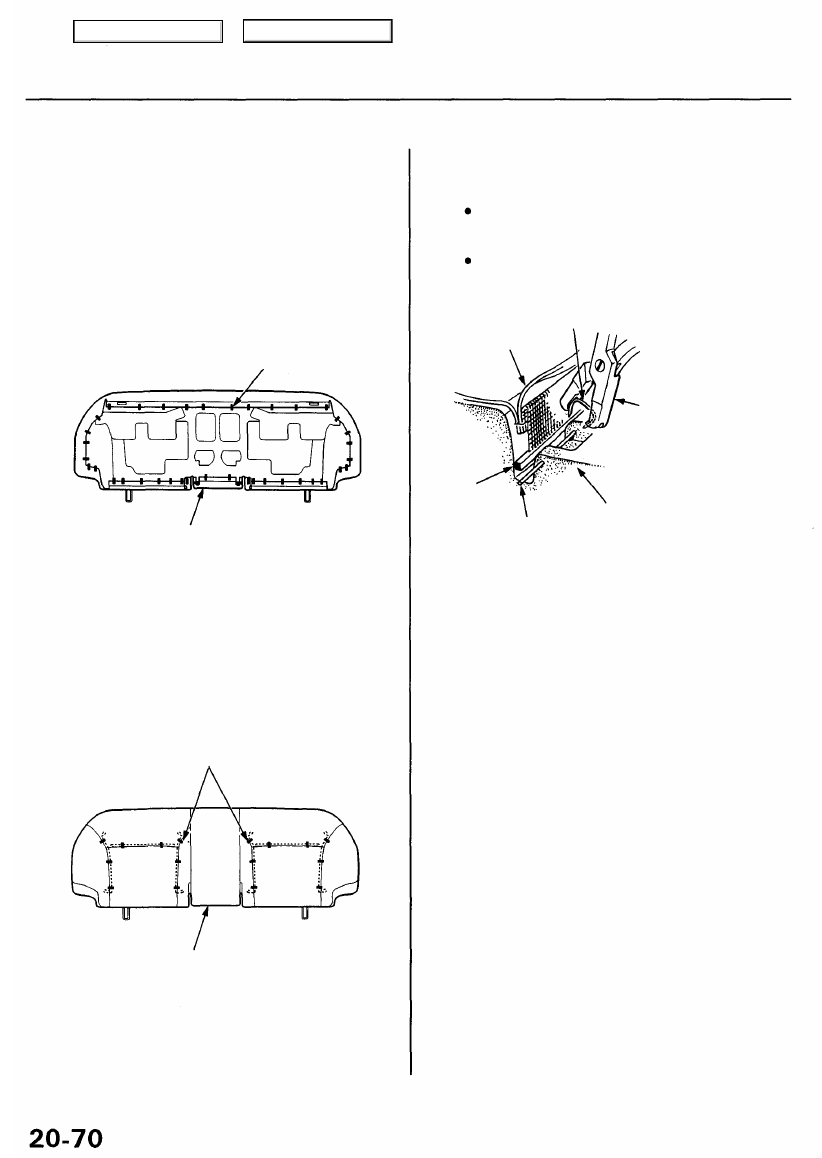
Seat Cover Replacement (cont'd)
Seat cushion cover:
1. Remove the seat cushion (see page
).
2. Loosen the seat cushion cover by releasing all the
clips.
CLIP
SEAT CUSHION
COVER
3. Pull back the edge of the seat cushion cover all the
way around, release the clips, and remove the seat
cushion cover.
CLIPS
SEAT CUSHION
COVER
4. Installation is the reverse of the removal procedure.
NOTE:
To prevent wrinkles when installing a seat cush-
ion cover, make sure the material is stretched
evenly over the pad before securing the clips.
Replace the released clips with new ones.
SEAT
COVER
NEW CLIP
UPHOLSTERY RING PLIERS
(Commercially available)
ROD
(Cover side)
PAD
WIRE
(Pad side)
Main Menu
Table of Contents
Нет комментариевНе стесняйтесь поделиться с нами вашим ценным мнением.
Текст