Acura TL (1995-1998) body repair. Manual — part 18
Rear Floor
Replacement
1. Remove the related parts.
• Rear seat
• Trim and other luggage compartment fittings
• Left and right rear suspension assembly
• Parking brake parts
• Muffler
• Wire harness
• Other parts as necessary
• Fuel tank and fuel pipes
Do not smoke while working near
the fuel system. Keep open flame away from the fuel
system. If necessary, remove the fuel tank and/or
lines before welding nearby. Drain fuel into an
approved container.
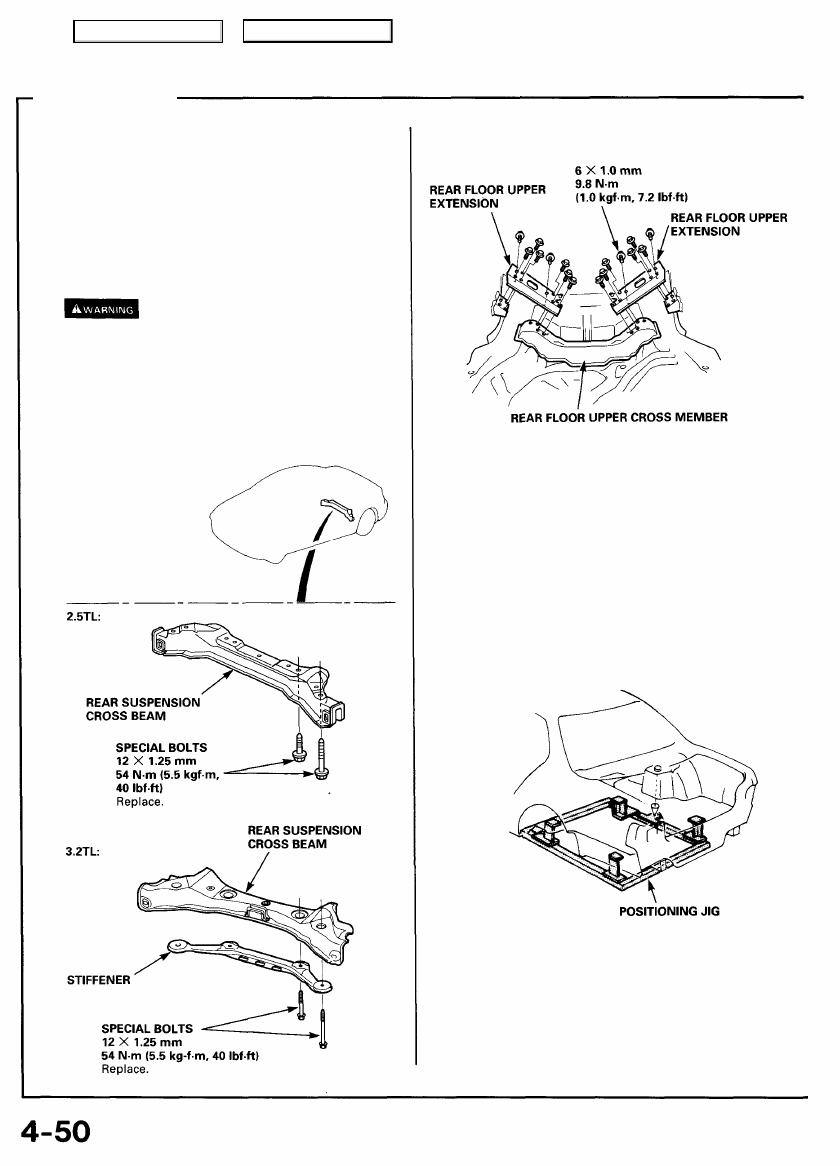
2. Remove the rear suspension cross beam.
3. Remove the rear floor upper extensions.
4. Pull out and straighten the damaged area.
• Check whether the damage extended to the rear
floor cross member, rear wheelhouse and the pas-
senger compartment, and pull out the damaged
parts using the frame corrector.
• Impact damage to the rear floor spreads to related
parts such as the rear frame, rear floor cross member
and rear wheelhouse.
• Therefore, pull out the damaged areas with the
frame straightener and measure in reference to body
dimensional drawing.
NOTE: Use of a positioning jig is recommended (see
page
).
5. Peel off the undercoat.
Heat the undercoat at the weld areas of the lower rear
floor with a gas torch and peel off the undercoat with a
metal spatula.
CAUTION: Be careful not to burn the fittings inside the
trunk compartment while heating.
6. Cut and pry off the rear panel (see page
).
Main Menu
Table of Contents
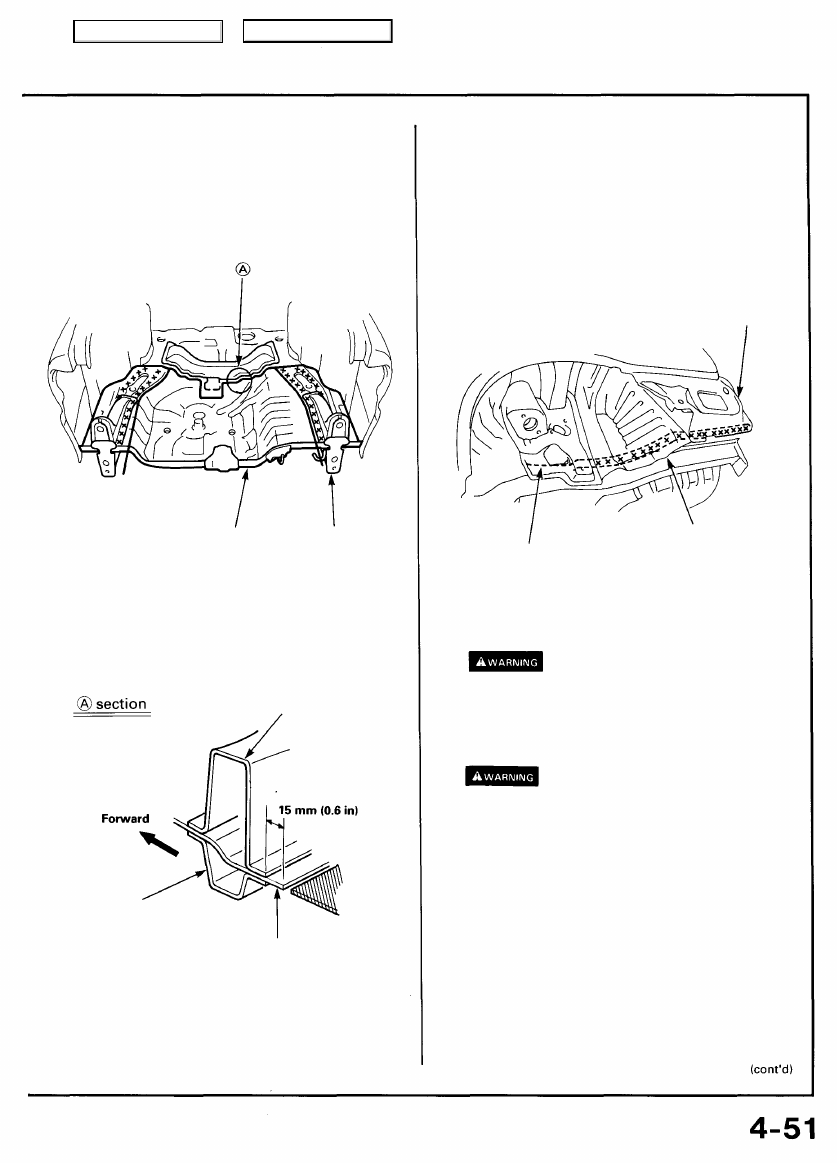
7. Cut and pry off the rear floor.
• Cut off the rear floor with a gas cutter or air chisel.
Level the spot welded flanges of the rear side frame
and rear floor cross member, as shown by the bold
line in the figure below.
REAR FLOOR
REAR FRAME
NOTE: Cut the rear floor 15 mm (0.6 in) from the welded
flange of the rear floor upper cross member.
REAR FLOOR UPPER
CROSS MEMBER
REAR FLOOR
CROSS MEMBER
REAR FLOOR
• Center punch around the spot weld imprints on the
remaining welded flanges. Do the same with the rear
wheelhouse and the side of the rear end inner panel.
• Drill holes with a spot cutter.
NOTE: When drilling holes, be careful not to drill down
to the rear frame.
• Pry off the flanges using a chisel.
OUTER PANEL
REAR INNER PANEL
REAR WHEELHOUSE
8. Mold the related parts.
• Remove the burrs from the spot weld or MIG weld
using a sander.
To prevent eye injury, wear goggles
or safety glasses whenever sanding, cutting or
grinding.
• Fill any holes made in the spot welded areas of the
flange by MIG or gas welding.
To prevent eye injury and burns
when welding, wear an approved welding helmet,
gloves and safety shoes.
Main Menu
Table of Contents

Rear Floor
Replacement (cont'd)
• Smooth the welding flanges of the rear frame with a
hammer and dolly.
NOTE: Check that the rear frame is parallel at the right
and left.
REAR FLOOR UPPER
CROSS MEMBER
REAR FRAME
REAR FLOOR
CROSS MEMBER
• Center punch the spot weld imprints on the rear floor
upper cross member welded flange.
• Drill holes with a spot cutter at the areas joined to the
rear floor upper cross member and rear floor.
NOTE: When drilling holes be careful not to drill down to
the rear floor.
REAR FLOOR
UPPER CROSS
MEMBER
REAR FLOOR
REAR FLOOR
CROSS MEMBER
• Pry off the welded flange sections using a chisel.
REAR FLOOR UPPER
CROSS MEMBER
REAR FLOOR
9. Keep the body level.
Jack-up the body at the front and back. Place safety
stands at the four designated places of the side sill.
10. Set the repair part.
• Cut the new rear floor to align it with the body.
NOTE: Cut the new part so it overlaps the body side floor
by approximately 40 mm (1.6 in).
Remove the undercoat from both sides of the areas
to be welded with a sander to expose the steel plate.
To prevent eye injury, wear goggles
or safety glasses whenever sanding, cutting or
grinding.
REPAIR PART
Main Menu
Table of Contents
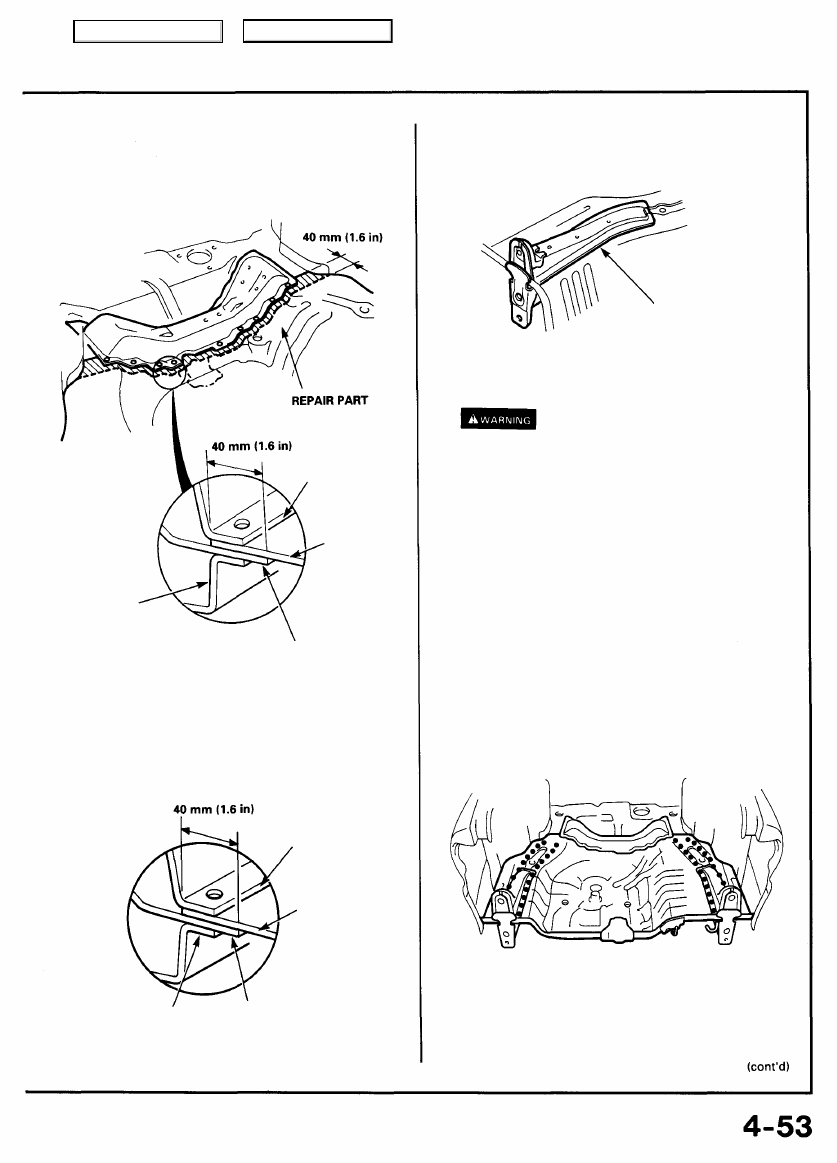
• Insert the repair part between the rear floor and rear
floor upper cross member.
• Check that the weld flange surfaces fit closely.
REAR FLOOR
UPPER CROSS
MEMBER
REPAIR
PART
REAR FLOOR
CROSS MEMBER
REAR
FLOOR
• Check the position of the rear floor and rear frames using
the body dimensional drawings (see
) and the
positioning jig.
REAR FLOOR
UPPER CROSS
MEMBER
REPAIR
PART
REAR FLOOR REAR FLOOR
CROSS MEMBER
11. Set the rear floor upper stiffener, and check the rear panel
position.
REAR FLOOR
UPPER
STIFFENER
12. Perform the main welding.
To prevent eye injury and burns
when welding, wear an approved welding helmet,
gloves and safety shoes.
Spot welding:
NOTE: Apply the spot sealer to the welding surface when
spot welding.
• Recheck the position of the rear frames and rear floor,
then weld the repair part and rear frames.
• Make 20% to 30% more spot welds than there were
holes drilled.
MIG welding:
• Drill the holes for welding the repair part.
• Check the rear frame position and weld the repair part
to the rear frames.
Main Menu
Table of Contents
Нет комментариевНе стесняйтесь поделиться с нами вашим ценным мнением.
Текст