Defender (1999-2002). Manual — part 98

CHASSIS AND BODY
21
REPAIR
29. Remove 2 screws securing each footwell vent
and remove vents from lower fascia.
30. Remove screw securing each door check strap
cover and remove both covers.
31. Remove 3 screws securing wiper motor cover to
bulkhead.
32. Remove wiper motor cover.
33. Remove 3 screws securing finisher rail to lower
fascia.
34. Remove finisher rail.
76
CHASSIS AND BODY
22
REPAIR
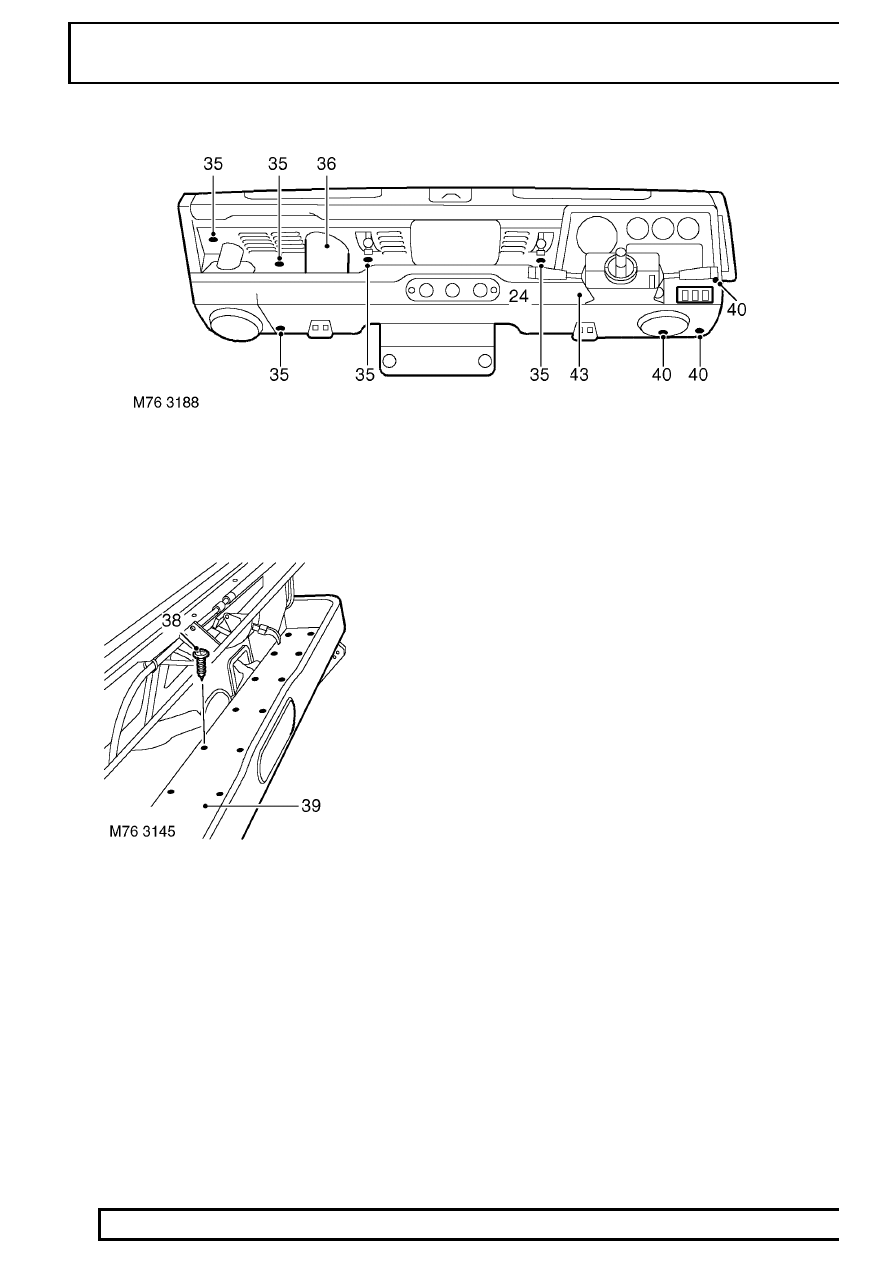
35. Remove 7 trim clips securing trim upper fascia
trim casing to bulkhead.
36. Carefully fold back trim casing over fresh air vent
operating levers and remove.
37. Release demist hose from parcel shelf.
38. Remove 18 screws securing parcel shelf to
lower fascia panel.
39. Remove parcel shelf.
40. Remove 7 screws securing bottom edge of lower
fascia panel to bulkhead.
41. Remove both retaining plates and lower footwell
covers.
42. Remove 2 bolts securing top of lower fascia to
bulkhead.
43. With assistance, remove lower fascia.
Refit
44. With assistance, fit lower fascia.
45. Fit 2 bolts securing top of lower fascia to
bulkhead.
46. Fit both retaining plates and footwell covers to
lower fascia.
47. Fit 7 screws securing bottom edge of lower
fascia to bulkhead.
48. Fit parcel shelf to lower fascia and secure with
screws.
49. Fit demist hose to parcel shelf.
50. Carefully manoeuvre upper fascia trim casing
over fresh air vents and fit to fascia.
51. Fit trim clips securing trim casing to bulkhead.
52. Fit finisher rail to lower fascia and secure with
screws.
53. Fit wiper motor cover and secure with screws.
54. Fit both door check strap covers and secure with
screws.
55. Fit both footwell vents to lower fascia and secure
with screws.
56. Fit interior fuse box cover.
57. Fit auxilliary switch panel cover.
58. Fit auxilliary switch panel. See this Section.

CHASSIS AND BODY
23
REPAIR
59. Fit radio housing to fascia and secure with trim
studs.
60. Position radio to fascia and connect multiplugs
and aerial.
61. Fit radio to fascia.
62. Fit crash pad to fascia and secure with screws.
63. Fit both demister vents to crash pad and secure
with screws.
64. Fit grab handle to fascia and secure with screws.
65. Fit Land Rover decal to grab handle.
66. Position both front speakers to fascia and
connect multiplugs.
67. Fit speakers to fascia and secure with screws.
68. Fit locking rings to speakers.
69. Connect multiplugs and Lucars to HRW, Rear
Fog Guard Lamp, and Hazard Warning
Switches.
70. Fit switches to fascia.
71. Position heater controls to fascia and secure
with screws.
72. Fit instrument pack. See ELECTRICAL,
Repair.
73. Fit 2 halves of nacelle to steering column and
secure with screws.
74. Fit steering wheel. See STEERING, Repair.
75. Reconnect battery negative lead.
PANEL - MOUNTING - FRONT DOOR - FROM 02MY
Service repair no - 76.11.28
Remove
1. Remove plastic sheet. See this Section.
2. Lower glass and remove 2 bolts securing door
glass to regulator.
3. Release glass from regulator, raise and wedge
in raised position.

76
CHASSIS AND BODY
24
REPAIR
4. Release clip, detach and remove lock solenoid
link.
5. Loosen 2 screws securing solenoid, release
solenoid from mounting panel, disconnect
multiplug and remove solenoid.
6. Release clip and disconnect interior handle link
from latch mechanism.
7. Release clips securing harness to panel.
8. Disconnect multiplug from motor.
9. Release harness sleeve and withdraw harness
from door.
10. Remove 6 bolts and 1 nut securing panel.
11. Remove panel assembly.
Нет комментариевНе стесняйтесь поделиться с нами вашим ценным мнением.
Текст