Defender (1999-2002). Manual — part 133

86
ELECTRICAL
4
REPAIR
Refit
12. Clean mating face of alternator and vacuum
pump.
13. Fit vacuum pump to alternator and tighten bolts
to 10 Nm (7 lbf.ft) .
14. Position alternator and connect multiplug.
15. Connect vacuum hose and oil drain hose to
vacuum pump and secure clip.
16. With assistance align alternator to mounting
bracket and fit but do not tighten bolt.
17. Fit bolt securing support stay to alternator and
tighten to 25 Nm (18 lbf.ft) .
18. Tighten alternator to mounting bracket bolt to 45
Nm (33 lbf.ft).
19. Using new ’O’ ring, fit and tighten lubrication pipe
union to 10 Nm (8 lbf.ft) .
20. Connect lead to alternator and tighten nut to 6
Nm (4.4 lbf.ft) .
21. Fit auxilliary drive belt tensioner and tighten bolt
to 50 Nm (37 lbf.ft) .
22. Fit auxilliary drive belt. See this Section.
HORN - LH
Service repair no - 86.30.10
Remove
1. Remove LH headlamp. See this Section.
2. Disconnect horn multiplug.
3. Remove nut and remove horn from mounting
bracket.
Refit
4. Position horn, tighten securing and connect
multiplug.
5. Fit LH headlamp. See this Section.
ELECTRICAL
5
REPAIR
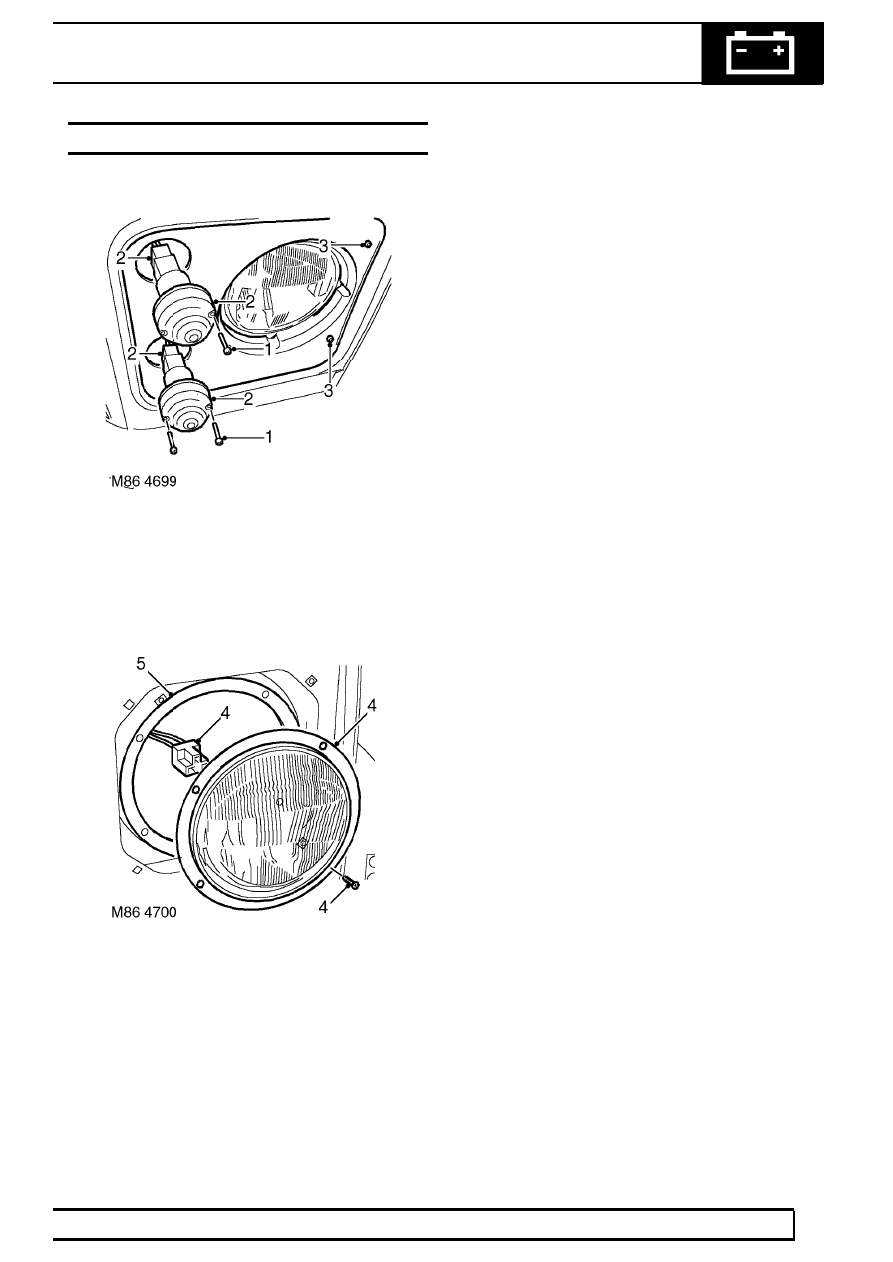
HEADLAMP
Service repair no - 86.40.49
Remove
1. Remove 4 screws and release side and indicator
lamps from wing.
2. Disconnect multiplugs and remove side and
indicator lamps.
3. Remove 2 screws and remove headlamp
finisher.
4. Remove 4 screws securing headlamp to wing,
disconnect multiplugs and remove headlamp.
5. Remove headlamp seal.
Refit
6. Fit headlamp seal.
7. Position headlamp, connect multiplugs, fit and
tighten headlamp screws.
8. Fit headlamp finisher and secure with screws.
9. Position side and indicator lamps, connect
multiplugs and secure with screws.
10. Reset headlamp alignment. See Adjustment.

86
ELECTRICAL
6
REPAIR
LAMP - TAIL
Service repair no - 86.40.70
Remove
1. Remove 2 screws securing tail lamp to body.
2. Disconnect multiplug and remove lamp.
Refit
3. Position tail lamp and connect multiplug.
4. Fit and tighten lamp securing screws.
RADIO
Service repair no - 86.50.03
Remove
1. Using tool SMD 4091 release radio from cage.
2. Disconnect coaxial cable from radio.
3. Disconnect 2 multiplugs from radio.
4. Remove radio from fascia.
Refit
5. Position radio to fascia and connect multiplugs.
6. Connect coaxial cable to radio.
7. Secure radio in cage.

ELECTRICAL
7
REPAIR
SPEAKER - FRONT
Service repair no - 86.50.15
Remove
1. Remove 4 screws securing speaker to fascia.
2. Release speaker from fascia and disconnect 2
Lucars.
3. Remove speaker.
Refit
4. Position speaker to fascia and connect Lucars.
5. Fit speaker to fascia and secure with screws.
SWITCH - TRANSMISSION BRAKE
Service repair no - 86.65.45
Remove
1. Release cover from transmission brake lever.
2. Remove 2 bolts and release transmission brake
lever from body.
3. Disconnect Lucar from transmission brake
warning switch.
4. Remove 2 screws securing switch from brake
lever and remove switch.
Refit
5. Fit switch to brake lever and tighten screws.
6. Connect switch Lucar.
7. Position brake lever and tighten bolts to 22 Nm
(16 lbf.ft).
8. Position cover to brake lever.
Нет комментариевНе стесняйтесь поделиться с нами вашим ценным мнением.
Текст