Defender 300Tdi (1996+). Manual — part 87
76
CHASSIS AND BODY
32
REPAIR
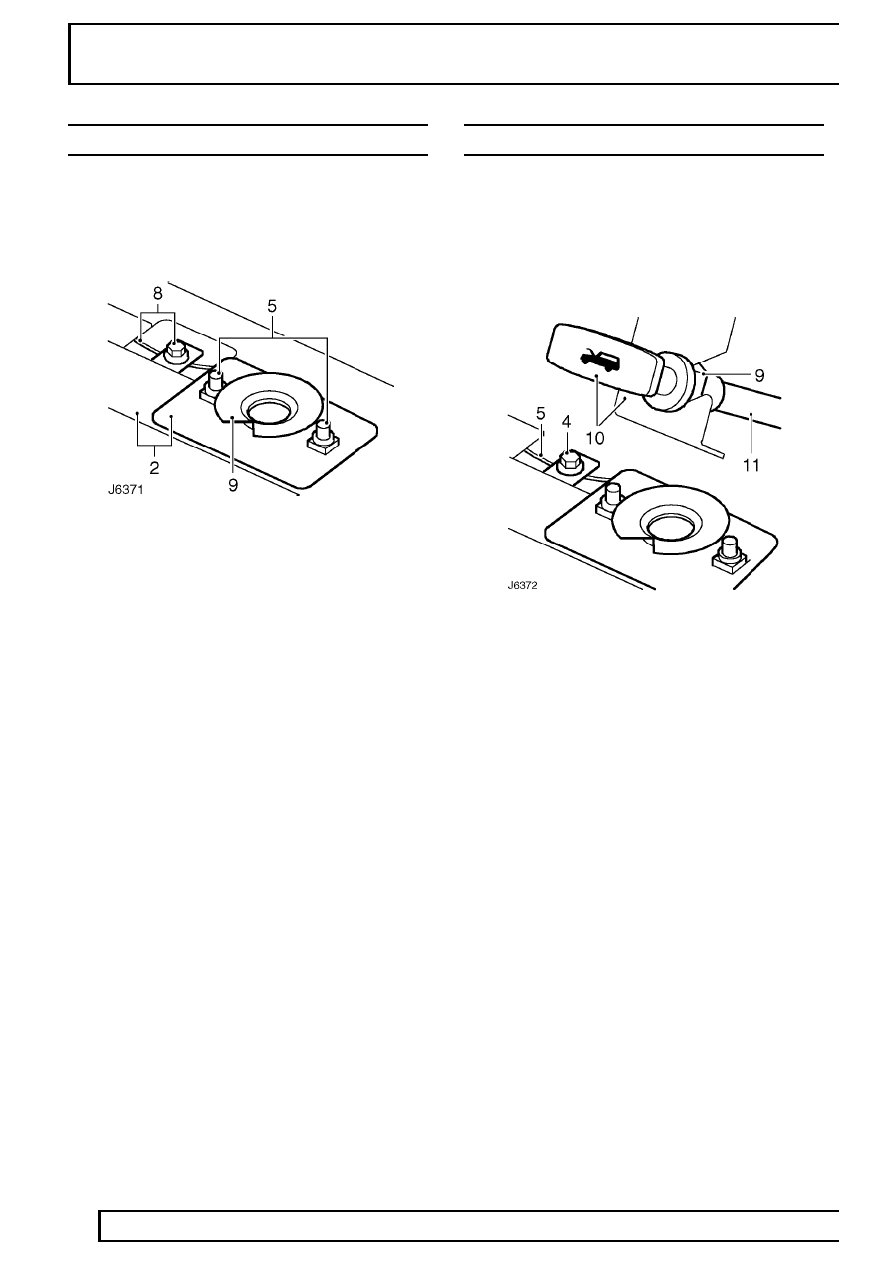
BONNET LOCK
Service repair no - 76.16.21
Remove
1. Open bonnet.
2. Mark position of guide plate and lock to bonnet
platform.
3. Remove 8 screws securing grille.
4. Remove grille.
5. Remove 2 bolts securing guide plate and lock.
6. Remove guide plate.
7. Release spring securing lock to bonnet platform.
8. Slacken clamping bolt securing bonnet release
cable.
9. Remove lock.
Refit
10. Fit spring between lock and bonnet platform.
11. Position lock and guide plate to bonnet platform
and nip up bolts.
12. Position guide plate and lock to position marks
and tighten bolts to
10 Nm (7 lbf/ft).
13. Fit cable to lock and tighten clamping bolt.
14. Check operation of release cable and adjust if
necessary.
15. Fit grille and tighten securing screws.
16. Close bonnet.
BONNET RELEASE CABLE
Service repair no - 76.16.29
Remove
1. Open bonnet.
2. Remove 8 screws securing grille.
3. Remove grille.
4. Slacken clamping bolt securing bonnet release
cable.
5. Remove cable from lock.
6. Release cable from clip on underside of bonnet
platform.
7. Feed cable through valance and collect
grommet.
8. Release cable from clip fixed to wheelarch under
expansion tank.
9. Loosen clamping nut securing bonnet release
handle to mounting bracket.
10. Remove bonnet release handle from mounting
bracket.
11. Withdraw cable through bulkhead.
Refit
12. Feed cable through bulkhead and fit bonnet
release handle to mounting bracket. Tighten
clamping nut.
13. Route cable behind expansion tank and fit to
securing clip.
14. Feed cable through valance.
15. Fit grommet between cable and valance.
16. Fit cable to securing clip on underside of bonnet
platform.
CHASSIS AND BODY
33
REPAIR
17. Fit cable to lock and tighten clamping bolt.
18. Check operation of release cable and bonnet
lock and adjust if necessary.
19. Fit grille and tighten screws.
20. Close bonnet.

76
CHASSIS AND BODY
34
REPAIR
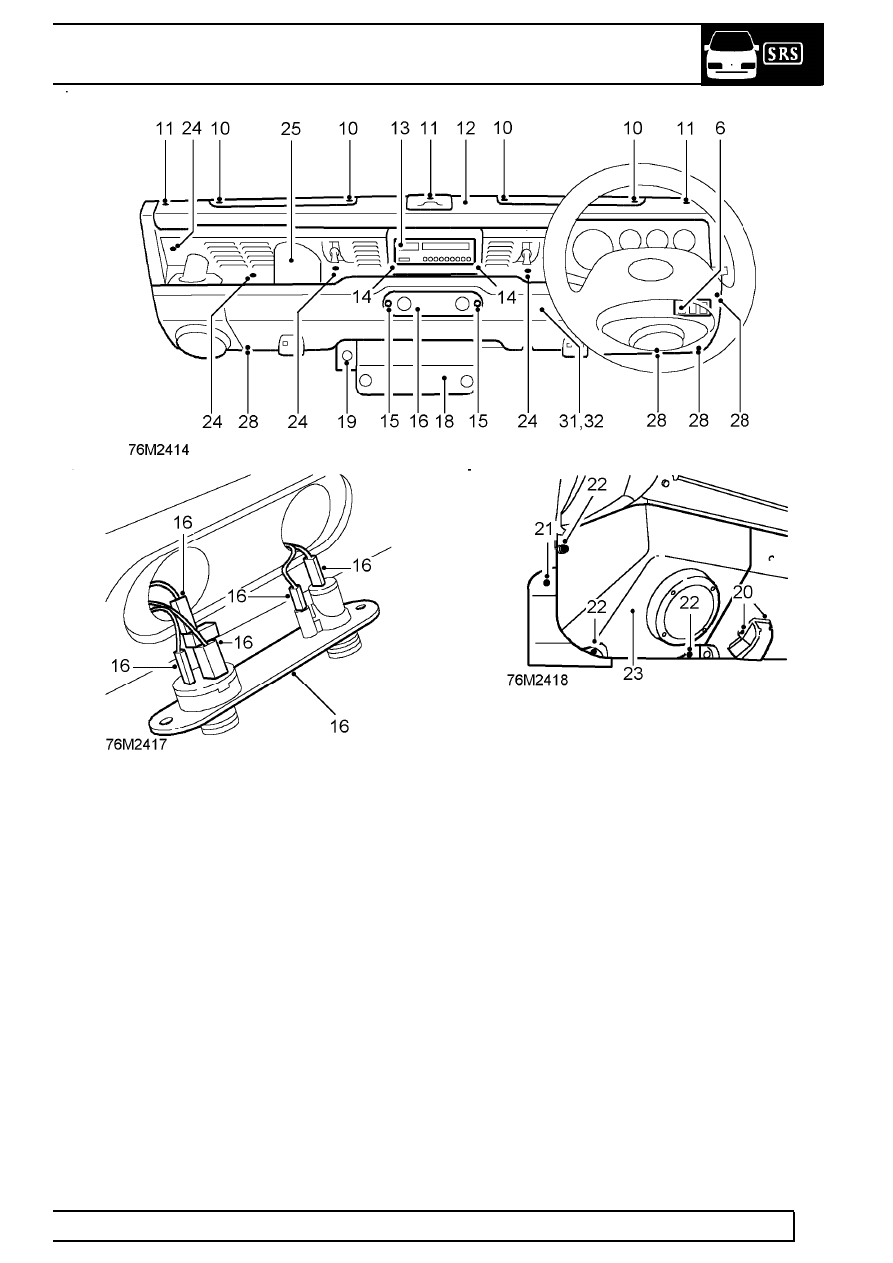
LOWER FASCIA PANEL (HEATER DUCT)
ASSEMBLY
Service repair no - 76.46.05
Remove
1. Disconnect battery.
2. Remove steering wheel
See STEERING,
Repair, Steering wheel .
3. Remove steering column nacelle
See
STEERING, Repair, Steering column nacelle .
4. Remove instrument panel
See INSTRUMENTS,
Repair, instrument panel .
5. Release heater cable at control lever
See
HEATING AND VENTILATION, Repair, Heater
control cable - air distribution .
6. Remove 2 screws, withdraw switch panel from
lower fascia and disconnect switch multi-plugs.
7. Prise out Land Rover decal and remove screw
securing grab handle to crash pad.
8. Remove lower screw and lift grab handle from
lower fascia panel.
9. On RH drive vehicles only, remove screw
securing LH side of finisher to wiper motor cover.
10. Remove 4 screws and remove both demister
vents from crash pad.
11. Remove 3 screws securing crash pad to fascia
bulkhead.
12. Remove crash pad.
13. Remove radio, if fitted.
14. Remove 2 trim studs securing radio housing to
trim panel. Remove radio housing.
CHASSIS AND BODY
35
REPAIR
15. If fitted, remove 2 screws, washers and nuts
securing auxiliary switch panel to lower fascia
panel and switch cover.
16. Withdraw switch panel and disconnect switch
leads.
17. Remove 2 screws securing switch cover to
parcel tray.
18. Remove fuse box cover.
19. Models with hand throttle:
Remove fuse box LH retaining screw.
Pivot fuse box down to gain access to lower
inner hand throttle cover fixing screw.
Remove 4 screws and lift up hand throttle cover
from lower fascia panel.
20. Remove 2 screws and remove both footwell
vents from lower fascia panel.
21. Remove single screw and detach door check
strap cover from LH and RH doors.
22. Remove 3 screws securing wiper motor cover to
fascia bulkhead.
23. Release locating pins from fascia panel, lower
wiper motor cover and, if applicable, disconnect
radio speaker leads. Retain wiper motor rack
cover. On LH drive vehicles, disconnect
multi-plugs from rear of switch panel.
24. Prise out 2 large and 5 small cap fasteners
securing trim panel to parcel shelf and fascia
bulkhead.
25. Carefully fold back trim panel to clear fresh air
vent operating levers and remove panel from
parcel shelf.
Нет комментариевНе стесняйтесь поделиться с нами вашим ценным мнением.
Текст