Toyota Corolla (2020 year). Owner's manual — part 17
262
5-1. Basic function
adjust the volume. Press and hold to restart the system.
(P.267, 303)
When an Apple CarPlay connection is established, press to dis-
play the Maps app screen.
*1, 2
Press to display the audio/visual system screen. (P.302, 303)
Press to display the “Menu” screen. (P.263)
Press to display the home screen. (P.270)
*1
:For details about Apple CarPlay: P.292
*2
:This function is not made available in some countries or areas.
*3
:The Toyota Entune App Suite Connect screen may not be displayed
when an Apple CarPlay connection is established.
The screen shots in this document and the actual screens of the system dif-
fer depending on whether the functions and/or a contract existed.
WARNING
For safety, the driver should not
operate the system while he/she
is driving. Insufficient attention to
the road and traffic may cause an
accident.
-------------------------------------------------------------------------------------------------------------------------------------------------------------
263
5-1. Basic function
5
Entune au
dio
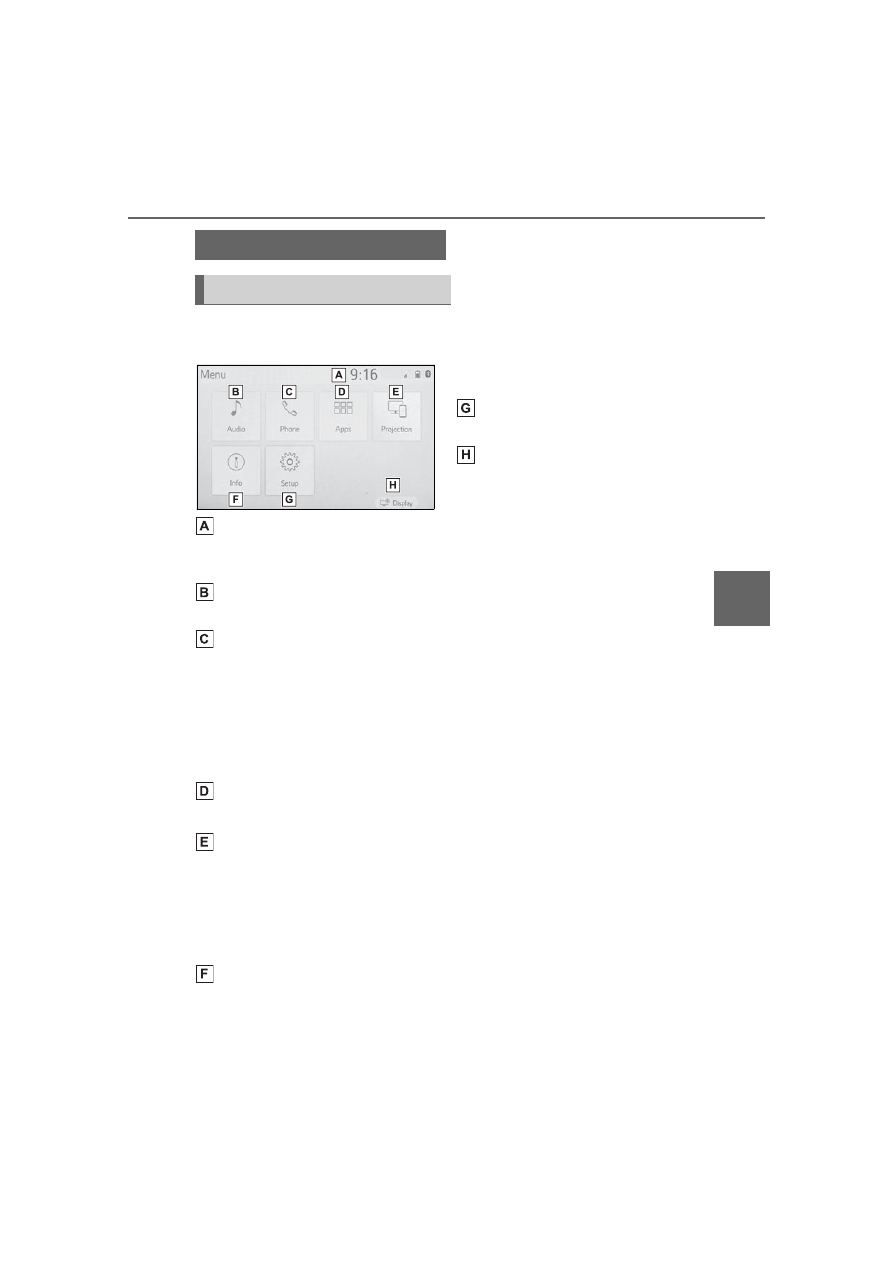
Press the “MENU” button to dis-
play the “Menu” screen.
Displays the clock. Select to
display the clock settings
screen. (P.297)
Select to display the audio
control screen. (P.302)
Select to display the
hands-free operation screen.
(P.345)
When an Apple CarPlay con-
nection is established, select
to display the Phone app
screen.
*
Select to display the applica-
tion screen.
*
When an Apple CarPlay con-
nection is established and
this button displays “Apple
CarPlay”, select to display
the home screen of Apple
CarPlay.
*
(P.292)
Vehicles without DCM: Select
to display the fuel consump-
tion screen. (P.92)
Vehicles with DCM: Select to
display the information
screen.
Select “ECO” to display the
fuel consumption screen.
(P.92)
The “Vehicle Alert History”
shown on the information
screen.
*
Select to display the “Setup”
screen. (P.266)
Select to adjust the contrast,
brightness, etc. of the dis-
play. (P.274)
*
: This function is not made avail-
able in some countries or areas.
Menu screen
Menu screen operation
-------------------------------------------------------------------------------------------------------------------------------------------------------------
264
5-1. Basic function
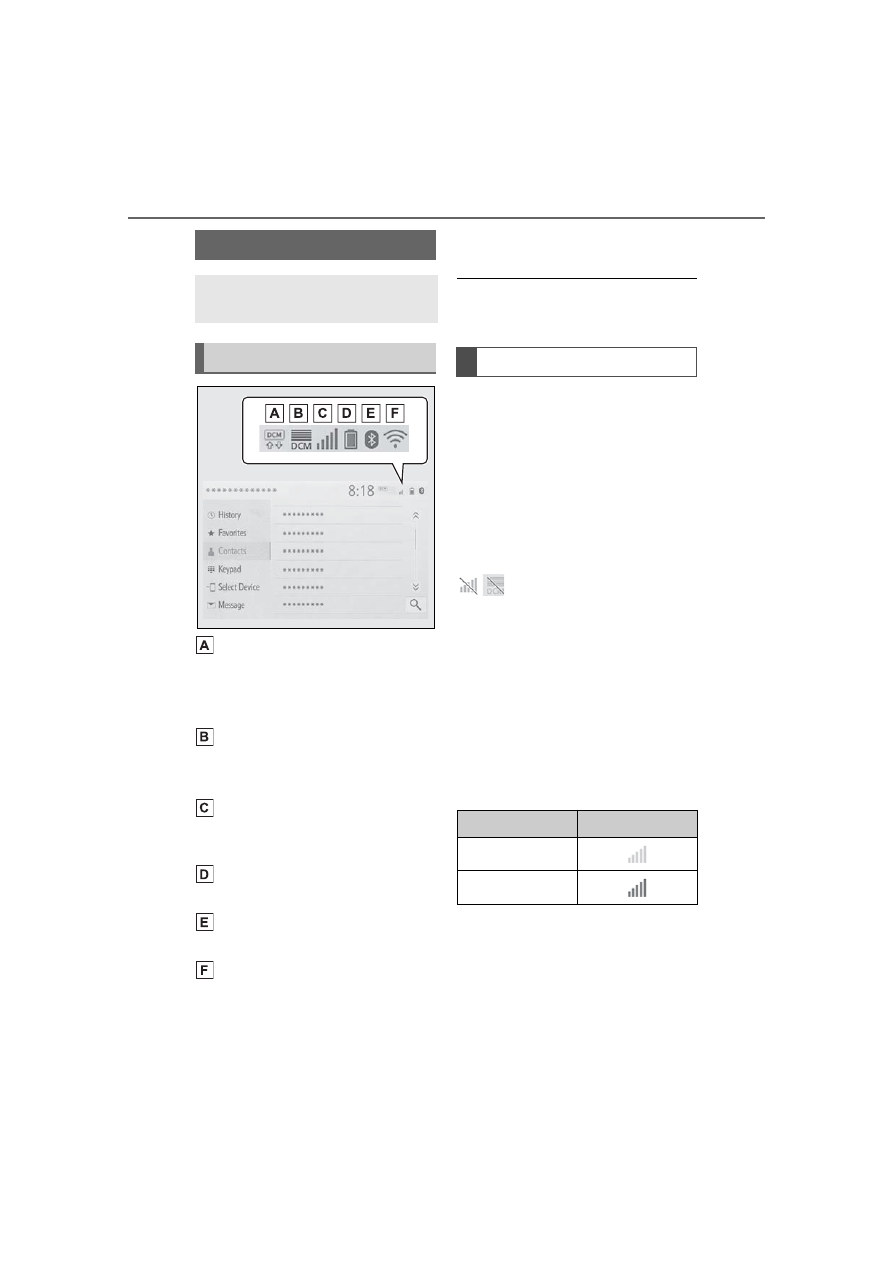
Indicate during data commu-
nication performed via Data
Communication Module
(DCM)
*1
The reception level of Data
Communication Module
(DCM) display
*1
(P.264)
The reception level of the
connected phone display
(P.264)
Remaining battery charge
display (P.265)
Bluetooth
®
phone connection
condition display (P.265)
Wi-Fi
®
connection condition
display
*1, 2
(P.287)
*1
:Vehicles with DCM
*2
:This function is not made avail-
able in some countries or areas.
The number of status icons that can
be displayed differs depending on
the displayed screen.
The level of reception does not
always correspond with the level
displayed on the cellular phone.
The level of reception may not
be displayed depending on the
phone you have.
When the cellular phone is out
of the service area or in a place
inaccessible by radio waves,
/
is displayed.
“Rm” is displayed when receiv-
ing in a roaming area. While
roaming, display “Rm” top-left
on the icon.
The receiving area may not be
displayed depending on the type
of Bluetooth
®
phone you have.
While connected with cellular
phone
Status icon
Status icons are displayed
at the top of the screen.
Status icon explanation
Reception level display
Reception Level
Indicators
Poor
Excellent
-------------------------------------------------------------------------------------------------------------------------------------------------------------
265
5-1. Basic function
5
Entune au
dio
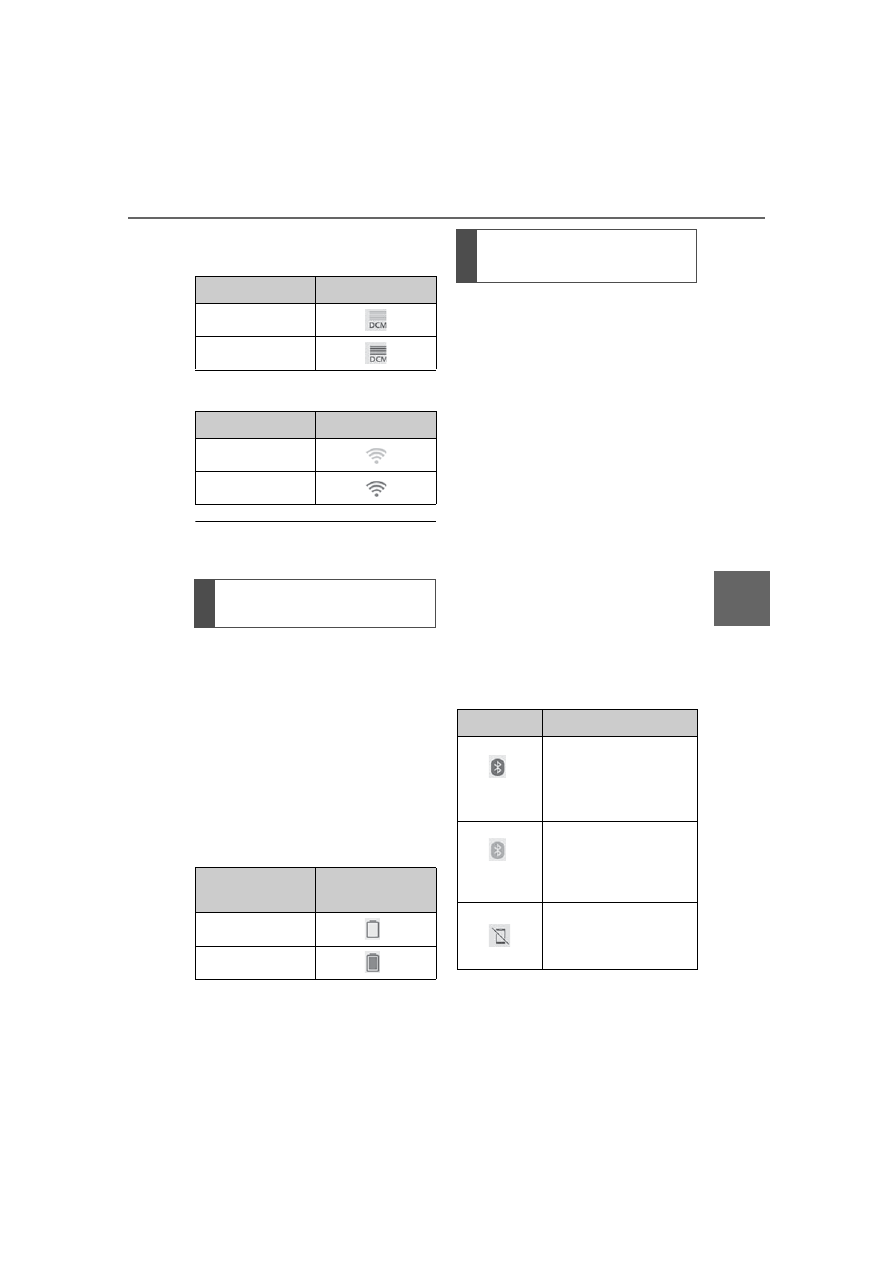
While using Data Communi-
cation Module (DCM)
While using Wi-Fi
®
Hotspot
When Wi-Fi
®
Hotspot is off, no item
is displayed.
The amount displayed does not
always correspond with the
amount displayed on the Blue-
tooth
®
device.
The amount of battery charge
left may not be displayed
depending on the type of the
Bluetooth
®
device connected.
This system does not have a
charging function.
An antenna for the Bluetooth
®
connection is built into the
instrument panel.
The condition of the Bluetooth
®
connection may deteriorate and
the system may not function
when a Bluetooth
®
phone is
used in the following conditions
and/or places:
The cellular phone is obstructed
by certain objects (such as
when it is behind the seat or in
the glove box or console box).
The cellular phone is touching or
is covered with metal materials.
Leave the Bluetooth
®
phone in a
place where the condition of the
Bluetooth
®
connection is good.
Reception Level
Indicators
Poor
Excellent
Reception Level
Indicators
No connection
Connected
Remaining battery charge
display
Remaining
charge
Indicators
Empty
Full
Bluetooth
®
connection
condition display
Indicators
Conditions
(Blue)
Indicates that the con-
dition of the Blue-
tooth
®
connection is
good.
(Gray)
While in this condition,
sound quality during
phone calls may dete-
riorate.
Indicates that the cel-
lular phone is not con-
nected via Bluetooth
®
.
-------------------------------------------------------------------------------------------------------------------------------------------------------------
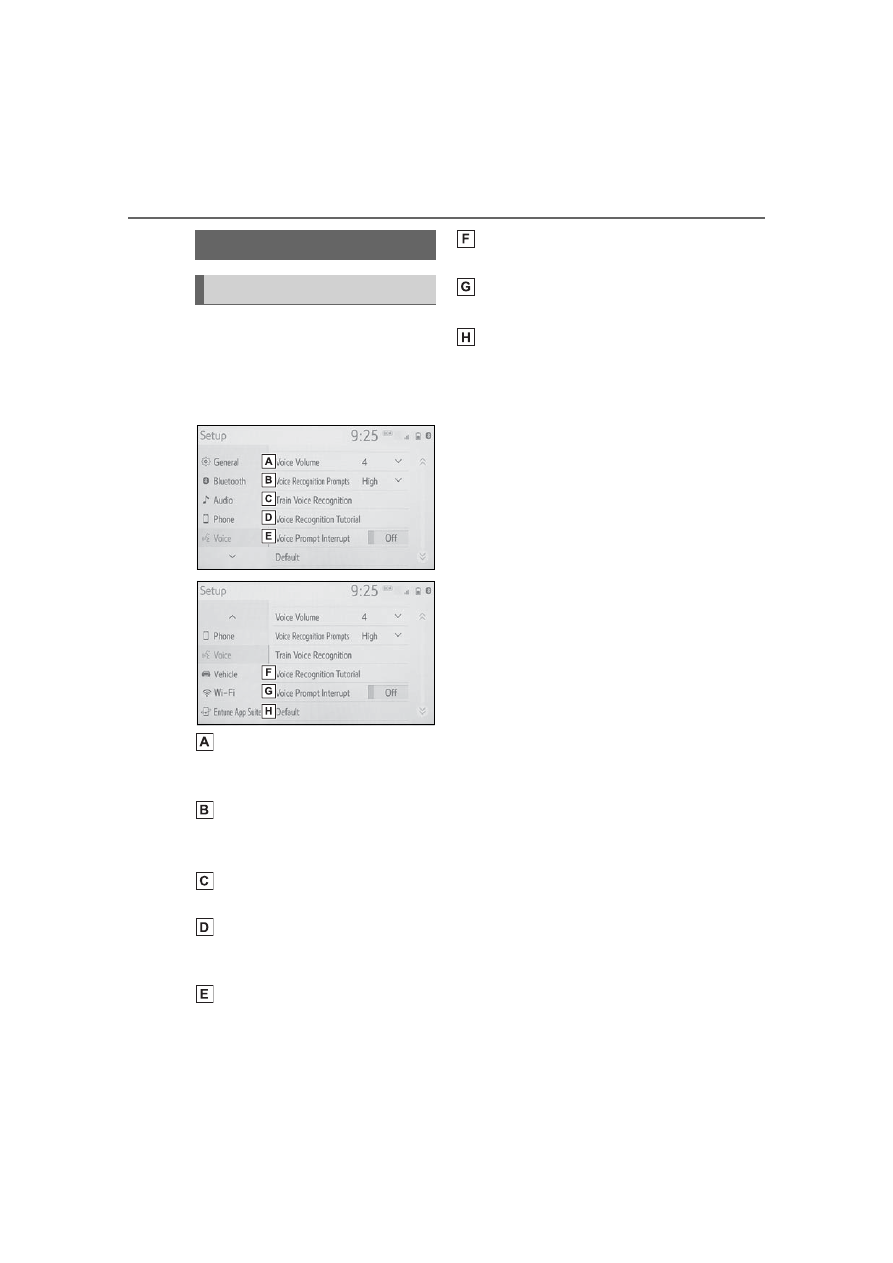
266
5-1. Basic function
Press the “MENU” button, then
select “Setup” to display the
“Setup” screen. The items
shown on the “Setup” screen
can be set.
Select to change the selected
language, operation sound
settings, etc. (P.296)
Select to set Bluetooth
®
device and Bluetooth
®
sys-
tem settings. (P.280)
Select to set audio settings.
(P.323)
Select to set the phone
sound, contacts, message
settings, etc. (P.360)
Select to set the voice set-
tings. (P.299)
Select to set vehicle informa-
tion. (P.300)
Select to set Wi-Fi
®
connec-
tion settings.
*1, 2
Select to set Toyota Entune
App Suite Connect settings.
*2
*1
:Vehicles with DCM
*2
:This function is not made avail-
able in some countries or areas.
“Setup” screen
“Setup” screen
-------------------------------------------------------------------------------------------------------------------------------------------------------------
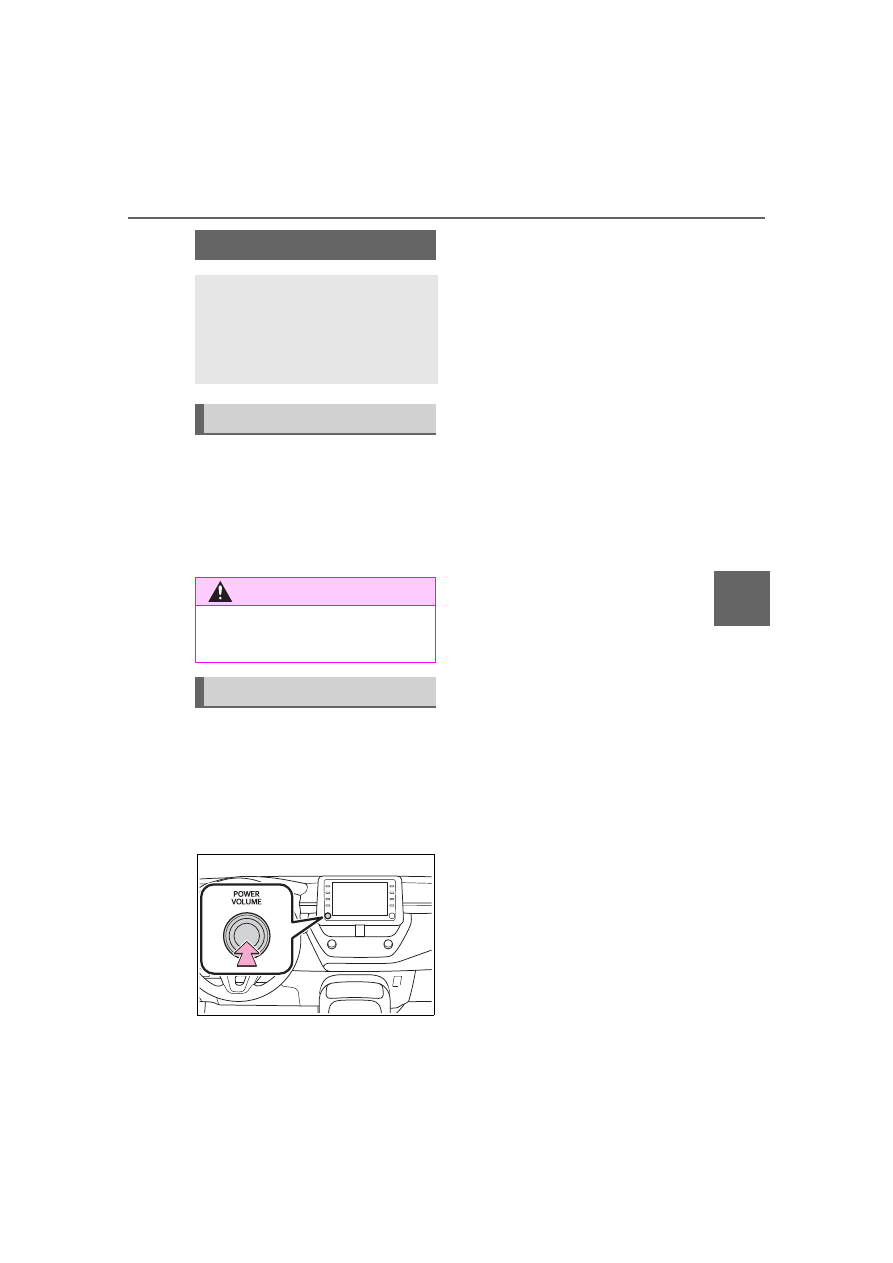
267
5-2. Basic information before operation
5
Entune au
dio
5-2.Basic information before operation
After a few seconds, the caution
screen will be displayed.
After about 5 seconds or select-
ing “Continue”, the caution
screen automatically switches to
the next screen.
When system response is
extremely slow, the system can
be restarted.
Press and hold the “POWER
VOLUME” knob for 3 seconds or
more.
Initial screen
When the engine switch is
turned to ACC or ON, the
initial screen will be dis-
played and the system will
begin operating.
Caution screen
WARNING
When the vehicle is stopped with
the engine running, always apply
the parking brake for safety.
Restarting the system
-------------------------------------------------------------------------------------------------------------------------------------------------------------
268
5-2. Basic information before operation
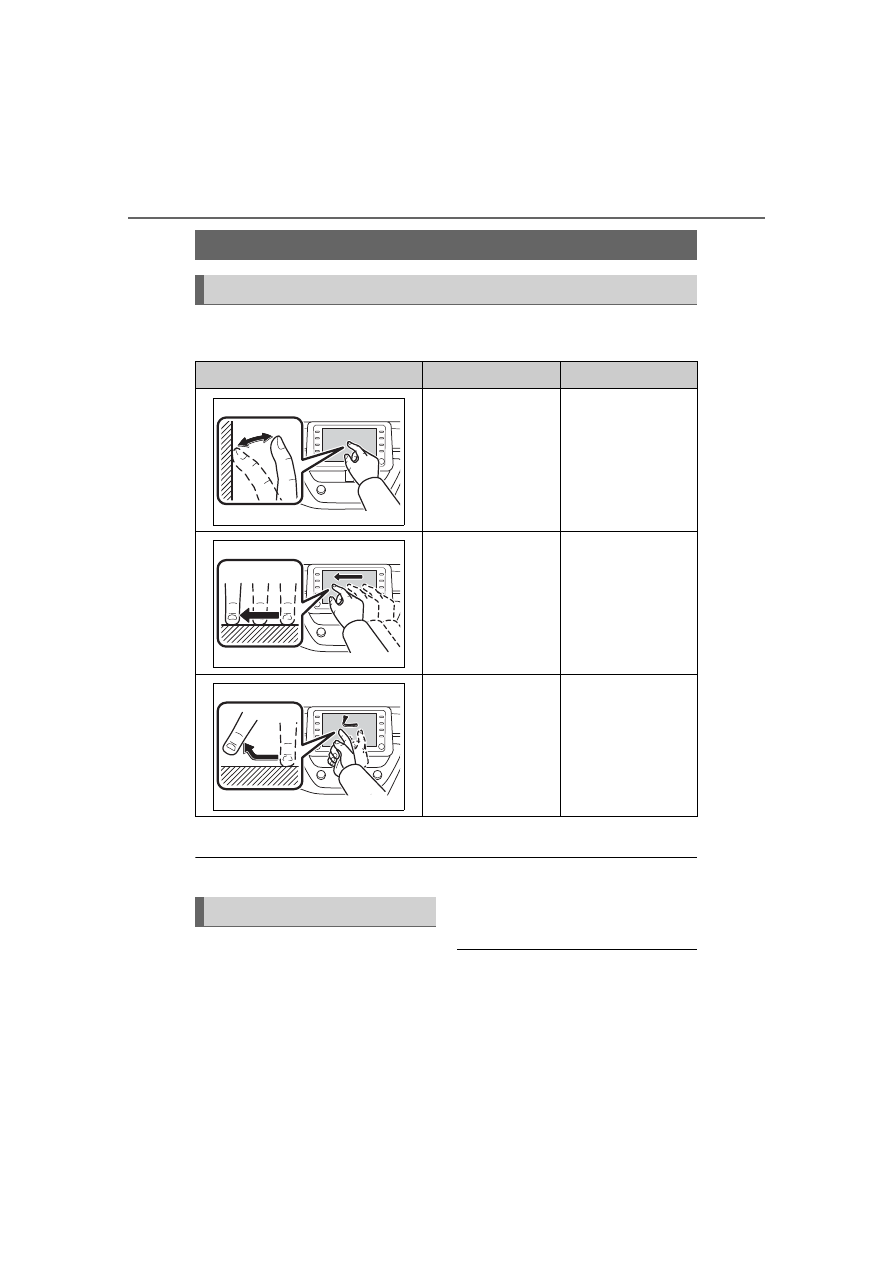
Operations are performed by touching the touch screen directly with
your finger.
*
: The above operations may not be performed on all screens.
Flick operations may not be performed smoothly at high altitudes.
This system is operated mainly
by the buttons on the screen.
(Referred to as screen buttons
in this manual.)
When a screen button is
touched, a beep sounds. (To set
the beep sound: P.296)
●
If the system does not respond to
touching a screen button, move
your finger away from the screen
and then touch it again.
●
Dimmed screen buttons cannot be
Touch screen
Touch screen gestures
Operation method
Outline
Main use
Touch
Quickly touch and
release once.
Selecting an item
on the screen
Drag
*
Touch the screen
with your finger,
and move the
screen to the
desired position.
Scrolling the lists
Flick
*
Quickly move the
screen by flicking
with your finger.
Scrolling the main
screen page
Touch screen operation
-------------------------------------------------------------------------------------------------------------------------------------------------------------
269
5-2. Basic information before operation
5
Entune au
dio
operated.
●
The displayed image may become
darker and moving images may
be slightly distorted when the
screen is cold.
●
In extremely cold conditions, the
screen may not be displayed and
the data input by a user may be
deleted. Also, the screen buttons
may be harder than usual to
depress.
●
When you look at the screen
through polarized material such as
polarized sunglasses, the screen
may be dark and hard to see. If
so, look at the screen from differ-
ent angles, adjust the screen set-
tings on the display settings
screen or take off your sun-
glasses.
●
When
is displayed on the
screen, select
to return to the
previous screen.
The operable areas of the
capacitive touch screen buttons
use capacitive touch sensors
and may not operate properly in
the following situations:
If the screen is dirty or wet
If a source of strong electro-
magnetic waves is brought
near the screen
If a glove is worn during oper-
ation
If the screen is touched by a
fingernail
If a stylus is used to operate
the buttons
If your palm touches the oper-
able area of another button
during operation
If a button is touched quickly
If the operable part of a
capacitive touch screen but-
ton is touched by or covered
with a metal object, such as
the following, it may not oper-
ate properly:
• Magnetic isolation cards
• Metallic foil, such as the inner
packaging of a cigarette box
• Metallic wallets or bags
• Coins
• Discs, such as a CD or DVD
If the operable part of a
capacitive touch screen but-
ton is wiped, it may operate
unintentionally.
If the capacitive touch screen
button is being touched when
the engine switch is changed
to ACC or ON, the button may
not operate properly. In this
case, remove anything touch-
ing the button, turn the engine
switch off and then turn it to
NOTICE
●
To prevent damaging the
screen, lightly touch the screen
buttons with your finger.
●
Do not use objects other than
your finger to touch the screen.
●
Wipe off fingerprints using a
glass cleaning cloth. Do not use
chemical cleaners to clean the
screen, as they may damage
the touch screen.
Capacitive touch screen
buttons
-------------------------------------------------------------------------------------------------------------------------------------------------------------
270
5-2. Basic information before operation
ACC or ON, or restart the sys-
tem by press and hold the
“POWER VOLUME” knob for
3 seconds or more.
Capacitive touch screen button sen-
sor sensitivity can be adjusted.
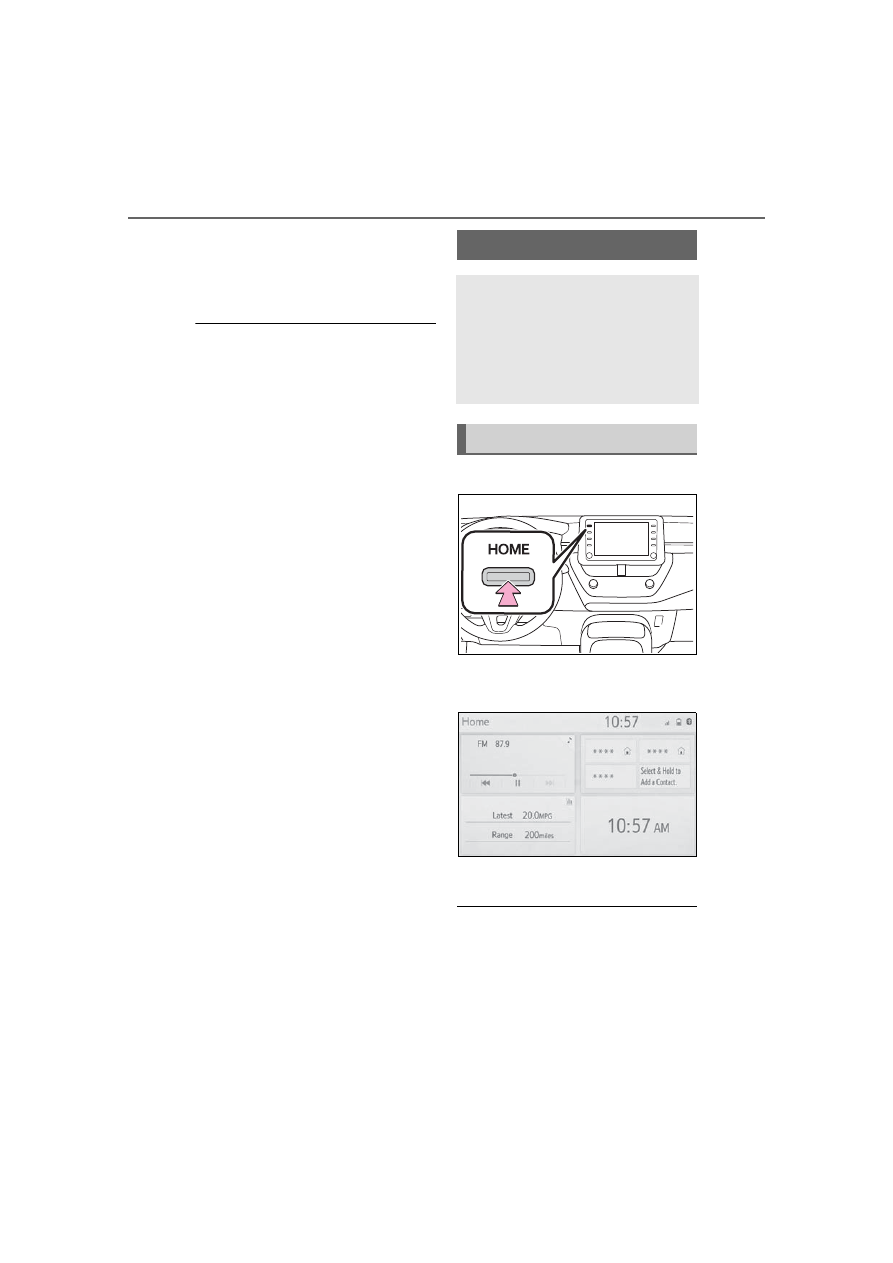
1
Press the “HOME” button.
2
Check that the home screen
is displayed.
Selecting a screen will display it full
screen.
●
The display information and area
on the home screen can be cus-
tomized.
●
The home screen can be set to
several types of split layouts
Home screen
On the home screen, multi-
ple screens, such as the
audio/visual system screen,
hands-free screen and clock
screen, can be displayed
simultaneously.
Home screen operation
-------------------------------------------------------------------------------------------------------------------------------------------------------------
271
5-2. Basic information before operation
5
Entune au
dio
The display information/area on
the home screen and the home
screen layout can be changed.
1
Press the “MENU” button.
2
Select “Setup”.
If the general settings screen is not
displayed, select “General”.
3
Select “Customize Home
Screen”.
4
Select the items to be set.
Select to change the display
information and area on the
home screen.
Select to change the home
screen layout.
When searching by a name or
entering data, letters and num-
bers can be entered via the
screen.
Text field. Entered charac-
ter(s) will be displayed.
Select to erase one charac-
ter.
Select and hold to continue
erasing characters.
Select to move the cursor.
Select to choose predictive
text candidate for entered
text. (P.272)
Select to display a list of pre-
dictive text candidates when
there is more than one.
(P.272)
Select to enter desired char-
acters.
Select to enter characters in
lower case or in upper case.
Customizing the home
screen
Entering letters and
numbers/list screen
operation
Entering letters and num-
bers
-------------------------------------------------------------------------------------------------------------------------------------------------------------
272
5-2. Basic information before operation
Select to change character
types. (P.272)
Select to make a space on
cursor.
Keyboard layout can be changed.
1
Select “Change Type”.
2
Select the desired character.
Depending on the screen being dis-
played, it may not be possible to
change keyboard characters.
When text is input, the system
predicts the text that may com-
plete the currently unconfirmed
text and displays predictive
replacement candidates that
match the beginning of the text.
1
Input text.
2
Select the desired candidate.
To select a candidate that is not
displayed, select
, and
then select the desired predic-
tive replacement candidate.
The list screen may be dis-
played after entering characters.
When a list is displayed, use the
appropriate screen button to
scroll through the list.
Changing character type
Displaying predictive text
candidates
List screen
Scrolling list screen
-------------------------------------------------------------------------------------------------------------------------------------------------------------
273
5-2. Basic information before operation
5
Entune au
dio
To scroll up/down the list,
flick the list up/down.
Select to skip to the next or
previous page. Select and
hold
or
to scroll
through the displayed list.
Indicates the position of the
displayed entries in the entire
list.
To scroll up/down pages,
drag the bar.
If
appears to the right of an item
name, the complete name is too
long to display.
●
Select to
scroll to the end of
the name.
●
Select
to move to the begin-
ning of the name.
Items are displayed in the list
with the most similar results of
the search at the top.
1
Select
.
2
Input text.
3
Select “Search”.
4
The list is displayed.
Searching a list
-------------------------------------------------------------------------------------------------------------------------------------------------------------
274
5-2. Basic information before operation
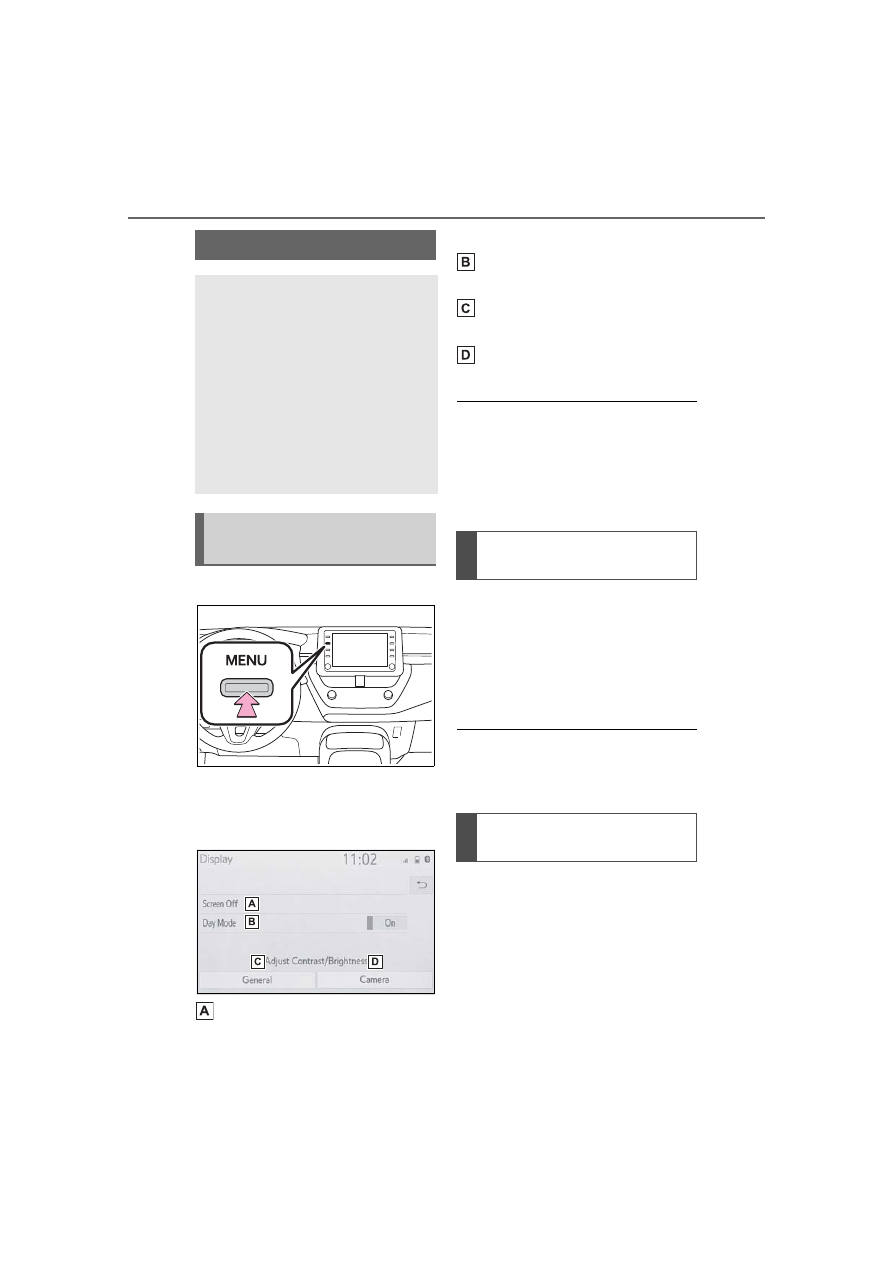
1
Press the “MENU” button.
2
Select “Display”.
3
Select the desired items to
be set.
Select to turn the screen off.
To turn it on, press any but-
ton.
Select to turn day mode
on/off. (P.274)
Select to adjust the screen
display. (P.274)
Select to adjust the camera
display.
When the screen is viewed through
polarized sunglasses, a rainbow
pattern may appear on the screen
due to optical characteristics of the
screen. If this is disturbing, please
operate the screen without polarized
sunglasses.
Depending on the position of the
headlight switch, the screen
changes to day or night mode.
This feature is available when
the headlight is switched on.
Select “Day Mode”.
If the screen is set to day mode with
the headlight switch turned on, this
condition is memorized even with
the engine turned off.
The contrast and brightness of
the screen can be adjusted
according to the brightness of
your surroundings.
1
Select “General” or “Cam-
era”.
2
Select the desired item.
“Display (General)” screen only:
Screen adjustment
The contrast and brightness
of the screen display and
the image of the camera dis-
play can be adjusted. The
screen can also be turned
off, and/or changed to either
day or night mode.
(For information regarding
audio/visual screen adjust-
ment: P.305)
Displaying the screen
adjustment screen
Changing between day
and night mode
Adjusting the con-
trast/brightness
-------------------------------------------------------------------------------------------------------------------------------------------------------------
275
5-2. Basic information before operation
5
Entune au
dio
Select “<” or “>” to select the
desired display.
“Contrast”
“+”: Select to strengthen the con-
trast of the screen.
“-”: Select to weaken the contrast of
the screen.
“Brightness”
“+”: Select to brighten the screen.
“-”: Select to darken the screen.
Linking multi-informa-
tion display and the
system
The following functions of
the system are linked with
the multi-information dis-
play in the instrument clus-
ter:
Audio
Phone
*
etc.
These functions can be
operated using multi-infor-
mation display control
switches on the steering
wheel. (P.87)
*
: When an Apple CarPlay con-
nection is established, this
function will be unavailable.
-------------------------------------------------------------------------------------------------------------------------------------------------------------
276
5-3. Connectivity settings
5-3.Connectivity settings
●
This system is not guaranteed to
operate with all Bluetooth
®
devices.
●
If your cellular phone does not
support HFP, registering the Blue-
tooth
®
phone or using OPP,
PBAP, MAP or SPP profiles indi-
vidually will not be possible.
●
If the connected Bluetooth
®
device version is older than rec-
ommended or incompatible, the
Bluetooth
®
device function may
not work properly.
●
Refer to
http://www.toyota.com/Entune/
in the United States,
http://www.toyota.ca/entune in
Canada, and
http://www.toyotapr.com/entune in
Puerto Rico, to find approved
Bluetooth
®
phones for this sys-
tem.
●
Certification
Bluetooth is a registered trademark
of Bluetooth SIG, Inc.
■
Registering from the sys-
tem
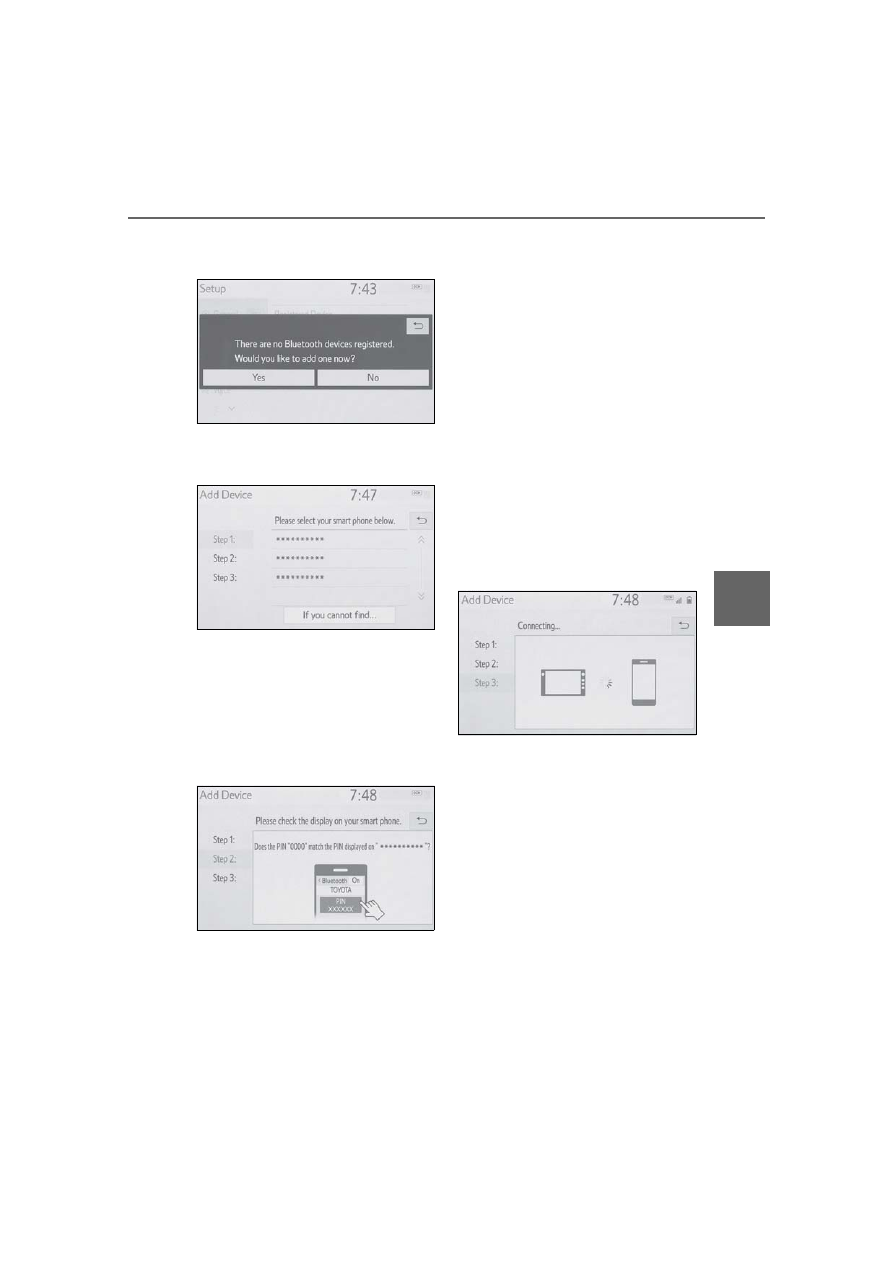
1
Turn the Bluetooth
®
connec-
tion setting of your cellular
phone on.
This function is not available when
Bluetooth
®
connection setting of
your cellular phone is set to off.
2
Press the “MENU” button.
3
Select “Phone”.
Operations up to this point can also
be performed by pressing the
“PHONE” button on the instrument
panel.
Registering/Connect-
ing a Bluetooth
®
device
To use the hands-free sys-
tem, it is necessary to regis-
ter a Bluetooth
®
phone with
the system.
Once the phone has been
registered, it is possible to
use the hands-free system.
This operation cannot be
performed while driving.
When an Apple CarPlay
connection is established,
Bluetooth
®
functions of the
system will become unavail-
able and any connected
Bluetooth
®
devices will be
disconnected.
Registering a Bluetooth
®
phone for the first time
-------------------------------------------------------------------------------------------------------------------------------------------------------------
277
5-3. Connectivity settings
5
Entune au
dio
4
Select “Yes” to register a
phone.
5
Select the desired Bluetooth
®
device.
If the desired Bluetooth
®
phone is
not on the list, select “If you cannot
find...” and follow the guidance on
the screen. (P.278)
6
Register the Bluetooth
®
device using your Blue-
tooth
®
device.
For details about operating
the Bluetooth
®
device, see
the manual that comes with it.
A PIN code is not required for
SSP (Secure Simple Pairing)
compatible Bluetooth
®
devices. Depending on the
type of Bluetooth
®
device
being connected, a message
confirming registration may
be displayed on the Blue-
tooth
®
device’s screen.
Respond and operate the
Bluetooth
®
device according
to the confirmation message.
7
Check that the following
screen is displayed, indicat-
ing pairing was successful (a
Bluetooth
®
link has been
established but registration is
not yet complete).
The system is connecting to
the registered device.
At this stage, the Bluetooth
®
functions are not yet avail-
able.
-------------------------------------------------------------------------------------------------------------------------------------------------------------
Нет комментариевНе стесняйтесь поделиться с нами вашим ценным мнением.
Текст