Citroën C3 (2023 year). Manual in english — page 2
18
Ease of use and comfort
Interior air recirculation
► Place the thumbwheel
5
in this
position to activate interior air
recirculation.
When this position is selected, outside air is
shut off and inside air is recirculated. This mode
is suitable when driving through an area with
polluted air such as a tunnel or when attempting
to quickly cool down the vehicle.
► To restore exterior air intake, place the
thumbwheel in any other position.
Outside air is introduced.
Front demist - defrost
Place the air flow adjustment and the air
distribution thumbwheels
2
and
3
to the
defrost position.
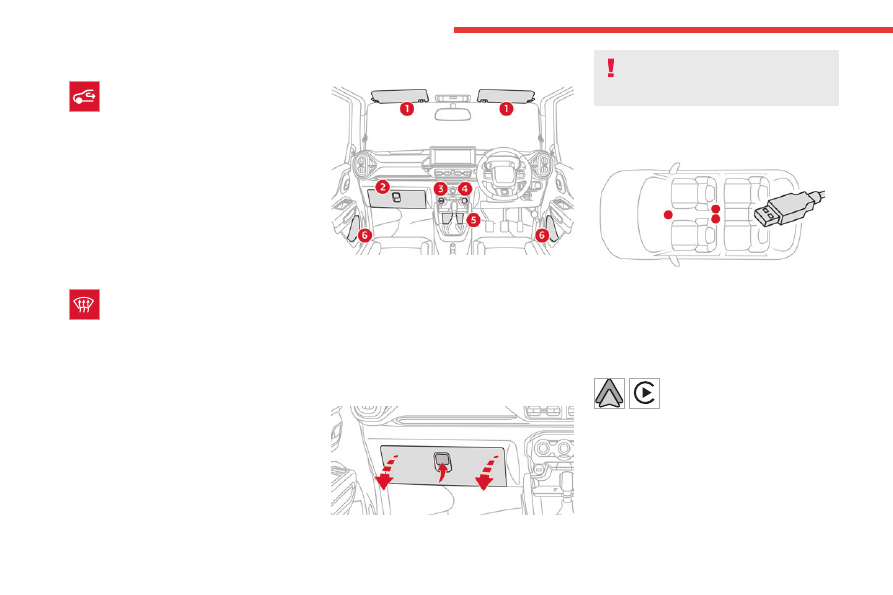
Interior fittings
1.
Sun visor
2.
Closed storage or glove box
3.
USB socket
4.
12 V socket
5.
Storage compartment
Cupholders
6.
Door pockets
Glove box
► To open the glove box, raise the handle.
Never drive with the glove box open
when a passenger is at the front. It may
cause injury during sharp deceleration!
USB sockets
(Depending on version.)
They allow the connection of a portable device to
charge the device.
USB port located at the front allows iPod and
USB drive to be connected for audio/video.
Two rear USB ports are for charging purpose
only, with quick charge facility on supported
smartphones.
The USB port located
at the front
allows USB media playback and
smartphone connection for Android Auto
®
or
CarPlay
®
, so that certain smartphone
applications can be used on the touch screen.
To achieve the best results, it is necessary to
use a cable made or approved by the device
manufacturer.
These applications can be managed using the
steering mounted controls or those of the audio
system.
-------------------------------------------------------------------------------------------------------------------------------------------------------------

19
Ease of use and comfort
3
12 V socket
► To connect a 12 V accessory (maximum
power: 120 W), lift the cover and plug in the
correct adapter.
Do not exceed the maximum power
rating of the socket (you may otherwise
damage your portable device).
Front courtesy lamps
Model 1 (without microphone)
The switch has 2 positions:
Permanently off.
Permanent lighting (with key in "ACC",
"Ignition" or "Start" position)
Model 2 (with microphone)
The switch has 3 positions:
Permanently off.
Permanent lighting, irrespective of the
doors status.
When the switch is in the middle position, it is in
AUTO
mode:
– The lamp switches ON when any of the doors
is open.
– The lamp dims and goes OFF upon closing of
all doors.
– The lamp goes OFF with ignition ON and all
doors closed properly.
Boot
fittings
Hooks
They are used to hang shopping bags.
Take care to only hang lightweight bags
(max. 3 kg).
-------------------------------------------------------------------------------------------------------------------------------------------------------------
20
Lighting and visibility
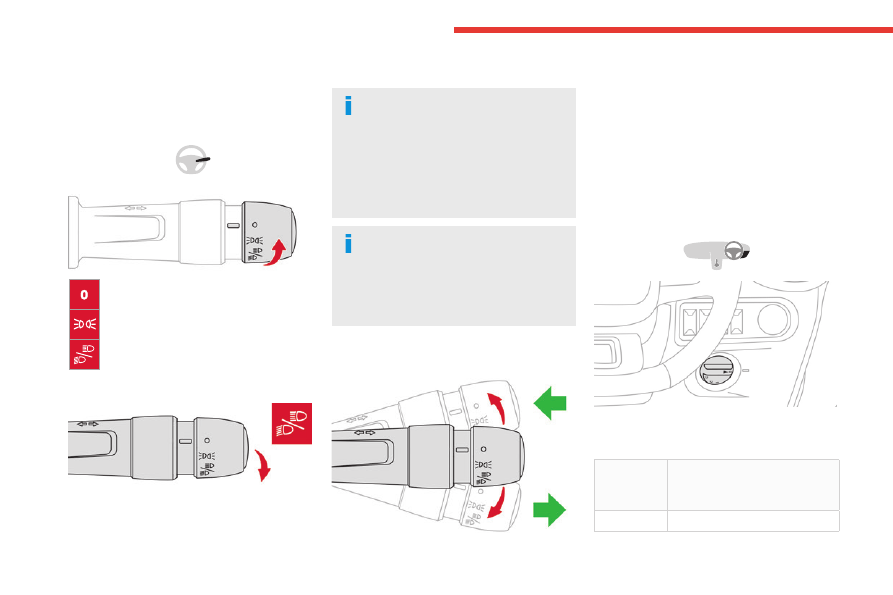
Exterior lighting control
stalk
Main lighting
Lighting off (ignition off)
Sidelamps only
Dipped or main beam headlamps
Headlamp dipping
► Turn and align the selection ring to switch
between dipped and main beam headlamps.
In the lighting off and sidelamps modes, the
driver can switch on the main beam headlamps
temporarily (“headlamp flash”) by pulling up the
stalk.
Switching on the lamps after
switching off the ignition
To reactivate the lighting control, rotate the
ring to the "
0
" position - lamps off, then to the
desired position.
If the driver's door is opened, a temporary
audible signal warns the driver that the lamps
are on.
In some weather conditions (e.g. low
temperature or humidity), the presence
of misting on the internal surface of the glass
of the headlamps and rear lamps is normal; it
disappears after the lamps have been on for a
few minutes.
Direction indicators
► Left or right: lower or raise the lighting control
stalk, beyond the point of resistance.
Three flashes
► Press briefly upwards or downwards, without
going beyond the point of resistance; the
direction indicators will flash 3 times.
Headlamp beam height
adjustment
To avoid disturbing other road users, the height
of the headlamp beams should be adjusted
according to the load in the vehicle.
Knob
switch
position
Static loading condition
0
Driver only
-------------------------------------------------------------------------------------------------------------------------------------------------------------
21
Lighting and visibility
4
Knob
switch
position
Static loading condition
0
Driver + 1 passenger
1
All the seats occupied
2
All the seats occupied + load
evenly distributed in the boot
3
Driver + load evenly distributed
in the boot
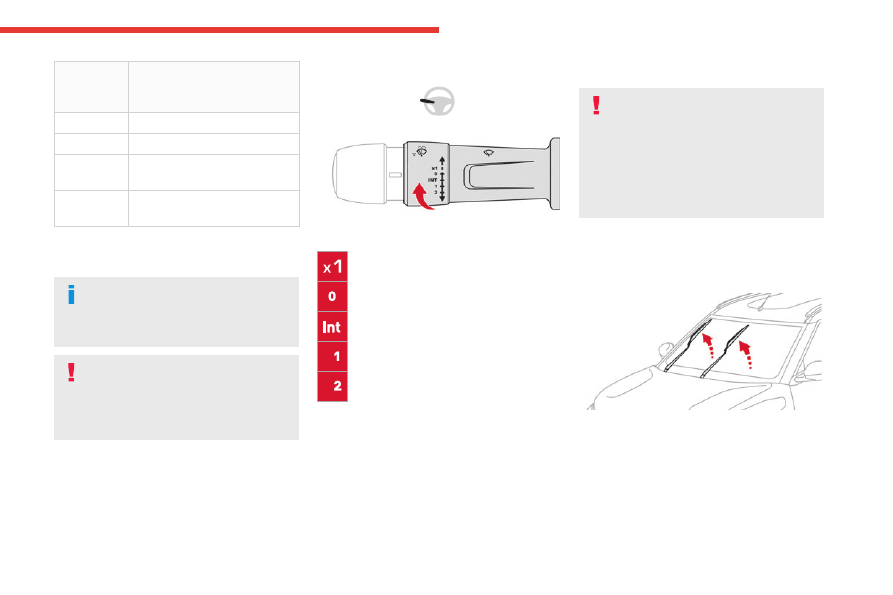
Wiper control stalk
In wintry conditions, remove snow, ice or
frost present on the windscreen, around
the wiper arms and blades and on the
windscreen seal, before operating the wipers.
Do not operate the wipers on a dry
windscreen. Under extremely hot or cold
conditions, ensure that the wiper blades are
not stuck to the windscreen before operating
the wipers.
Windscreen wipers
► To select the wiping speed: raise or lower the
stalk to the desired position.
Single wiping / Mist
Off
Intermittent wiping
Slow wiping
Fast wiping
Single wipe
► Pull the stalk briefly towards you.
Front screenwash
► Pull the wiper control stalk towards you and
hold.
The screenwash and windscreen wipers operate
for as long as the control stalk is pulled.
Termination of the screenwash is followed by a
final wiping cycle.
To avoid damaging the wiper blades, do
not operate the screenwash if the
screenwash reservoir is empty.
Only operate the screenwash if there is no
risk of the fluid freezing on the windscreen
and hindering visibility. During the winter
period, use "very cold climate" rated products.
Never top up with water.
Changing a wiper blade
Before removing a front wiper
► Within one minute after switching off the
ignition, operate the wiper stalk to position the
wiper blades vertically on the windscreen.
or
► A minute after switching off the ignition,
straighten the arms manually.
Removing
► Lift the corresponding wiper arm.
-------------------------------------------------------------------------------------------------------------------------------------------------------------
22
Lighting and visibility
► Unclip the wiper blade and remove it.
Refitting
► Position and clip the new wiper blade to the
arm.
► Fold down the wiper arm carefully.
After refitting a front wiper
► Switch on the ignition.
► Operate the wiper lever again to park the
wiper blades.
-------------------------------------------------------------------------------------------------------------------------------------------------------------
23
Safety
5
General safety
recommendations
Do not remove the labels attached in
different places on your vehicle. They
include safety warnings as well as
identification information for the vehicle.
For all work on your vehicle, use a
qualified workshop that has the technical
information, skills and equipment required, all
of which a CITROËN dealer is able to
provide.
Installing electrical accessories:
– The fitting of electrical equipment
or accessories not approved by CITROËN
may cause excessive current consumption
and failure of the vehicle's electrical system.
Contact a CITROËN dealer for information on
the range of approved accessories.
– As a safety measure, access to the
diagnostic socket, used for the vehicle's
electronic systems, is reserved strictly for
CITROËN dealers, equipped with the special
tools required (risk of malfunctions of the
vehicle's electronic systems that could cause
breakdowns or serious accidents). The
Manufacturer cannot be held responsible if
this advice is not followed.
– Any modification or adaptation not intended
or authorised by CITROËN or carried out
without meeting the technical requirements
defined by the Manufacturer will result in the
suspension of the commercial warranty.
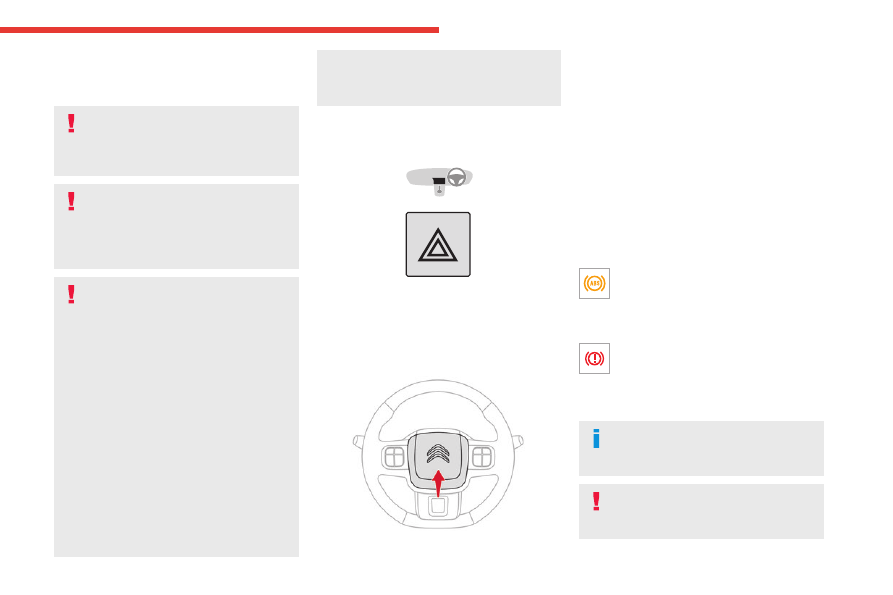
Hazard warning lamps
► Pressing the red button causes all the
direction indicators to flash.
They can operate with the ignition off.
Horn
► Press the central part of the steering wheel.
Anti-lock Braking System
(ABS) and Electronic
Brake Force Distribution
(EBFD)
These systems enhance the vehicle’s stability
and handling during braking, and enable greater
control while cornering, particularly on poor or
slippery road surfaces.
ABS prevents wheel locking in the event of
emergency braking.
EBFD manages the braking pressure wheel by
wheel.
This warning lamp is continuously on in
the event of an ABS malfunction.
The vehicle retains conventional braking. Drive
carefully at a moderate speed.
Contact a CITROËN dealer as soon as possible.
This warning lamp, accompanied by an
audible signal, indicates an EBFD
malfunction.
You must stop as soon as it is safe to do so.
Contact a CITROËN dealer.
The normal operation of the ABS may
result in slight vibrations in the brake
pedal.
When braking in an emergency, press
the brake pedal very firmly and
maintain this pressure.
-------------------------------------------------------------------------------------------------------------------------------------------------------------
24
Safety
When changing wheels (tyres and rims),
ensure that these are approved by the
manufacturer for your vehicle.
After an impact, have these systems
checked by a CITROËN dealer.
Seat belts
Inertia reel
The seat belts are equipped with an inertia reel
which allows the strap length to automatically
adjust to your shape. The seat belt returns to its
storage automatically when it is not used.
The inertia reels are fitted with a device which
automatically locks the strap in the event of a
collision, emergency braking or if the vehicle rolls
over. It can be released by pulling the strap firmly
and then releasing it so that it reels in slightly.
Force limiter
This system reduces the pressure of the seat
belt on the chest of the occupant, thus improving
their protection.
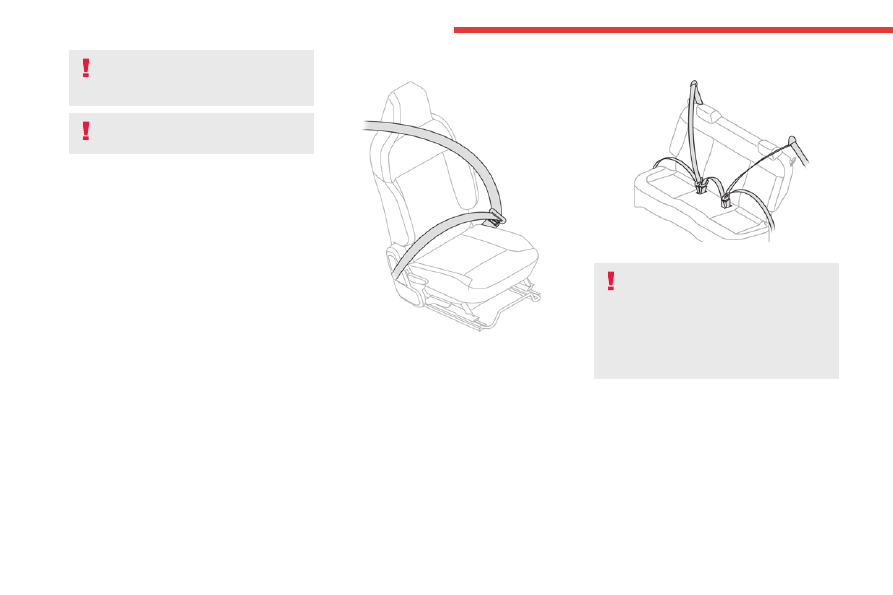
Front seat belts
The front driver seat belt is fitted with inertia reel
and a force limiting system.
The front passenger seat belt is equipped with
inertia reel.
Rear seat belts
The outer seats have a belt with inertia reel.
Before performing any operations on the
rear seats, to avoid damage to the seat
belts, check that:
– the outer seat belts are correctly in the
storage position, lying vertically along the
pillar,
– the central seat belt is stowed.
Fastening
► To fasten the seat belt, pull the webbing and
insert the tongue into the buckle.
► Check whether the seat belt is fastened
correctly by pulling the webbing.
If the driver or co-driver seat belt is not fastened
while the ignition is ON, the seat belt warning
lamp chimes and illuminates until the seat belt is
fastened.
-------------------------------------------------------------------------------------------------------------------------------------------------------------

25
Safety
5
Unlocking
► To unfasten the seat belt, press the red
button written “PRESS” on the buckle.
► Allow the belt to retract and make sure the
webbing is not twisted.
Twisted webbing would not allow smooth
retraction of the belt.
Seat belt not fastened/
unfastened alerts
It comes on in red in the instrument panel
once the system detects that a seat belt is
not fastened or is unfastened.
Advice
The driver must ensure that passengers
use the seat belts correctly and that they
are all fastened before setting off.
Wherever seated in the vehicle, you must
always fasten the seat belt, even for short
journeys.
Do not interchange the seat belt buckles, as
they will not fulfil their role fully.
Before and after use, ensure that the seat belt
is reeled in correctly.
After folding or moving a seat or rear bench
seat, ensure that the seat belt is positioned
and reeled in correctly.
While fastening the seat belt ensure that strap
must pass over your chest and top of your
shoulder and not touch your face, neck, side
of your shoulder or pass under your arm.
An accident or sudden stop could damage
the seat belt, please have your seat belts
inspected by authorized dealers after an
accident or sudden stop.
Do not use a damaged seat belt which would
result in serious injury.
Installation
The lower part of the strap must be
positioned as low as possible on the pelvis.
The upper part must be positioned on the
shoulder.
In order to be effective, a seat belt:
– must be tightened as close to the body as
possible;
– must be pulled in front of you with a smooth
movement, ensuring that it is not twisted;
– must only be used to secure one person;
– must not show signs of tearing or fraying;
– must not be changed or modified, in order
to avoid affecting its performance.
Do not wear your seat belt over hard or
breakable objects in your pockets or on your
clothing. If an accident occurs, objects such
as glasses, pens, etc. under the seat belt can
cause injury.
Recommendations for children
Use a suitable child seat if the passenger
is less than 12 years old or shorter than one
and a half metres.
Never use the same seat belt to secure more
than one child.
Never carry a child on your lap.
For more information on
Child seats
, refer to
the corresponding section.
Recommendations for pregnant
women
Pregnant women should use seat belts,
although specific recommendations about
driving should be made by the woman's
medical advisor. Remember that the lap
portion of the belt should be worn as low as
possible across the hips.
A pregnant woman should not wear the seat
belt across the stomach which would result in
serious injury to the fetus and/or the pregnant
mother.
Maintenance
In accordance with current safety
regulations, for all repairs on your vehicle's
seat belts, go to a qualified workshop with
the skills and equipment needed, which a
CITROËN dealer is able to provide.
Have the seat belts checked regularly by a
CITROËN dealer, particularly if the straps
show signs of damage.
-------------------------------------------------------------------------------------------------------------------------------------------------------------
26
Safety
Clean the seat belt straps with soapy water or
a textile cleaning product, sold by CITROËN
dealers.
Airbags
General information
The airbags have been designed to optimise the
safety of the occupants in the event of a violent
collision.
The airbags are supplementary restraint systems
(SRS) that help cushion the impact force to the
head and chest during severe frontal collisions.
The SRS includes Airbags, Seatbelts, Airbag
ECU, Collision sensors and SRS warning lamp.
Electronic detectors record and analyse the front
impacts sustained in the impact detection zones:
– In the event of violent impact, the airbags
deploy instantly and help better protect the
occupants of the vehicle; immediately after the
impact, the airbags deflate rapidly in order not
to hinder the visibility or the possible exit of the
occupants.
– In the event of a slight impact, a rear impact
and under certain rollover conditions, the airbags
may not deploy; only the seat belt helps to
protect you in these situations.
During a frontal crash, children could be fatally
injured if they are sitting on driver’s lap/standing
very close to the dashboard, as the airbags exert
severe force levels during deployment.
The seriousness of the impact depends on the
nature of the obstacle and the speed of the
vehicle at the moment of collision.
The airbags do not operate when the
ignition is switched off.
This equipment will only deploy once. If a
second impact occurs (during the same or a
subsequent accident), the airbag will not be
deployed again.
When one or more airbags are deployed,
the detonation of the pyrotechnic charge
incorporated in the system makes a noise and
releases a small quantity of smoke.
This smoke is not harmful, but sensitive
individuals may experience slight irritation.
The detonation noise associated with the
deployment of one or more airbags may result
in a slight loss of hearing for a short time.
The airbags will deploy irrespective of
whether the seat belt is buckled or not. In
order to reduce the risk of SERIOUS INJURY
or DEATH, we recommend occupants to
always be buckled.
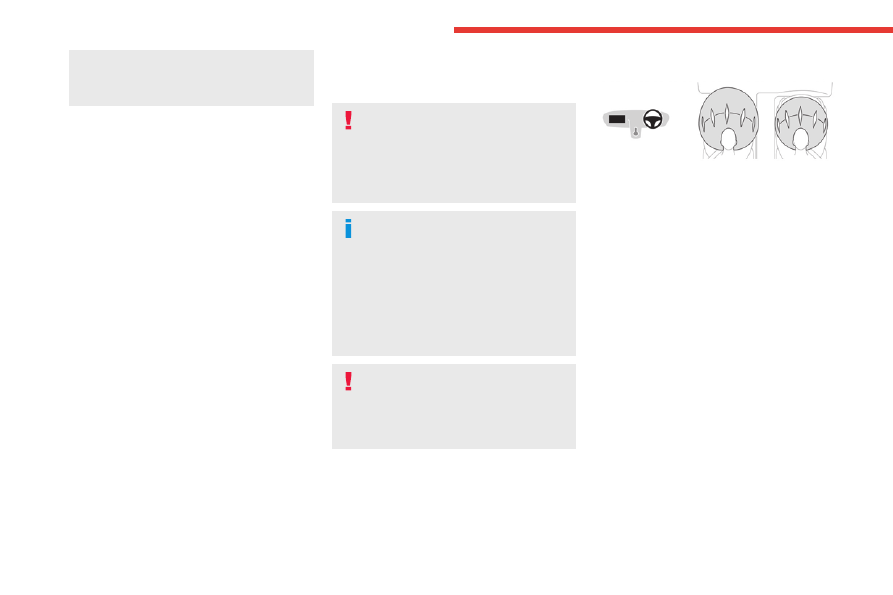
Front airbags
This system protects the driver and front
passenger in the event of a serious front impact,
in order to limit the risk of head and chest
injuries.
The driver's airbag is fitted in the centre of the
steering wheel; the front passenger airbag is
fitted in the dashboard above the glove box.
Deployment
1. Frontal collision
Airbags may deploy during severe front
collision when the crash intensity is above
the threshold and the angle of impact is less
than or equal to 30 degrees with respect to
longitudinal axis of vehicle.
2. Collision with utility poles or trees
Airbags may deploy when the vehicle hits
pole or tree with sufficient intensity to trigger
the airbag. The crash intensity should be
above the threshold to inflate the airbag.
3. Underride collision
Airbags may deploy when the vehicle rides
under the trucks or vehicles with higher
ground clearance. The crash intensity should
be above the threshold to inflate the airbag.
-------------------------------------------------------------------------------------------------------------------------------------------------------------
27
Safety
5
Non-inflation conditions
1. Low speed front collisions
The airbags may not deploy if the collision is
not severe and below the design threshold
intensity. The force of impact is less in this
case and much of the protection during low
speed crash is provided by seat belts, if
properly worn.
2. Rear collisions
Frontal airbags are not designed to deploy
when there is a rear crash, since the
occupants tend to move backwards. In this
case, the airbags will not provide any benefit
to cushion the force of impact.
3. Side collisions
Frontal airbags may not deploy during side
crash, since the occupant moves sideways.
4. Angled collisions
Airbags may not deploy if the angle of
collision is beyond 30 degrees with the
head-on vehicle or the rigid wall or curb or
pole.
5. Roll over collisions
Frontal airbags may not deploy in roll over
conditions, as the occupant moves sideways
or rolls. Important to wear seat belts in this
case, to avoid floating inside the vehicle and
risk serious injuries.
6. Speed breakers & pot holes
Airbags may not deploy when crossing speed
breakers even at high speed or when vehicle
drops into pot hole or ditch drop.
7. Curb hits
The airbag may not deploy when the vehicle
hits the curbs.
8. Pedestrian impact
Airbags will not inflate when the vehicle hits
the pedestrian.
Malfunction
If this warning lamp comes on in the
instrument panel, you must contact a
CITROËN dealer to have the system checked.
The airbags may not be deployed in the event of
a serious impact.
Advice
For the airbags to be fully effective,
observe the safety recommendations
below.
Adopt a normal upright sitting position.
Fasten the seat belt ensuring it is correctly
positioned and adjusted.
Do not leave anything between the occupants
and the airbags (a child, pet, object, etc.), nor
fix or attach anything close to or in the way of
the airbag release trajectory; this could cause
injuries during their deployment.
Never modify the original definition of your
vehicle, particularly in the area directly around
the airbags.
After an accident or if the vehicle has been
stolen, have the airbag systems checked.
All work on the airbag systems must only be
performed by a CITROËN dealer.
Even if all of the precautions mentioned
are observed, a risk of injury or of minor
burns to the head, chest or arms cannot be
ruled out when an airbag is deployed. The
airbag inflates almost instantly (within a few
milliseconds) then deflates within the same
time discharging the hot gas via openings
provided for this purpose.
Do not drive holding the steering wheel
by its spokes or resting your hands on
the centre part of the wheel.
Passengers must not place their feet on the
dashboard.
Do not smoke as deployment of the airbags
can cause burns or the risk of injury from a
cigarette or pipe.
Never remove or pierce the steering wheel or
hit it violently.
Do not fix or attach anything to the steering
wheel or dashboard, as this could cause
injuries when the airbags are deployed.
-------------------------------------------------------------------------------------------------------------------------------------------------------------
28
Safety
Child seats
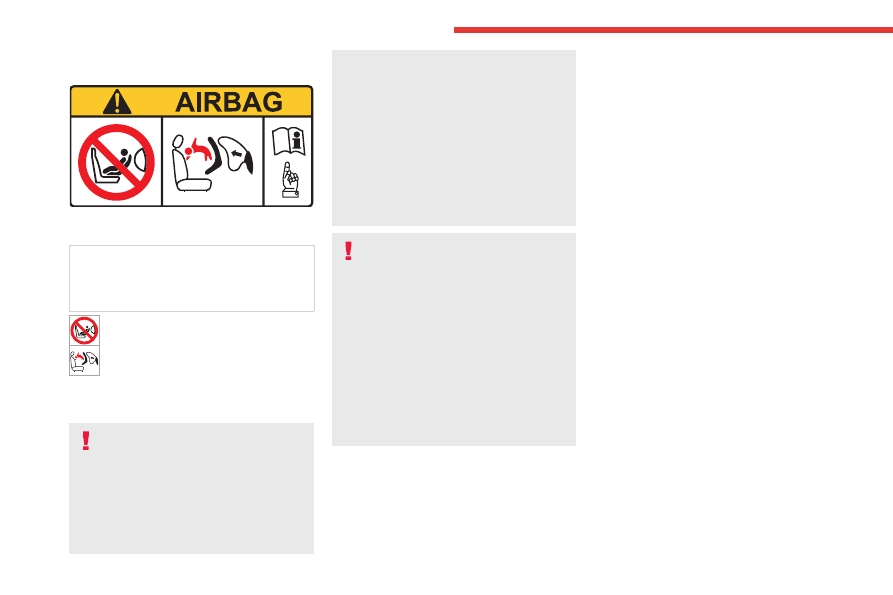
Warning label on the sun visor - Front
passenger airbag
NEVER use a rearward facing child restraint
on a seat protected by an ACTIVE AIRBAG
in front of it, SERIOUS INJURY to the CHILD
may occur.
Do not install a rear-facing child restraint
on the front passenger’s seat.
A child in a rear-facing child restraint
could be seriously harmed if the
passenger's front airbag inflates. The inflated
airbag would be too close to the back of a
rear-facing child restraint.
An incorrectly installed child seat
compromises the child's safety in the
event of an accident.
Ensure that there is no seat belt or seat belt
buckle under the child seat, as this could
destabilise it.
Remember to fasten the seat belts or the
harness of child seats, keeping the slack
relative to the child's body to a minimum,
even for short journeys.
When installing a child seat using the seat
belt, ensure that the seat belt is tightened
correctly on the child seat and that it secures
the child seat firmly on the seat of the vehicle.
Ensure that the head restraint is stored or
attached securely to prevent it from being
thrown around the vehicle in the event of
sharp braking. Refit the head restraint once
the child seat has been removed.
Additional protections
To prevent accidental opening of the
doors and rear windows, use the "Child lock".
Take care not to open the rear windows by
more than one third.
To protect young children from the rays of the
sun, fit side blinds on the rear windows.
As a safety precaution, do not leave:
– a child alone and unattended in a vehicle,
– a child or an animal in a vehicle which is
exposed to the sun, with the windows closed,
– the keys within reach of children inside the
vehicle.
-------------------------------------------------------------------------------------------------------------------------------------------------------------

29
Safety
5
Child restraint system
The suitability of each passenger's seat position for carriage of children and fitting of child restraint system is shown below. Whenever you carry children
up to 12 years of age, properly use the child restraints which conform to AIS 072, the standard for child restraints, referring to the table.
Seating position (or other site)
MASS GROUP
Front
passenger
Rear outboard
LH
*
Rear centre
Rear outboard
RH
*
Intermediate
outboard*
Intermediate
centre
Group 0
Up to 10 kg
X
U
X
X
N.A
N.A
Group 0+
Up to 13 kg
X
U
X
X
N.A
N.A
Group 1
9 to 18 kg
X
U
X
X
N.A
N.A
Group 2
15 to 25 kg
X
U
X
X
N.A
N.A
Group 3
22 to 36 kg
X
U
X
X
N.A
N.A
U
Suitable for "universal" category restraints approved for use in this mass group.
Universal is the category in the AIS 072.
X
Seat position not suitable for children in this mass group.
N.A
Seat position not available for children in this mass group.
* Outboard indicates window side seat.
ELR type belt
Install your child restraint system according to
the instructions provided by the child restraint
system manufacturer.
Make sure the seat belt is securely latched.
Try to move the child restraint system in all
directions to make sure it is securely installed.
-------------------------------------------------------------------------------------------------------------------------------------------------------------
30
Safety
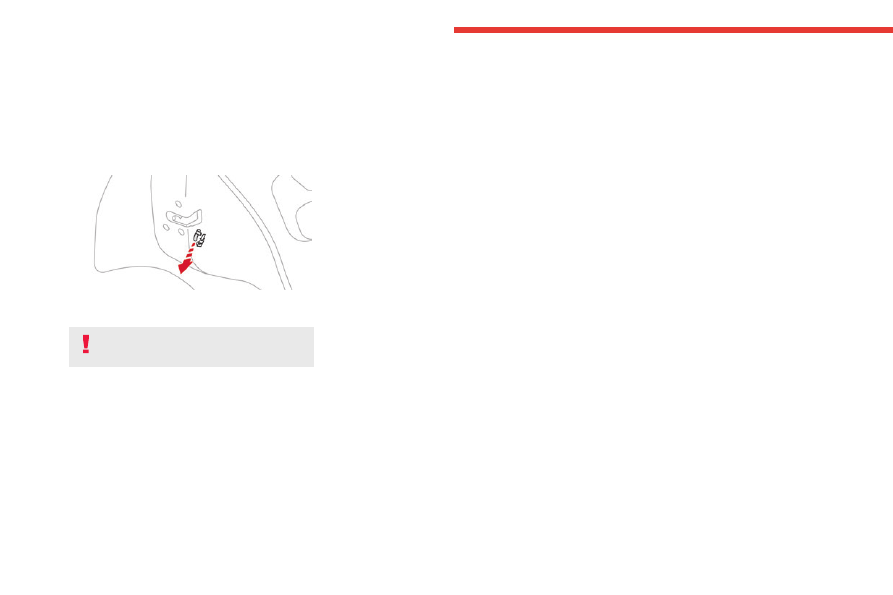
Manual child lock
This system prevents opening of a rear door
using its interior handle.
The control is located on the edge of each rear
door (marked by a label).
Locking / Unlocking
► To lock, pull the lever down.
► To unlock, pull the lever up.
Refer to the legislation in force in your
country before using this system.
-------------------------------------------------------------------------------------------------------------------------------------------------------------

31
Driving
6
Driving recommendations
► Observe the driving regulations and remain
vigilant whatever the traffic conditions.
► Monitor your environment and keep your
hands on the wheel to be able to react to
anything that may happen any time.
► Drive smoothly, anticipate the need for
braking and maintain a longer safety distance,
especially in bad weather.
► Stop the vehicle to carry out operations that
require close attention (such as adjustments).
► During long trips, take a break every two
hours.
Important!
Never leave the engine running in a
closed space without sufficient
ventilation.
Internal combustion engines emit
toxic exhaust gases such as carbon
monoxide. Danger of poisoning and death!
In severe wintry conditions, let the engine
run for 4 minutes before moving off, to
ensure the correct operation and durability of
the mechanical components of your vehicle
(engine and gearbox).
Never drive with the parking brake
applied
. Risk of overheating and
damage to the braking system!
Do not park the vehicle or leave the
engine running on a flammable
surface (dry grass, dead leaves, etc.).
The
exhaust system of your vehicle is very hot,
even several minutes after the engine stops.
Risk of fire!
Never leave a vehicle unattended with
the engine running.
If you have to leave
your vehicle with the engine running, apply
the parking brake and put the gearbox into
neutral.
Never leave children inside the vehicle
unsupervised
.
On flooded roads
We strongly advise against driving on flooded
roads, as this could cause serious damage to
the engine or gearbox, as well as to the electrical
systems of your vehicle.
If you have to drive on a flooded road:
► drive as slowly as possible without stalling. In
all cases, do not exceed 10 km/h,
► do not stop and do not switch off the engine.
On leaving the flooded road, as soon as safety
conditions allow, make several light brake
applications to dry the brake discs and pads.
If in doubt about the state of your vehicle,
contact a CITROËN dealer.
Starting / Switching off the
engine
Key ignition switch
It has 4 positions:
1. Stop
Inserting and removing the key, steering
column locked.
2. ACC
Steering column unlocked, use of the
vehicle's electric equipment.
3. ON
(Ignition)
Steering column unlocked, ignition on, engine
running.
4. Starting
-------------------------------------------------------------------------------------------------------------------------------------------------------------
32
Driving
Avoid attaching heavy objects to the key
or the remote control. It would weigh
down on its shaft in the ignition switch and
could cause a malfunction.
Ignition on position
It allows the use of the vehicle's electric
equipment or portable devices to be charged.
Starting the engine
With the parking brake applied:
► Place the gear lever in neutral then fully
depress the clutch pedal.
► Insert the key into the ignition switch; the
system recognises the code.
► Unlock the steering column by simultaneously
turning the steering wheel and the key.
In certain cases, you may have to apply
significant force to move the steering
wheel (wheels on full lock, for example).
► Operate the starter motor by turning the key
to position
3
without pressing the accelerator
pedal, until the engine starts. Once the engine
starts, release the key.
After a cold start, preheating the catalytic
converter can cause noticeable engine
vibrations for anything up to 2 minutes while
stationary with the engine running
(accelerated idle speed).
If the engine does not start straight away,
switch off the ignition. Wait a few
seconds before operating the starter motor
again. If the engine does not start after a few
attempts, do not keep trying - risk of
damaging the starter motor, the battery and
the engine.
Contact a CITROËN dealer.
In mild conditions, do not leave the
engine at idle to warm up but move off
straight away and drive at moderate speed.
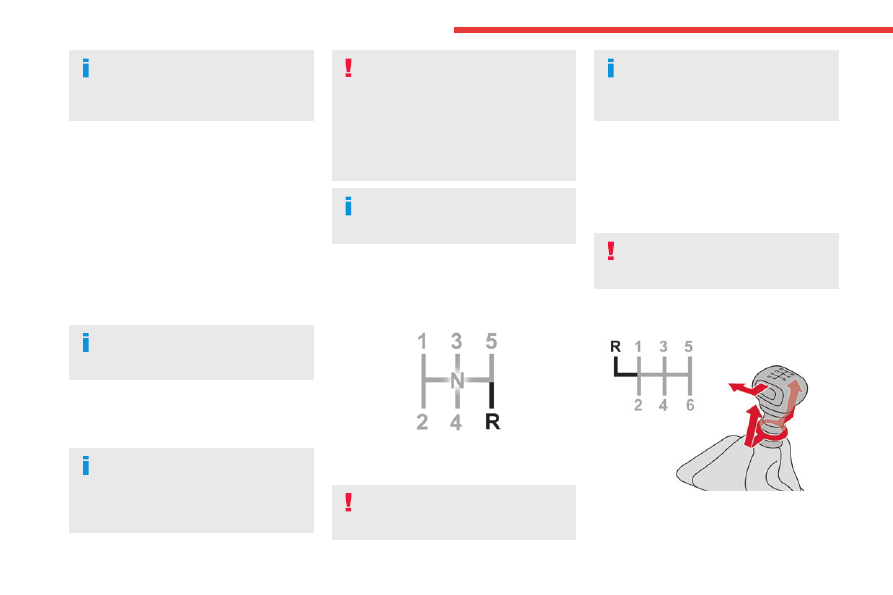
5-speed manual gearbox
Engaging reverse gear
► Fully depress the clutch pedal.
► Push the gear lever fully to the right, then
backwards.
Only engage reverse gear when the
vehicle is stationary with the engine at
idle.
As a safety precaution and to facilitate
starting the engine:
– Always select neutral.
– Depress the clutch pedal.
6-speed manual gearbox
Engaging 5
th
or 6
th
gear
► Move the gear selector fully to the right to
engage 5
th
or 6
th
gear.
Failure to follow this instruction could
cause permanent damage to the gearbox
(inadvertent engagement of 3
rd
or 4
th
gear).
Engaging reverse gear
► Raise the ring under the knob and move the
gear selector to the left, then forwards.
-------------------------------------------------------------------------------------------------------------------------------------------------------------
33
Driving
6
Only engage reverse gear when the
vehicle is stationary with the engine at
idle.
As a safety precaution and to facilitate
starting the engine:
– Always select neutral.
– Press the clutch pedal.
Gear efficiency indicator
This system helps reduce fuel consumption by
recommending the most appropriate gear.
Operation
The system advises to change gear.
The information appears in the instrument
panel in the form of an ascending or
descending arrow.
The number displayed is the current gear.
Gear shift recommendations should not be
considered compulsory. In fact, the road layout,
the traffic density and safety remain the deciding
factors when choosing the best gear. The driver
therefore remains responsible for deciding
whether or not to follow the indications issued by
the system.
This function cannot be deactivated.
The system adapts its gear shift
recommendation according to the driving
conditions (slope, load, etc.) and the driver’s
requirements (power, acceleration, braking,
etc.).
The system never suggests:
– engaging first gear;
– engaging reverse.
Overspeed alert
An audible overspeed alert is triggered when the
vehicle exceeds predefined speed thresholds.
When the vehicle speed is greater than 80 km/h,
the alert is emitted every 2 minutes.
When the vehicle speed is greater than 120
km/h, the alert is emitted every 2 seconds.
This system cannot be modified nor
deactivated.
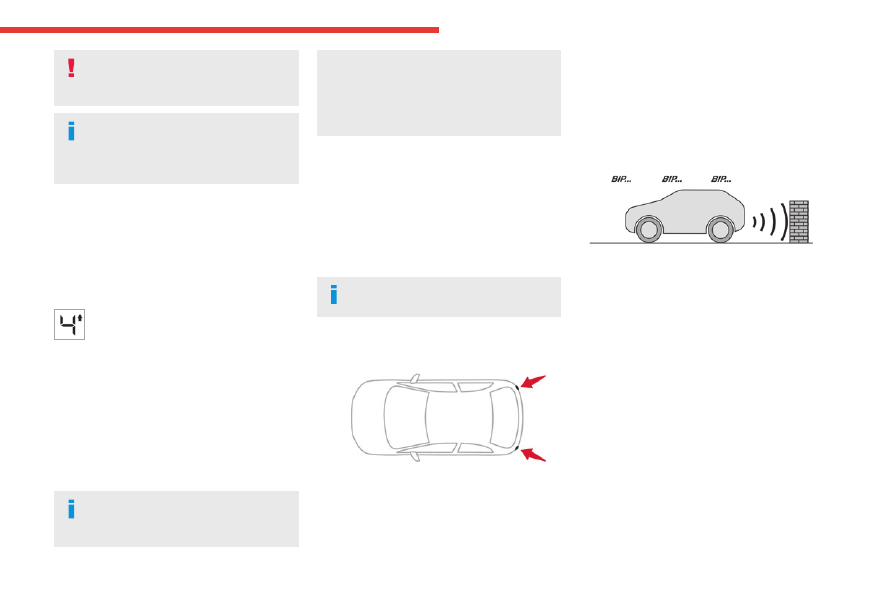
Parking sensors
Using sensors located in the bumper, this
system signals the proximity of obstacles
(e.g. pedestrian, vehicle, tree, barrier) present in
their field of detection.
Rear parking sensors
The system is switched on by engaging reverse
gear.
The system is switched off when disengaging
reverse gear.
Audible assistance
The system signals the presence of obstacles
within the sensors’ detection zone.
The proximity information is given by an
intermittent audible signal, the frequency of
which increases as the vehicle approaches the
obstacle.
When the distance between the vehicle
and the obstacle becomes less than about
60 centimetres, the audible signal becomes
continuous.
Operating limits
If the boot is heavily loaded, the vehicle may tilt,
affecting distance measurements.
-------------------------------------------------------------------------------------------------------------------------------------------------------------
Нет комментариевНе стесняйтесь поделиться с нами вашим ценным мнением.
Текст