Citroën C3 (2023 year). Manual in english — page 3
34
Driving
Manoeuvring aids cannot, in any
circumstances, replace the need for
vigilance on the part of the driver.
The driver must always check the
surroundings of the vehicle before and during
the whole manoeuvre, in particular using the
mirrors.
-------------------------------------------------------------------------------------------------------------------------------------------------------------
35
Practical information
7
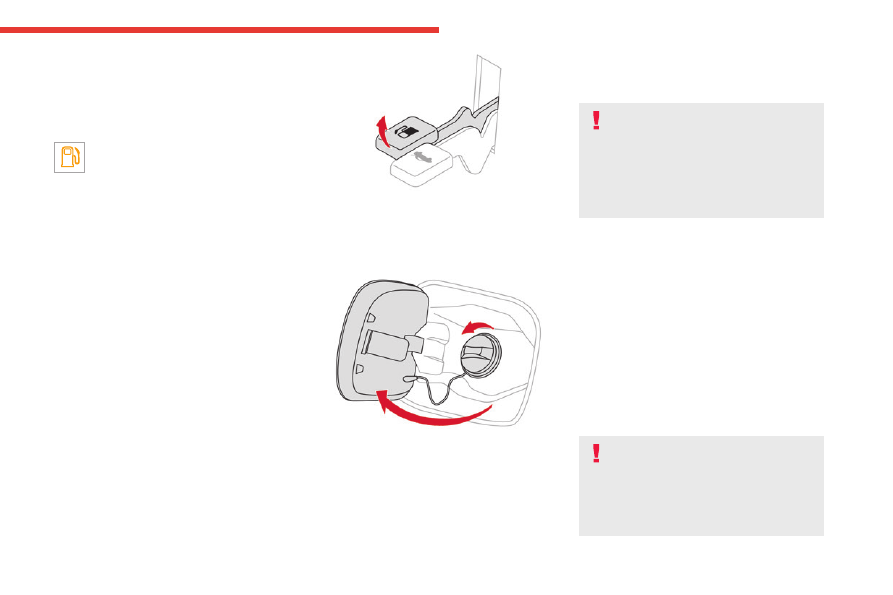
Refuelling
Fuel tank capacity: 30 litres.
Reserve level: approximately 5 litres.
Low fuel level
When the low fuel level is reached, this
warning lamp comes on on the instrument
panel, accompanied by an audible signal. When
it first comes on,
about 5 litres
of fuel remain.
Until sufficient fuel is added, this warning lamp
appears every time the ignition is switched on,
accompanied by an audible signal. When driving,
the audible signal are repeated with increasing
frequency as the fuel level drops towards
0
.
You must refuel as soon as possible to avoid
running out of fuel.
Refuelling
Additions of fuel must be of at least 5 litres, in
order to be registered by the fuel gauge.
Opening the filler cap may create a noise caused
by an inrush of air. This vacuum is entirely
normal, resulting from the sealing of the fuel
system.
To refuel in complete safety:
►
You must switch off the engine.
► Lift the fuel filler flap lever, located on the
floor beside the driver's seat, to open the flap.
► Take care to select the pump that delivers the
correct fuel type for the vehicle's engine (see a
reminder label on the inside of the filler flap).
► Turn the filler cap to the left and remove it.
► Introduce the filler nozzle and push it in as
far as possible before starting to refuel (risk of
blowback).
► Fill the tank.
Do not continue past the first cut-off of the
nozzle, as this may cause malfunctions.
► Refit the filler cap.
► Turn it to the right.
► Push the filler flap to close it.
If you have put in wrong/dirty/
contaminated fuel or H2O mixed fuel in
the vehicle, you must have the fuel tank
drained and filled with the correct fuel before
starting the engine.
Contact a CITROËN dealer for the fuel
system cleaning.
The vehicle is fitted with a catalytic converter, a
device which helps to reduce the level of harmful
emissions in the exhaust gases.
You must use unleaded fuel.
The filler neck is narrower, admitting unleaded
petrol nozzles only.
Fuel cut-off
Your vehicle is equipped with a safety device
which cuts off the fuel supply in the event of a
collision.
Bonnet
When the engine is hot, handle the
exterior safety catch and the bonnet stay
with care (risk of burns), using the protected
area.
When the bonnet is open, take care not to
damage the safety catch.
-------------------------------------------------------------------------------------------------------------------------------------------------------------
36
Practical information
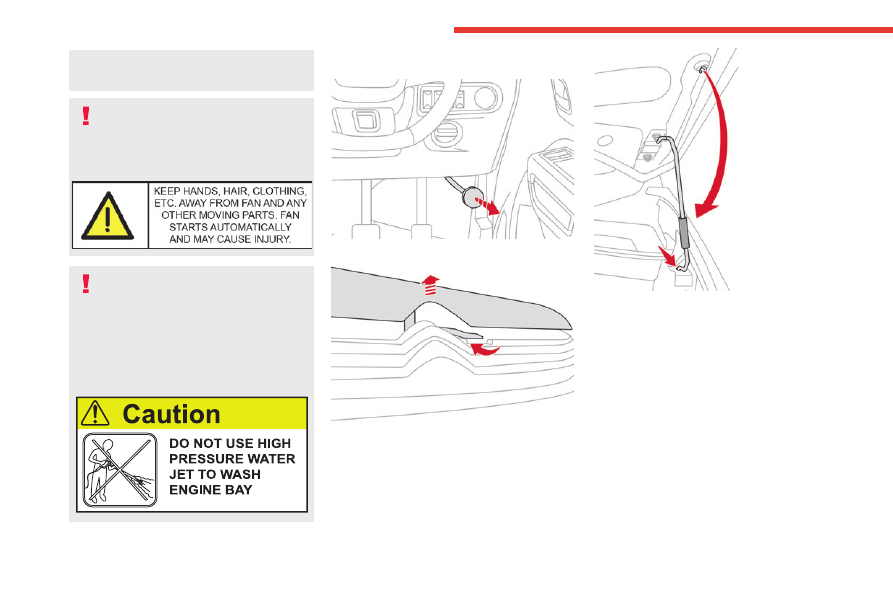
Do not open the bonnet under very windy
conditions.
Cooling of the engine when stopped
The engine cooling fan may start after
the engine has been switched off.
Take care with objects or clothing that
could be caught in the blades of the fan!
Water washing in the engine
compartment including high pressure
water washing may cause the failure of
electrical circuits located in the engine
compartment.
Never allow water or other liquids to come in
contact with electrical/electronic components
inside the vehicle as this may damage them.
Opening
► Pull the release lever towards you.
► Lift the safety catch and raise the bonnet.
► Unclip the stay from its housing and place it
in the support slot to hold the bonnet open.
Closing
► Take the stay out of the support slot.
► Clip the stay in its housing.
► Lower the bonnet and release it near the end
of its travel.
► Pull on the bonnet to check that it is locked
correctly.
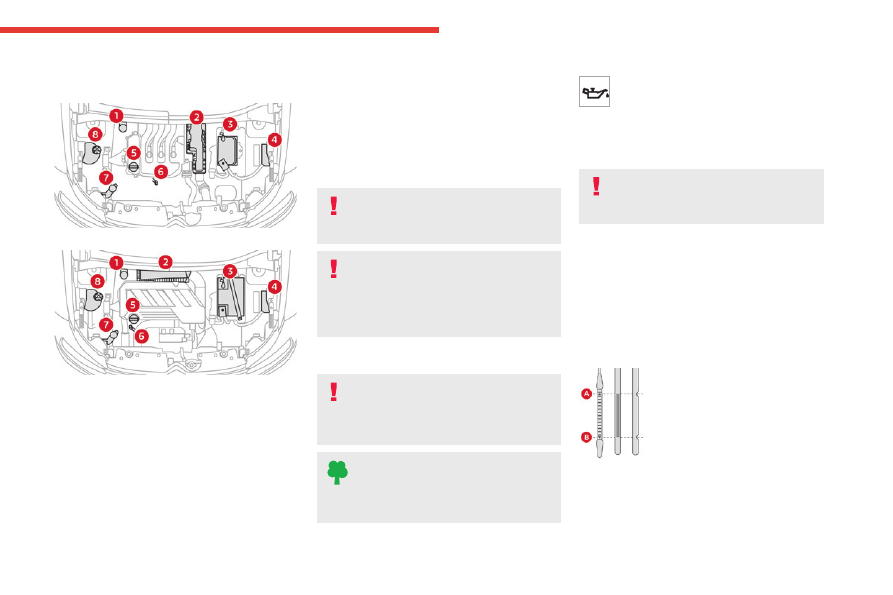
Engine compartment
The engines represented are examples given for
illustration purposes only.
The locations of the following elements may
vary:
-------------------------------------------------------------------------------------------------------------------------------------------------------------
37
Practical information
7
– Air filter.
– Engine oil dipstick.
– Engine oil filler cap.
NA engine
Turbo engine
1.
Brake fluid reservoir
2.
Air filter
3.
Battery
4.
Fusebox
5.
Engine oil filler cap
6.
Engine oil dipstick
7.
Screenwash fluid reservoir
8.
Engine coolant reservoir
Checking levels
Check all of the following levels regularly in
accordance with the manufacturer's service
schedule. Top them up if required, unless
otherwise indicated.
If a level drops significantly, have the
corresponding system checked by a CITROËN
dealer.
The fluids must comply with the
manufacturer's requirements and with
the vehicle's engine.
Take care when working under the
bonnet, as certain areas of the engine
may be extremely hot (risk of burns) and the
cooling fan could start at any time (even with
the ignition off).
Used products
Avoid prolonged contact of used oil or
fluids with the skin.
Most of these fluids are harmful to health and
very corrosive.
Do not discard used oil or fluids into
sewers or onto the ground.
Empty used oil into the containers reserved
for this purpose at a CITROËN dealer.
Engine oil
The level is checked, with the engine
having been switched off for at least 30
minutes and on level ground, using the dipstick.
To know how often the engine oil should be
replaced, refer to the manufacturer's servicing
schedule.
In order to maintain the reliability of the
engine and emissions control system,
never use additives in the engine oil.
Checking using the dipstick
For the location of the dipstick, please refer
to the illustration of the corresponding engine
compartment.
► Grasp the dipstick by its coloured grip and
pull it out completely.
► Wipe the end of the dipstick using a clean,
lint-free cloth.
► Reinsert the dipstick and push fully down,
then pull it out again to visually check the oil
level: the correct level is between marks
A
(max)
and
B (min).
Do not start the engine
if the level is:
– above mark
A
: contact a CITROËN dealer.
-------------------------------------------------------------------------------------------------------------------------------------------------------------
38
Practical information
– below mark
B
: top up the engine oil
immediately.
Oil grade
Before topping up or changing the engine
oil, check that the oil is suitable for the engine
and complies with the recommendations in
the service schedule supplied with the vehicle
(or available from your CITROËN dealer).
Use of non-recommended oil may invalidate
the contractual warranty in the event of
engine failure.
Topping up the engine oil level
For the location of the engine oil filler cap, please
refer to the corresponding under-bonnet engine
compartment illustration.
► Add oil in small quantities, avoiding any spills
on engine components (risk of fire).
► Wait a few minutes before checking the level
again using the dipstick.
► Top up the level if necessary.
► After checking the level, carefully screw the
oil filler cap back on and replace the dipstick in
its tube.
Within 30 minutes of adding oil, the oil
level indication in the instrument panel
when the ignition is switched on is not valid.
Brake
fluid
The level of this fluid should be close to
the "
MAX
" mark. If not, check the leakage
in the circuit and the brake pad wear.
To know how often the brake fluid should be
replaced, refer to the manufacturer's servicing
schedule.
Clean the cap before removing it to refill.
Use only DOT3 or DOT4 brake fluid from
a sealed container.
Engine coolant
It is normal to top up this fluid between
two services.
The check and top-up must only be done with
the engine cold.
A low level presents a risk of serious damage to
the engine.
The level of engine coolant should be close to
the "
MAX
" mark but should never exceed it.
If the level is close to or below the "
MIN
” mark, it
is essential to top up.
When the engine is hot, the temperature of
engine coolant is regulated by the fan.
As the cooling system is pressurised, wait at
least one hour after switching off the engine
before carrying out any work.
In order to avoid the risk of burning, if you need
to top up in an emergency, wrap a cloth around
the cap and unscrew the cap by two turns to
allow the pressure to drop.
Once the pressure has dropped, remove the cap
and top up to the required level.
Screenwash fluid
Top up to the required level when
necessary.
Fluid specification
The fluid must be topped up with a ready-to-use
mixture.
In winter (temperatures below zero), a liquid
containing an agent to prevent freezing must
be used which is appropriate for the prevailing
conditions, in order to protect the elements of the
system (pump, tank, ducts, jets, etc.).
Filling with pure water is prohibited under
all circumstances (risk of freezing,
limestone deposits, etc.).
-------------------------------------------------------------------------------------------------------------------------------------------------------------
39
Practical information
7
Consumables
Designation
Grade/Specs
Quantity
Engine options
EB2 - NA
5W40 B712296 Synthetic
2.55 Lts
EB2 G2 Turbo
5W30 B712297 Synthetic
3.1 Lts
Transmission options
Transmission fluid - MA
75W - 80 B13/0067 API GL-4
2.1 ± 0.2 Lts
Transmission fluid - MB6
75W - 80 B13/0067 API GL-4
1.8 ± 0.2 Lts
HVAC
Compressor Oil
PS R1
120 ml
AC Refrigerant for EB2 - NA
R134A
425 grams
AC Refrigerant for EB2 G2 Turbo
R134A
550 grams
Cooling
Coolant (Premixed) for EB2 NA
(Antifreeze Coolant 40% + DM / DI
Water 60%)
GOLDEN CRUISER LONG LIFE
ANTIFREEZE-COOLANT, GC LLC
2200 NP
4.65 ± 0.1 Lts
Coolant (Premixed) for EB2 G2
Turbo
(Antifreeze Coolant 40% + DM / DI
Water 60%)
GOLDEN CRUISER LONG LIFE
ANTIFREEZE-COOLANT, GC LLC
2200 NP
5.7 ± 0.1 Lts
Brake/Clutch
Brake fluid
DOT3/DOT4
450 ± 50 ml
Clutch fluid
Clutch fluid line connected with brake reservoir
Axle
Axle oil
NA
Checks
Unless otherwise indicated, check these
components in accordance with the
manufacturer's service schedule.
Otherwise, have them checked by a CITROËN
dealer.
Only use products recommended by
CITROËN.
In order to optimise the operation of
components as important as those in the
braking system, CITROËN selects and offers
very specific products.
12 V battery
Check regularly during service that the
terminals and coin plug caps are clean
and tightened.
-------------------------------------------------------------------------------------------------------------------------------------------------------------
40
Practical information
The battery electrolyte must be filled. If the level
is found to be below the “MIN” level line, add
distilled water to the “MAX” level line.
For more information on the precautions
to take before any work on the
12 V
battery
, refer to the corresponding section.
Passenger compartment
filter
Depending on the environment and the
use of the vehicle (e.g. dusty atmosphere,
city driving),
change it twice as often, if
necessary
.
A clogged passenger compartment filter
can adversely affect air conditioning
system performance and generate
undesirable odours.
Air filter
Depending on the environment and the
use of the vehicle (e.g. dusty atmosphere,
city driving),
change it twice as often, if
necessary
.
Oil filter
Change the oil filter each time the engine
oil is changed.
Manual gearbox
The gearbox does not require any
maintenance (no oil change).
Brake pads
Brake wear depends on the style of
driving, particularly in the case of vehicles
used in town, over short distances. It may be
necessary to have the condition of the brakes
checked, even between vehicle services.
Unless there is a leak in the circuit, a drop in the
brake fluid level indicates that the brake pads
are worn.
After washing the vehicle, moisture, or in
wintry conditions, ice can form on the
brake discs and pads: braking efficiency may
be reduced. Gently dab the brakes to dry and
defrost them.
Brake disc and drum wear
For information on checking brake disc
and drum wear, contact a CITROËN
dealer.
Wheels and tyres
The inflation pressure of all tyres,
including the spare wheel, must be
checked on "cold” tyres.
The pressures indicated on the tyre pressure
label are valid for "cold" tyres. If you have driven
for more than 10 minutes or more than 10
kilometres at over 50 km/h, add 0.3 bar (30 kPa)
to the values indicated on the label.
Under-inflation increases fuel
consumption. Non-compliant tyre
pressure causes premature wear on tyres and
has an adverse effect on the vehicle's road
holding - risk of an accident!
Driving with worn or damaged tyres reduces the
braking and road holding performance of the
vehicle. It is recommended to regularly check the
condition of the tyres (tread and sidewalls) and
wheel rims as well as the presence of the valves.
When the wear indicators no longer appear set
back from the tread, the depth of the grooves is
less than 1.6 mm; it is imperative to replace the
tyres.
Using different size wheels and tyres from those
specified can affect the lifetime of tyres, wheel
rotation, ground clearance, the speedometer
reading and have an adverse effect on road
holding.
Fitting different tyres on the front and rear axles
can cause ABS and EBFD systems to mistime.
Shock absorbers
It is not easy for drivers to detect when
shock absorbers are worn. Nevertheless,
the shock absorbers have a major impact on
road-holding and braking performance.
For your safety and driving comfort, it is
important to have them regularly checked by a
CITROËN dealer.
-------------------------------------------------------------------------------------------------------------------------------------------------------------
41
Practical information
7
Timing and accessory kits
Timing and accessory kits are used from
the time the engine is started until it is
switched off. It is normal for them to wear over
time.
A faulty timing or accessory kit can damage
the engine, rendering it unusable. Observe the
recommended replacement frequency, stated in
distance travelled or time elapsed, whichever is
reached first.
Advice on care and
maintenance
General recommendations
Observe the following recommendations to avoid
damaging the vehicle.
Exterior
Never use a high-pressure jet wash in
the engine compartment - risk of
damaging the electrical components!
Do not wash the vehicle in bright sunshine or
extremely cold conditions.
When washing the vehicle in an
automatic roller-brush car wash, be sure
to lock the doors.
When using a pressure washer, hold the
lance at least 30 cm from the vehicle
(particularly when cleaning areas containing
chipped paint, sensors or seals).
Promptly clean up any stains containing
chemicals liable to damage the vehicle's paint
(including tree resin, bird droppings, insect
secretions, pollen and tar).
If justified by the environment, clean the
vehicle more frequently to remove salty
deposits (in coastal areas), soot (in industrial
areas) and mud (in wet or cold areas). These
substances can be highly corrosive.
Contact a CITROËN dealer for advice on
removing stubborn stains requiring special
products (such as tar or insect removers).
Preferably, have paint touch-ups performed
by a CITROËN dealer.
The versions provided with roof rails are
not designed for fitting roof racks. It is
only for aesthetic factor.
Do not apply loads on the roof rails.
Interior
When washing the vehicle, never use a
water hose or high-pressure jet to clean
the interior.
Liquids carried in cups or other open
containers can spill, presenting a risk of
damage if they come into contact with the
controls in the dashboard and centre console.
Be vigilant!
Bodywork
High-gloss paint
Do not use abrasive products, solvents,
petrol or oil to clean the bodywork.
Never use an abrasive sponge to clean
stubborn stains - risk of scratching the
paintwork!
Do not apply polish in strong sunshine, or to
plastic or rubber parts.
Use a soft cloth and soapy water or a pH
neutral product.
Gently wipe the bodywork with a clean
microfibre cloth.
Apply polish with the vehicle clean and dry.
Comply with the instructions for use stated on
the product.
-------------------------------------------------------------------------------------------------------------------------------------------------------------
42
In the event of a breakdown
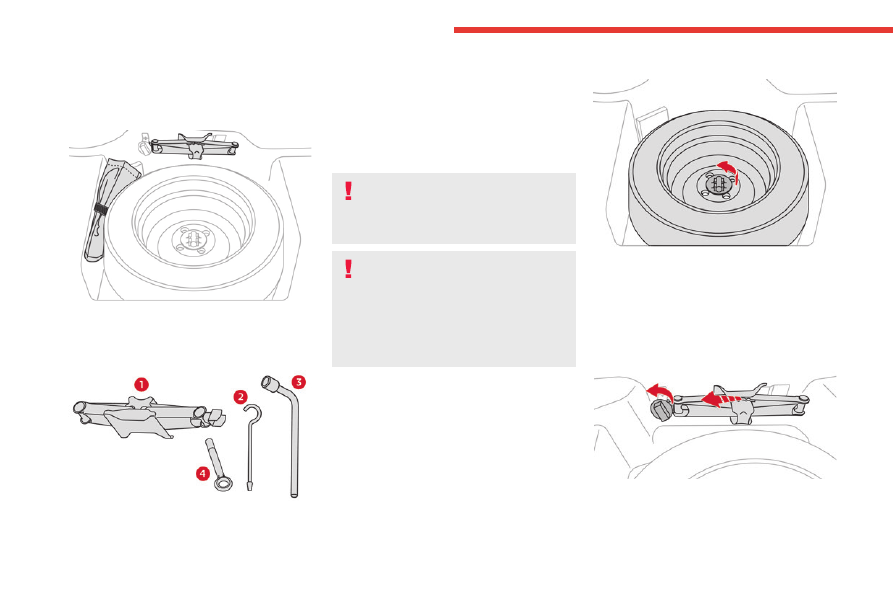
Tool kit
Set of tools supplied with the vehicle.
Accessing the tools
The tools are located under the boot floor carpet,
with the spare wheel.
List of tools
1.
Jack
To raise the vehicle.
2.
Jack handle
3.
Wheel wrench
To remove the wheel bolts.
4.
Removable towing eye
For more information on
Towing the vehicle
and using the removable towing eye, refer to the
corresponding section.
These tools are specific to the vehicle
and may vary according to the level of
equipment.
Do not use them for any other purpose.
The jack must only be used to change a
wheel with a damaged or punctured tyre.
Do not use any jack other than the one
supplied with the vehicle.
If the vehicle does not have its original jack,
contact a CITROËN dealer.
The jack does not require any maintenance.
Spare wheel
Access to the spare wheel
The spare wheel is installed in the boot, under
the floor carpet.
Removing the spare wheel
► Rotate the fixing screw to unlock the spare
wheel.
► Lift the spare wheel towards you from the
rear.
► Take the wheel out of the boot.
Removing the jack
► Rotate the fixing screw to unlock the jack on
one end.
► Tilt the jack towards the right and lift it from
the rear.
-------------------------------------------------------------------------------------------------------------------------------------------------------------
43
In the event of a breakdown
8
Removing a wheel
Parking the vehicle
Immobilise the vehicle where it does
not obstruct traffic: the ground must be level,
stable and non-slippery.
With a manual gearbox, engage first gear to
lock the wheels, apply the parking brake and
switch off the ignition.
Check for the fixed illumination of the parking
brake indicator lamps in the instrument panel.
The occupants must get out of the vehicle
and wait where they are safe.
If necessary, place a chock under the wheel
diagonally opposite the wheel to be changed.
Never go underneath a vehicle raised using a
jack; use an axle stand.
Wheel with wheel trim
When removing the wheel
, first remove
the wheel trim by pulling at the valve aperture.
When refitting the wheel
, refit the wheel
trim, starting by placing its aperture in line
with the valve and then pushing it into place
all round its edge with the palm of your hand.
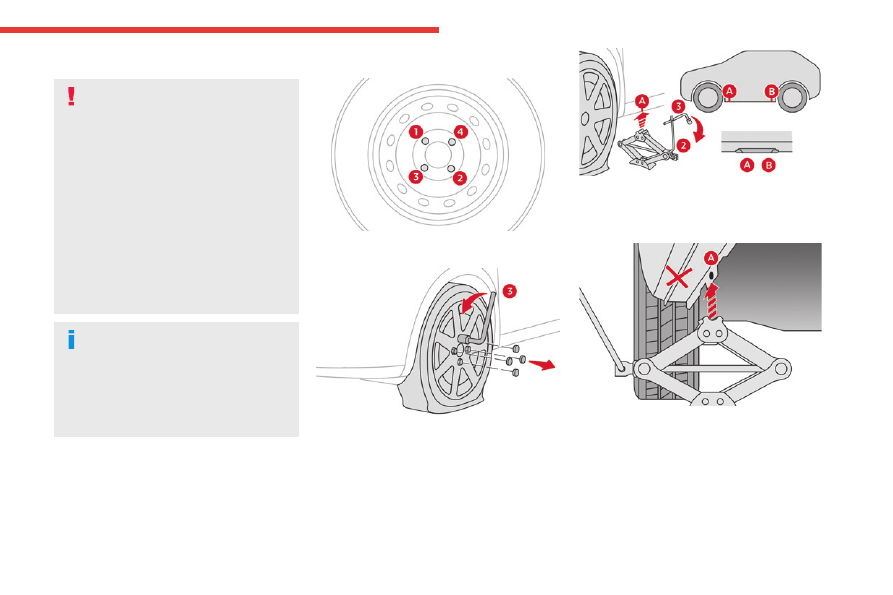
Wheel nuts removing pattern
► Loosen the nuts on the wheel in diagonal
sequence. Do not remove wheel nuts.
► Slacken the bolts using the wheel wrench
3
only.
► Place the foot of jack
1
on the ground and
ensure that it is directly below the front
A
or
rear
B
jacking point on the underbody, whichever
is closest to the wheel to be changed.
► Extend jack
1
with the jack handle
2
and
wheel wrench
3
until its head comes into contact
with jacking point
A
or
B
; contact area
A
or
B
on the vehicle must be properly inserted into the
central part of the head of the jack.
► Raise the vehicle until there is sufficient
space between the wheel and the ground to
admit the spare (not punctured) wheel easily.
-------------------------------------------------------------------------------------------------------------------------------------------------------------
44
In the event of a breakdown
Ensure that the jack is stable. If the
ground is slippery or loose, the jack may
slip or collapse - risk of injury!
Take care to position the jack strictly at
one of the jacking points
A
or
B
under the
vehicle, ensuring that the head of the jack is
centred under the contact area of the vehicle.
Otherwise, there is a risk of damage to the
vehicle and/or of the jack collapsing - risk of
injury!
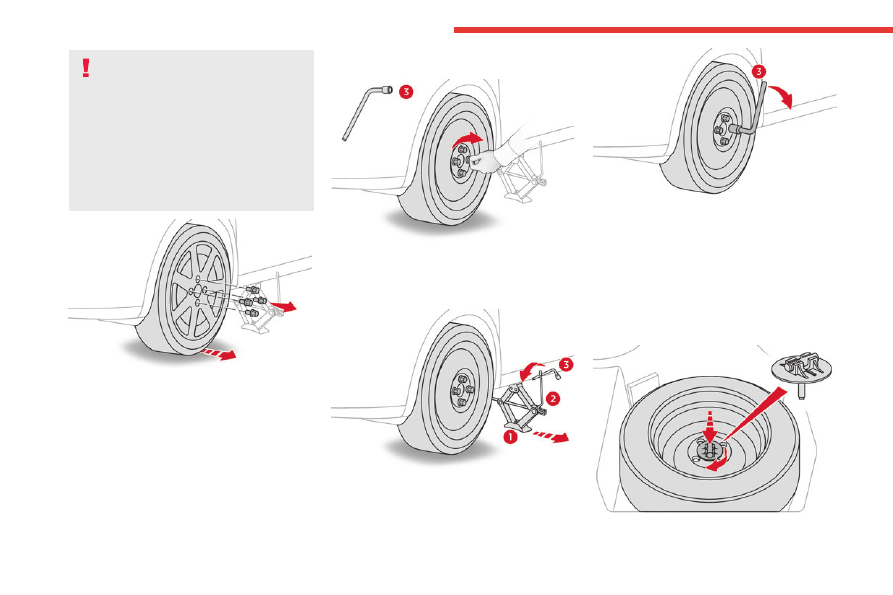
► Remove the bolts and store them in a clean
place.
► Remove the wheel.
Fitting a wheel
► Fit the wheel on the hub.
► Screw in the bolts by hand as far as possible.
► Pre-tighten the bolts using the wheel wrench
3
only.
► Lower the vehicle again fully.
► Fold jack
1
and remove it.
► Tighten the bolts using the wheel wrench
3
only.
► Refit the bolt cover (depending on
equipment).
► Store the tools.
Putting the spare wheel
back in place
► Put the spare wheel back in its housing.
-------------------------------------------------------------------------------------------------------------------------------------------------------------
45
In the event of a breakdown
8
► Tighten the spare wheel fixing screw by a few
turns.
After changing a wheel
The temporary spare wheel is only
intended for temporary emergency use,
until the conventional wheel can be repaired
or replaced.
Continuous use of this spare can result in tire
failure and loss of control. Always observe
these precautions when using this spare:
– Your vehicle will respond differently with
this temporary spare.
– Do not exceed 80 km/h speed.
– Replace this spare with a standard tire and
wheel as soon as possible.
– Use of this spare will reduce ground
clearance.
– Set the specified tire pressure indicated
on the tire information label located on the
driver's door lock pillar.
– Do not use tire chains on the temporary
spare. If you must use tire chains, rearrange
the wheels so standard tires and wheels are
fitted to the front axle.
– The temporary spare wheel has a much
shorter tread life than the conventional wheels
on your vehicle. Replace the tire as soon as
possible as the tread wear indicator appears.
The inflation pressure of the temporary spare
wheel should be checked at least monthly. At
the same time, check that the tire is stored
securely. If it is not, tighten it.
Note that two or more temporary spare
wheels should not be used on one vehicle
simultaneously.
Changing a bulb
In some weather conditions (e.g. low
temperature or humidity), misting on the
internal surface of the glass of the headlamps
and rear lamps is normal, and will disappear
after the lamps have been on for a few
minutes.
The headlamps have polycarbonate
lenses with a protective coating:
–
Do not clean them with a dry or abrasive
cloth, nor with detergent or solvent
products.
– Use a sponge and soapy water or a pH
neutral product.
– When using a high-pressure washer on
persistent marks, do not keep the lance
directed towards the headlamps, lamps or
their edges for too long, so as not to damage
their protective coating and seals.
Changing a bulb must only be done with
the ignition off and after the headlamp /
lamp has been switched off for several
minutes - risk of serious burns!
Do not touch the bulb directly with your
fingers; use a lint-free cloth.
It is essential only to use anti-ultraviolet
(UV) type bulbs, so as not to damage the
headlamp.
Always replace a failed bulb with a new bulb
of the same type and specification. To avoid
lighting imbalance, replace the bulbs in pairs.
Refitting the lamp units
Perform the operations in the reverse
order to dismantling.
Opening the bonnet / Accessing the
bulbs
With the engine warm, proceed with caution -
risk of burns!
Take care with objects or clothing that could
be caught in the blades of the cooling fan -
risk of strangulation!
Halogen bulbs (Hx)
To ensure good quality lighting, check
that the bulb is correctly positioned in its
housing.
-------------------------------------------------------------------------------------------------------------------------------------------------------------
46
In the event of a breakdown
Light-emitting diode (LED)
headlamps and lamps
Depending on version, the affected types of
headlamps / lamps are:
– Daytime running lamps / sidelamps.
– Direction indicator side repeaters.
– Third brake lamp.
– Number plate lamps.
Light emitting diodes (LED)
For the replacement of this type of bulb,
you must contact a CITROËN dealer.
Do not touch the LED technology lamps - risk
of electrocution!
Front lamps
Model 1
1.
Daytime running lamps/sidelamps (W5W
bulb)
2.
Direction indicators (PY21W - 12V - 21W)
3.
Beam headlamps (H4 - 12V - 60/55W)
Model 2
1.
Daytime running lamps/sidelamps (LED)
2.
Direction indicators (PY21W - 12V - 21W)
3.
Beam headlamps (H4 - 12V - 60/55W)
Daytime running lamps/sidelamps
► Turn the bulb holder a quarter of a turn and
pull it out.
► Pull the bulb out and change it.
Direction indicators
Rapid flashing of a direction indicator
lamp (left or right) indicates that one of
the bulbs on the corresponding side has
failed.
► Turn the bulb holder a eighth of a turn anti-
clockwise and remove it.
► Remove the bulb and replace it.
Amber coloured bulbs, such as the
direction indicators, must be replaced by
bulbs with identical colour and specifications.
Beam headlamps
► Remove the protective cover by pulling on
the tab.
► Disconnect the bulb connector.
► Release the retaining tab.
► Change the bulb taking care to align the
metal part with the grooves on the lamp.
► Reposition the retaining tab.
► Reconnect the bulb connector.
-------------------------------------------------------------------------------------------------------------------------------------------------------------
47
In the event of a breakdown
8
► Ensure that the cover is refitted correctly all
around to ensure correct sealing.
Rear lamps
Model 1
1.
Sidelamps / Brake lamps
(P21/5W - 12V - 21W/5W)
2.
Direction indicators (PY21W - 12V - 21W)
3.
Reversing lamp (P21W - 12V - 21W)
Model 2
1.
Sidelamps / Brake lamps
(P21/5W - 12V - 21W/5W)
2.
Direction indicators (PY21W - 12V - 21W)
3.
Reversing lamp (P21W - 12V - 21W)
4.
Additional sidelamps (W3W - 12V - 3W)
5.
Connecting tail lamps (W3W - 12V - 3W)
Changing bulbs
These bulbs are changed after removing the tail
lamp assembly.
► Open the boot.
► Unscrew the nut and remove it. Be careful
not to drop it inside the wing.
► Unclip the lamp unit and carefully extract it
pulling straight towards the outside.
A standard pair of pliers or the wheel wrench
(depending on equipment) may be necessary to
remove the nut.
Sidelamps/Brake lamps / Reversing lamp /
Direction indicators
► Turn the bulb holder a eighth of a turn anti-
clockwise and remove it.
► Remove the bulb and replace it.
Additional sidelamps / Connecting tail
lamps (if equipped)
► Turn the bulb holder a quarter of a turn and
pull it out.
► Pull the bulb out and change it.
Interior lighting
Courtesy lamp (10W - 12V - 10W)
► Using a thin, flap tip screwdriver, unclip the
entire console surrounding the courtesy lamp.
► Remove the defective bulb and replace it.
► Fit the console back into place around the
courtesy lamp and clip it correctly.
-------------------------------------------------------------------------------------------------------------------------------------------------------------
48
In the event of a breakdown
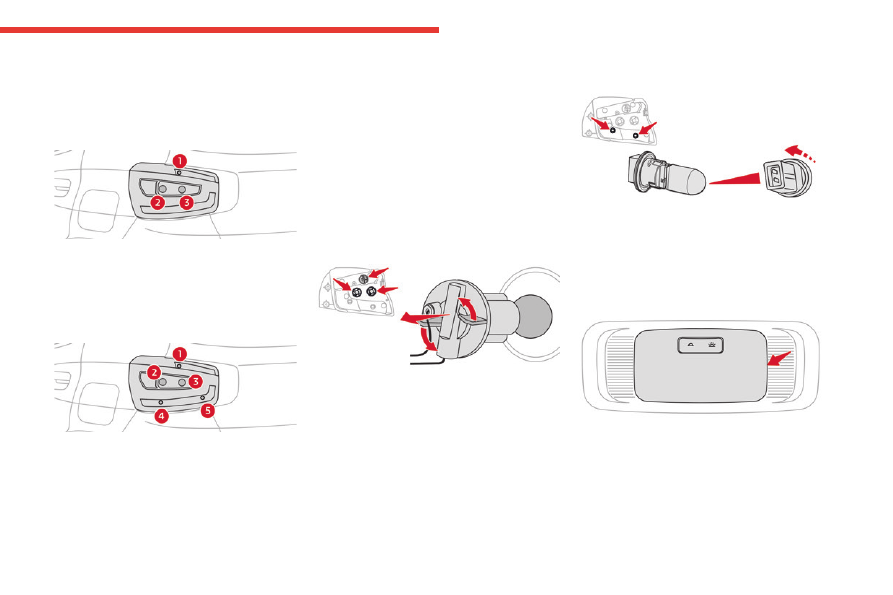
Changing a fuse
Access to the tools
The puller is located inside the engine fuse box.
► Open the bonnet.
► Disengage the cover completely.
► Take the puller from its housing.
Changing a fuse
Before changing a fuse:
► Identify the cause of the fault and fix it.
► Switch off all power consumption.
► Identify the defective fuse using the current
allocation tables and diagrams.
To replace a fuse, it is essential to:
► Use the special puller to extract the fuse
from its housing and check the condition of its
filament.
► Always replace the failed fuse with a fuse of
the same rating (same colour); use of a different
rating may cause malfunctions - risk of fire!
If the fault recurs soon after replacing a fuse,
have the electrical system checked by a
CITROËN dealer.
The fuse allocation tables and the
corresponding diagrams are available
from a CITROËN dealer.
The replacement of a fuse not shown in
the allocation tables may cause a serious
malfunction of the vehicle. Contact a
CITROËN dealer.
Good
Faulty
Puller
Installing electrical accessories
The vehicle's electrical system is
designed to operate with standard or optional
equipment.
Before installing other electrical equipment
or accessories to your vehicle, contact a
CITROËN dealer.
CITROËN accepts no responsibility for
the cost incurred in repairing the vehicle
or for rectifying malfunctions resulting from
the installation of accessories not supplied or
not recommended by CITROËN and not
installed in accordance with its
recommendations, in particular when the
combined power consumption of all of the
additional equipment connected exceeds 10
milliamperes.
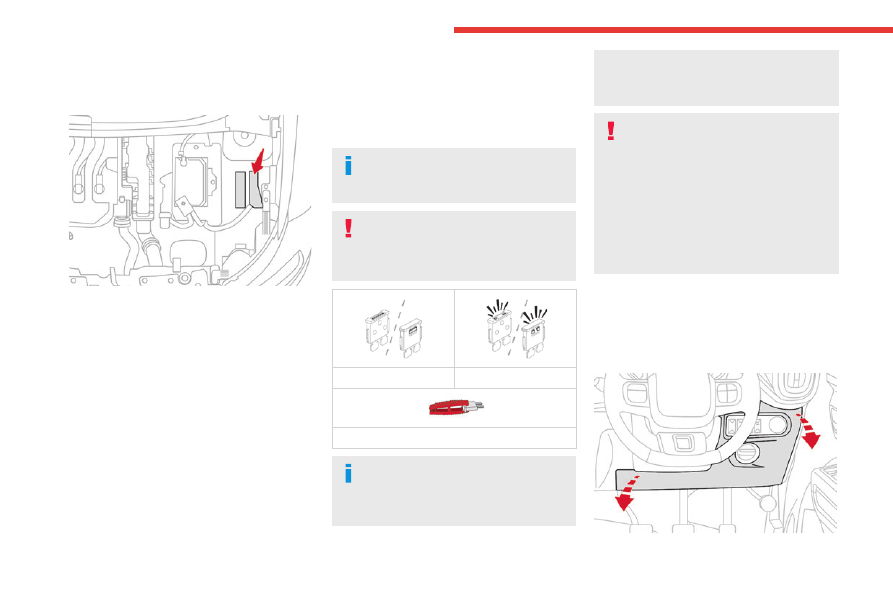
Dashboard fuses
The fusebox is placed in the lower dashboard
(right-hand side).
Access to the fuses
-------------------------------------------------------------------------------------------------------------------------------------------------------------

49
In the event of a breakdown
8
► Unclip the cover by pulling at the top left, then
right.
Version 1
Fuse No.
Colour
Rating (A)
Functions
FF01
Red
10
On-board diagnosis (OBD-II) / Spare connector
FF02
Yellow
20
Body control and cluster module 1 (BCCM-1)
FF03
Green
30
Body control and cluster module 2 (BCCM-2)
FF04
Yellow
20
Body control and cluster module 3 (BCCM-3)
FF07
Blue
15
12 V Socket
FF08
Tan
5
Cabin lamp / Spare connector
FF09
Blue
15
Front wiper and washer
FF10
Tan
5
ECU's ignition
FF12
Tan
5
Airbag ECU
FF10
Tan
5
Switches ignition
FF
Tan
5
Service
FF
Red
10
Service
FF
Blue
15
Service
FS01
Pink
30
Body Control & Cluster Module 5 (BCCM-5)
Relays
Relay
Colour
Rating (A)
Functions
MICRO
Brown
20
Ignition Loads
-------------------------------------------------------------------------------------------------------------------------------------------------------------
Нет комментариевНе стесняйтесь поделиться с нами вашим ценным мнением.
Текст