Citroën C3 (2023 year). Manual in english — page 1
2
Contents
■
■
Key with remote control function
4
Exterior lighting control stalk
Headlamp beam height adjustment
5
General safety recommendations
6
Starting / Switching off the engine
7
Advice on care and maintenance
10
■
-------------------------------------------------------------------------------------------------------------------------------------------------------------
3
Overview
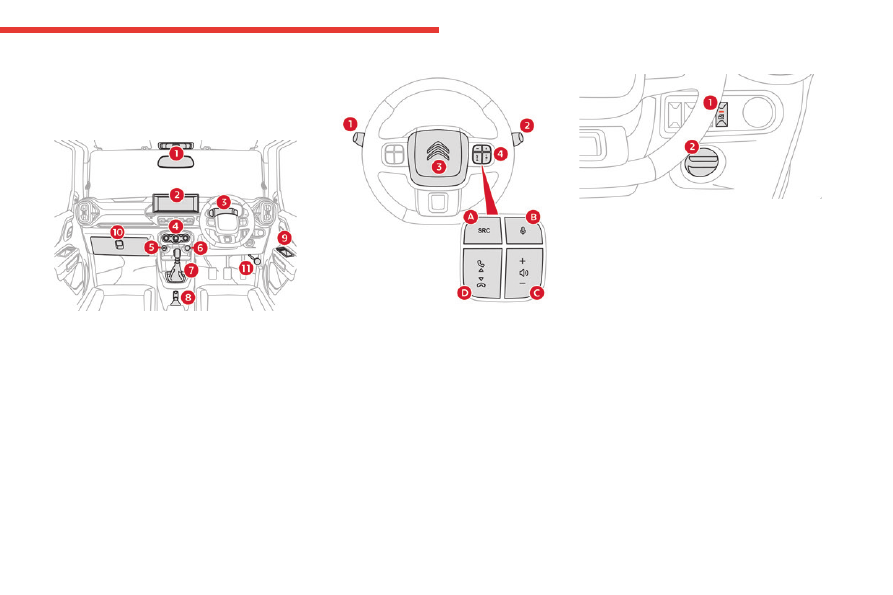
Instruments and controls
These illustrations and descriptions are provided
for information only. The presence and location
of certain elements may vary, depending on the
version or trim level.
1.
Interior rear view mirror
Courtesy lamp
2.
Open storage or Touch screen
3.
Instrument panel
4.
Manual air conditioning
Front demisting/defrosting
5.
USB socket
6.
12 V socket
7.
Gear shift lever
8.
Parking brake
9.
Electric windows
10.
Closed storage or Glove box
11.
Bonnet release
Steering mounted controls
1.
Wiper control stalk
2.
Lighting control stalk
Direction indicators
3.
Horn
4.
Audio system controls
A.
Audio source selection
B.
Voice command
C.
Short press on the buttons: decrease /
increase volume
Long press on the decrease button: mute
audio system
D.
Select previous / next media
Accept / reject incoming call
Side controls
1.
Rear window control deactivation
2.
Headlamp adjustment
-------------------------------------------------------------------------------------------------------------------------------------------------------------
4
Driving tips
Driving tips
Improving fuel economy
The following tips will help you in improving fuel
economy.
– Avoid excessive idling.
– Avoid sudden acceleration.
– Avoid unnecessary deceleration and stopping.
– Keep steady cruise speed as much as
possible.
Keep the air filter clean
If the air cleaner is clogged with dust, there
will be greater intake resistance, resulting in
decreased power output and increased fuel
consumption.
Keep tire pressures correct
Underinflating of the tires can waste fuel due to
increased running resistance of the tires. Keep
your tires inflated to the correct pressure shown
on the label on the driver’s door lock pillar.
Do not use tires other than those
specified by Citroën. Never use different
sizes or types of tires on the front and rear
wheels.
Driving on hills
When climbing steep hills, the vehicle may begin
to slow down and show a lack of power. If this
happens, you should shift to a lower gear so that
the engine will again be operating in its normal
power range
While driving down a hill, never turn off the
vehicle.
Try not to hold the brake pedal down too long
or too often while going down a long hill. This
could cause the brakes to overheat, resulting in
reduced braking efficiency.
Use the parking brake when parking your
vehicle and shift the gear shift lever into
the first gear or reverse gear position for the
sake of safety.
Driving on slippery roads
Under wet road conditions, you should drive at
a lower speed than on dry roads due to possible
slippage of tires during braking. When driving on
icy, snow-covered, or muddy roads, reduce your
speed and avoid sudden acceleration, abrupt
braking, or sharp steering movements.
Vehicle may
break-down
, meet with an
accident
or
catch fire
due to:
– Installation of:
• High wattage bulbs
• Non genuine lamps / horns
• Modified suspension / wheels
• Non genuine parts / accessories etc.
– Short circuiting due to tampering of wiring
harness.
Do not store or carry inflammable
materials in the vehicle.
Avoid driving into or starting the vehicle
in a heavily water logged area. Vehicle
may break-down or engine may fail due to:
– Water entry into the engine.
– Short circuiting of the electrical systems.
– EVAP (Evaporative Emission Control
System) malfunction.
If the vehicle is stuck into deep water, do not
start / crank the vehicle until the level of water
drops below the level of exhaust pipe.
If the vehicle is submerged in water, report to
the nearest authorized workshop.
-------------------------------------------------------------------------------------------------------------------------------------------------------------
5
Instruments
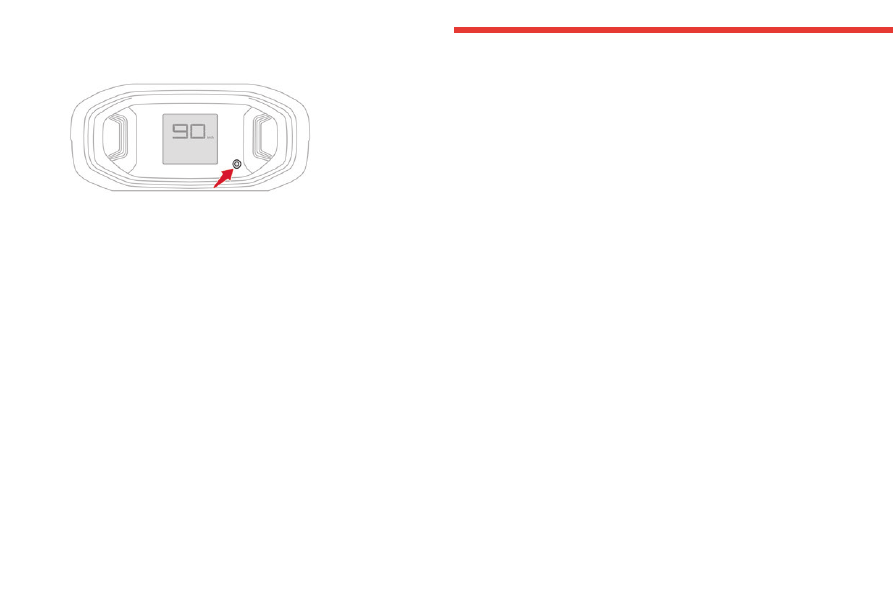
1
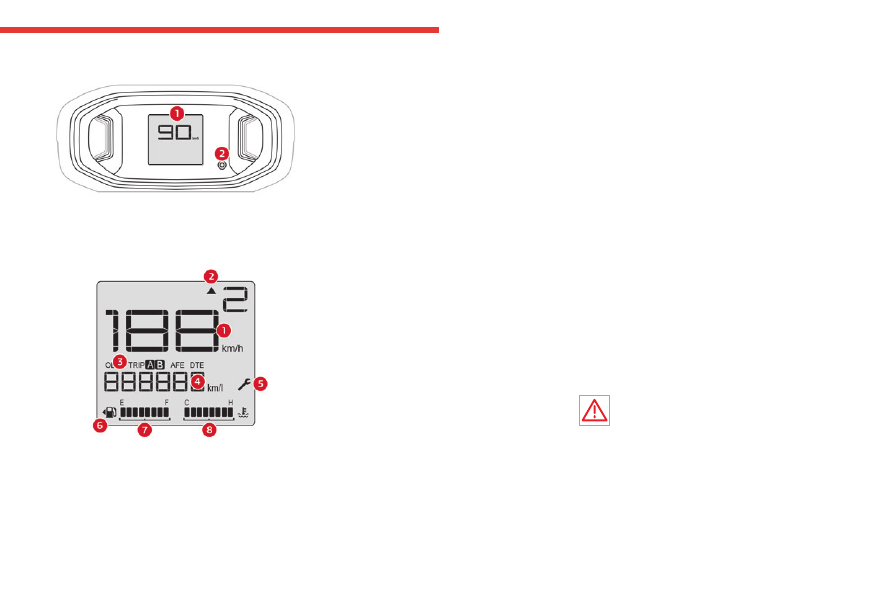
Instrument panel
1.
Display screen
2.
Trip computer button
Display screen
1.
Speedometer
2.
Gear shift indicator
3.
Trip meter A/B
Odometer (ODO)
Average Fuel Economy (AFE)
Distance To Empty (DTE)
Illumination level
4.
Applicable units for displayed information
5.
Service indicator
6.
Fuel lid cap direction indication
7.
Fuel gauge
8.
Engine coolant temperature (°C)
Warning and indicator
lamps
Displayed as symbols, the warning and indicator
lamps inform the driver of the occurrence of a
malfunction (warning lamps) or of the operating
status of a system (operation or deactivation
indicator lamps). Certain lamps light up in two
ways (fixed or flashing) and/or in several colours.
Associated warnings
The illumination of a lamp may be accompanied
by an audible signal and/or a message displayed
in a screen.
Relating the type of alert to the operating status
of the vehicle allows you to determine whether
the situation is normal or whether a fault has
occurred: refer to the description of each lamp
for further information.
When the ignition is switched on
Certain red or orange warning lamps come on
for a few seconds when the ignition is switched
on. These warning lamps should go off as soon
as the engine is started.
For more information on a system or a function,
refer to the corresponding section.
Warning lamp continuously
lit
The illumination of a red or orange warning lamp
may indicate the occurrence of a fault that needs
further investigation.
If a warning lamp remains lit
The references
(1)
,
(2)
and
(3)
in the warning
and indicator lamp description indicate whether
you should contact a qualified professional in
addition to the immediate recommended actions.
(1)
:
You must stop the vehicle
.
Stop as soon as it is safe to do so and switch off
the ignition.
(2)
: Contact a CITROËN dealer.
(3)
: Visit a CITROËN dealer.
List of warning and
indicator lamps
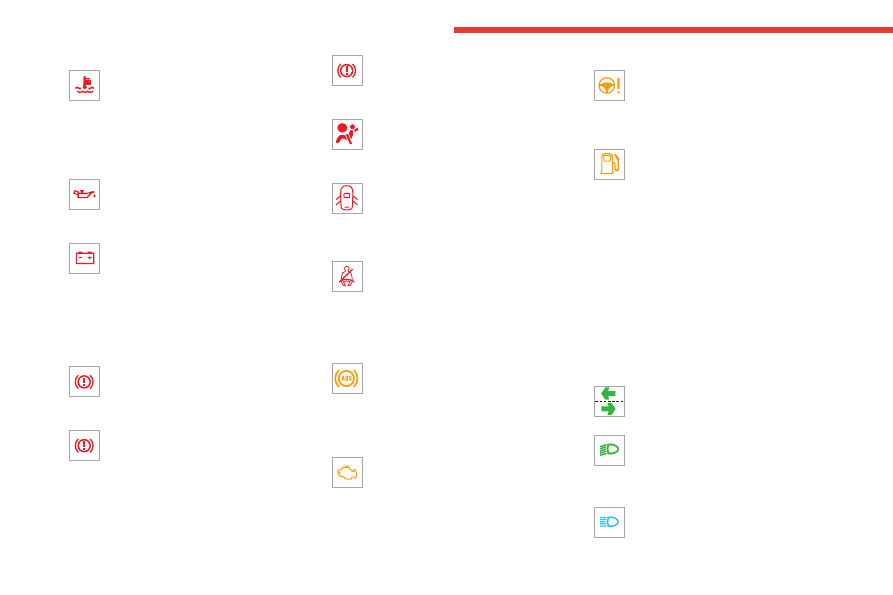
Red warning/indicator lamps
STOP
Fixed, associated with another warning
lamp, accompanied by an audible signal
(single tone buzzer).
It indicates a serious fault with the engine,
low engine oil & coolant temperature warning,
braking system, airbag malfunction or a major
electrical fault.
Carry out (1) and then (2).
-------------------------------------------------------------------------------------------------------------------------------------------------------------
6
Instruments
Maximum engine coolant temperature
Fixed.
The temperature of the cooling system is
too high.
Carry out (1), then wait until the engine has
cooled down before topping up the level, if
necessary. If the problem persists, carry out (2).
Engine oil pressure
Fixed.
Oil pressure is insufficient.
Carry out (1) and then (2).
12 V battery charge
Fixed.
The battery charging circuit has a fault
(dirty terminals, slack or cut alternator belt, etc.).
Carry out (1).
Clean and retighten the terminals. If the warning
lamp does not go off when the engine is started,
carry out (2).
Parking brake
Fixed.
The parking brake is applied or not
properly released.
Brake system
Fixed when the ignition is ON.
The Electronic Brake Distribution (EBD)
or the brake system has a fault or the brake fluid
level has dropped significantly.
If necessary, top up with fluid that complies with
the manufacturer's recommendations. If the
problem persists, carry out (2).
Fixed when driving.
The brake system has a fault.
Carry out (1) then (2).
Airbags
Fixed.
The airbag system is faulty.
Carry out (3).
Door(s) open
Fixed.
An audible signal supplements the alert if
the speed is higher than 5 km/h.
A door or the boot is not properly closed.
Seat belts not fastened/unfastened
Fixed or flashing, accompanied by an
increasing audible signal.
A seat belt has not been fastened or has been
unfastened.
Orange warning/indicator lamps
Anti-lock braking system (ABS)
Fixed.
The anti-lock braking system has a fault.
The vehicle retains conventional braking.
Drive carefully at moderate speed, then carry
out (3).
Engine self-diagnostic system
Fixed.
The engine system or emissions control
system has a fault.
The warning lamp should go off when the engine
is started.
Carry out (3) quickly.
Power steering
Fixed.
The power steering has a fault.
Drive carefully at moderate speed, then carry
out (3).
Low fuel level
Fixed, with the reserve level shown in
orange, accompanied by an audible
signal.
When it first comes on, there are
approximately
5 litres of fuel
remaining in the tank (reserve).
Until the fuel level is topped up, this alert will
be repeated every time the ignition is switched
on, with increasing frequency as the fuel level
decreases and approaches zero.
Refuel without delay to avoid running out of fuel.
Never drive until completely empty
, as this
could damage the fuel pump, the emissions
control and injection systems.
Green warning/indicator lamps
Direction indicators
Direction indicators with audible signal.
The direction indicators are on.
Dipped beam headlamps
Fixed.
The lamps are on.
Blue warning/indicator lamps
Main beam headlamps
Fixed.
The lamps are on.
-------------------------------------------------------------------------------------------------------------------------------------------------------------
7
Instruments
1
Black/white warning lamps
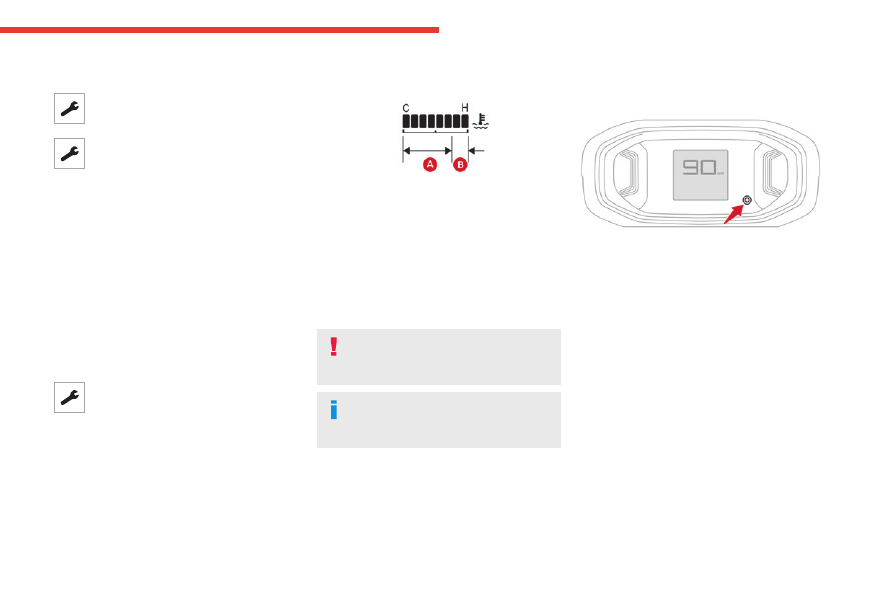
Service
Flashing.
A fault has been detected.
Carry out (3).
Fixed.
The servicing interval has been
exceeded.
Your vehicle must be serviced as soon as
possible. Carry out (3).
Indicators
Service indicator
The vehicle servicing must be done according to
the distance covered (kilometres or miles) or the
time elapsed since the last service.
The servicing alert is given at whichever of these
two terms is reached first.
Service indicator
Fixed, when the ignition is switched on.
The next service is due.
Have your vehicle serviced very soon.
Engine coolant temperature
indicator
With the engine running:
– In zone
A
, the temperature is correct.
– In zone
B
, the temperature is too high; the
associated warning lamp comes on in red on the
instrument panel, accompanied by an audible
signal.
You must stop the vehicle as soon as it is
safe to do so.
Wait a few minutes before switching off the
engine.
After switching off the ignition, carefully
open the bonnet and check the coolant
level.
For more information on
Checking
levels
, refer to the corresponding
section.
Trip computer
Data displayed
► Make a short press on the button located
on the instrument panel to display and switch
between the following information:
– Odometer
– Trip A
– Trip B
– Average Fuel Economy (AFE)
– Distance To Empty (DTE)
– Illumination level (park lamp on then press the
trip button to adjust the illumination level of the
cluster)
-------------------------------------------------------------------------------------------------------------------------------------------------------------
8
Instruments
Resetting data
► Make a long press (more than 2 seconds)
on the button located on the instrument panel to
reset the information displayed in the following
screens:.
– Trip A
– Trip B
– Average Fuel Economy (AFE)
Definitions
Odometer
(km)
The total distance the vehicle has driven.
Trip meter A/B
(km)
The distance travelled in short trips or between
fuel stops.
Trips "
A
" and "
B
" are independent and are used
identically.
Average Fuel Economy (AFE)
(km/L)
The average fuel consumption calculated based
on the last trip.
Distance To Empty (DTE)
(km)
The distance which can still be travelled with the
fuel remaining in the tank (based on the current
driving conditions).
This value may vary following a change in
the style of driving or the terrain, resulting
in a significant change in the current fuel
consumption.
If dashes instead of figures continue to be
displayed when driving, contact a CITROËN
dealer.
-------------------------------------------------------------------------------------------------------------------------------------------------------------
9
Access
2
Key
The key allows the central locking or unlocking of
the vehicle using the door lock.
It also allows the engine to be started or
switched off.
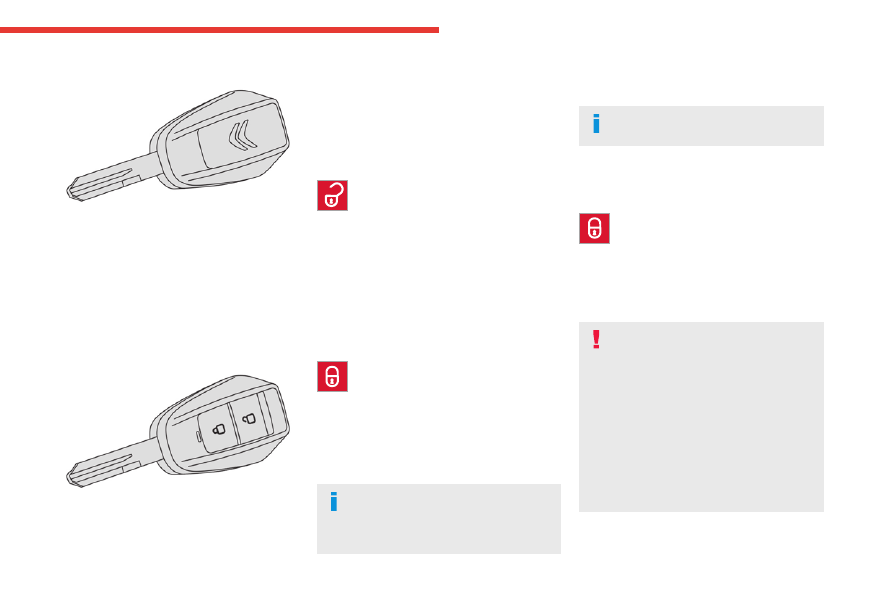
Key with remote control
function
Remote control function
The remote control can be used for the following
remote functions, depending on version:
– Unlocking / Locking the vehicle.
– Locating the vehicle.
Key
The key allows starting and switching off the
engine. It can also be used to lock/unlock the
vehicle.
Unlocking the vehicle
With the remote control
► Press this button to unlock the vehicle.
The direction indicators blink twice to signal
unlocking of the vehicle.
With the key
► Turn the key in the driver's door lock
clockwise
to unlock.
Locking the vehicle
With the remote control
► Press this button to lock the vehicle.
The direction indicators blink once to signal the
locking of the vehicle.
If one of the doors or the boot is still open, the
central locking does not work; the vehicle locks,
then immediately unlocks, identifiable by the
locks making a rebound sound.
When the vehicle is locked, if it is
unlocked without the opening of a door
or the boot, it will automatically lock itself
again after thirty seconds.
With the key
► Turn the key in the driver's door lock
anticlockwise
to lock.
Check that the doors and boot are fully
closed.
Locating the vehicle
This function helps you to spot your vehicle from
a distance, with the vehicle locked.
► Press this button.
The direction indicators or daytime running
lamps/sidelamps, depending on version, flash or
light up for a few seconds.
Advice
Remote control
The remote control is a sensitive, high-
frequency device; avoid handling it in your
pocket, due to the risk of unintentionally
unlocking the vehicle.
Avoid pressing the remote control buttons
while out of range of the vehicle, due to
the risk of rendering the remote control
inoperative. It would then be necessary to
reset it.
The remote control does not work when the
key is in the ignition switch.
-------------------------------------------------------------------------------------------------------------------------------------------------------------
10
Access
As a safety precaution, remove the key
from the ignition when leaving the
vehicle, even for a short time.
Do not modify the electronic vehicle
immobiliser, as this might result in
malfunctions.
Remember to remove the key and turn the
steering wheel to engage the steering lock.
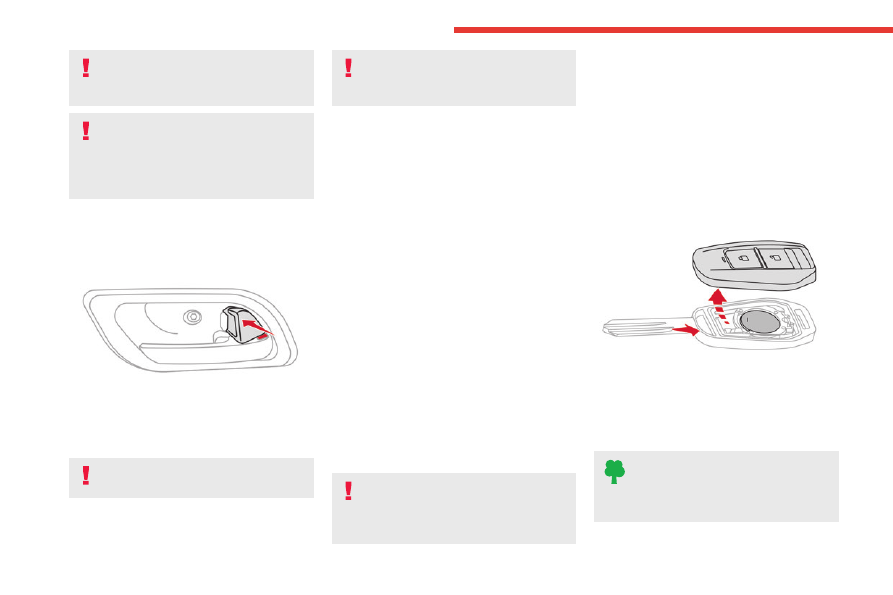
Central locking
Manual
► Push/pull this knob located on the driver's
door handle to lock/unlock the doors from inside
the vehicle.
When the doors are locked, the red indicator is
no longer visible.
The central locking does not take place if
one of the doors is open.
Driving with the doors locked could make
it more difficult for the emergency
services to enter the vehicle in an emergency.
Automatic (anti-intrusion
security)
The doors and boot lock automatically when
driving (speed above 4-5 km/h).
Back-up procedures
Lost keys, remote control
Visit a CITROËN dealer with the vehicle's
registration certificate, a personal identification
document and, if possible, the label bearing the
key code.
The CITROËN dealer will be able to retrieve the
key code and the transponder code required to
order a new key.
Central locking not
functioning
Use these procedures in the following cases:
– Central locking malfunction.
– Battery disconnected or discharged.
In the event of a malfunction of the
central locking system, the battery must
be disconnected to ensure that the vehicle is
locked fully.
Driver's door
► Turn the key anticlockwise to lock it, or
clockwise to unlock it.
All doors
► Use the manual knob in the driver's door to
lock in the four doors and close the doors.
Changing the remote
control battery
Battery ref.: CR2032/3 Volts.
► Hold the key blank and pull the key top cover
in opposite direction.
► Remove the discharged battery from its
housing.
► Insert the new battery, observing the polarity,
and clip the cover onto the housing.
Do not throw remote control batteries
away, as they contain metals that are
harmful to the environment. Take them to an
approved disposal point.
-------------------------------------------------------------------------------------------------------------------------------------------------------------
11
Access
2
Doors
Opening
From outside
► After unlocking the vehicle, pull the door
handle.
From inside
► Pull the interior opening control of a door; this
unlocks the vehicle completely.
Closing
If a door is not properly closed, this
warning lamp comes on accompanied by
an audible signal when the vehicle is travelling at
more than 5 km/h.
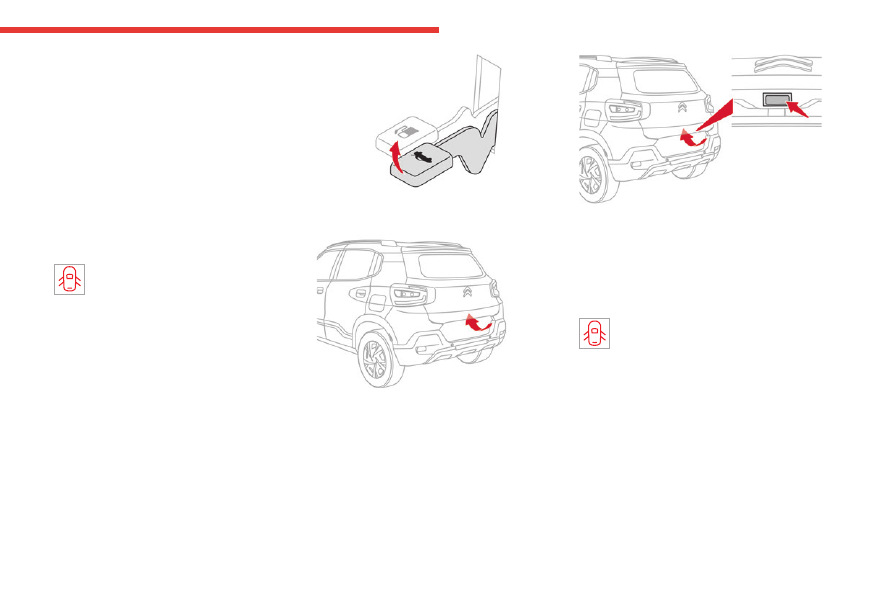
Boot
Opening
Depending on version:
► Lift the opening lever located besides the
driver's seat to open the tailgate.
► Lift the tailgate.
or
► Press the switch located on the tailgate
bottom to open the tailgate.
► Lift the tailgate.
Closing
► Lower the tailgate using the interior grab
handle.
If the tailgate is not properly closed, this
warning lamp comes on accompanied by
an audible signal, if the vehicle is travelling at
more than 5 km/h.
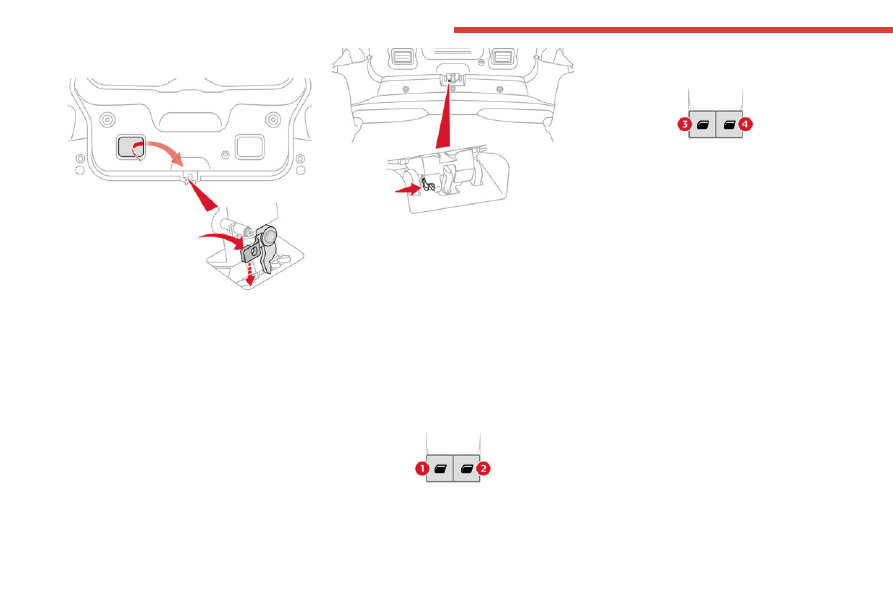
Back-up release
To manually unlock the boot in the event of a
battery or central locking failure.
-------------------------------------------------------------------------------------------------------------------------------------------------------------
12
Access
To unlock the boot
► Fold the rear seats to gain access to the lock
from inside the boot.
► Insert the hand inside the tailgate right cutout
area.
► Press the lever downwards to release the
lock.
Next option to unlock the boot:
► Fold the rear seats to gain access to the lock
from inside the boot.
► Press the lever by following the arrow
direction to release the lock.
To re-lock the boot
If the problem persists, the boot will remain
locked after opening and closing.
Windows
Electric windows
Control switch at driver door
1.
Left-hand front
2.
Right-hand front
Control switch at console (depending on
version)
3.
Left-hand rear
4.
Right-hand rear
Operation
Opening
► Press the switch; the window stops as soon
as the switch is released.
► One touch-down: press the switch past its
resistance point; the window opens completely
when the switch is released.
Closing
► Pull the switch; the window stops as soon as
the switch is released.
-------------------------------------------------------------------------------------------------------------------------------------------------------------
13
Access
2
Rear manual windows
► Turn the window handle located on the door
panel.
-------------------------------------------------------------------------------------------------------------------------------------------------------------
14
Ease of use and comfort
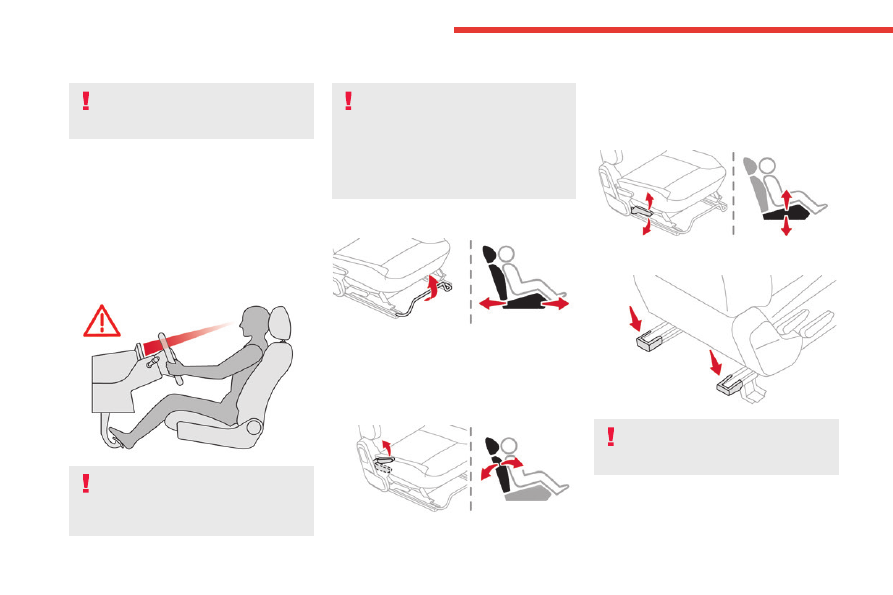
Correct driving position
For safety reasons, adjustments must
only be made when the vehicle is
stationary.
Before taking to the road and to make the most
of the ergonomic layout of the instruments and
controls, carry out these adjustments in the
following order:
– seat backrest angle.
– seat cushion height.
– longitudinal seat position.
– steering wheel height.
– rear view mirror and door mirrors.
– seat belt fastened.
Once these adjustments have been
made, check that the instrument panel
can be viewed correctly from your driving
position.
Front seats
Before moving the seat backwards,
ensure that there is nothing that might
prevent the full travel of the seat.
There is a risk of trapping or pinching
passengers if present in the rear seats or
jamming the seat if large objects are placed
on the floor behind the seat.
Longitudinal adjustment
► Raise the control bar and slide the seat
forwards or backwards.
► Release the bar to lock the seat in position on
one of the runners.
Backrest angle adjustment
► Raise the control lever to the maximum
height in order to avoid noise and mechanism
failure.
Height adjustment
(Driver only, depending on version)
► Raise or lower the control as many times as
needed.
Avoid stepping on these plastic parts
- Risk of injury or damaging the
components!
-------------------------------------------------------------------------------------------------------------------------------------------------------------
15
Ease of use and comfort
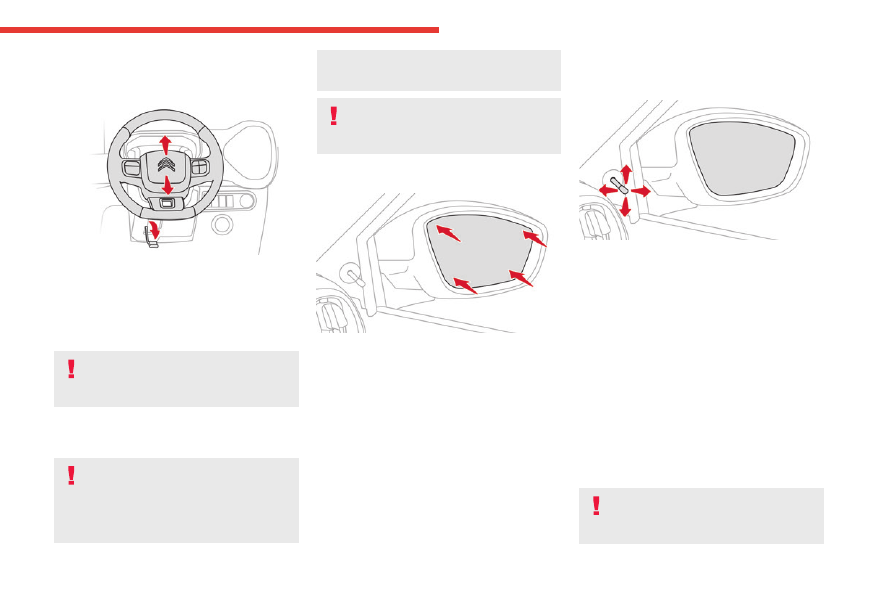
3
Steering wheel
adjustment
► When stationary, hold the steering wheel on
one hand and pull the control lever to release the
steering wheel.
► Adjust the height to suit your driving position.
► Push the control lever to lock the steering
wheel.
As a safety measure, these adjustments
must only be carried out with the vehicle
stationary.
Door mirrors
Objects viewed in the door mirror on the
passenger side are closer than they
appear. Be careful when moving to the right.
Using only this mirror could cause an
accident. Use the inside mirror or glance over
your shoulder to properly judge distances to
other objects.
Do not adjust the mirrors while driving.
You could lose control of your vehicle
and cause an accident.
Manual adjustment
► Move directly the mirror in any direction to
adjust it.
Manual adjustment with the
control
► Move the lever in any direction to adjust it.
If the mirror unit has come out of its initial
position, with the vehicle stationary, push it back
into place manually or use the control.
There is no risk of breakage, even in frosty
weather.
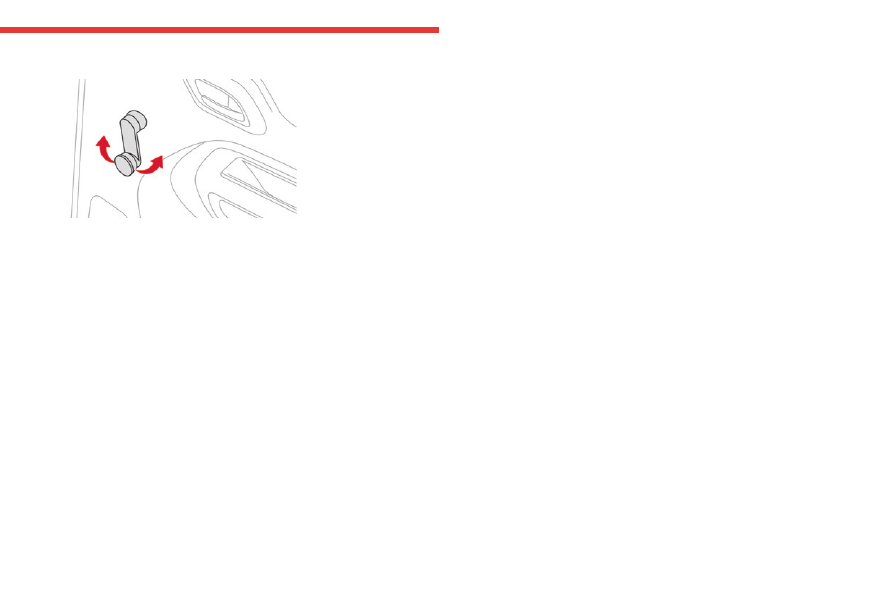
Manual folding
The mirrors can be folded manually (parking
obstruction, narrow garage, etc.).
► Turn the mirror towards the vehicle.
Rear seats
Folding the backrest
Manoeuvring the seat backrest should
only be done when the vehicle is
stationary.
-------------------------------------------------------------------------------------------------------------------------------------------------------------
16
Ease of use and comfort
► If necessary, move the front seats forward.
► Check that no person or object will interfere
with folding down the backrest (clothing,
luggage, etc.).
► Check that the outer seat belts are lying flat
on the backrest.
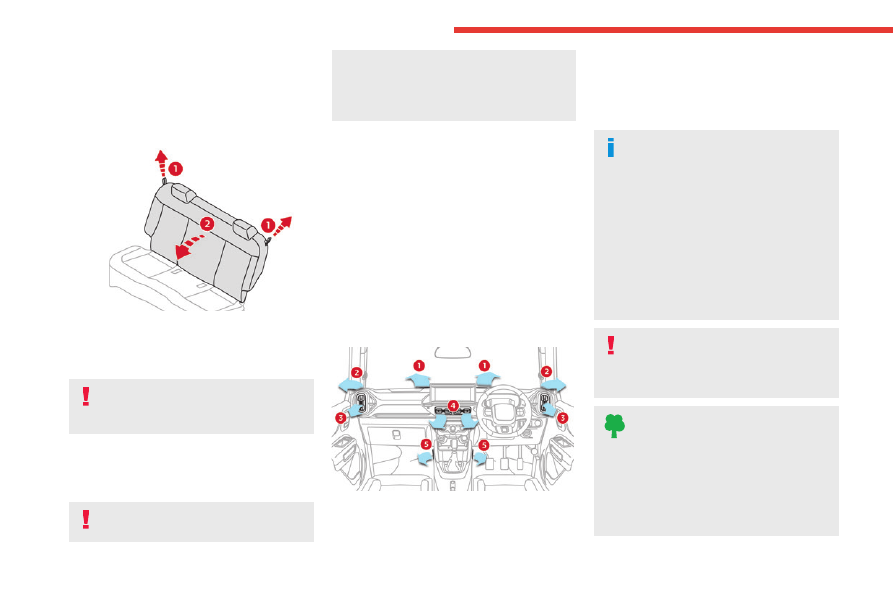
► Pull the rope
1
up and fold the backrest
2
inwards to increase boot space.
Repositioning the backrest
First check that the outer seat belts are
lying vertically flat alongside the backrest
latching rings.
► Put the backrest
2
in the upright position and
push it firmly to latch it home.
► Ensure that the outer seat belts were not
trapped during the operation.
Please note: an incorrectly latched
backrest compromises the safety of
passengers in the event of sudden braking or
an accident.
The contents of the boot may be thrown
forward - risk of serious injury!
Heating and Ventilation
Air intake
The air circulating in the passenger compartment
is filtered and originates either from the
exterior, via the grille located at the base of the
windshield, or from the inside in air recirculation
mode.
Controls
The controls are grouped together in the control
panel on the centre console.
Air distribution
1.
Windshield defroster outlets
2.
Side defroster outlets
3.
Side outlets
4.
Central outlets
5.
Floor outlets
Advice
Using the ventilation and air
conditioning system
► To ensure that air is distributed evenly,
keep the external air intake grilles at the base
of the windscreen, the nozzles, the vents, the
air outlets and the air extractor in the boot
free from obstructions.
► Operate the air conditioning system for at
least 5 to 10 minutes once or twice a month to
keep it in perfect working order.
► If the system does not produce cold air,
switch it off and contact a CITROËN dealer.
Avoid driving for too long with the
ventilation off or with prolonged operation
of interior air recirculation. Risk of misting and
deterioration of the air quality!
If the interior temperature is very high
after the vehicle has stood for a long
time in the sunshine, drive with the windows
open for a few moments to air the passenger
compartment.
Put the air flow control at a setting high
enough to quickly change the air in the
passenger compartment.
-------------------------------------------------------------------------------------------------------------------------------------------------------------
17
Ease of use and comfort
3
Condensation created by the air
conditioning results in a discharge of
water underneath the vehicle. This is perfectly
normal.
Servicing the ventilation and air
conditioning system
► Ensure that the passenger compartment
filter is in good condition and have the filter
elements replaced regularly.
► To ensure correct operation of the
air conditioning system, have it checked
according to the recommendations in the
Maintenance and Warranty Guide.
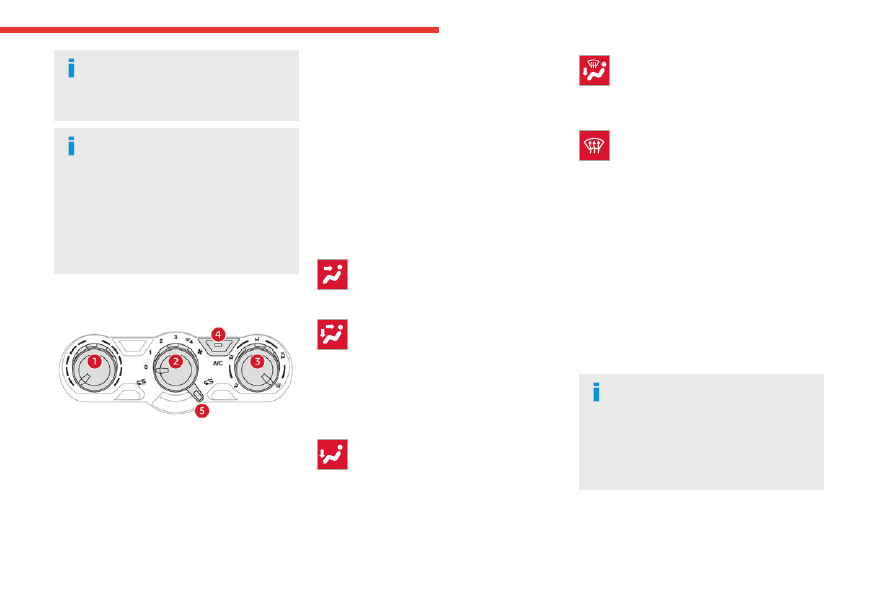
Manual air conditioning
1.
Temperature adjustment
2.
Air flow adjustment
3.
Air distribution adjustment
4.
Air conditioning on/off
5.
Interior air recirculation
Temperature adjustment
► Turn the thumbwheel
1
to adjust the
temperature to your requirements.
Air
flow adjustment
► Turn the thumbwheel
2
to choose the speed
of the ventilation fan (from 0 to 4).
When the air flow is reduced to a minimum,
ventilation stops.
Air distribution adjustment
You can vary the air distribution turning the
thumbwheel
3
to the desired position:
Ventilation
Temperature-controlled air comes out of the
center and side outlets.
Bi-level ventilation
Temperature-controlled air comes out of the floor
outlets and cooler air comes out of the center
and side outlets. When the temperature selector
1
is in the fully cold or fully hot position, the air
from the floor outlets and the air from the center
and side outlets will be the same temperature.
Heat
Temperature-controlled air comes out of the floor
outlets and the side outlets. a small amount of
air comes out of the windshield defroster outlets
and also comes slightly out of the side defroster
outlets.
Heat and defrost
Temperature-controlled air comes out of the floor
outlets, the windshield defroster outlets, the side
defroster outlets and the side outlets.
Defrost
Temperature-controlled air comes out of the
windshield defroster outlets, the side defroster
outlets and the side outlets.
Air conditioning on / off
The air conditioning system is designed to
operate effectively in all seasons, with the
windows closed.
It is used to:
– lower the temperature in summer,
– increase the effectiveness of the demisting in
winter, above 3°C.
► Press button
4
to activate/deactivate the air
conditioning system.
Air conditioning does not operate when
the air flow is disabled.
To obtain cool air more quickly, enable interior
air recirculation for a brief period. Then return
to the intake of exterior air.
Switching off the air conditioning may result in
some discomfort (humidity or misting).
-------------------------------------------------------------------------------------------------------------------------------------------------------------
Нет комментариевНе стесняйтесь поделиться с нами вашим ценным мнением.
Текст