KIA Borrego (2017 year). Manual — part 25

What to do in an emergency
(Continued)
WARNING - Protecting
WARNING - For EUROPE
❈ All vehicles sold in the
TPMS
•
Do not modify the vehicle, it
EUROPE market during
Tampering with, modifying, or
may interfere with the TPMS
below period must be
disabling the Tire Pressure
function.
equipped with TPMS.
Monitoring System
(TPMS)
•
The wheels on the market do
components may interfere with
- New model vehicle :
not have a TPMS sensor.
the system's ability to warn the
Nov. 1, 2012 ~
For your safety, we recom-
driver of low tire pressure con-
- Current model vehicle :
mend that you use parts for
ditions and/or TPMS malfunc-
Nov. 1, 2014~ (Based on
replacement from an author-
tions. Tampering with, modify-
vehicle registrations)
ized Kia dealer.
ing, or disabling the Tire
Pressure Monitoring System
•
If you use the wheels on the
market, use a TPMS sensor
(TPMS) components may void
the warranty for that portion of
approved by a Kia dealer.
the vehicle.
If your vehicle is not equipped
with a TPMS sensor or TPMS
does not work properly, you
may fail the periodic vehicle
inspection conducted in your
country.
(Continued)
7 15

What to do in an emergency
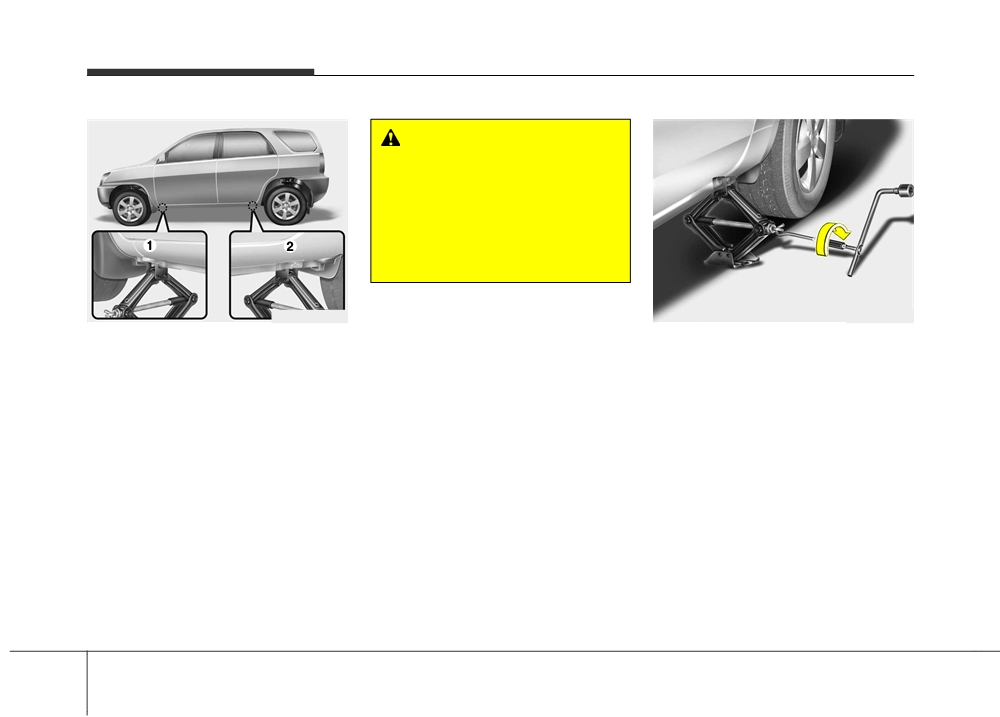
IF YOU HAVE A FLAT TIRE (WITH SPARE TIRE)
Jack and tools
Jacking instructions
(Continued)
The jack is provided for emergency
•
Be sure to use the correct
tire changing only.
front and rear jacking posi-
To prevent the jack from “rattling”
tions on the vehicle; never
while the vehicle is in motion, store it
use the bumpers or any other
properly.
part of the vehicle for jacking
Follow jacking instructions to reduce
support.
the possibility of personal injury.
•
The vehicle can roll off the
jack causing serious injury or
death.
WARNING - Changing
•
Do not get under a vehicle
tires
that is supported by a jack.
OHM069002
•
Never attempt vehicle repairs
•
Do not start or run the engine
in the traffic lanes of a public
The jack, jack handle, wheel lug nut
while the vehicle is on the
road or highway.
wrench are stored in the luggage
jack.
•
Always move the vehicle com-
compartment.
•
Do not allow anyone remain in
pletely off the road and onto
Pull up the luggage box cover to
the vehicle while it is on the
the shoulder before trying to
reach this equipment.
jack.
change a tire. The jack should
(1) Jack handle
be used on firm level ground.
•
Make sure any children pres-
(2) Jack
If you cannot find a firm level
ent are in a secure place away
place off the road, call a tow-
from the road and from the
(3) Wheel lug nut wrench
ing service company for
vehicle to be raised with the
assistance.
jack.
(Continued)
7 16

What to do in an emergency
Removing and storing the
spare tire
OHM068004
OHM068005
3. Use the wheel lug nut wrench to
4. After the spare tire reaches the
OHM068003
loosen the bolt enough to lower
ground, continue to turn the
the spare tire.
wrench counterclockwise, and
Your spare tire is stored underneath
Turn the wrench counterclockwise
draw the spare tire outside. Never
your vehicle, directly below the cargo
rotate the wrench excessively, oth-
area.
until the spare tire reaches the
ground.
erwise the spare tire carrier may
To remove the spare tire:
be damaged.
1. Open the tailgate.
5. Remove the retainer (1) from the
2. Find the plastic hex bolt cover and
center of the spare tire.
remove the cover.
7 17

What to do in an emergency
Changing tires
WARNING
Ensure the spare tire retainer is
properly aligned with the center
of the spare tire to prevent the
spare tire from “rattling”.
Otherwise, it may cause the
spare tire to fall off the carrier
and lead to an accident.
OHM068006
To store the spare tire:
1VQA4022
1. Lay the tire on the ground with the
1. Park on a level surface and apply
valve stem facing up.
the parking brake firmly.
2. Place the wheel under the vehicle
2. Shift the shift lever into P (Park).
and install the retainer (1) through
the wheel center.
3. Activate the hazard warning flasher.
3. Turn the wrench clockwise until it
clicks.
7 18

What to do in an emergency
WARNING - Changing a
tire
•
To prevent vehicle movement
while changing a tire, always
set the parking brake fully,
and always block the wheel
diagonally opposite the wheel
being changed.
•
We recommend that the
wheels of the vehicle be
1VQA4023
OHM068009
chocked, and that no person
4. Remove the wheel lug nut wrench,
remain in a vehicle that is
6. Loosen the wheel lug nuts coun-
jack, jack handle, and spare tire
being jacked.
terclockwise one turn each, but do
from the vehicle.
not remove any nut until the tire
has been raised off the ground.
5. Block both the front and rear of
wheel that is diagonally opposite
the jack position.
7 19
What to do in an emergency
WARNING - Jack
location
To reduce the possibility of
injury, be sure to use only the
jack provided with the vehicle
and in the correct jack position;
never use any other part of the
vehicle for jack support.
OCM049013N
OCM054012
7. Place the jack at the front(1) or
8. Insert the jack handle into the jack
rear(2) jacking position closest to
and turn it clockwise, raising the
the tire you are changing. Place
vehicle until the tire just clears the
the jack at the designated loca-
ground. This measurement is
tions under the frame. The jacking
approximately
30 mm (1.2 in).
positions are plates welded to the
Before removing the wheel lug
frame with two tabs and a raised
nuts, make sure the vehicle is sta-
dot to index with the jack.
ble and that there is no chance for
movement or slippage.
7 20

What to do in an emergency
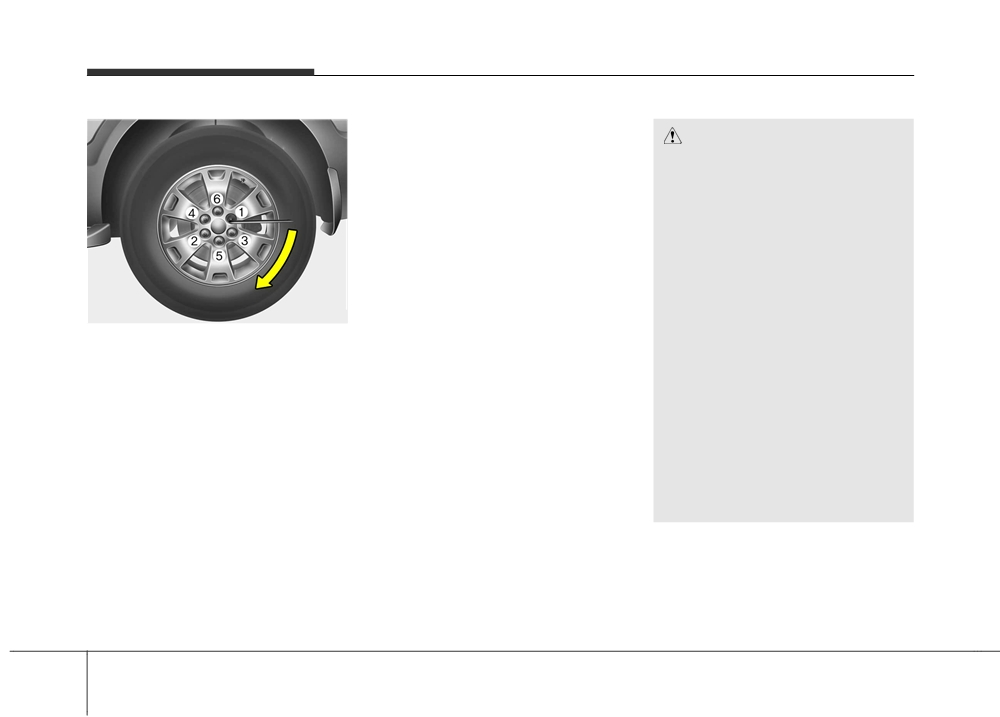
9. Loosen the wheel nuts and
10. To reinstall the wheel, hold it on
remove them with your fingers.
WARNING
the studs, put the wheel nuts on
Slide the wheel off the studs and
the studs and tighten them finger
Wheels may have sharp edges.
lay it flat so it cannot roll away. To
Handle them carefully to avoid
tight. Jiggle the tire to be sure it is
put the wheel on the hub, pick up
completely seated, then tighten
possible severe injury. Before
the spare tire, line up the holes
putting the wheel into place, be
the nuts as much as possible
with the studs and slide the wheel
with your fingers again.
sure that there is nothing on the
onto them.
hub or wheel (such as mud, tar,
11. Lower the vehicle to the ground
If this is difficult, tip the wheel
gravel, etc.) that interferes with
by turning the wheel nut wrench
slightly and get the top hole in the
the wheel from fitting solidly
counterclockwise.
wheel lined up with the top stud.
against the hub.
Then jiggle the wheel back and
If there is, remove it. If there is
forth until the wheel can be slid
not good contact on the mount-
over the other studs.
ing surface between the wheel
and hub, the wheel nuts could
come loose and cause the loss
of a wheel. Loss of a wheel may
result in loss of control of the
vehicle. This may cause serious
injury or death.
7 21
What to do in an emergency
If you have a tire gauge, remove the
valve cap and check the air pressure.
CAUTION
If the pressure is lower than recom-
Your vehicle has metric threads
mended, drive slowly to the nearest
on the wheel studs and nuts.
service station and inflate to the cor-
Make certain during wheel
rect pressure. If it is too high, adjust it
removal that the same nuts that
until it is correct. Always reinstall the
were removed are reinstalled -
valve cap after checking or adjusting
or, if replaced, that nuts with
tire pressure. If the cap is not
metric threads and the same
replaced, air may leak from the tire. If
chamfer configuration are used.
you lose a valve cap, buy another and
Installation of a non-metric
install it as soon as possible.
thread nut on a metric stud or
OHM068012
After you have changed wheels,
vice-versa will not secure the
Then position the wrench as shown
always secure the flat tire in its place
wheel to the hub properly and
in the drawing and tighten the wheel
and return the jack and tools to their
will damage the stud so that it
nuts. Be sure the socket is seated
proper storage locations.
must be replaced.
completely over the nut. Do not stand
Note that most lug nuts do not
on the wrench handle or use an
extension pipe over the wrench han-
have metric threads. Be sure to
use extreme care in checking
dle. Go around the wheel tightening
every other nut until they are all tight.
for thread style before installing
aftermarket lug nuts or wheels.
Then double-check each nut for
tightness. After changing wheels, we
If in doubt, consult an author-
ized Kia dealer.
recommend that the system be
checked by an authorized Kia dealer.
Wheel nut tightening torque:
Steel wheel & aluminum alloy wheel:
9~11 kgf·m (65~79 lbf·ft)
7 22

What to do in an emergency
Important - use of compact spare
WARNING - Wheel studs
tire (if equipped)
WARNING
If the studs are damaged, they
Your vehicle is equipped with a com-
The compact spare tire is for
may lose their ability to retain
pact spare tire. This compact spare
emergency use only. Do not
the wheel. This could lead to the
tire takes up less space than a regu-
operate your vehicle on this
loss of the wheel and a collision
lar-size tire. This tire is smaller than a
compact spare at the speed
resulting in serious injuries.
conventional tire and is designed for
over 80 km/h (50 mph). The orig-
temporary use only.
inal tire should be repaired or
replaced as soon as possible to
To prevent the jack, jack handle,
avoid failure of the spare possi-
CAUTION
wheel lug nut wrench and spare tire
bly leading to personal injury or
from rattling while the vehicle is in
• You should drive carefully
death.
motion, store them properly.
when the compact spare is in
use. The compact spare
should be replaced by the
WARNING - Inadequate
The compact spare should be inflat-
proper conventional tire and
ed to 420 kPa (60 psi).
spare tire pressure
rim at the first opportunity.
Check the inflation pressures
• The operation of this vehicle
as soon as possible after
is not recommended with
✽ NOTICE
installing the spare tire. Adjust
more than one compact spare
Check the inflation pressure after
it to the specified pressure, if
tire in use at the same time.
installing the spare tire. Adjust it to
necessary. Refer to “Tires and
the specified pressure, as necessary.
wheels” in chapter 9.
7 23

What to do in an emergency
When using a compact spare tire,
•
Do not take the vehicle through an
•
The temporary compact tire should
observe the following precautions:
automatic car wash while the com-
not be used on any other wheels,
pact spare tire is installed.
nor should standard tires, snow
•
Under no circumstances should
tires, wheel covers or trim rings be
you exceed 80 km/h (50 mph); a
•
Do not use tire chains on the tem-
used with the temporary compact
higher speed could damage the
porary compact tire. Because of
spare wheel. If such use is
tire.
the smaller size, a tire chain will not
attempted, damage to these items
fit properly. This could damage the
•
Ensure that you drive slowly
or other car components may
vehicle and result in loss of the
enough to avoid all hazards. Any
occur.
chain.
road hazard, such as a pothole or
•
Do not use more than one tempo-
debris, could seriously damage the
•
Temporary compact tire should not
rary compact tire at a time.
compact spare.
be installed on the front axle if the
•
Any continuous road use of this tire
vehicle must be driven in snow or
•
Do not tow a trailer while the tem-
on ice.
porary compact tire is installed.
could result in tire failure, loss of
vehicle control, and possible per-
•
Do not use the temporary compact
sonal injury.
tire on any other vehicle because
this tire has been designed espe-
•
Do not exceed the vehicle’s maxi-
cially for your vehicle.
mum load rating or the load-carry-
ing capacity shown on the sidewall
•
The temporary compact tire tread
of the compact spare tire.
life is shorter than a regular tire.
Inspect your temporary compact
•
Avoid driving over obstacles. The
tire regularly and replace worn
compact spare tire diameter is
compact spare tires with the same
smaller than the diameter of a con-
size and design, mounted on the
ventional tire and reduces the
same wheel.
ground clearance approximately
2.5 cm (1 inch), which could result
in damage to the vehicle.
7 24

What to do in an emergency
Jack label
■ Example
1. Model Name
• Type A
2. Maximum allowable load
3. When using the jack, set your
parking brake.
4. When using the jack, stop the
engine.
5. Do not get under a vehicle that is
supported by a jack.
OHYK064001
6. The designated locations under
• Type B
the frame
7. When supporting the vehicle, the
base plate of jack must be vertical
under the lifting point.
8. Shift into Reverse gear on vehicles
with manual transmission or move
the shift lever to the P position on
OHYK064005
vehicles with automatic transmis-
• Type C
sion.
9. The jack should be used on firm
level ground.
10. Jack manufacturer
11. Production date
12. Representative company and
address
OHYK064002
❈ The actual Jack label in the vehicle may differ from the illustration.
For more detailed specifications, refer to the label attached to the jack.
7 25

What to do in an emergency
EC Declaration of Conformity for Jack
OUM074110L
7 26

What to do in an emergency
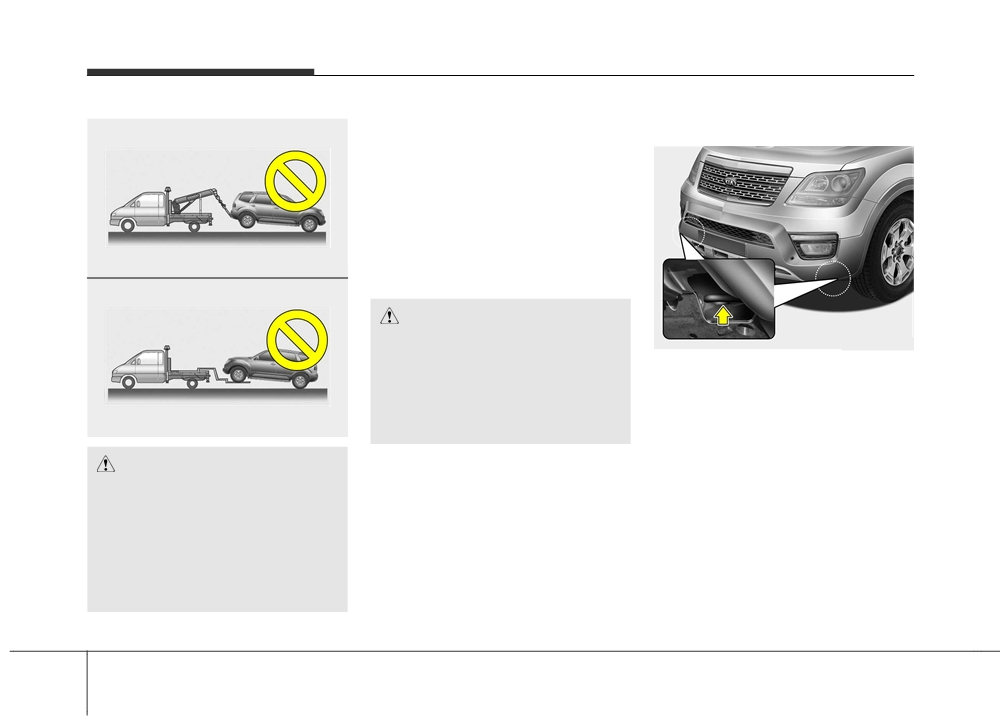
TOWING
Towing service
If emergency towing is necessary,
On 2WD or part-time 4WD (2H posi-
we recommend having it done by an
tion) vehicles, it is acceptable to tow
authorized Kia dealer or a commer-
the vehicle with the front wheels on
cial tow-truck service. Proper lifting
the ground (without dollies) and the
and towing procedures are neces-
rear wheels off the ground.
sary to prevent damage to the vehi-
If any of the loaded wheels or sus-
cle. The use of wheel dollies (1) or
pension components are damaged
flatbed is recommended.
or the vehicle is being towed with the
On 4WD vehicles, your vehicle must
rear wheels on the ground, use a
be towed with a wheel lift and dollies
towing dolly under the rear wheels.
or flatbed equipment with all the
When being towed by a commercial
wheels off the ground.
tow truck and wheel dollies are not
used, the rear of the vehicle should
CAUTION
always be lifted, not the front.
*
The 4WD vehicle should never
be towed with the wheels on the
ground. This can cause serious
damage to the transaxle or the
4WD system.
OHM068016
* 2WD or part-time 4WD (2H position) vehicles
only
7 27
What to do in an emergency
When towing your vehicle in an
Emergency towing
emergency without wheel dollies :
1. Set the ignition switch in the ACC
position.
2. Place the transaxle shift lever in N
(Neutral).
3. For part-time 4WD vehicle, set the
transfer shift knob to 2H.
OHM068017
4. Release the parking brake.
CAUTION
Failure to place the transmis-
OHM066013L
sion shift lever in N
(Neutral)
If towing is necessary, we recom-
and the transfer shift knob for
mend you to have it done by an
part-time 4WD operation to 2H
authorized Kia dealer or a com-
may cause internal damage to
mercial tow truck service.
the transmission.
OHM068018
CAUTION
• Do not tow the vehicle back-
wards with the rear wheels on
the ground as this may cause
damage to the vehicle.
• Do not tow with sling-type
equipment. Use wheel lift or
flatbed equipment.
7 28

What to do in an emergency
If towing service is not available in an
emergency, your vehicle may be
CAUTION
WARNING
temporarily towed using a cable or
• Attach a towing strap to the
Use extreme caution when tow-
chain secured to the emergency tow-
tow hook.
ing the vehicle.
ing hook under the front (or rear) of
• Using a portion of the vehicle
•
Avoid sudden starts or erratic
the vehicle. Use extreme caution
other than the tow hooks for
driving maneuvers which
when towing the vehicle. A driver
towing may damage the body
would place excessive stress
must be in the vehicle to steer it and
of your vehicle.
on the emergency towing hook
operate the brakes.
• Use only a cable or chain
and towing cable or chain. The
Towing in this manner may be done
specifically intended for use
hook and towing cable or
only on hard-surfaced roads for a
in towing vehicles. Securely
chain may break and cause
short distance and at low speed.
fasten the cable or chain to
serious injury or damage.
Also, the wheels, axles, power train,
the towing hook provided.
•
If the disabled vehicle is
steering and brakes must all be in
unable to be moved, do not
good condition.
•
Before emergency towing, check if
forcibly continue the towing.
• Do not use the tow hooks to pull a
the hook is not broken or dam-
We recommend that you con-
vehicle out of mud, sand or other
aged.
tact an authorized Kia dealer
conditions from which the vehicle
or a commercial tow truck
•
Fasten the towing cable or chain
cannot be driven out under its own
service for assistance.
securely to the hook.
power.
•
Tow the vehicle as straight
•
Do not jerk the hook. Apply it
• Avoid towing a vehicle heavier than
ahead as possible.
steadily and with even force.
the vehicle doing the towing.
•
Keep away from the vehicle
•
To avoid damaging the hook, do
• The drivers of both vehicles should
during towing.
not pull from the side or at a verti-
communicate with each other fre-
cal angle. Always pull straight
quently.
ahead.
7 29

What to do in an emergency
Emergency towing precautions
CAUTION - Automatic
•
Turn the ignition switch to ACC so
transaxle
the steering wheel isn’t locked.
•
If the car is being towed with all
•
Place the transaxle shift lever in N
four wheels on the ground, it
(Neutral).
can be towed only from the
•
Release the parking bake.
front. Be sure that the transaxle
•
Press the brake pedal with more
is in neutral. Be sure the steer-
force than normal since you will
ing is unlocked by placing the
have reduced brake performance.
ignition switch in the ACC posi-
•
More steering effort will be
tion. A driver must be in the
OHM068019
required because the power steer-
towed vehicle to operate the
ing system will be disabled.
steering and brakes.
•
Use a towing strap less than 5 m
(16 feet) long. Attach a white or red
•
If you are driving down a long hill,
•
To avoid serious damage to
cloth
(about
30 cm (12 inches)
the brakes may overheat and brake
the automatic transaxle, limit
wide) in the middle of the strap for
performance will be reduced. Stop
the vehicle speed to 15 km/h
easy visibility.
often and let the brakes cool off.
(10 mph) and drive less than
1.5 km (1 mile) when towing.
•
Drive carefully so that the towing
•
Before towing, check the auto-
strap is not loosened during tow-
ing.
matic transaxle for fluid leaks
under your vehicle. If the auto-
matic transaxle fluid is leak-
ing, flatbed equipment or a
towing dolly must be used.
7 30

What to do in an emergency
OHM066014L
Tie-down hook
(for flatbed towing)
WARNING
Do not use the hooks under the
rear of the vehicle for towing
purposes. These hooks are
designed ONLY for transport
tie-down. If the tie-down hooks
are used for towing, the tie-
down hooks or rear bumper will
be damaged and this could lead
to serious injury.
7 31
Большое спасибо!
Ваше мнение очень важно для нас.
Нет комментариевНе стесняйтесь поделиться с нами вашим ценным мнением.
Текст