Subaru Impreza 3 / Impreza WRX / Impreza WRX STI. Service manual — part 737
EI-35
Front Bumper
EXTERIOR/INTERIOR TRIM
5
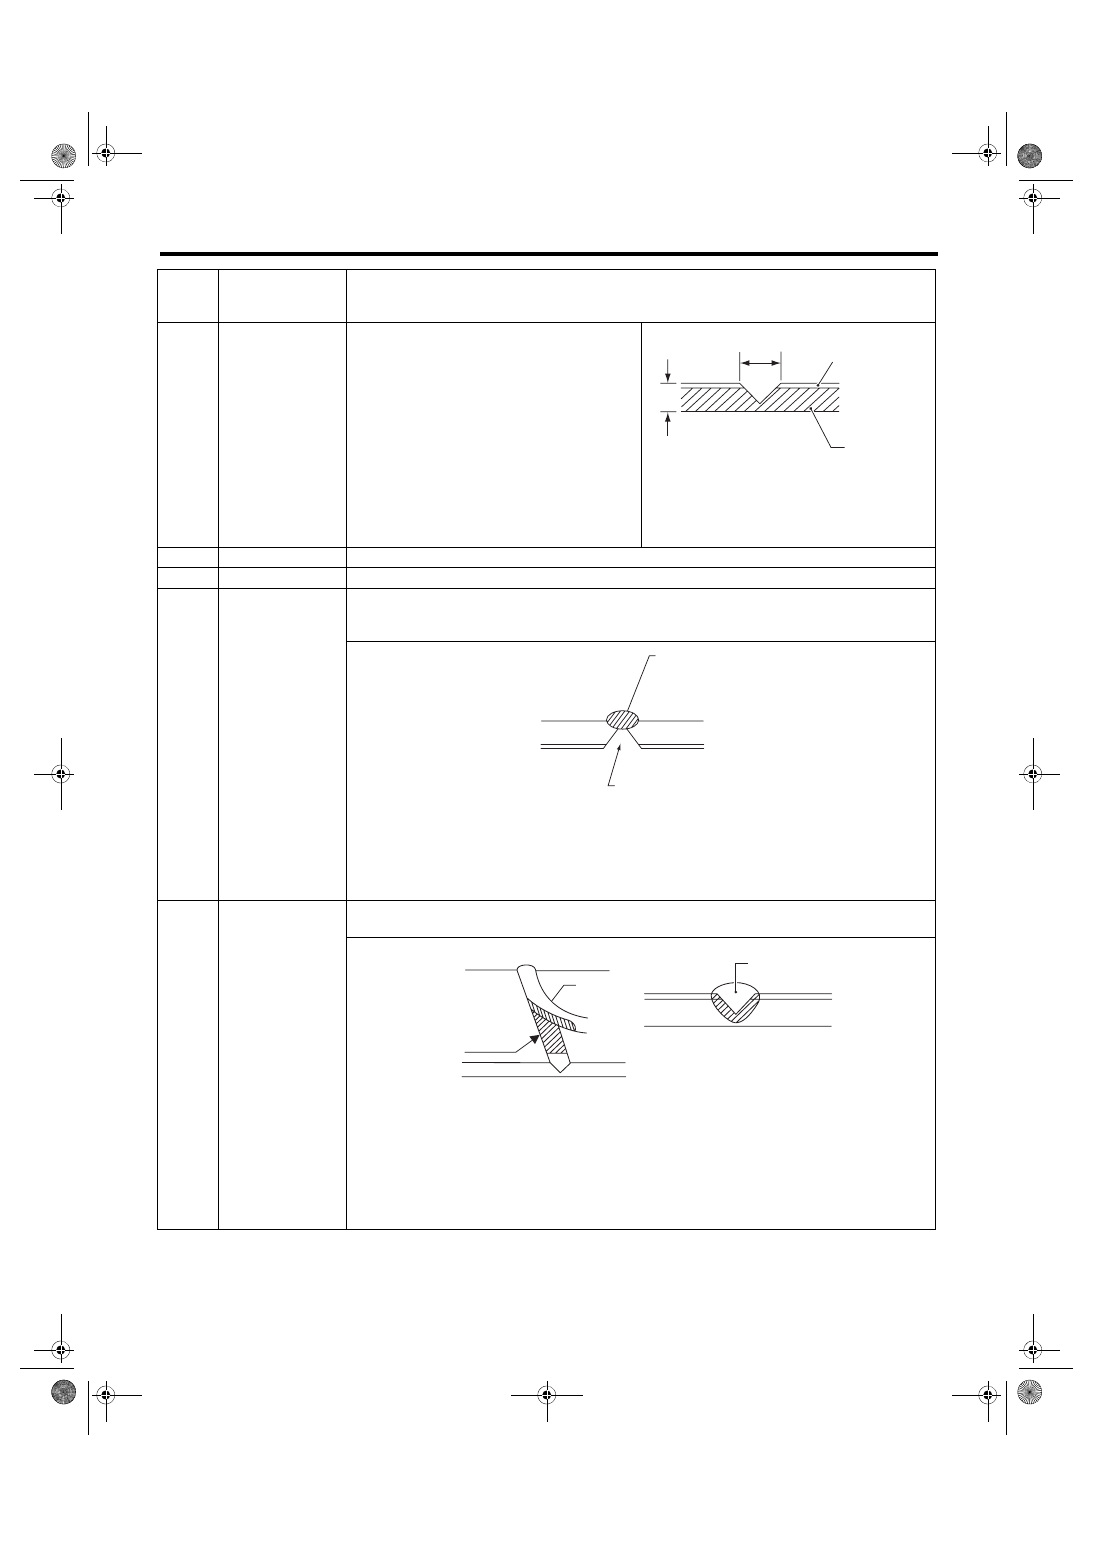
Cutting
If the damage is a crack or a hole, cut a guide
slit of 20 to 30 mm (0.79 to 1.18 in) in length
along the crack or hole up to the bumper base
surface. Next, use a knife or grinder to carve a
V-shaped groove in the area for repair.
(1) Paint surface
(2) PP base surface
(3) 20 — 30 mm (0.79 — 1.18 in)
(4) 3 mm (0.12 in)
6
Sanding (I)
Grind beveled surface with sand paper (#40 — #60) to smooth finish.
7
Cleaning
Clean the sanded surface with the same solvent as used in process No. 4.
8
Temporary welding
Grind the side just opposite the beveled area with sand paper (#40 — #60) and clean using a sol-
vent.
Temporarily spot-weld the side, using PP welding rod and heater gun.
(1) Welded point (Use heater gun and PP welding rod)
(2) PP base surface
(3) Beveled section
NOTE:
• Do not melt welding rod until it flows out. This results in reduced strength.
• Leave the welded spot unattended until it cools completely.
9
Welding
Using a heater gun and PP welding rod, weld the beveled spot while melting both the rod and
damaged area.
(1) Welding rod
(2) Melt hatched area
(3) Section
NOTE:
• Melt the sections indicated by hatched area.
• Do not melt the welding rod until it flows out, in order to provide strength.
• Always keep the heater gun 1 to 2 cm (0.4 to 0.8 in) away from the welding spot.
• Leave the welded spot unattended until it cools completely.
Pro-
cess
No.
Process name
Job contents
EI-00235
(4)
(2)
(1)
(3)
EI-00236
(1)
(2)
(3)
(1)
(2)
(2)
(3)
EI-00237
EI-36
Front Bumper
EXTERIOR/INTERIOR TRIM
10
Sanding (II)
Remove excess part of weld with a putty knife. If a drill or disc wheel is used instead of the knife,
operate it at a rate lower than 1,500 rpm and grind the excess part little by little. A higher rpm will
cause the PP substrate to melt from the heat.
Sand the welded spot smooth with #240 sand paper.
11
Masking
Mask the black substrate section using masking tape.
12
Cleaning/degreas-
ing
Completely clean the entire coated area, using solvent similar to that used in process No. 4.
13
Primer coating
Apply a coat of primer for bumpers to the repaired surface and its surrounding areas. Mask these
areas, if necessary.
NOTE:
Be sure to apply a coat of primer using a spray gun at a pressure of 245 — 343 kPa (2.5 — 3.5 kgf/cm
2
,
36 — 50 psi).
14
Leave unattended
Leave the repaired area unattended at 20°C (68°F) for 10 to 15 minutes until primer is half-dry.
NOTE:
If dirt or dust comes in contact with the coated area, wipe it off with a cloth dampened with alcohol.
(Do not use thinner since the coated area tends to melt.)
15
Surfacer coating
Apply a coat of surfacer for PP bumpers to the repaired area two or three times at an interval of 3
— 5 minutes.
For surfacer/hardener mixture, viscosity and paint thickness, observe the specifications of the sur-
facers to be used.
16
Drying
Allow the coated surface to dry for 20 minutes at 20°C (68°F) [or 30 minutes at 60°C (140°F)].
17
Sanding (III)
Sand the coated surface and its surrounding areas using #400 sand paper and water.
18
Cleaning/degreas-
ing
Same as process No. 12.
19
Top coat (I)
Non-colored
Metallic paint
Use a “block” coating method.
For paint/hardener mixture, observe the specifi-
cations recommended by the manufacturers.
• Viscosity: 11 — 13 sec./20°C (68°F)
• Coating film thickness: 40 — 50 µ
• Spraying pressure: 245 — 343 kPa
(2.5 — 3.5 kgf/cm
2
, 36 — 50 psi)
Use a “block” coating method.
For paint/hardener mixture, observe the specifi-
cations recommended by the manufacturers.
• Viscosity: 11 — 13 sec./20°C (68°F)
• Coating film thickness: 20 — 30 µ
• Spraying pressure: 245 — 343 kPa
(2.5 — 3.5 kgf/cm
2
, 36 — 50 psi)
20
Leave unattended
Not required.
Leave unattended at 20°C (68°F) for at least 10
minutes until the topcoated area is half-dry.
NOTE:
Be careful to keep dust or dirt from coming in
contact with the affected area.
21
Top coat (II)
Not required.
Apply a clear coat three times at an interval of 3
to 5 minutes.
For paint/hardener mixture, observe the specifi-
cations recommended by the manufacturers.
• Viscosity: 10 — 13 sec./20°C (68°F)
• Coating film thickness: 20 — 30 µ
• Spraying pressure: 245 — 343 kPa
(2.5 — 3.5 kgf/cm
2
, 36 — 50 psi)
Pro-
cess
No.
Process name
Job contents
EI-00042
EI-37
Front Bumper
EXTERIOR/INTERIOR TRIM
22
Drying
Allow the coated surface to dry for two hours at 20°C (68°F) or 30 minutes at 60°C (140°F).
NOTE:
Do not allow the temperature to exceed 80°C (176°F) since this will deform the PP substrate.
23
Inspection
Carefully check the condition of the repaired area.
24
Removal of mask-
ing
Remove the masking tape applied in process No. 11 and 13.
25
Parts installation
Install parts on the bumper in reverse order of removal.
26
Bumper installation Install the bumper.
Pro-
cess
No.
Process name
Job contents
EI-38
Rear Bumper
EXTERIOR/INTERIOR TRIM
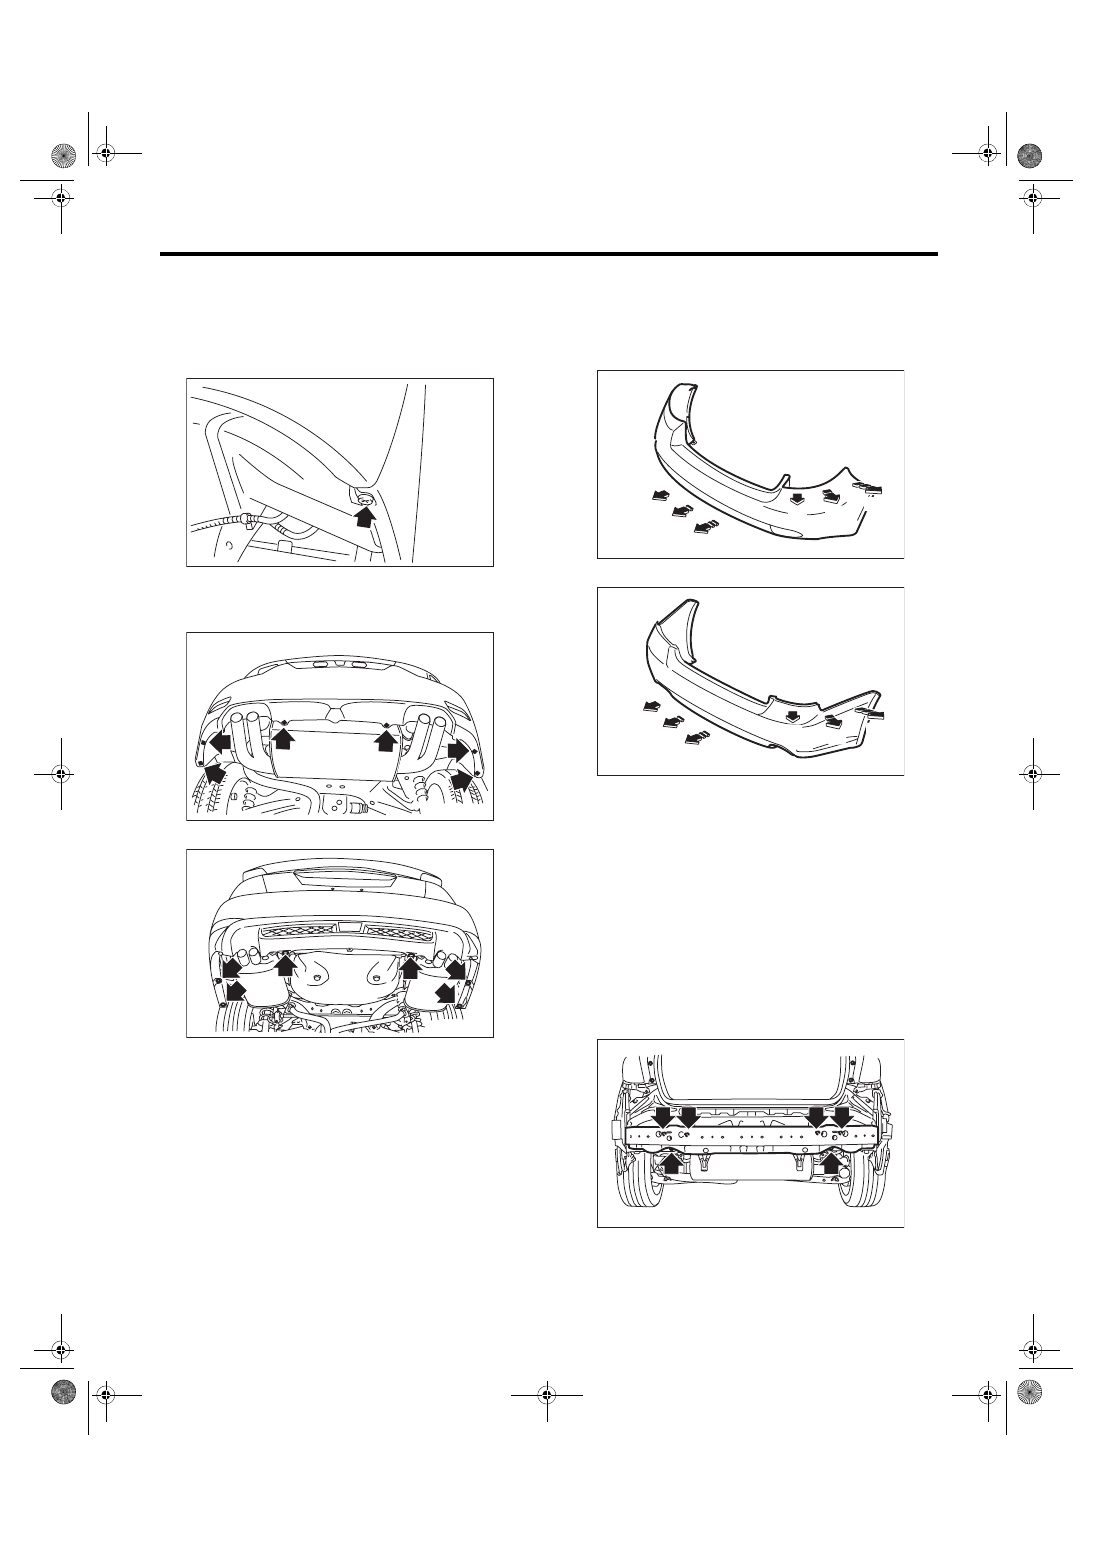
8. Rear Bumper
A: REMOVAL
1. REAR BUMPER FACE
1) Remove the clips inside the wheel housing.
2) Remove the clips on the lower side of rear
bumper.
• 5 door model
• 4 door model
3) Remove the rear bumper from vehicle body.
CAUTION:
Do not pull with an excessive force. Otherwise
the bracket installation area may be damaged.
• 5 door model
• 4 door model
(1) Detach from the fender side in order from (a)
to (c) while pulling up on the bumper face and
twisting it towards you. (Both sides)
(2) Lifting the center of bumper face upward,
detach in the order from (d) to (f).
4) Remove the reflector. (5 door model)
2. REAR BUMPER BEAM ASSEMBLY
1) Remove the rear bumper face. <Ref. to EI-38,
REAR BUMPER FACE, REMOVAL, Rear
2) Remove the nuts, and remove the bumper beam
assembly from the vehicle body.
• 5 door model
EI-01630
EI-01969
EI-02958
EI-02390
(e)
(f)
(d)
(b)
(c)
(a)
EI-02391
(e)
(f)
(d)
(b)
(a)
(c)
EI-01875
Нет комментариевНе стесняйтесь поделиться с нами вашим ценным мнением.
Текст