Subaru Legacy (2005 year). Service manual — part 730
DI-27
DIFFERENTIALS
Differential Gear Oil
4) Fill the differential carrier with gear oil to the bot-
tom of filler plug.
NOTE:
• Carefully refill oil while watching the level. Exces-
sive or insufficient oil must be avoided.
Recommended gear oil:
<Ref. to DI-2, SPECIFICATION, General De-
scription.>
Oil capacity:
0.8
2 (0.8 US qt, 0.7 Imp qt)
• Except for VA2-type
• VA2-type
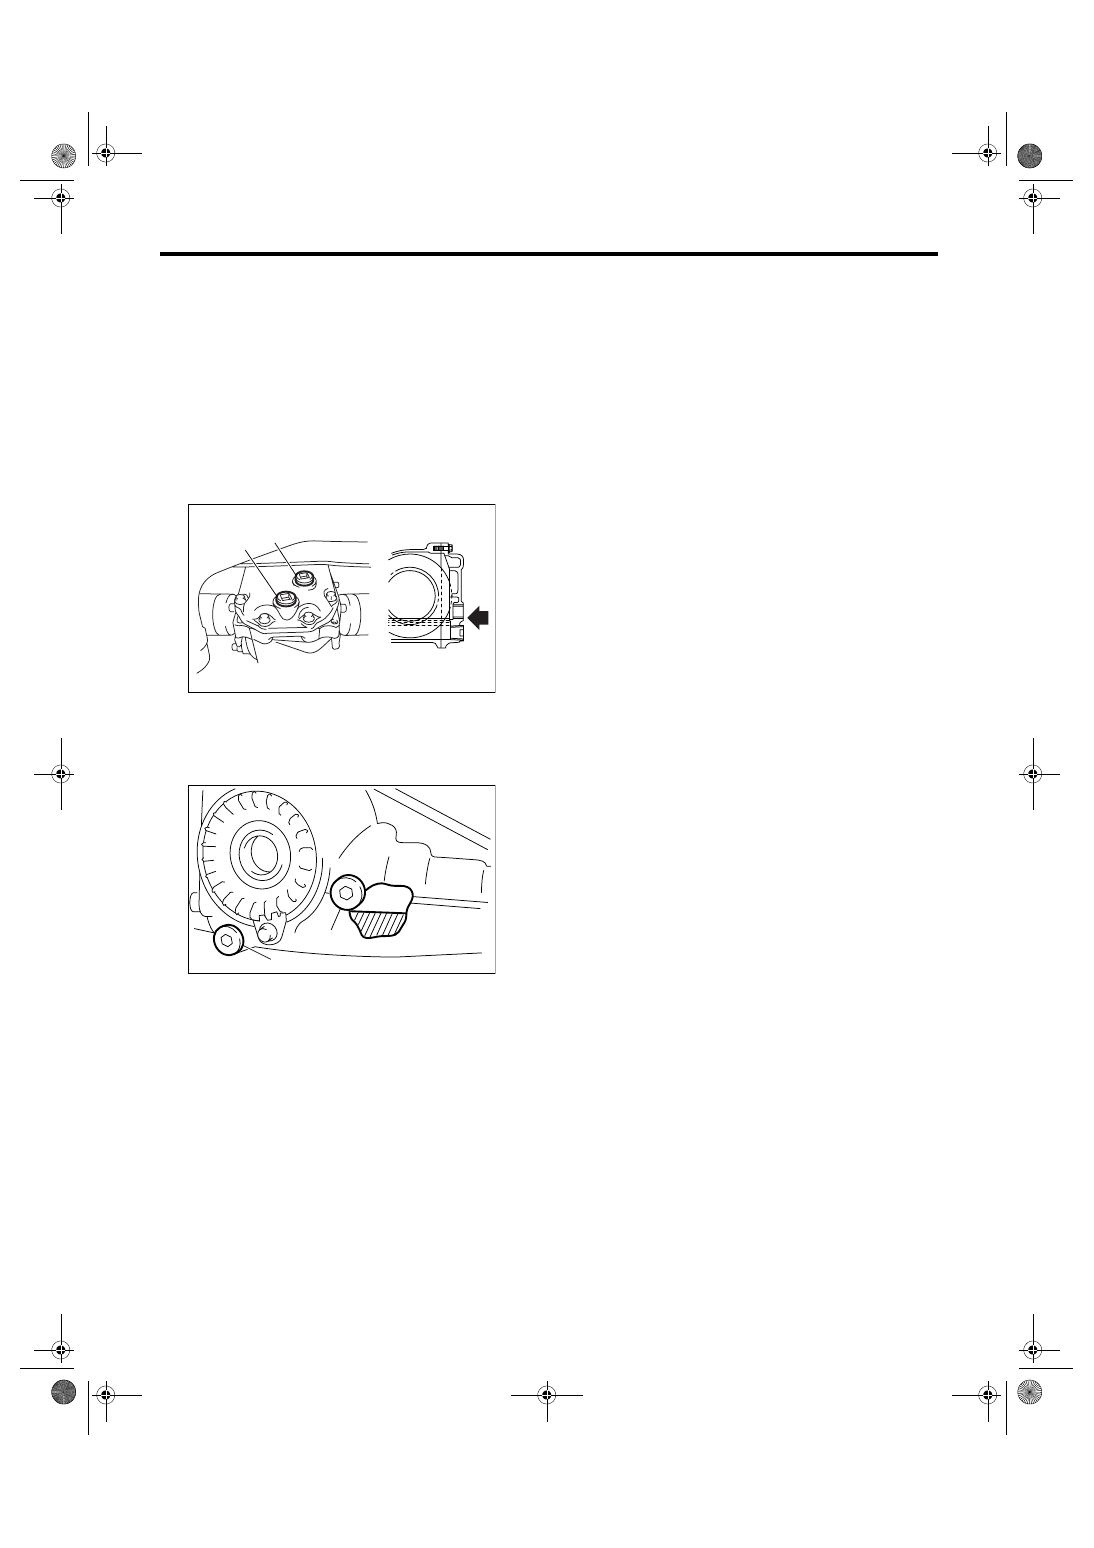
5) Install the filler plug.
NOTE:
• Apply liquid gasket to the filler plug threads for T-
type.
Liquid gasket:
THREE BOND 1105 (Part No. 004403010) or
equivalent
• Use a new aluminum gasket for VA1-type.
• Use a new metal gasket for VA2-type.
Tightening torque:
T-type
49 N
⋅
m (5.0 kgf-m, 36.2 ft-lb)
VA1-type
34 N
⋅
m (3.5 kgf-m, 25.3 ft-lb)
VA2-type
29 N
⋅
m (3.0 kgf-m, 21.4 ft-lb)
(A) Filler plug
(B) Drain plug
(A) Filler plug
(B) Drain plug
DI-00391
(A)
(B)
(B)
DI-00355
(A)
DI-28
DIFFERENTIALS
Front Differential Assembly
3. Front Differential Assembly
A: NOTE
1. AT MODEL
• 4AT
For front differential of 4AT model, refer to “4AT”
section. <Ref. to 4AT-115, Front Differential As-
sembly.>
• 5AT
For front differential of 5AT model, refer to “5AT”
section. <Ref. to 5AT-92, Front Differential Assem-
bly.>
2. MT MODEL
For front differential of manual transmission, refer
to “5MT” section. <Ref. to 5MT-84, Front Differen-
tial Assembly.>
DI-29
DIFFERENTIALS
Rear Differential (T-type)
4. Rear Differential (T-type)
A: REMOVAL
1) Disconnect the ground cable from battery.
2) Move the select lever or gear shift lever to neu-
tral.
3) Loosen the wheel nuts.
4) Release the parking brake.
5) Lift-up the vehicle.
6) Remove the rear wheels.
7) Remove the rear exhaust pipe and muffler.
• 2.0 L SOHC and DOHC non-turbo model
<Ref. to EX(H4SO 2.0)-10, Rear Exhaust Pipe.>
<Ref. to EX(H4SO 2.0)-12, Muffler.>
• 2.0 L DOHC turbo model
<Ref. to EX(H4DOTC)-11, Rear Exhaust Pipe.>
8) Remove the propeller shaft.
<Ref. to DS-10, REMOVAL, Propeller Shaft.>
9) Prepare the transmission jack and band.
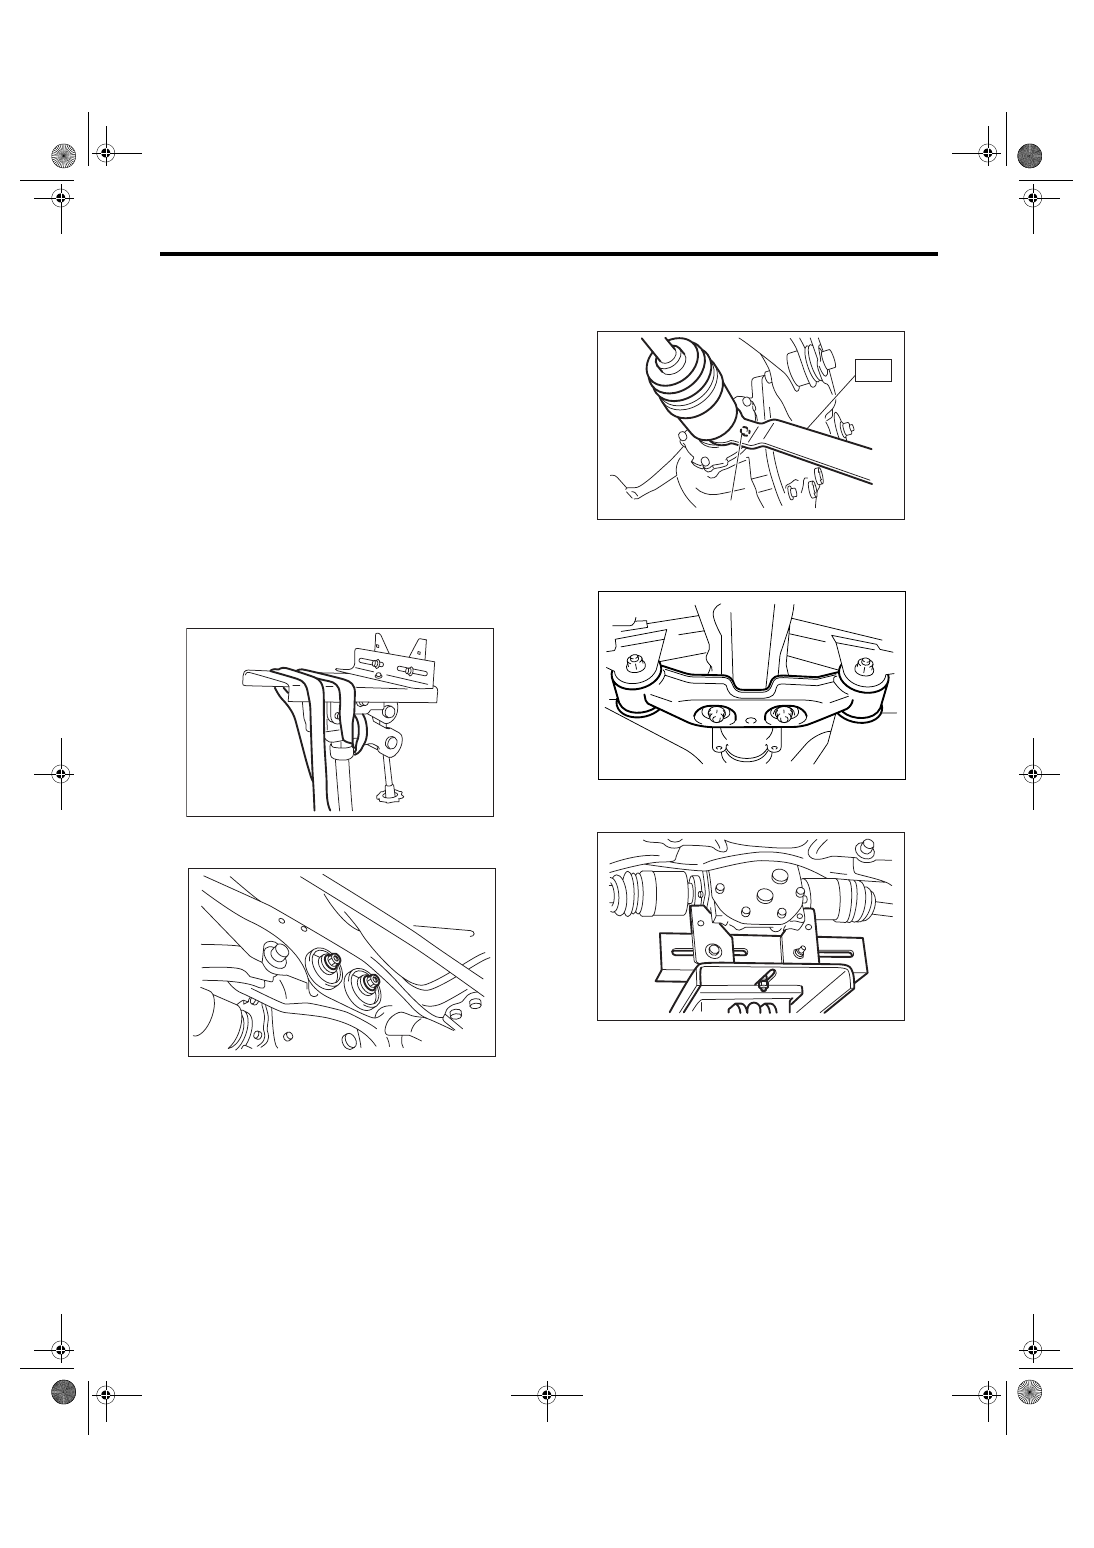
10) Loosen the self-locking nuts which hold the
rear differential to rear crossmember.
11) Remove the DOJ of rear drive shaft from rear
differential using ST.
ST
28099PA100
DRIVE SHAFT REMOVER
12) Remove the rear differential front member.
13) Support the rear differential with transmission
jack.
14) Secure the rear differential using band.
15) Remove the self-locking nuts which hold the
rear differential to crossmember.
DI-00268
DI-00269
(A) Bolt
DI-00270
(A)
ST
DI-00358
DI-00273
DI-30
DIFFERENTIALS
Rear Differential (T-type)
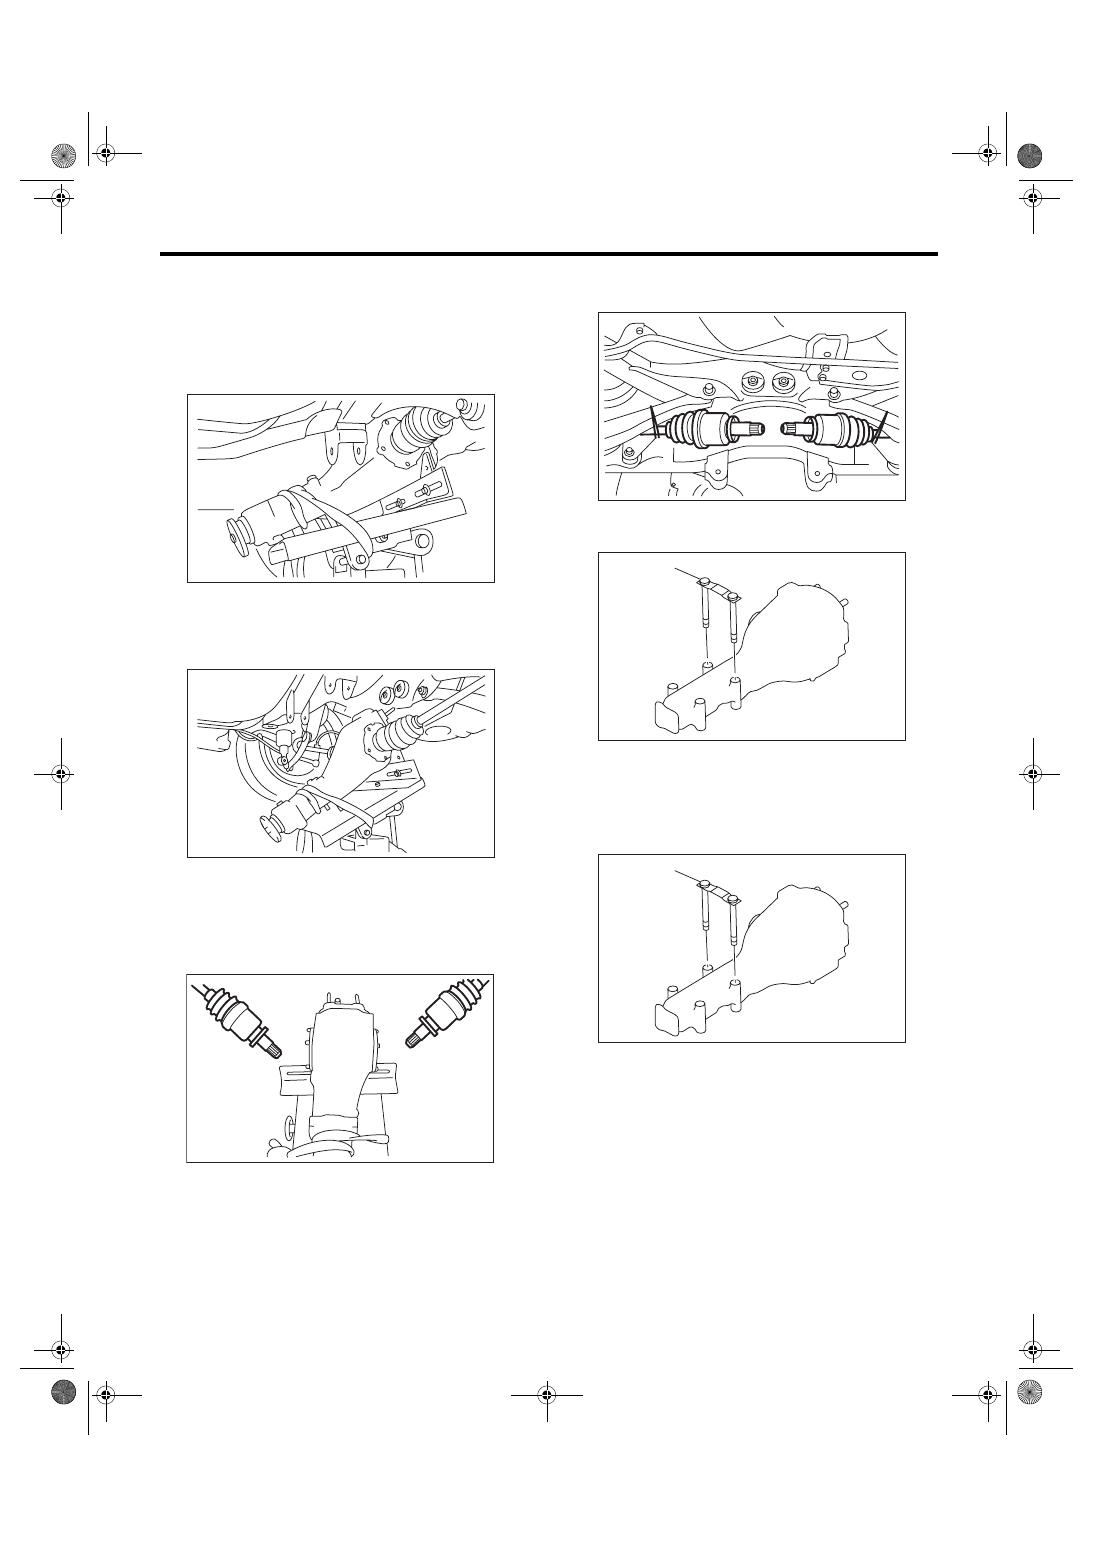
16) Remove the rear differential stud bolt from rear
crossmember bushing.
NOTE:
When removing the stud bolt, carefully adjust the
angle and location of transmission jack and jack
stand, if necessary.
17) Lower the transmission jack stand after remov-
ing the rear differential stud bolt from rear cross-
member. Rear drive shaft should not come into
contact with lateral link bolt.
18) Pull out the axle shaft from rear differential.
NOTE:
If it is difficult to remove the axle shaft from rear dif-
ferential, remove it using ST.
ST
28099PA100
DRIVE SHAFT REMOVER
19) Lower the transmission jack.
20) Secure the rear drive shaft to lateral link using
wire.
21) Remove the rear differential member plate from
rear differential.
B: INSTALLATION
1) Install the rear differential member plate to rear
differential.
2) Set the rear differential to transmission jack.
NOTE:
Secure the rear differential to transmission jack us-
ing band.
DI-00400
DI-00392
DI-00276
(A) Rear differential member plate
(A) Rear differential member plate
DI-00277
DI-00359
(A)
DI-00359
(A)
Нет комментариевНе стесняйтесь поделиться с нами вашим ценным мнением.
Текст