Subaru Legacy (2005 year). Service manual — part 302
LU(H4DOTC)-7
LUBRICATION
Oil Pressure System
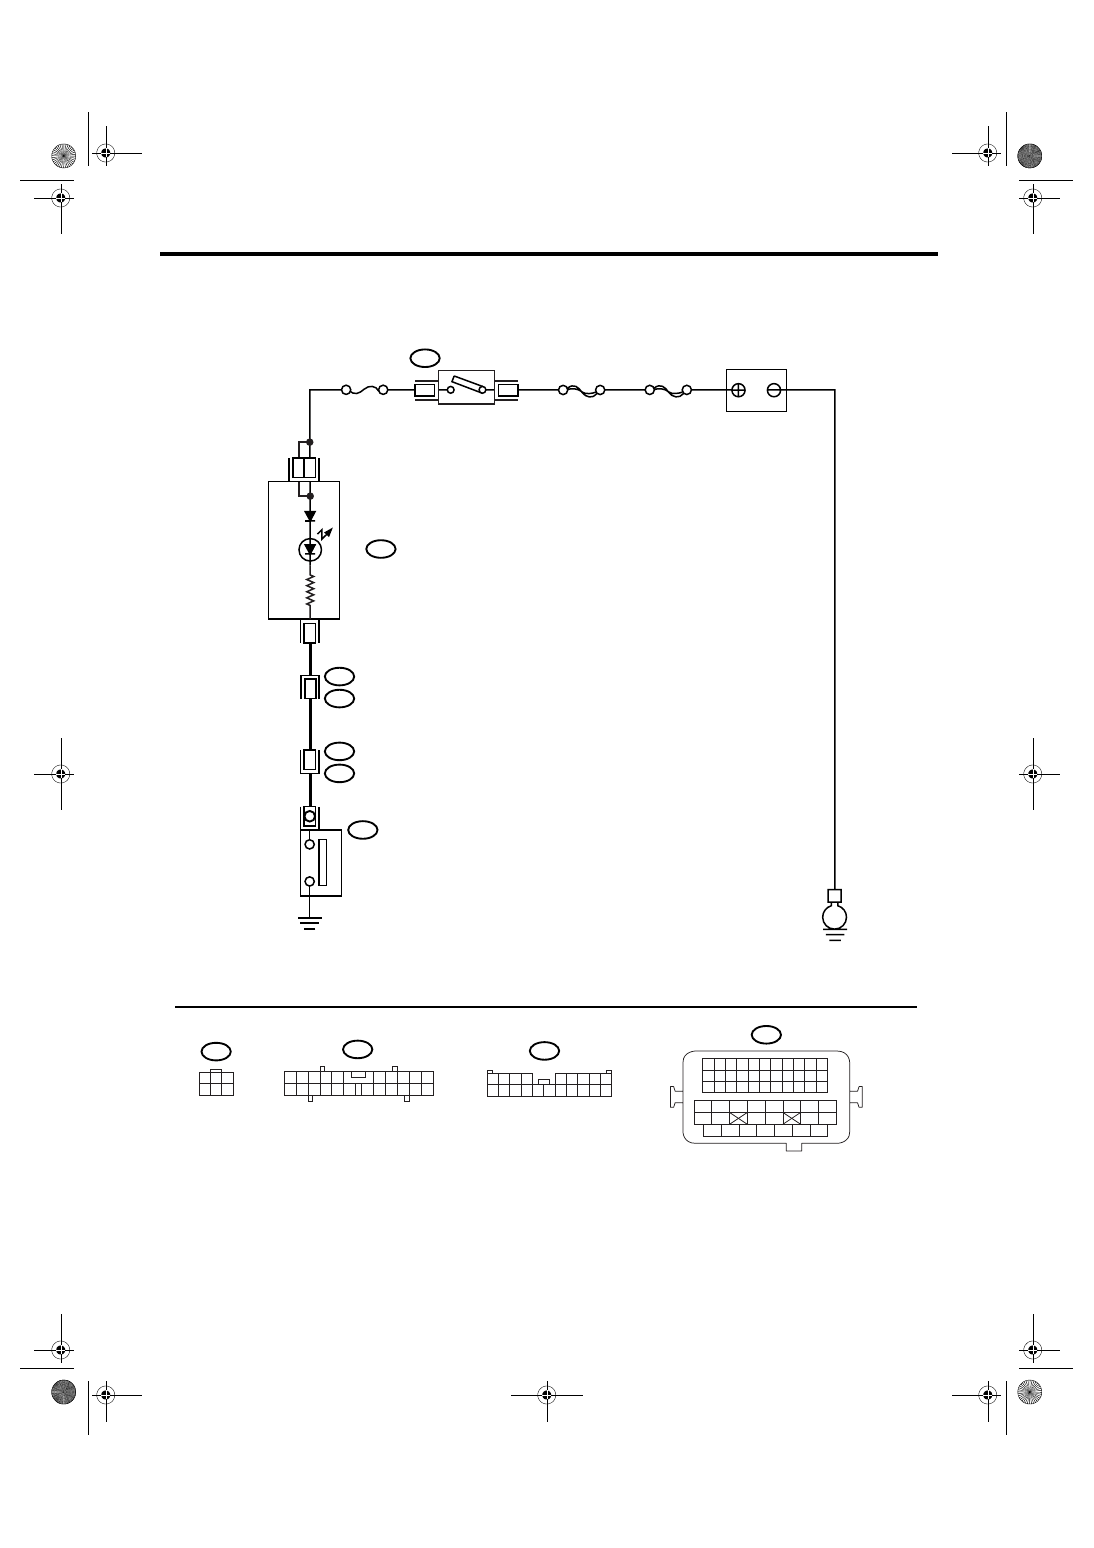
2. Oil Pressure System
A: WIRING DIAGRAM
LU-02152
E
i3
B38
B21
E2
17
E11
No.5
SBF-6
MAIN SBF
B72
3
6
B72
A15
i10
31
i10
BATTERY
IGNITION
SWITCH
COMBINATION
METER
OIL PRESSURE
W
ARNING LIGHT
OIL PRESSURE
SWITCH
A4
A3
1
3
4 5 6
2
2
1
3 4
6 7 8 9 10
22
21
20
19
18
17
16
15
14
13
12
11
5
1 2 3 4
5 6 7 8 9
10 11 12 13 14 15 16 17 18 19 20
B38
B21
1 2 3 4
12 13 14 15
5 6 7 8
16 17 18 19
9 10 11
20 21 22
23 24 25 26 27 28 29 30 31 32 33
35
34
37
36
39
38
41
40
43
42
44
45
47
46
49
48
51
50
53
52
54
A:
A:

LU(H4DOTC)-8
LUBRICATION
Oil Pressure System
B: INSPECTION
Step
Check
Yes
No
1
CHECK COMBINATION METER.
1) Turn the ignition switch to ON. (Engine
OFF)
2) Check the warning light of combination
meter.
Does the warning light illumi-
nate?
Repair or replace
the combination
meter. <Ref. to IDI-
3, INSPECTION,
Combination
Meter System.>
2
CHECK HARNESS CONNECTOR BETWEEN
COMBINATION METER AND OIL PRES-
SURE SWITCH.
1) Turn the ignition switch to OFF.
2) Disconnect the connector from oil pressure
switch.
3) Turn the ignition switch to ON.
4) Measure the voltage of harness between oil
pressure switch connector and chassis ground.
Connector & terminal
(E11) No. 1 (+) — Chassis ground (
−
):
Is the voltage more than 10 V? Replace the oil
pressure switch.
3
CHECK COMBINATION METER.
1) Turn the ignition switch to OFF.
2) Remove the combination meter.
3) Measure the resistance of combination
meter.
Terminals
No. 4 — No. 15:
No. 3 — No. 15:
Is the resistance less than 10
Ω?
Replace the har-
ness connector
between combina-
tion meter and oil
pressure switch.
Repair or replace
the combination
meter. <Ref. to IDI-
3, INSPECTION,
Combination
Meter System.>
LU(H4DOTC)-9
LUBRICATION
Engine Oil
3. Engine Oil
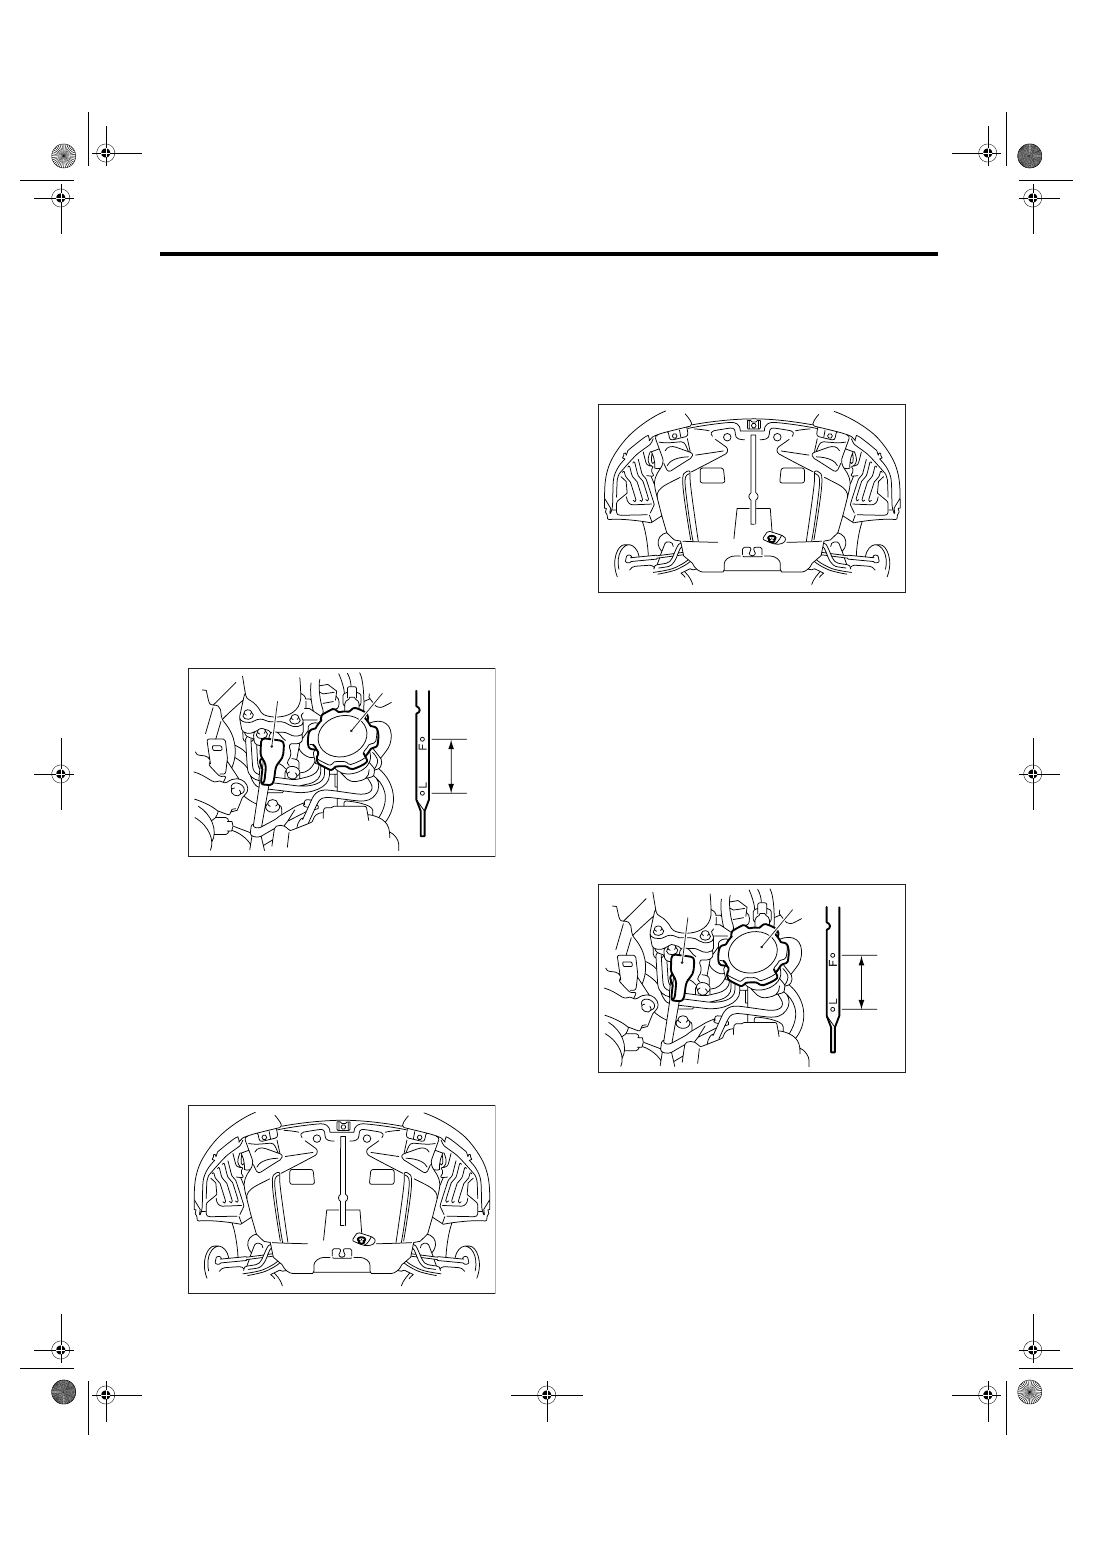
A: INSPECTION
1) Park the vehicle on a level surface.
2) Remove the oil level gauge and wipe it clean.
3) Reinsert the oil level gauge all the way. Be sure
that the oil level gauge is correctly inserted and
properly orientated.
4) Remove the oil level gauge again and check the
engine oil level. If the engine oil level is below the
“L” line, add oil to bring the level up to the “F” line.
5) After turning off the engine, wait a few minutes
for the oil to return to the oil pan before checking
the level.
6) Just after driving or while the engine is warm, en-
gine oil level shows in the range between “F” line
and notch mark. This is caused by thermal expan-
sion of engine oil.
NOTE:
To prevent overfilling of engine oil, do not add oil
above the “F” line when the engine is cold.
B: REPLACEMENT
1) Open the engine oil filler cap for quick draining of
engine oil.
2) Lift-up the vehicle.
3) Drain the engine oil by loosening the engine oil
drain plug.
4) Tighten the engine oil drain plug after draining
engine oil.
NOTE:
Use a new metal gasket.
Tightening torque:
44 N
⋅
m (4.5 kgf-m, 33 ft-lb)
5) Use the engine oil of proper quality and viscosi-
ty, fill the engine oil through oil filler duct to upper
level on level gauge. Make sure that the vehicle is
parked on a level surface when checking oil level.
Recommended oil:
<Ref. to LU(H4DOTC)-2, SPECIFICATION,
General Description.>
Engine oil capacity (when replacing engine oil):
4.0
2 (4.2 US qt, 3.5 Imp qt)
6) Close the engine oil filler cap.
7) Start the engine and warm it up for a time.
8) After the engine stops, recheck the oil level. If
necessary, add engine oil up to the upper level on
level gauge.
(A) Oil level gauge
(B) Engine oil filler cap
(C) Upper level
(D) Lower level
(E) Approx. 1.0
2(1.1 US qt, 0.9 Imp qt)
LU-00213
(C)
(B)
(A)
(E)
(D)
LU-00219
(A) Oil level gauge
(B) Engine oil filler cap
(C) Upper level
(D) Lower level
(E) Approx. 1.0
2(1.1 US qt, 0.9 Imp qt)
LU-00219
LU-00213
(C)
(B)
(A)
(E)
(D)
LU(H4DOTC)-10
LUBRICATION
Oil Pump
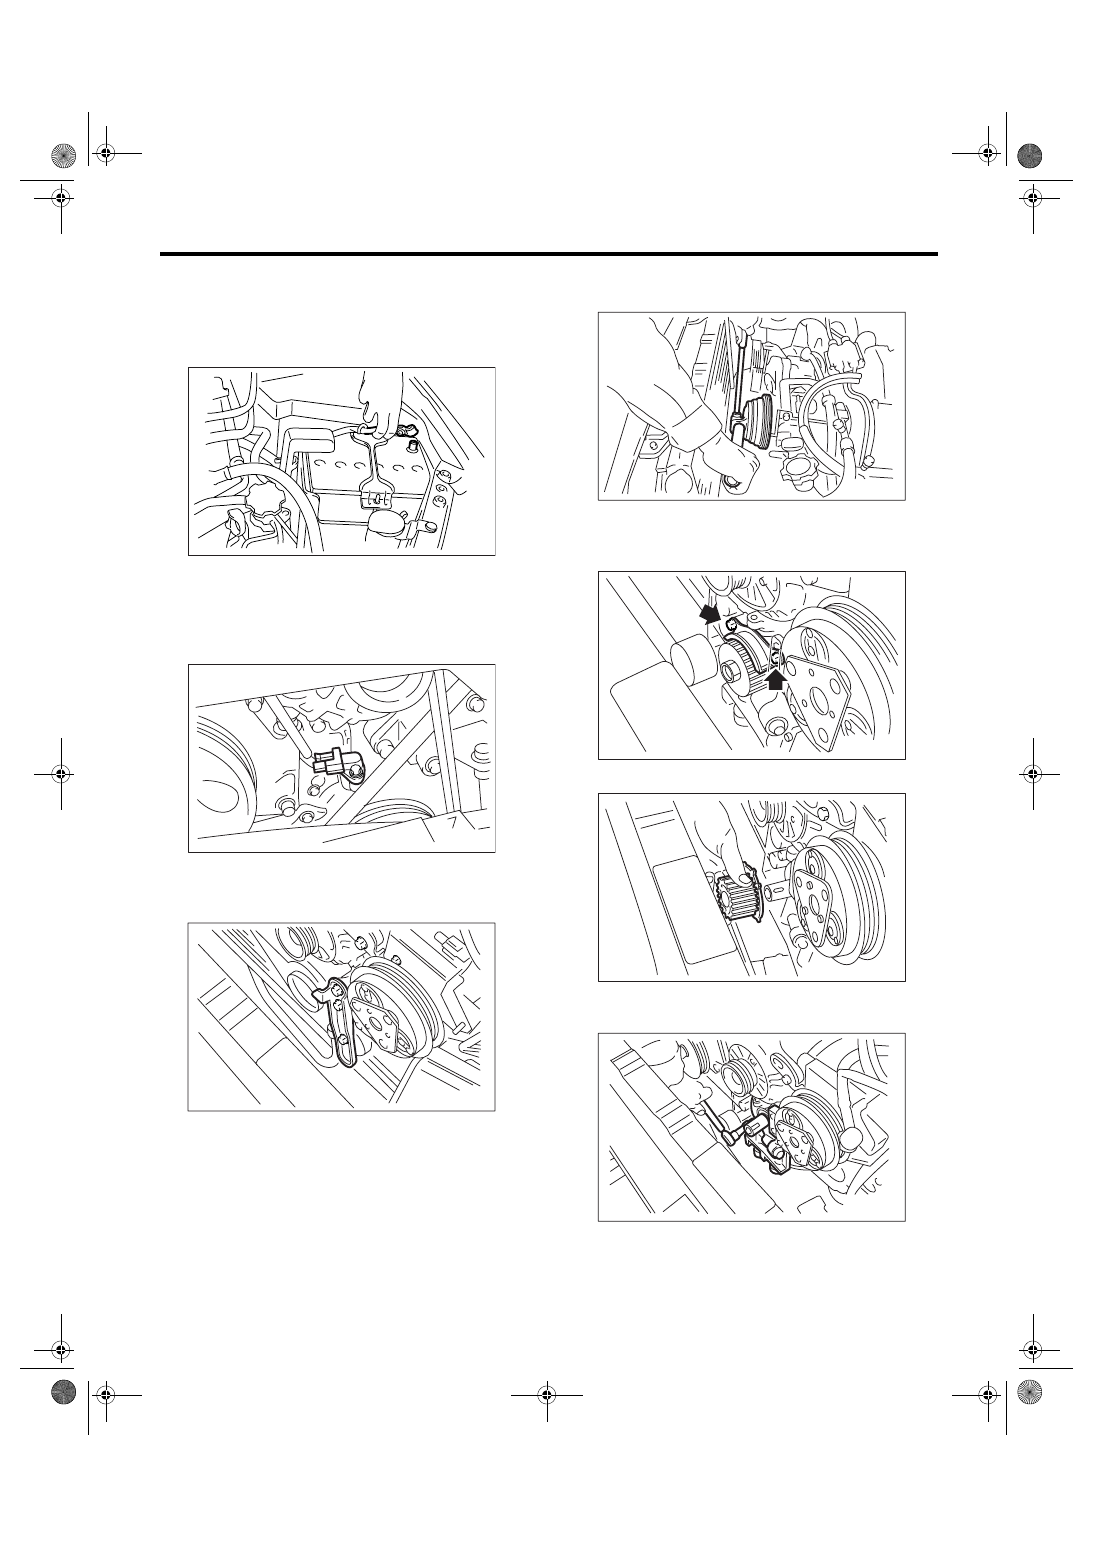
4. Oil Pump
A: REMOVAL
1) Remove the collector cover.
2) Disconnect the ground cable from battery.
3) Lift-up the vehicle.
4) Remove the under cover.
5) Remove the radiator. <Ref. to CO(H4DOTC)-19,
REMOVAL, Radiator.>
6) Remove the crankshaft position sensor.
7) Remove the V-belts.
REMOVAL, V-belt.>
8) Remove the rear side V-belt tensioner.
9) Remove the crank pulley using ST.
ME(H4DOTC)-43, REMOVAL, Crank Pulley.>
10) Remove the water pump. <Ref. to
CO(H4DOTC)-15, REMOVAL, Water Pump.>
11) Remove the timing belt guide.
12) Remove the crank sprocket.
13) Remove the bolt which installs oil pump to cyl-
inder block.
IN-00203
LU-00046
LU-00011
LU-00012
LU-00013
LU-00014
LU-00015
Нет комментариевНе стесняйтесь поделиться с нами вашим ценным мнением.
Текст