Subaru Legacy III (2000-2003 year). Service manual — part 436

EX(H4DOSTC)-12
EXHAUST
REAR EXHAUST PIPE
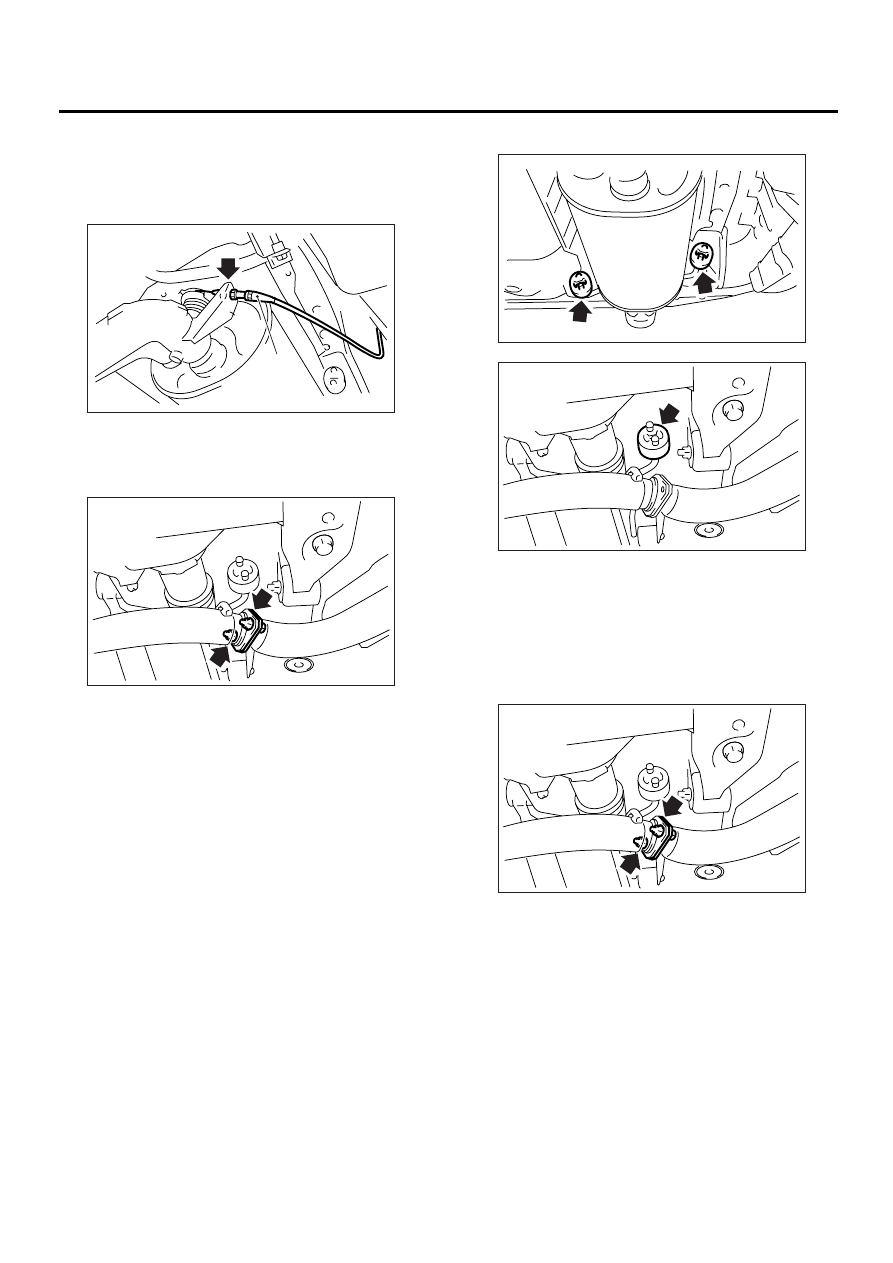
5. Rear Exhaust Pipe
A: REMOVAL
1) Lift-up the vehicle.
2) Separate the rear exhaust pipe from center ex-
haust pipe.
CAUTION:
Be careful, the exhaust pipe is hot.
3) Separate the rear exhaust pipe from muffler.
CAUTION:
Be careful not to pull down the rear exhaust
pipe.
4) Remove the rear exhaust pipe.
B: INSTALLATION
NOTE:
Replace the gaskets with new ones.
1) Install the rear exhaust pipe to muffler.
Tightening torque:
48 N·m (4.9 kgf-m, 35.4 ft-lb)
2) Install the rear exhaust pipe to center exhaust
pipe.
Tightening torque:
18 N·m (1.8 kgf-m, 13.0 ft-lb)
3) Lower the vehicle.
C: INSPECTION
1) Make sure there are no exhaust leaks from con-
nections and welds.
2) Make sure there are no holes or rusting.
3) Make sure the cushion rubber is not worn or
cracked.
EX-00085
EX-00090
EX-00090
EX-00085
EX(H4DOSTC)-13
EXHAUST
MUFFLER
6. Muffler
A: REMOVAL
1) Disconnect the cable (A) for variable muffler
from joint part of muffler. (MT vehicles)
2) Separate the muffler from rear exhaust pipe.
CAUTION:
Be careful, the exhaust pipe is hot.
3) Remove the rubber cushions, and then detach
the muffler.
CAUTION:
Be careful not to drop the muffler during remov-
al.
NOTE:
To facilitate removal, apply a coat of SUBARU
CRC to the mating area of rubber cushions in ad-
vance.
SUBARU CRC (Part No. 004301003)
B: INSTALLATION
1) Install in the reverse order of removal.
CAUTION:
Replace the gasket with a new one.
Tightening torque:
48 N·m (4.9 kgf-m, 35.4 ft-lb)
C: INSPECTION
1) Make sure there are no exhaust leaks from con-
nections and welds.
2) Make sure there are no holes or rusting.
3) Make sure the cushion rubber is not worn or
cracked.
EX-00091
(A)
EX-00090
EX-00092
EX-00093
EX-00090
EX(H4DOSTC)-14
EXHAUST
VARIABLE MUFFLER CONTROL UNIT
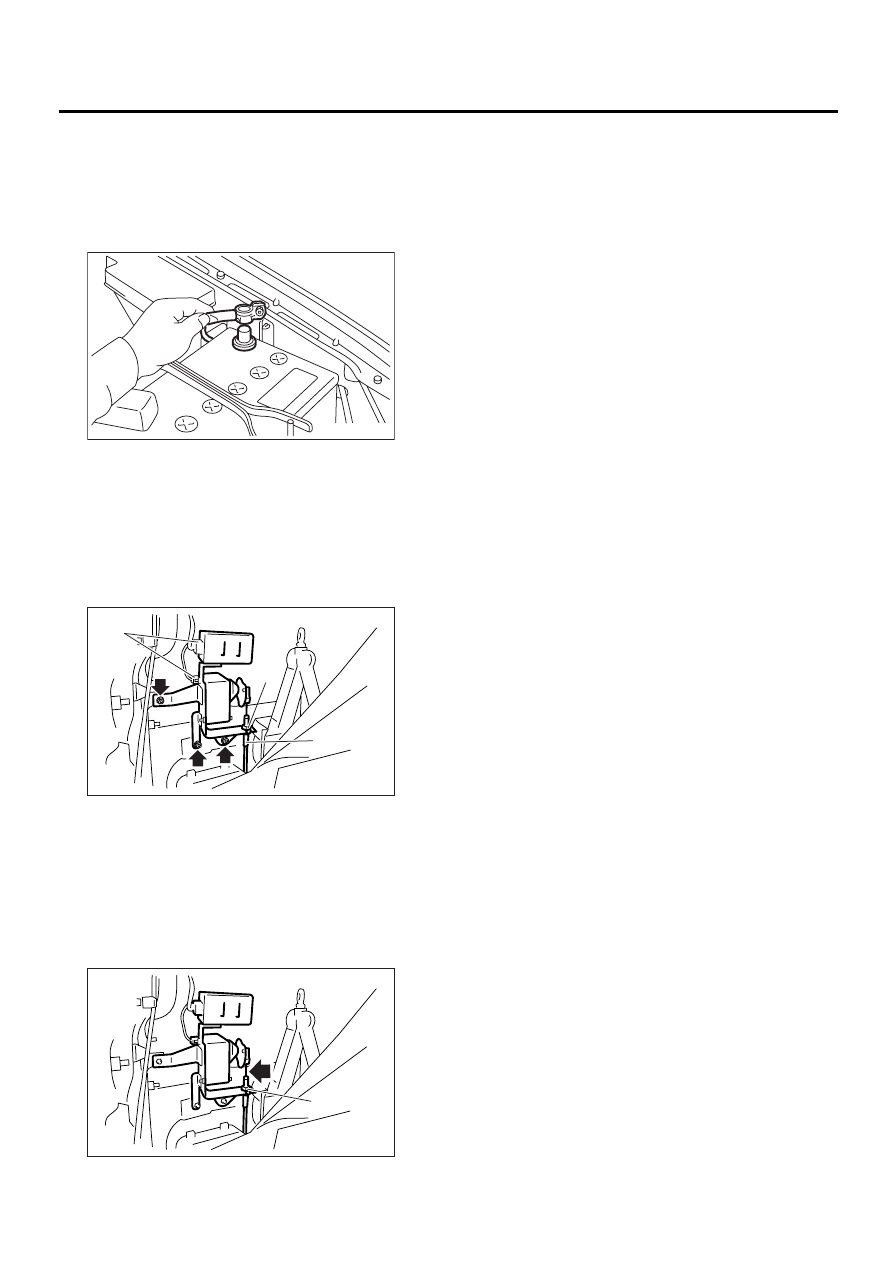
7. Variable Muffler Control Unit
A: REMOVAL
NOTE:
This unit is equipped only for MT vehicles.
1) Disconnect the ground cable from battery.
2) Remove the rear quarter trim. <Ref. EI-42 RE-
MOVAL, Rear QUARTER Trim.>
3) Loosen the lock nut (A) which holds control ca-
ble, and then remove the cable (B).
4) Disconnect the variable muffler control unit and
connector (C) of actuator.
5) Remove the variable muffler control unit, actua-
tor and bracket as a unit.
B: INSTALLATION
Install in the reverse order of removal.
C: ADJUSTMENT
Adjust the free play of control cable with lock nut
(A).
Inner cable free play when pressed with finger:
2.0 mm (0.08 in)
D: INSPECTION
Turn the ignition switch ON (engine OFF), and then
check that the actuator moves smoothly and does
not make abnormal noise.
FU-00009
EX-00094
(A)
(C)
(B)
EX-00095
(A)

COOLING
CO(H4DOSTC)
Page
General Description . . . . . . . . . . . . . . . . . . . . . 2
Radiator Main Fan System. . . . . . . . . . . . . . . . . . ..7
Radiator Sub Fan System . . . . . . . . . . . . . . . . . . .11
Engine Coolant. . . . . . . . . . . . . . . . . . . . . . ..15
Water Pump . . . . . . . . . . . . . . . . . . . . . . . ..17
Thermostat . . . . . . . . . . . . . . . . . . . . . . . . 21
Radiator. . . . . . . . . . . . . . . . . . . . . . . . . .23
Radiator Cap . . . . . . . . . . . . . . . . . . . . . . . .27
Radiator Main Fan and Fan Motor . . . . . . . . . . . . . . . 28
Radiator Sub Fan and Fan Motor. . . . . . . . . . . . . . . ..30
Reservoir Tank . . . . . . . . . . . . . . . . . . . . . . ..32
Coolant Filler Tank . . . . . . . . . . . . . . . . . . . . . 33
Engine Cooling System Trouble in General . . . . . . . . . . . ..34
Нет комментариевНе стесняйтесь поделиться с нами вашим ценным мнением.
Текст