Subaru BRZ (2012 year). Service manual — part 17
PI-15
Pre-delivery Inspection
PRE-DELIVERY INSPECTION
43.ILLUMINATION CONTROL
Check that the illumination control operates normally.
44.WINDOW WASHER
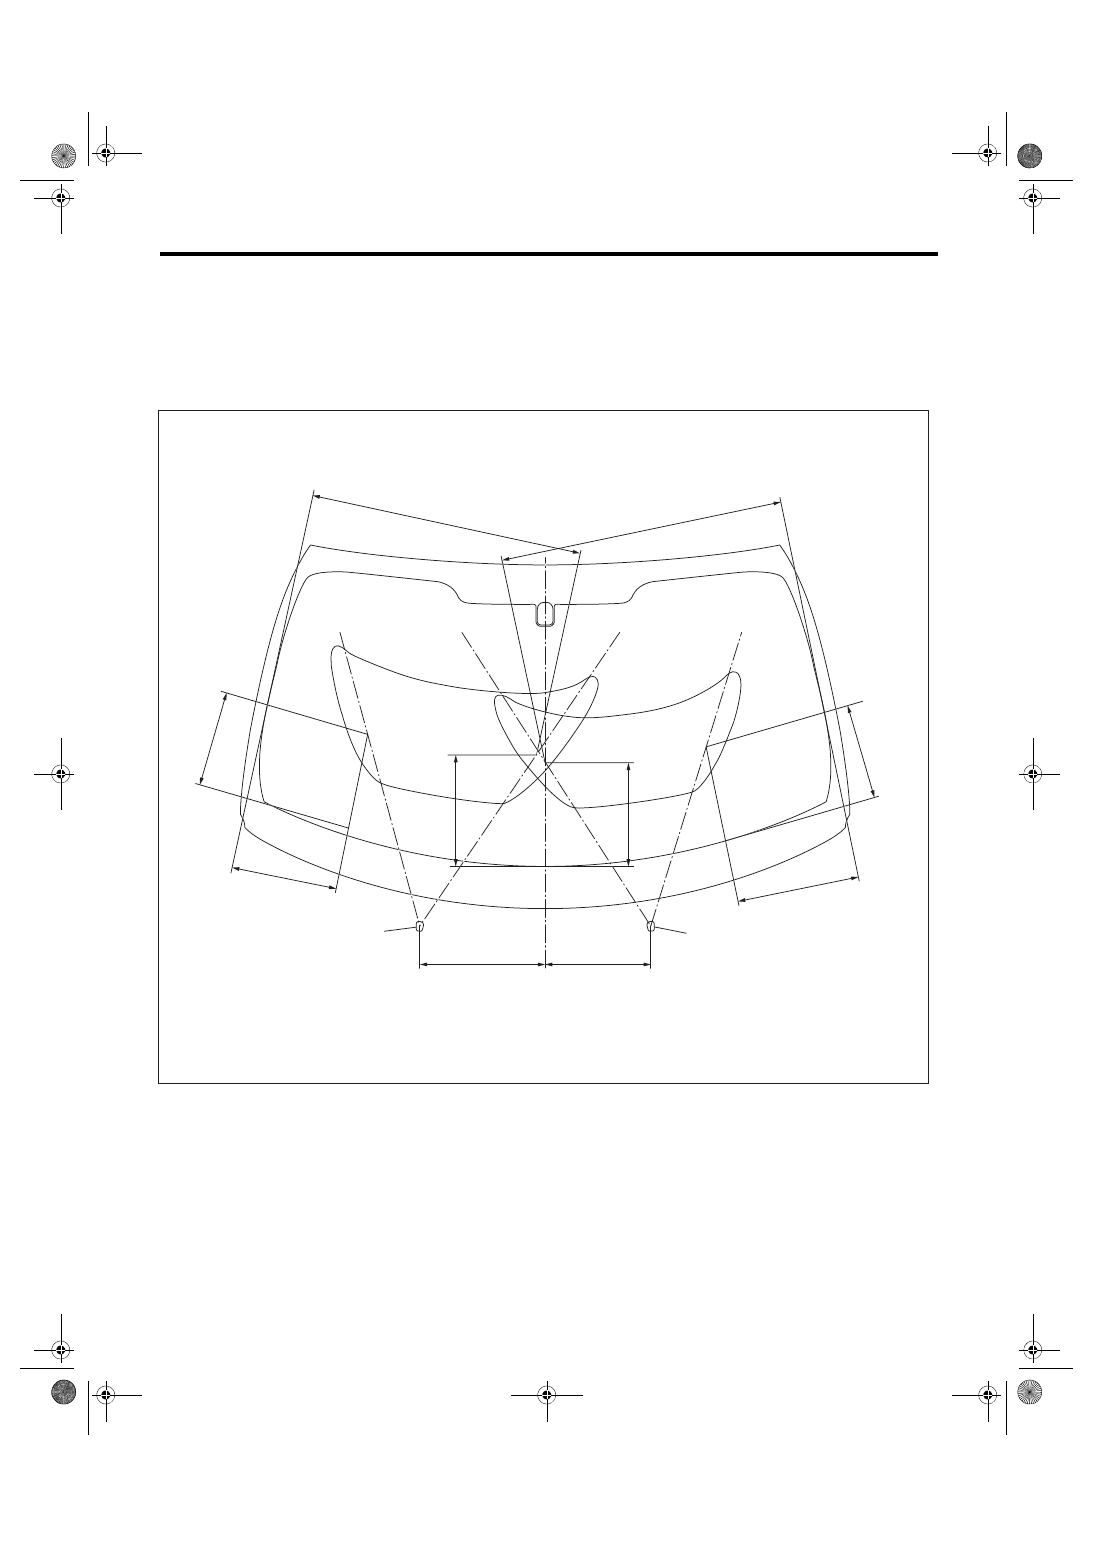
Check that the window washer system injects washer fluid to the specified area of the windshield shown in
the figure.
Front spray position:
(A)
Washer nozzle
(B)
660 mm (25.98 in)
(C)
684 mm (26.93 in)
(D)
247 mm (9.72 in)
(E)
232 mm (9.13 in)
(F)
268 mm (10.55 in)
(G)
250 mm (9.84 in)
(H)
253 mm (9.96 in)
(I)
299 mm (11.77 in)
(J)
300 mm (11.81 in)
(K)
250 mm (9.84 in)
PI-00794
(J)
(H)
(B)
(F)
(D)
(G)
(K)
(I)
(C)
(E)
(A)
(A)
PI-16
Pre-delivery Inspection
PRE-DELIVERY INSPECTION
45.WIPER
Check the front and rear wipers for normal opera-
tions.
46.POWER WINDOW
CAUTION:
If battery has been removed, AUTO UP does not
operate properly because initialized. In this
case, perform the initial setting and check
AUTO UP operates properly.
NOTE:
Check the power window if the door glass of the
driver’s seat does not open/close automatically.
• Operate the power window switches one by one
to check that each of the power windows goes up
and down without noises.
• Check AUTO UP/AUTO DOWN operate properly
by operating the power window switch on driver's
and passenger's seat sides.
47.REAR DEFOGGER
Press the rear defogger switch and check that the
light inside the switch is activated for approx. 15
minutes and the rear defogger automatically turns
to OFF.
48.DOOR MIRROR
• Check that the remote control mirror operates
normally.
• Check that the heated mirror operates normally.
49.DIAGNOSTIC TROUBLE CODE (DTC)
CHECK
Read the diagnostic trouble code and check that
the diagnostic trouble code is not detected.
If any diagnostic trouble code is detected, clear all.
1) Read Diagnostic Trouble Code
NOTE:
For detailed operation procedures, refer to “PC ap-
plication help for Subaru Select Monitor”.
2) Clear Memory Mode
NOTE:
For detailed operation procedures, refer to “PC ap-
plication help for Subaru Select Monitor”.
50.BRAKE TEST
Check the foot brake for normal operations.
51.PARKING BRAKE
Check the parking brake for normal operations.
When pulling the parking brake lever with a force of
200 N (20 kgf, 45 lb), check that the lever stroke of
parking brake lever is 7 to 8 notches.
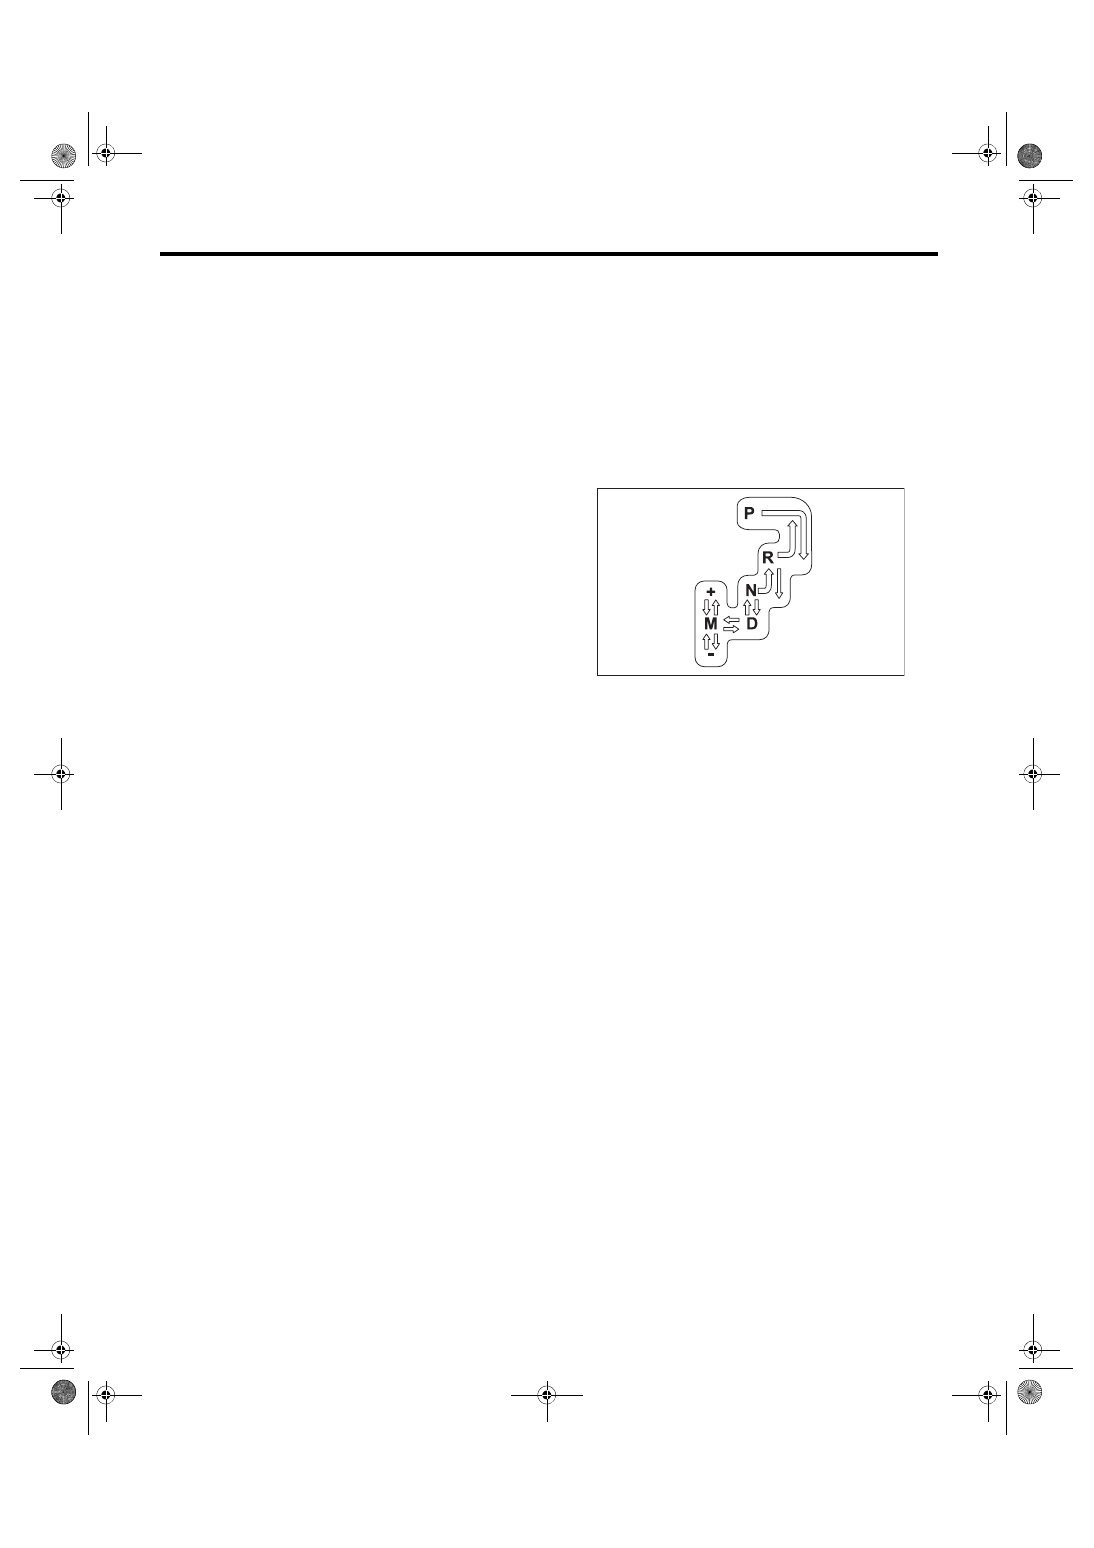
52.SHIFT CONTROL
• AT
1) Turn the ignition switch to ON.
2) While brake pedal is not depressed, check if the
select lever does not move from “P” range.
3) While brake pedal is depressed, check if the se-
lect lever moves from “P” range.
4) Set the selector lever to each gear position and
check the shifting while driving the vehicle. Operate
the selector lever and paddle shift at manual mode
and check the shifting while driving the vehicle.
5) With the ignition switch at ON, operate the
SNOW/SPORT switch, and check that “SNOW”
and “SPORT” indicator lights in the meter illumi-
nate/turn off accordingly.
6) Set the select lever to other than “P” range. (Oth-
er than models with keyless access function)
7) When the ignition switch is turned to OFF, check
if the ignition key switch cannot be removed. (Other
than models with keyless access function)
• MT
1) Check for smooth operation to each position.
2) Check that the lever cannot be moved to the re-
verse position unless the pull-ring is pulled up.
3) Check that the lever can be moved to the re-
verse position when the pull-ring is pulled up.
53.CRUISE CONTROL
Operate the cruise control system. Check that the
system is activated and deactivated correctly.
54.FLUID LEAKAGE
Check entire areas of the vehicle for any trace of
engine coolant/engine oil/transmission fluid leaks.
PI-00789
PI-17
Pre-delivery Inspection
PRE-DELIVERY INSPECTION
55.WATER LEAK TEST
Spray the vehicle with water using a hose and
check that no water enters the passenger compart-
ment.
• Before performing the water leakage test, re-
move anything that may obstruct the operation or
which must be kept dry.
• Close all the windows and doors securely. Close
the front hood and trunk lid before starting the test.
• Connect a hose to a tap, and spray water on the
vehicle. The rate of water spray must be approx. 20
to 25 L (5.3 — 6.6 US gal, 4.4 — 5.5 Imp gal) per
minute.
When spraying water on areas adjacent to the floor
and wheel house, increase the pressure. When
spraying water on areas other than the floor and
wheel house, decrease the pressure. But the force
of water must be made strong occasionally by
pressing the end of the hose.
NOTE:
Be sure to keep the hose at least 10 cm (3.9 in)
away from vehicle.
Check the following areas.
• Front window and body framework mating por-
tion
• Door mating portions
• Glass mating portions
• Rear quarter window mating portions
• Rear window and body framework mating por-
tion
• Around roof drips
If any dampness in the compartments is discovered
after the water has been applied, carefully check all
the areas that may have possibly contributed to the
leak.
56.APPEARANCE 2
1) If protective coating (wrap guard) is applied, re-
move it.
NOTE:
• When removing the wrap guard, using steam will
make it easier to remove.
• Vehicle left for a extended periods or at low tem-
peratures, spray the vehicle with water heated 50
— 60°C (122 — 140°F) to raise the surface temper-
ature before peeling off the wrap guard. Do not use
the water heated to over 60°C (140°F).
• If the adhesive remains exist on the coated sur-
face, soak a flannel rag, etc. with a small amount of
coating wax or solvent such as oil benzene and
IPA, put the soaked cloth on the remains lightly,
and then wipe them off with a flannel rag etc.
• Keep solvent from touching the resin or rubber
parts. Do not use coating wax or solvents while the
component surface temperature is hot due to hot
weather etc.
• If the coated surface is swollen out due to seams
or moisture, expose the vehicle to the sunlight for a
few hours or heat the seam and swollen portions
using a dryer etc.
• Dispose of the peeled wrap guard as burnable
industrial garbage.
2) Check the whole vehicle body for flaking paint,
damage by transportation, corrosion, dirt, cracks or
blisters.
NOTE:
• It is better to determine an inspection pattern in
order to avoid missing an area, since the total in-
spection area is wide.
• Do not repair the body paint unless absolutely
necessary. Also, if the vehicle is in need of repair to
remove scratches or corroded paint, the repair area
must be limited to the minimum. Re-painting and
spray painting must be avoided as much as possi-
ble.
3) Check each window glass for scratches careful-
ly. Slight damage may be removed by polishing
with cerium oxide. (Fill a cup half with cerium oxide,
and add warm water to it. Then agitate the content
until it turns to wax. Apply this wax to a soft cloth,
and polish the glass with it.)
4) Check each portion of the vehicle body and un-
derside components for the formation of rust. If rust
is discovered, remove it with sandpaper of #80 to
#180 and treat the surface with rust preventive. Af-
ter this treatment is completed, flush the portion
thoroughly, and prepare the surface for repair
painting.
5) Check each portion of body and all of the exteri-
or parts for deformation or distortion. Also, check
each light lens for cracks.
6) Peel the protective tape, vinyl wrapping and
identification seal attached to the following places.
CAUTION:
Be sure to always peel off the protective film of
the SUS plate. Failure to remove the film can re-
sult in rust depending on the situation.
• Seat
• Door trim
• Floor carpet
• Side sill
• Front hood lock release lever
• Door mirror
• Front fog light
• SUS plate
• QTR trim
PI-18
Pre-delivery Inspection
PRE-DELIVERY INSPECTION
Нет комментариевНе стесняйтесь поделиться с нами вашим ценным мнением.
Текст