Volkswagen Golf SportWagen (2015 year). Instruction — part 9

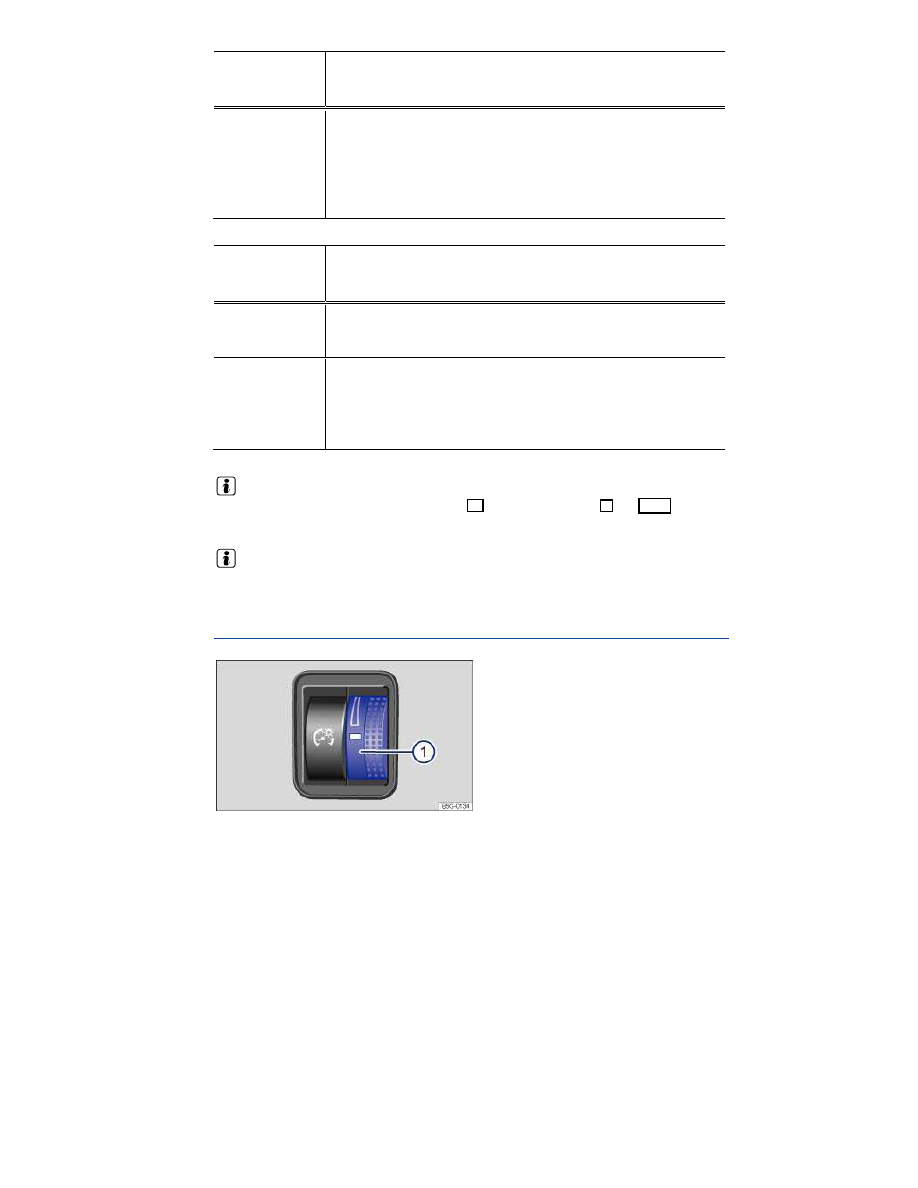
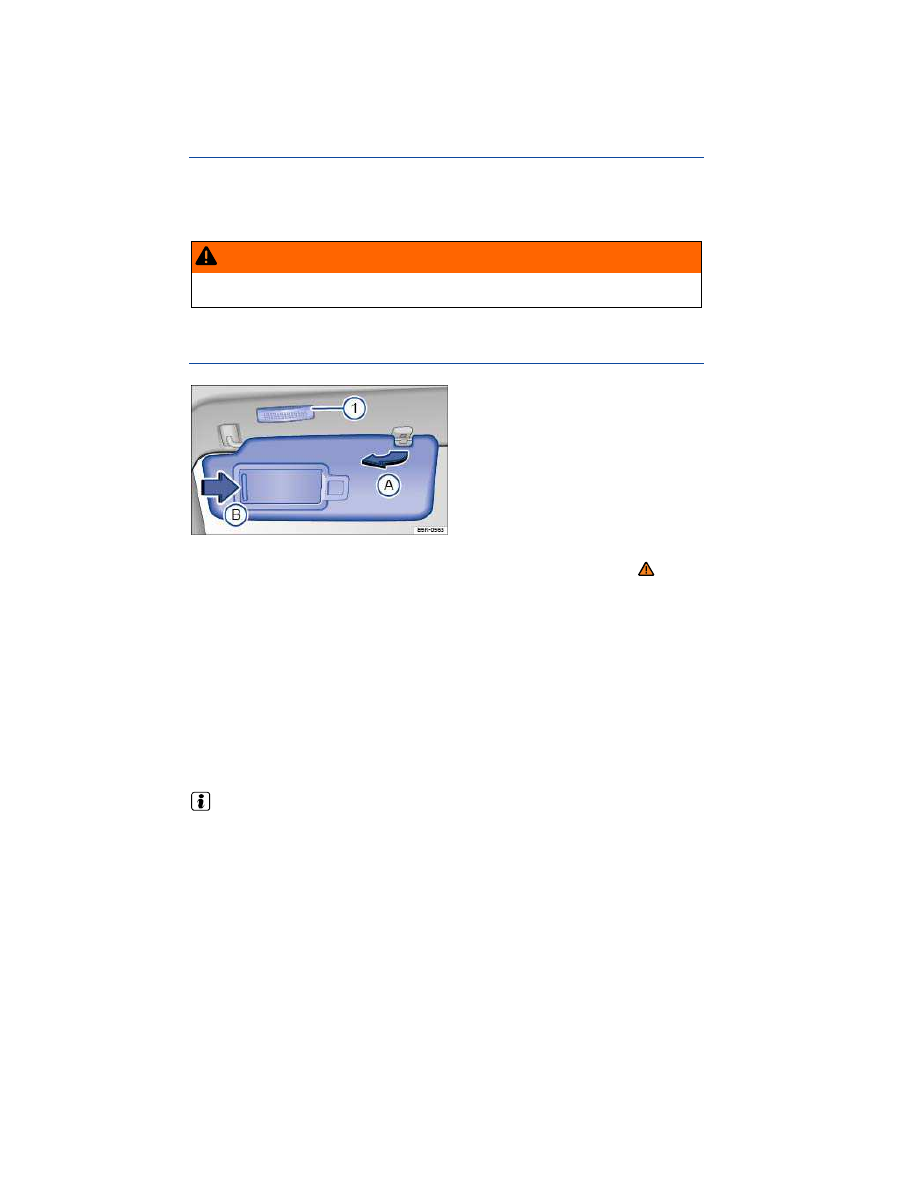
Fig. 76 Headlight switch next to the steering wheel (with fog lights and automatic headlights, if equipped).
Please first read and note the introductory information and heed the WARNINGS
Adjust the light switch to the desired position
⇒
fig. 75
or
⇒
fig. 76
:
Symbol When the ignition is
switched off
When the ignition is switched
on
Fog lights and low beams
switched off.
Headlights off, daytime running
lights (DRL) on.
Orientation lighting may be
switched on.
Automatic headlights active;
DRL on.
Low beams switched off. The
DRL may stay on. The length
of time they stay on depends
on the vehicle battery charge.
Low beams switched on.
Parking lights and taillights
switched on.
Parking lights, DRL, and tail-
lights switched on.
Fog lights switched off. The
DRL may stay on for some
time.
Headlights and fog lights
switched on.
Fog lights
The indicator light in the headlight switch shows that the fog lights are switched on.
To switch on the fog lights : first turn the light switch to position
, then pull the light switch out
to the first detent.
To switch off the fog lights, push the switch back in from the first detent. To then turn off the head-
lights, turn the switch to position .
Acoustic warning when lights are not switched off
In the following situation, a warning chime will sound if you take the key out of the ignition and open
the driver door. This is to remind you that lights are still on.
Light switch in position
.
WARNING
Daytime running lights and parking lights are not bright enough to let you see ahead or be
seen by others when it is dark.
Always switch on the low-beam headlights at dusk or when it is dark and whenever the
weather is bad or visibility is poor.
Never use the daytime running lights to see where you are going. They are not bright
enough and will not let you see far enough ahead for safety, especially at dusk or when it is
dark. Always switch on the low-beam headlights at dusk or when it is dark.
The taillights do not come on with the daytime running lights. Unless the taillights are on,
a vehicle cannot be seen by others in bad weather, at dusk, or when it is dark.
Even if automatic headlights (
) are switched on, the low-beam headlights may still not
come on by themselves in fog or heavy rain. You have to switch on the low-beam headlights
manually.
In cool or humid weather, the insides of the headlights, the rear lights, and turn signals can tem-
porarily fog up. This is normal and does not affect the service life of the vehicle's lighting system.
Lights and vision features
Please first read and note the introductory information and heed the WARNINGS
Parking lights
If the ignition is switched off and the vehicle is locked from the outside with the headlight switch in the
position, the parking lights in both headlights come on together with both taillights.
Daytime running lights (DRL)
Separate lamps are installed in the headlights or in the front bumper for the daytime running lights
(DRL).
The daytime running lights are switched on whenever the ignition is switched on and the light switch is
in position ,
, or
.
When the daytime running lights are switched on, only these separate lamps come on if the headlight
switch is in position or
⇒ .
If the light switch is in position
, a low-light sensor switches the low beams as well as the instru-
ment and switch lighting on and off automatically.
Daytime running lights (DRL) parking feature
Some models are equipped with a daytime running lights (DRL) parking feature that switches the
daytime running lights off when the parking brake is engaged and the ignition is switched on.
Function
Action

Function
Action
Switching the
DRL off:
– Switch the ignition on.
– Turn the light switch to the posi-
tion.
– Set the parking brake.
Switching the
DRL back on:
– Release the parking brake.
Static cornering lights
Your vehicle may have fog lights under the front bumper, which on some models are also static cor-
nering lights. On some models the static cornering lights may be integrated in the headlights. At
speeds below about 25 mph (40 km/h), the light on one side of the vehicle will come on automatically
when you turn a corner. If you turn to the right, the right fog light comes on; turn left and the left fog
light comes on. The light dims and goes out when the steering wheel is straightened out again.
When you move the selector lever to Reverse (R), the static cornering lights on both sides of the
vehicle may come on so that you can see the area around the vehicle better when backing up.
The static cornering lights work only when the headlights are on. If you are using automatic headlights
(headlight switch in the
position
⇒
fig. 76
), they work only when the headlights have been auto-
matically switched on. The static cornering lights do not come on when the headlight switch is in the
position or when the fog lights themselves have been switched on
⇒ Switching lights on and off.
Automatic headlights (
)
Your vehicle may be equipped with automatic headlights (
), which are a convenience feature only
and cannot always recognize all lighting and driving situations.
If the light switch is in the
position, both vehicle lighting and instrument and switch lighting are
automatically switched on and off in the following situations
⇒ :
Automatic activation:
Automatic deactivation:
If the low-light sensor reg-
isters darkness, for exam-
ple when driving through a
tunnel.
If sufficient brightness is
registered.
If the rain sensor recog-
nizes rain and switches
the windshield wipers on.
If the windshield wipers
have not moved for sever-
al minutes.
You can adjust the level of darkness the vehicle must register before automatically switching on the
headlights in the Infotainment system by pressing the
button followed by the function keys
and
Lights
⇒ Menu and system settings (SETUP). You can also turn the automatic activation of the
headlights with the rain sensors on and off via this menu.
Adaptive Front Lighting System (AFS)
The Adaptive Front Lighting System (AFS) works only with the low beams switched on and only at
speeds above about 6 mph (10 km/h). The swivel-mounted lamps automatically improve road illumina-
tion during cornering.
In some models, the headlights will turn independently, even when driving straight ahead. They can
adjust according to the weather conditions and the speed of the vehicle to better light up the road
ahead. The bulbs return to their original position after a short period of time, depending on the vehicle
speed.
On vehicles equipped with AFS, the feature can be switched on and off in the Infotainment system by
pressing the
button followed by the
and Lights function keys
⇒ Menu and system settings
(SETUP).
WARNING
Crashes and other accidents can happen when you cannot see the road ahead and when you
cannot be seen by other motorists.
Never use daytime running lights (DRL) to see where you are going. DRL are not bright
enough to light up the roadway and be seen by other motorists. You will not be able to see far
enough ahead for safety, especially at dusk or when it is dark. Always switch on the low-
beam headlights at dusk or when it is dark.
The taillights do not come on when the daytime running lights are switched on and the
headlight switch is in position or
. A vehicle without taillights on cannot be seen by
others in bad weather, at dusk, or when it is dark.
If automatic headlights (
) are switched on, the low-beam headlights still may not be
switched on in fog or heavy rain. You have to switch on the low-beam headlights yourself.
In cool or humid weather, the insides of the headlights, the rear lights, and turn signals can tem-
porarily fog up. This is normal and does not affect the service life of the vehicle's lighting system.
Coming Home/Leaving Home features (orientation lighting)
Please first read and note the introductory information and heed the WARNINGS
Your vehicle may be equipped with Coming Home/Leaving Home features, which are controlled auto-
matically by a low-light sensor.
Coming
Home
Action
Switch on:
– Switch off the ignition
The Coming Home feature is switched on when the head-
light switch is in the
position and the low-light sensor
registers darkness
The delay period starts once the last vehicle door or the
rear hatch is closed.
Coming
Home
Action
Switch off:
– Automatically after delay period is over.
– Automatically, if a vehicle door or the rear hatch is still
open about 30 seconds after activation.
– Turn light switch to the position.
– Switch the ignition on.
Leaving
Home
Action
Switch on:
– Unlock the vehicle if the light switch is in the
posi-
tion and the low-light sensor registers darkness.
Switch off:
– Automatically after preset delay period is over.
– Lock the vehicle.
– Turn the light switch to the position.
– Switch the ignition on.
The length of time the lights stay on can be adjusted or the feature can be activated and deac-
tivated in the Infotainment system by pressing the
button followed by the
and Lights function
keys
⇒ Menu and system settings (SETUP).
If the Coming Home feature is switched on and the driver door is opened, no warning chime will
sound to alert you that the lights are still on.
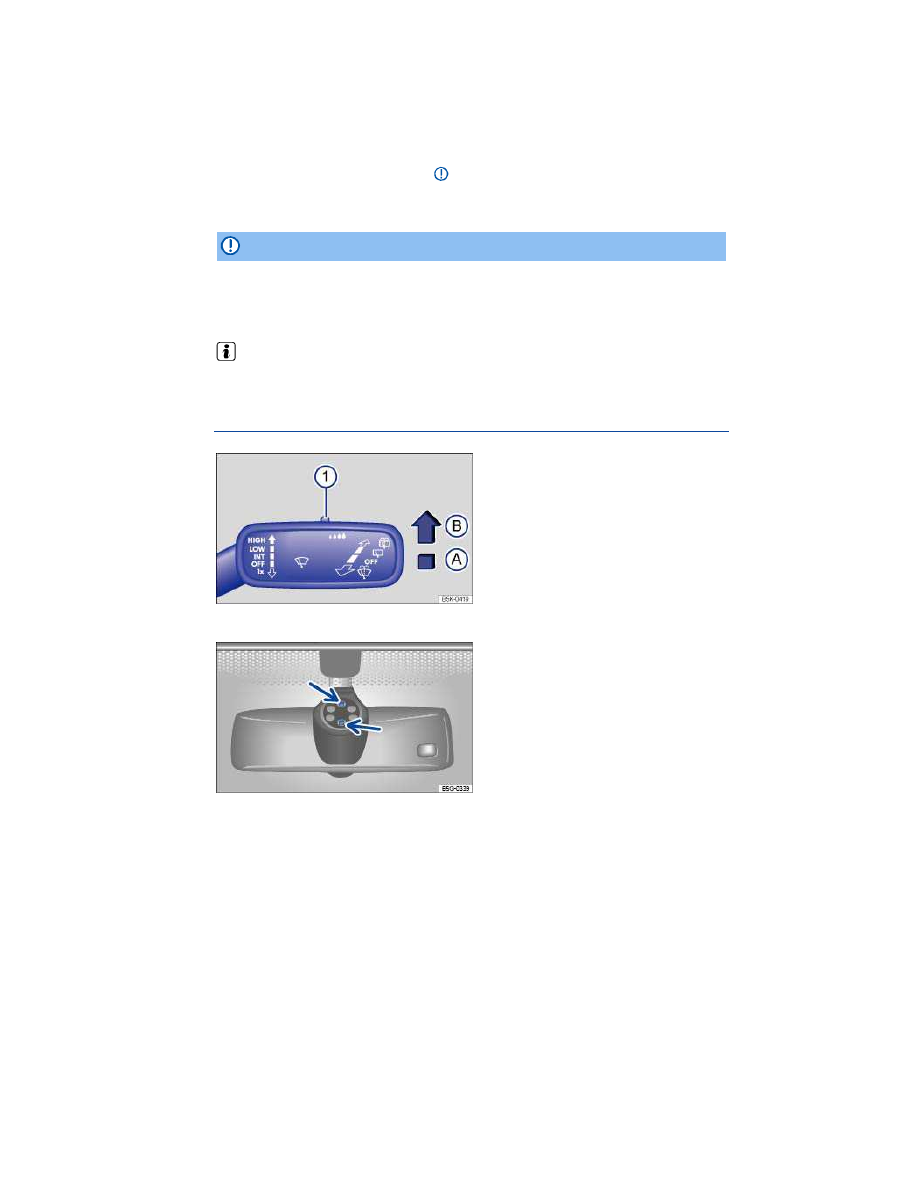
Instrument panel lighting and headlight range adjustment
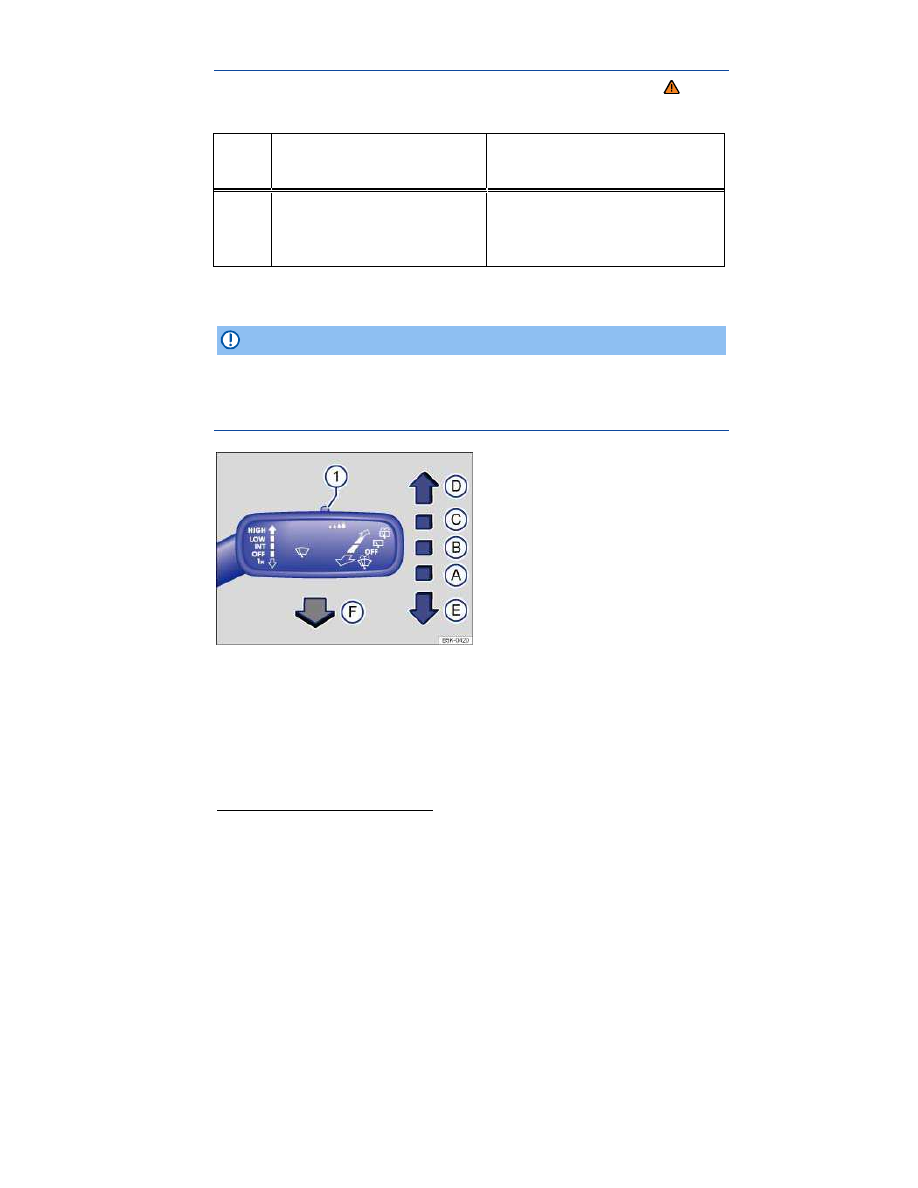
Fig. 77 To the left of the steering wheel: Thumbwheel to adjust instrument panel lighting 1.
Please first read and note the introductory information and heed the WARNINGS
Instrument cluster and switch brightness
Depending on vehicle equipment, you can either adjust the brightness of the instrument cluster and
switch lighting by turning the thumbwheel
⇒
fig. 77
(1)
, or by pressing the
button followed by the
and Lights function keys in the Infotainment system
⇒ Menu and system settings (SETUP).
In some vehicles with daytime running lights (DRL), the instrument cluster lighting switches off auto-
matically when it is dark outside or when driving through tunnels, for example. You will need to switch
the headlights on manually when this happens, so that the vehicle's taillights will turn on
⇒ page 120,
Lights and vision features,
⇒ Lights and vision features.
Headlight range adjustment
For vehicles equipped with halogen headlights: The headlight range cannot be manually adjusted. If
you believe the headlights are not properly adjusted or are not sure, have them checked immediately
by an authorized Volkswagen dealer or an authorized Volkswagen Service Facility
⇒ .
For vehicles equipped with HID (Xenon) headlights: The headlights are equipped with an automatic
leveling feature that automatically adjusts the headlight range to the vehicle loading condition once the
low beams are switched on
⇒ .
WARNING
Headlights that are aimed too high because of the way the vehicle is loaded can blind and
distract other drivers. This can lead to a crash and serious personal injuries.
Always make sure the headlights are adjusted to loading conditions so that they do not
blind others.
WARNING
If the automatic leveling feature of the headlights does not work properly or at all, the head-
lights could blind and distract other drivers. This can lead to a crash and serious personal
injuries.
Have headlight range adjustment checked immediately by an authorized Volkswagen
dealer or an authorized Volkswagen Service Facility.
Interior and reading lights
Please first read and note the introductory information and heed the WARNINGS
Button Function
Front interior lights on.
Rear interior lights on.

Button Function
Door contact button.
Press the button, and the interior lights come on automatically
when the vehicle is unlocked, a door is opened, or the vehicle
key is removed from the ignition.
The lights go out about 20 seconds after you close the doors.
They also go out when you lock the vehicle or switch on the
ignition.
Press the button back out again to switch the door contact fea-
ture off.
Reading light on or off.
Glove and luggage compartment lights
The glove and luggage compartments may have lights that come on automatically when they are
opened and go off when they are closed.
Ambient (background) lighting (if equipped)
When the ignition and the headlights are switched on, ambient lights in the doors and footwells light
up.
On appropriately equipped vehicles, you can adjust the brightness of the ambient lighting in the Info-
tainment system by pressing the
button followed by the
and Lights function keys
⇒ Menu and
system settings (SETUP).
The interior and reading lights go out when you lock the vehicle or a few minutes after you re-
move the vehicle key from the ignition. This helps to prevent unnecessary drain on the vehicle battery.
Sun protection
Introduction
In this section you’ll find information about:
Sun visors
Windshield made of heat-insulating glass
WARNING
Sun visors can reduce visibility.
Always stow sun visors when not needed to block sun glare.
Sun visors
Fig. 78 In the headliner: Sun visor.
Please first read and note the introductory information and heed the WARNINGS
Sun visor adjustment
Flip the sun visor down toward the windshield.
Lift it out of the retaining clip
⇒
fig. 78
(A)
and swivel it over toward the door.
Additional sun visor positions
On some vehicles, you can slide the sun visor towards the rear of the vehicle after swiveling it over to
the door.
Vanity mirror and lighting
A vanity mirror is behind a cover in the sun visor. Your vehicle may also be equipped with a light
(1)
that comes on when you slide the cover
(B)
open.
The light goes out when you shut the cover or if you flip the sun visor up again.
The interior light above the sun visor goes out after several minutes. This helps to prevent un-
necessary drain on the vehicle battery.

Windshield made of heat-insulating glass
Fig. 79 Heat-reflective windshield with communications window (blue shaded area).
Please first read and note the introductory information and heed the WARNINGS
Windshields made of insulating glass have a transparent metallic infrared-reflecting coating. There is
an uncoated area (communications window) just above the inside rearview mirror
⇒
fig. 79
. This
serves as a communications window for transmitting signals to and from electronic components and
accessories.
The uncoated area must not be blocked on the inside or outside or covered with stickers because this
can cause the electronic components to malfunction.
Windshield wipers and washer
Introduction
In this section you’ll find information about:
Indicator light
Windshield wiper lever
Windshield wiper functions
Windshield wiper service position
Rain sensor
Checking and refilling windshield washer fluid
More information:
Exterior views
Infotainment system
Shifting
Climate control
Working in the engine compartment
Exterior care and cleaning
WARNING
Windshield washer fluid without enough frost protection can freeze on the windshield and
reduce visibility.
Use the windshield washer system with enough frost protection for winter temperatures.
Never use the windshield wipers/washers when it is freezing without first defrosting the
windshield. The washer solution may freeze on the windshield and reduce visibility.
WARNING
Worn or dirty wiper blades reduce visibility and increase the risk of accidents and severe
injuries.
Always replace wiper blades that are worn, damaged, or do not keep the windshield clear.
NOTICE
To help prevent damage to the wiper blades and the wiper motor when it is cold outside, al-
ways make sure that blades are not frozen to the windshield before operating the wipers. Using
the windshield wiper service position can be helpful in cold weather so the wipers do not
freeze to the windshield
⇒ Windshield wiper service position.
Indicator light
Please first read and note the introductory information and heed the WARNINGS
Your vehicle may be equipped with a windshield washer fluid indicator light.
Lights
up
Possible cause
Proper response
Not enough windshield wash-
er fluid for the front and rear
windshield washers.
6
Refill windshield washer reservoir
at the next opportunity
When the ignition is switched on, several warning and indicator lights come on briefly for a function
check. They go out after a few seconds.
NOTICE
Failure to heed warning lights or text WARNINGS can result in vehicle damage.
Windshield wiper lever
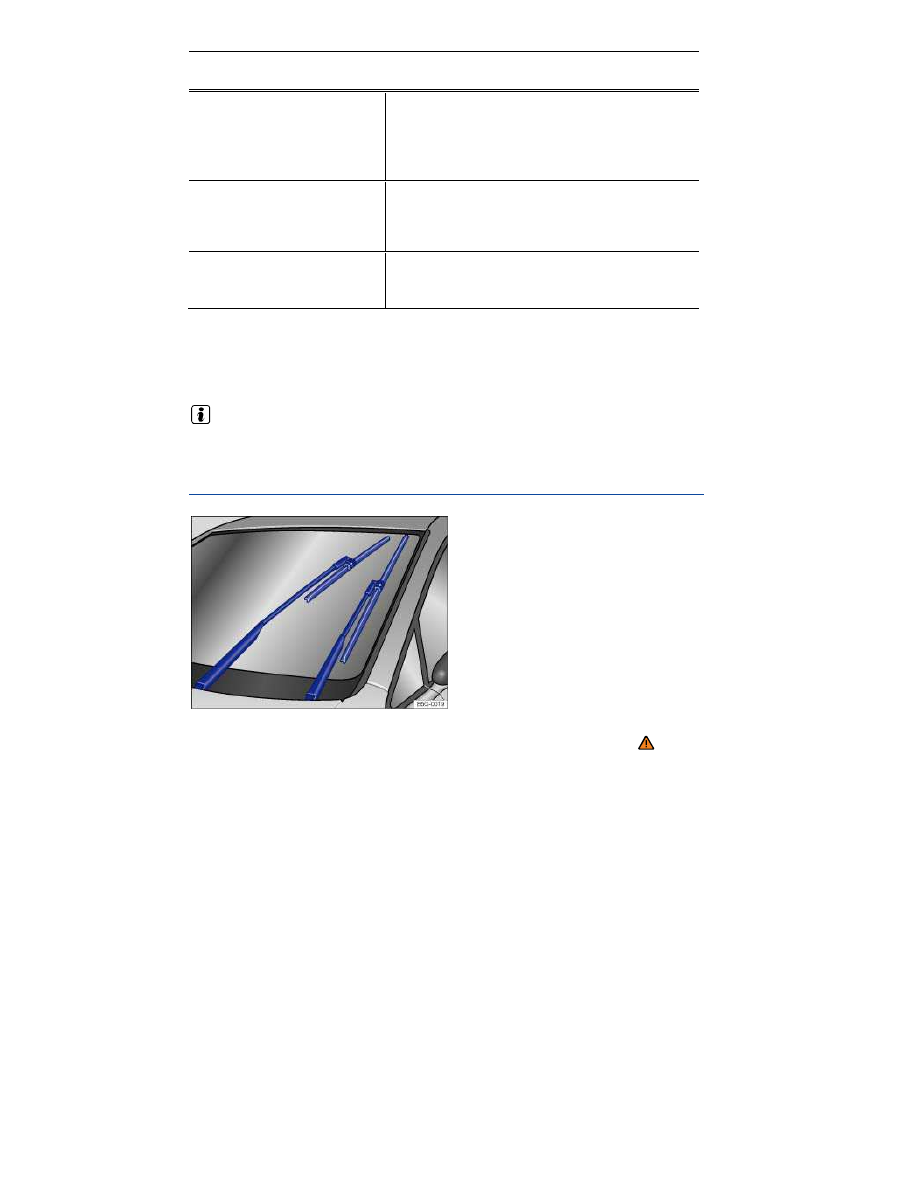
Fig. 80 Operating the front windshield wipers.
6
Displayed in color on an instrument cluster with color display.

Fig. 81 Operating the rear wiper.
Please first read and note the introductory information and heed the WARNINGS
Move the lever to the desired position
⇒ :
(A)
Wiper switched off.
(B)
Intermittent wiping for the front windshield. Rain sensor active
(if equipped).
(C)
Slow wiper speed.
(D)
Fast wiper speed.
(E)
x
One-tap wiping – brief wiping. Hold the lever pressed down
longer to wipe more often.
(F)
Pull the lever toward the steering wheel to activate the front
windshield washers, then release.
(G)
Intermittent wiping for the rear window. The wiper wipes about
every 6 seconds.
(H)
Press the lever forward as far as it will go to activate the rear
window washers, then release to stay in intermittent wiping
mode (position
(G)
). Pull the lever toward the steering wheel to
turn the rear wiper off.
(1)
Switch for adjusting the windshield wiper interval settings (ve-
hicles without a rain sensor) or the sensitivity of the rain sensor
(vehicles with a rain sensor).
NOTICE
To help prevent damage to the wiper blades and the wiper motor when it is cold outside, al-
ways make sure that blades are not frozen to the windshield before operating the wipers. Using
the service position can be helpful in cold weather so the wipers do not freeze to the wind-
shield
⇒ Windshield wiper service position.
If the ignition is switched off while the wipers are running, the wipers will continue at the
same wiping speed when the ignition is switched on again. Frost, ice, snow, leaves, and other
objects on the windshield can damage the wipers and the wiper motor.
Remove snow and ice from the wipers before you begin driving.
If the wiper blades freeze to the windshield, loosen them carefully. Volkswagen recom-
mends using a deicing spray.
NOTICE
Never switch on the windshield wipers when the windshield is dry because the windshield can
be scratched.
On some vehicles, the windshield wipers work only if the ignition is switched on and the engine
hood is closed. The windshield wipers turn off automatically when the engine hood is opened. The
rear window wiper turns off when the rear hatch is opened.
The intermittent wiping for the front windshield depends on the driving speed. The higher the
speed, the faster the wipers move.
If the front wipers are on, the rear wiper is switched on automatically when backing up.
On appropriately equipped vehicles, this feature can be turned on and off in the Infotainment
system by pressing the
button followed by the
and Mirror and wipers function keys
⇒ Menu
and system settings (SETUP).
If the wiper blades freeze to the windshield, loosen them carefully. Volkswagen recommends
using a deicing spray.
Windshield wiper functions
Please first read and note the introductory information and heed the WARNINGS
Wiper performance in different situations:
When the vehicle is not
moving:
The wiper speed changes temporarily to the
next lower speed.
Wiper performance in different situations:
During automatic
wipe/wash:
While the washer system is working, the
Climatronic switches to recirculation for
about 30 seconds to help prevent the washer
fluid odor from entering the vehicle interior.
During intermittent wiping: Speed-dependent interval control: The high-
er the vehicle speed, the faster the wipers
move.
When a vehicle door is
opened:
The windshield wipers stop.
Heated washer nozzles
Some vehicles are equipped with heated washer nozzles. The heating thaws frozen washer nozzles,
but not the fluid supply hoses. When the ignition is switched on, the heat applied to the washer noz-
zles is automatically regulated depending on the outside air temperature.
If there is something on the windshield, the wiper will try to wipe it away. If it continues to block
the wiper, the wiper will stop moving. Remove the obstacle and switch the wiper on again.
Windshield wiper service position
Fig. 82 Windshield wiper in service position.
Please first read and note the introductory information and heed the WARNINGS
In the service position, the wiper arms can be lifted away from the windshield
⇒
fig. 82
. The wipers are
moved to the service position as follows:
The engine hood must be closed
⇒ Working in the engine compartment.
Switch the ignition off, turn it on briefly, and then off again.
Press the windshield wiper lever down briefly
⇒
fig. 80
(E)
when the ignition is off.
Wipers move into service position.
Carefully fold the wiper arms back onto the windshield before driving! Switch the ignition on and press
the windshield wiper lever down briefly
⇒
fig. 80
(E)
. The wiper arms move back to their original posi-
tion.
Lifting the wiper blades and tilting them away from the windshield
Put the wiper arms in service position
⇒ .
Do not handle the wiper blades, handle the wiper arms only at the attachment above the wiper
blades.
NOTICE
To help prevent damage to the engine hood and the windshield wiper arms, lift the wiper
arms away from the windshield only when they are in the service position.
Always carefully fold the windshield wiper arms down against the windshield before driving
the vehicle.
The windshield wiper arms can be moved to the service position only when the vehicle is not
moving.
Rain sensor
Fig. 83 Windshield wiper lever: Adjusting the rain sensor 1 (if equipped).
Fig. 84 Inside the front windshield above the inside mirror: Sensitive rain sensor surface.
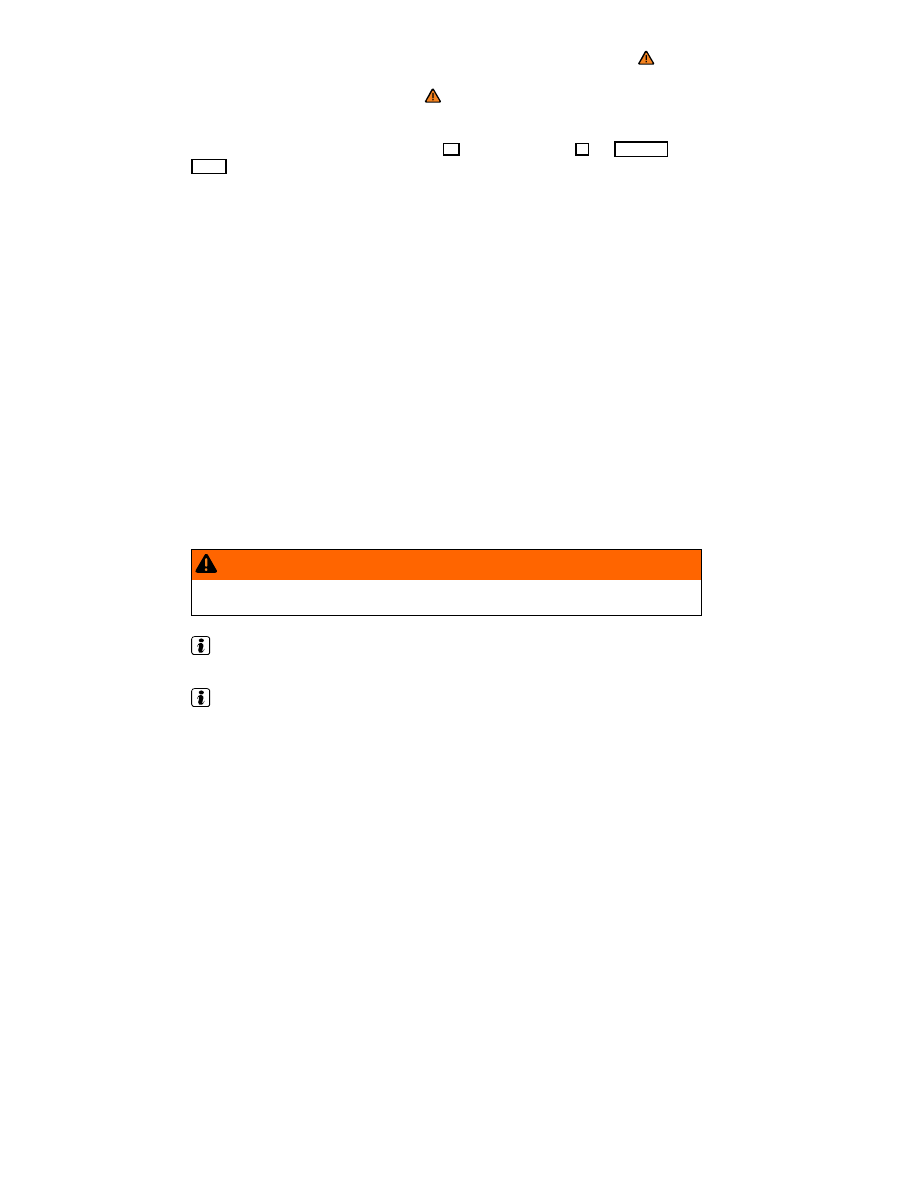
Please first read and note the introductory information and heed the WARNINGS
When switched on, the rain sensor automatically shortens or lengthens the time between wiping
intervals depending on how hard it is raining
⇒ . The rain sensor's sensitivity can be adjusted
manually. Manual wiping (vehicles without rain sensors), see
⇒ Windshield wiper lever.
On appropriately equipped vehicles, the automatic wipe function of the rain sensor can be turned on
and off in the Infotainment system by pressing the
button followed by the
and Mirror and
wipers function keys
⇒ Menu and system settings (SETUP).
Push the lever into the desired position
⇒
fig. 83
:
(A)
Rain sensor off (windshield wiper lever home position).
(B)
Rain sensor active – automatic wiping as needed.
(1)
Adjust the sensitivity of the rain sensor:
– Move switch to the right – high sensitivity.
– Move switch to the left – low sensitivity.
After switching the ignition off and back on again, the rain sensor stays on and works again when the
wiper lever is in position
(B)
.
Possible reasons for changes in the way the rain sensor works
The rain sensor may misread what is happening in the detection zone of its sensitive rain-sensor
surface
⇒
fig. 84
(arrow) and not work for a number of reasons, which may include:
Worn out wiper blades: Worn out wiper blades may leave a film of water or wiping streaks; this can
cause the wipers to run longer, to wipe more often, or to wipe continuously at high speed.
Insects: Insects hitting the windshield may trigger the wipers.
Salt streaks: Salt streaks on the windshield from winter driving can cause wiping more often or
continuously on glass that is almost dry.
Dirt: Caked-on dust, wax, any other buildup on the windshield (lotus effect), or car-wash detergent
residue can lower the rain sensor's sensitivity and cause it to react too slowly or not at all.
Crack or chip in the windshield: If a stone hits and chips the windshield while the rain sensor is on,
this will trigger a wiper cycle. After that, the rain sensor will recognize the change and recalibrate itself
to respond to the sensitive surface's reduced detection zone. Depending on the size of the chip, the
sensor's reaction pattern may or may not change.
WARNING
The rain sensor cannot always recognize rain and activate the wipers.
Switch the wipers on manually when water on the windshield reduces visibility.
Clean the rain sensor's sensitive surface
⇒
fig. 84
(arrows) regularly and check the wiper blades
for wear or damage.
To remove wax and coats of polish safely, we recommend using an alcohol-based windshield
cleaner.
Нет комментариевНе стесняйтесь поделиться с нами вашим ценным мнением.
Текст