Infiniti G35 (2008 year). Manual — part 12

Comfort & Conv. settings
The following display will appear when pushing
the
SETTING button, selecting the “Comfort &
Conv. ” key with the INFINITI controller and
pushing the
ENTER button. This key does not
appear on the display until the ignition switch is
pushed to the ON position.
Auto Interior Illumination
When this item is turned to ON, the interior
lights will illuminate if any door is unlocked.
Auto Headlights Sensitivity (if so equipped)
Adjust the sensitivity of the automatic head-
lights higher (right) or lower (left).
Auto Headlights Off Delay (if so equipped)
Choose the duration of the automatic headlight
off timer from 0, 30, 45, 60, 90, 120, 150 and
180 second periods.
Speed Sensing Wiper Interval
When this item is turned to ON, the wiper
interval is adjusted automatically according to
the vehicle speed.
Selective Door Unlock
When this item is turned to ON, only the driver’s
door is unlocked first after the door unlock
operation. When the door handle request
switch on the driver’s or front passenger’s side
door is pushed to be unlocked, only the corre-
sponding door is unlocked first. All the doors
can be unlocked if the door unlock operation is
performed again within 5 seconds.
When this item is turned to OFF, all the doors
will be unlocked after the door unlock operation
is performed once.
Intelligent Key Lock/Unlock
When this item is turned to ON, door
lock/unlock function by pushing the door
handle request switch will be activated.
Lift Steering Wheel on Exit (if so equipped)
When this item is turned to ON, the steering
wheel moves upward for easy exit if the ignition
switch is in the OFF position and the driver’s
door is opened. After getting into the vehicle
and pushing the ignition switch to the ACC
position, the steering wheel moves to the pre-
vious position.
Slide Driver Seat Back on Exit (if so equipped)
When this item is turned to ON, the driver’s seat
moves backward for easy exit if the ignition
SAA1564
SAA1565
4-16
Monitor, climate, audio, phone and voice recognition systems
w
—
—
07/05/07—pattie
X
-------------------------------------------------------------------------------------------------------------------------------------------------------------
switch is in the OFF position and the driver’s
door is opened. After getting into the vehicle
and pushing the ignition switch to the ACC
position, the driver’s seat moves to the previous
position.
Return All Settings to Default
Select this item, push the
ENTER button and
choose “YES” if you want to return all settings
to the default.
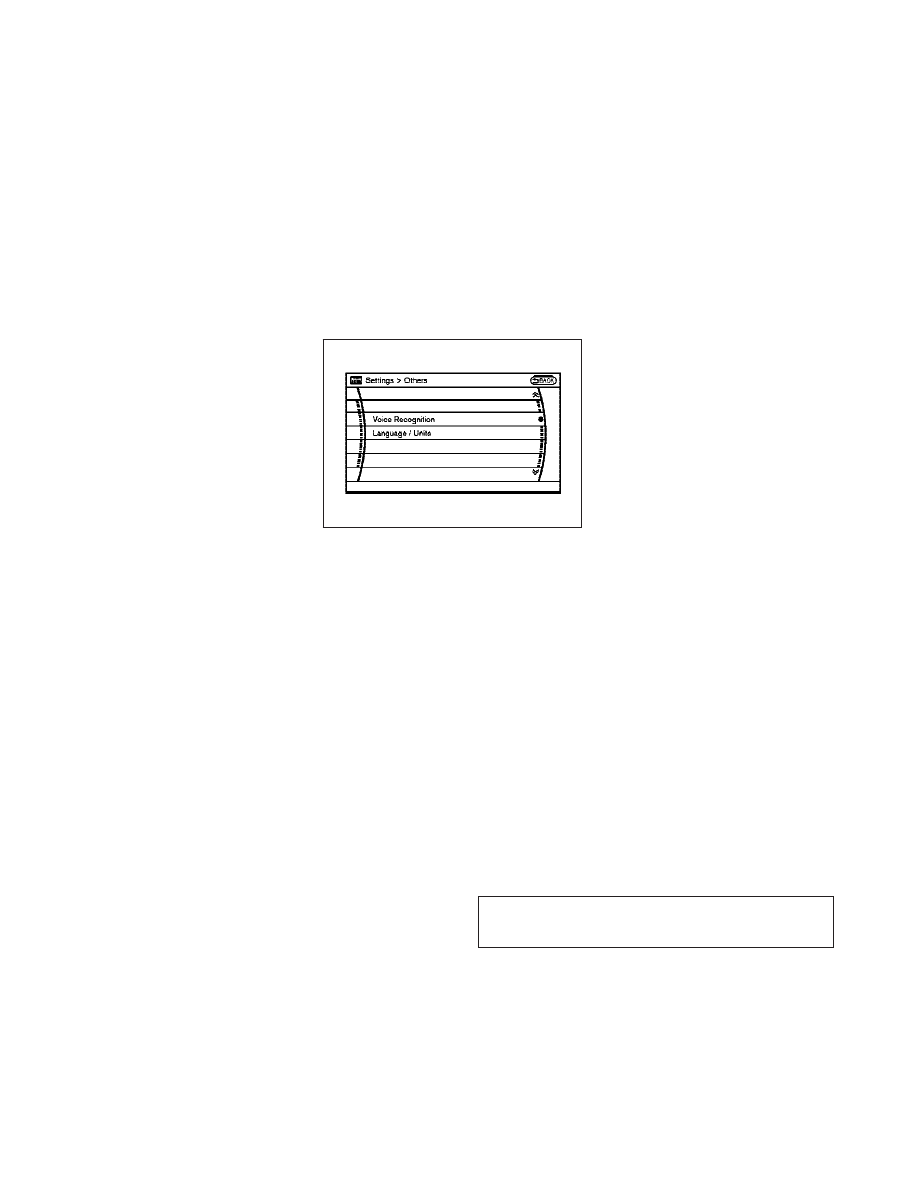
Others settings (models with
navigation system)
The following display will appear when pushing
the
SETTING button, selecting the “Others ” key
with the INFINITI controller and pushing the
ENTER button.
Voice Recognition
● Command List
Displays the voice command list on the
screen.
● Minimize Voice Feedback
When this item is turned to ON, vocal feed-
back is reduced if the voice recognition
system is activated.
● Voice Command Learning
Select this item to have the INFINITI Voice
Recognition system learn the user’s voice.
The system can memorize the voices of up to
three persons.
For the details of this function, see “INFINITI
VOICE RECOGNITION SYSTEM (models with
navigation system)” later in this section.
● User Guide
Select this item to learn the operation flow of
the INFINITI Voice Recognition system with
the help of a step-by-step guide.
Language/Units
● Select Language
Choose the “
Select Language ” key and push
the
ENTER button. Select “English” or
“Français” for your favorite display appear-
ance.
● Select Units
Choose the “
Select Units ” key and push the
ENTER button. Select “US” (Mile, °C, MPG) or
“Metric” (km, °F, L/100 km) for your favorite
display appearance.
SAA1566
Monitor, climate, audio, phone and voice recognition systems
4-17
w
—
—
07/14/07—pattie
X
-------------------------------------------------------------------------------------------------------------------------------------------------------------

Language/Units settings (models
without navigation system)
The following display will appear when pushing
the
SETTING
button,
selecting
the
“
Language/Units ” key with the INFINITI control-
ler and pushing the
ENTER button.
Select Language
Choose the “
Select Language ” key and push
the
ENTER button. From the following display,
select “English”, “Français” or “Español” for
your favorite display appearance.
Select Units
Choose the “
Select Units ” key and push the
ENTER button. From the following display, se-
lect “US” (Mile, °C, MPG) or “Metric” (km, °F,
L/100 km) for your favorite display appearance.
HOW TO USE AUX BUTTON
Images being played can be switched to the
center display if NTSC compatible devices are
connected to the auxiliary input jacks in the
center console. (See “AUXILIARY INPUT JACKS”
later in this section.) Push the
AUX button to
perform switching.
The above display will appear when the “
Set-
ting ” key is selected using the INFINITI
controller.
SAA1092
SAA1567
4-18
Monitor, climate, audio, phone and voice recognition systems
w
—
—
07/05/07—pattie
X
-------------------------------------------------------------------------------------------------------------------------------------------------------------
Display Mode
Choose the display mode from the following:
● Normal
● Wide
● Cinema
When the selector lever is shifted into the R
(Reverse) position, the monitor display shows
view to the rear of the vehicle.
The system is designed as an aid to the driver in
detecting large stationary objects to help avoid
damaging the vehicle. The system will not de-
tect small objects below the bumper and may
not detect objects close to the bumper or on the
ground.
WARNING
● The rear view camera is a convenience but it
is not a substitute for proper backing up.
Always turn and check that it is safe to do so
before backing up. Always back up slowly.
● Objects viewed in the RearView Monitor dif-
fer from actual distance because a wide-
angle lens is used. Objects in the RearView
Monitor will appear visually opposite than
when viewed in the rear view and outside
mirrors.
● Make sure that the trunk is securely closed
when backing up.
● Do not put anything on the rear view camera.
The rear view camera is installed on the
trunk finisher or on the rear spoiler.
● When washing the vehicle with high-
pressure water, be sure not to spray it
around the camera. Otherwise, water may
enter the camera unit causing water conden-
sation on the lens, a malfunction, fire or an
electric shock.
● Do not strike the camera. It is a precision
instrument. Otherwise, it may malfunction
or cause damage resulting in a fire or an
electric shock.
CAUTION
There is a plastic cover over the camera. Do not
scratch the cover when cleaning dirt or snow
from the cover.
REARVIEW MONITOR (if so equipped)
Monitor, climate, audio, phone and voice recognition systems
4-19
w
—
—
07/14/07—pattie
X
-------------------------------------------------------------------------------------------------------------------------------------------------------------
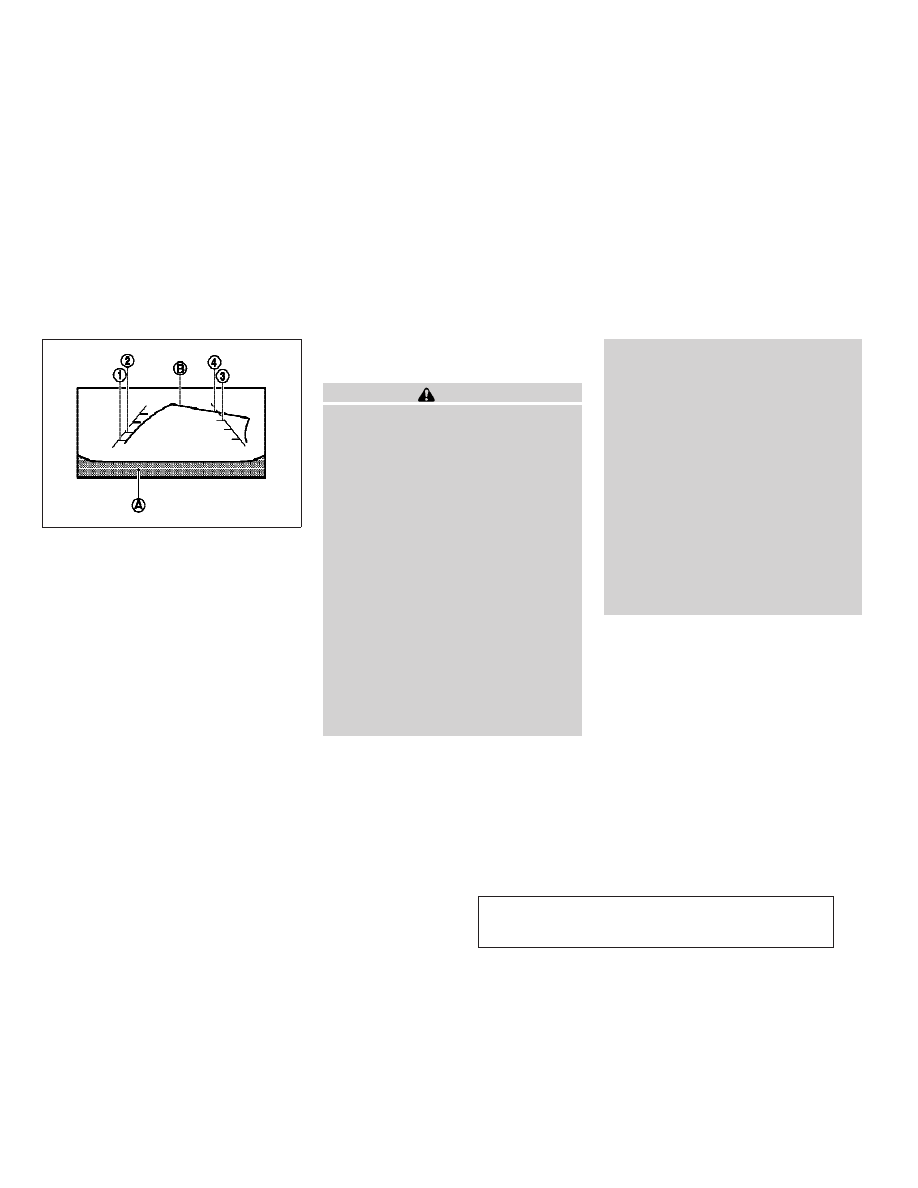
HOW TO READ THE DISPLAYED LINES
Guiding lines which indicate the vehicle width
and distances to objects with reference to the
bumper line
s
A
are displayed on the monitor.
They are indicated as reference distances to
objects. Displayed lines indicate distances 1.5
feet (red)
s
1
, 3 feet (yellow)
s
2
, 7 feet (green)
s
3
and 10 feet (green)
s
4
[0.5 m (red), 1 m
(yellow), 2 m (green) and 3 m (green)] from the
lower part of the bumper line
s
A
.
When the steering wheel is turned with the
selector lever in the R (Reverse) position, the
predicted course line
s
B
is displayed on the
monitor.
HOW TO PARK WITH PREDICTED
COURSE LINES
WARNING
● Always turn and check that it is safe to do so
before backing up. Always back up slowly.
● Use the displayed lines as a reference. The
lines are highly affected by the number of
occupants, fuel level, vehicle position, road
condition and road grade.
● If the tires are replaced with different sized
tires, the predicted course line may be dis-
played incorrectly.
● On a snow-covered or slippery road, there
may be a difference between the predicted
course line and the actual course line.
● If the battery is disconnected or becomes
discharged, the predicted course lines may
be displayed incorrectly. If this occurs,
please perform the following procedures:
– Turn the steering wheel from lock to lock
while the engine is running.
– Drive the vehicle on a straight road for
more than 5 minutes.
● When the steering wheel is turned with the
ignition switch in the ACC position, the pre-
dicted course lines may be displayed
incorrectly.
● The distance guide line and the vehicle
width line should be used as a reference only
when the vehicle is on a level paved surface.
The distance viewed on the monitor is for
reference only and may be different than the
actual distance between the vehicle and dis-
played objects.
● When backing-up the vehicle up a hill ob-
jects viewed in the monitor are further than
they appear. When backing-up the vehicle
down a hill objects viewed in the monitor are
closer than they appear. Use the inside mir-
ror or glance over your shoulder to properly
judge distances to other objects.
The vehicle width and predicted course lines are
wider than the actual width and course.
SAA1099
4-20
Monitor, climate, audio, phone and voice recognition systems
w
—
—
07/14/07—pattie
X
-------------------------------------------------------------------------------------------------------------------------------------------------------------
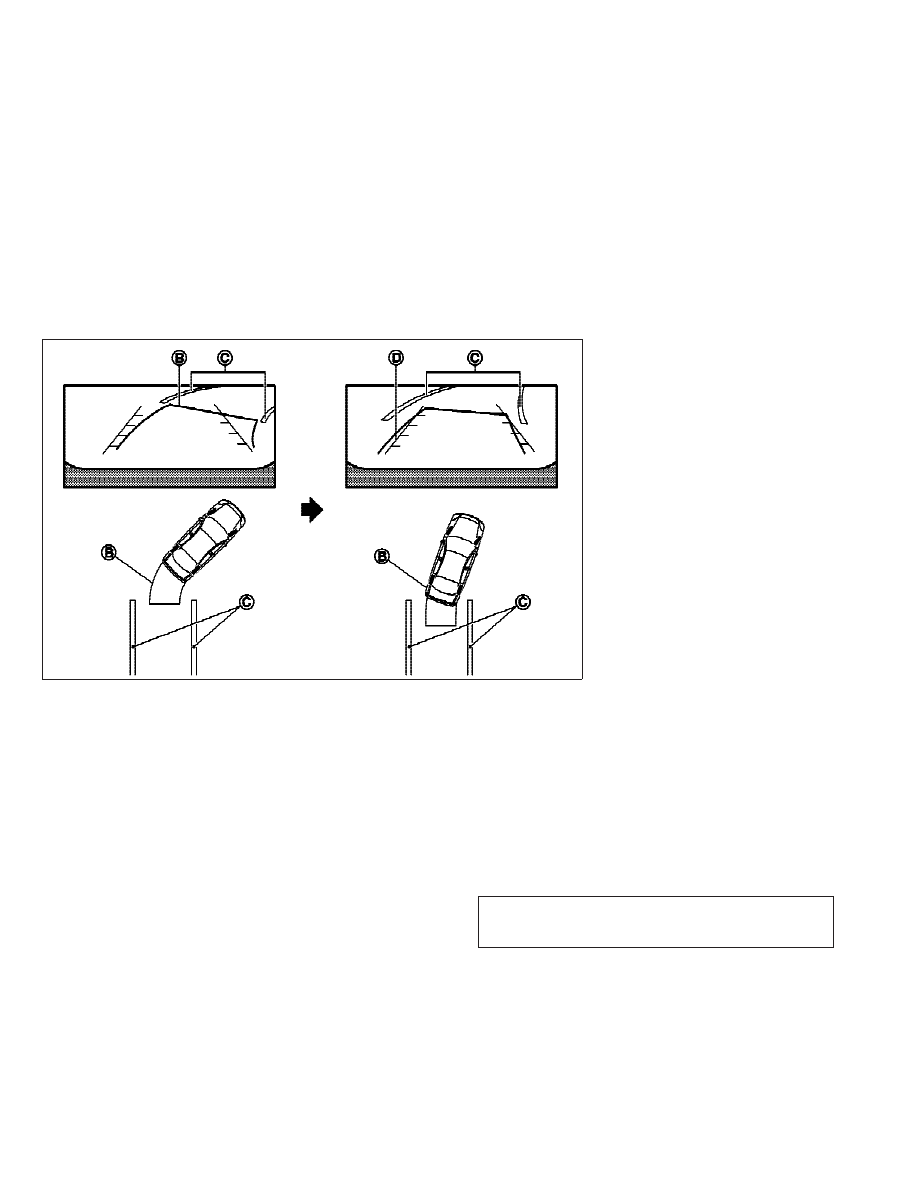
1. Visually check that the parking space is
safe before parking your vehicle.
2. The rear view of the vehicle is displayed
on the screen as illustrated when the
selector lever is moved to the R (Reverse)
position. The predicted course lines
s
B
will appear when the steering wheel is
turned to the right or left.
3. Back up the vehicle to the parking space
s
C
while referring to the predicted course
lines. Do not rely completely on the infor-
mation displayed on the screen. Confirm
the safety of the vehicle by visually check-
ing around the vehicle.
4. Maneuver the steering wheel to make the
vehicle width lines
s
D
parallel to the
parking space
s
C
while referring to the
predicted course lines.
5. When the vehicle is parked in the space
completely, move the selector lever to the
P (Park) position and apply the parking
brake.
HOW TO ADJUST THE SCREEN
To adjust the Display ON/OFF, Brightness, Tint,
Color, Contrast and Black Level of the RearView
Monitor, push the
SETTING button with the
RearView Monitor on, select the item key and
adjust the level using the INFINITI controller.
Do not adjust the Brightness, Contrast, Tint and
Color of the RearView Monitor while the vehicle
is moving. Make sure the parking brake is firmly
applied and the engine is not running.
SAA1137
Monitor, climate, audio, phone and voice recognition systems
4-21
w
—
—
07/14/07—pattie
X
-------------------------------------------------------------------------------------------------------------------------------------------------------------

OPERATING TIPS
● When the selector lever is shifted to R, the
monitor screen automatically changes to the
RearView Monitor mode. However, the radio
can be heard.
● It may take some time until the RearView
Monitor or the normal screen is displayed
after the selector lever has been shifted to R
from another position or to another position
from R. Objects may be distorted momen-
tarily until the RearView Monitor screen is
displayed completely.
● When the temperature is extremely high or
low, the screen may not clearly display
objects. This is not a malfunction.
● When strong light directly enters the cam-
era, objects may not be displayed clearly.
This is not a malfunction.
● Vertical lines may be seen in objects on the
screen. This is due to strong reflected light
from the bumper. This is not a malfunction.
● The screen may flicker under fluorescent
light. This is not a malfunction.
● The colors of objects on the RearView Moni-
tor may differ somewhat from those of the
actual object.
● Objects on the monitor may not be clear in a
dark place or at night. This is not a malfunc-
tion.
● If dirt, rain or snow attaches to the camera,
the RearView Monitor may not clearly dis-
play objects. Clean the camera.
● Do not use alcohol, benzine or thinner to
clean the camera. This will cause discolora-
tion. To clean the camera, wipe with a cloth
dampened with diluted mild cleaning agent
and then wipe with a dry cloth.
● Do not damage the camera as the monitor
screen may be adversely affected.
● Do not use wax on the camera window. Wipe
off any wax with a clean cloth dampened
with mild detergent diluted with water.
Center ventilators
SAA1499
Side ventilators
SAA1500
VENTILATORS
4-22
Monitor, climate, audio, phone and voice recognition systems
w
—
—
07/14/07—pattie
X
-------------------------------------------------------------------------------------------------------------------------------------------------------------
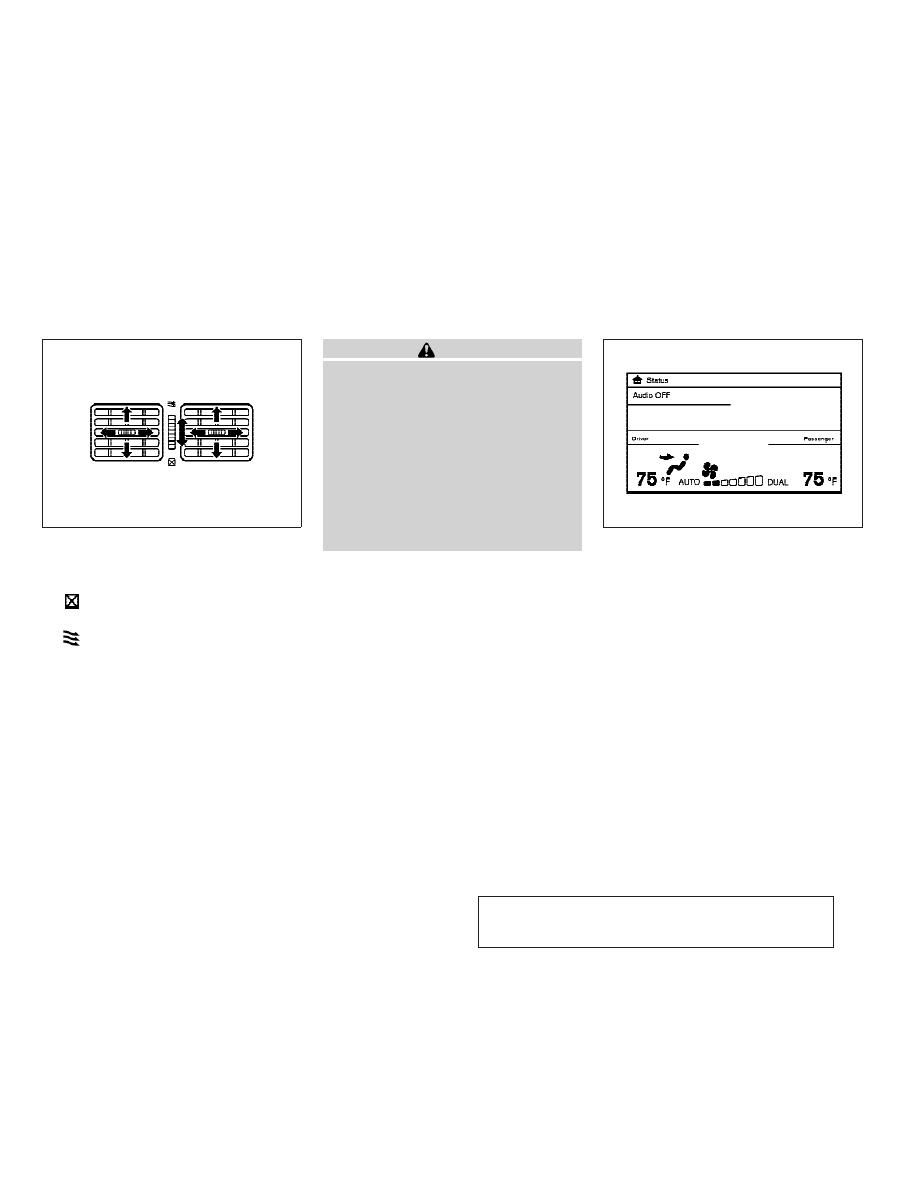
Open or close, and adjust the air flow direction
of ventilators.
: This symbol indicates that the vents
are closed.
: This symbol indicates that the vents
are open.
WARNING
● The air conditioner cooling function oper-
ates only when the engine is running.
● Do not leave children or adults who would
normally require the support of others alone
in your vehicle. Pets should not be left alone
either. On hot, sunny days, temperatures in
a closed vehicle could quickly become high
enough to cause severe or possibly fatal in-
juries to people or animals.
● Do not use the recirculation mode for long
periods as it may cause the interior air to
become stale and the windows to fog up.
Start the engine and operate the automatic
climate control system.
When the “STATUS” button is pushed, the
automatic climate control status screen will
appear. (See “HOW TO USE STATUS BUTTON”
earlier in this section.)
You can individually set the driver and front
passenger side temperature using each tem-
perature control button.
Rear (if so equipped)
SAA0564B
SAA1520
AUTOMATIC CLIMATE CONTROL
Monitor, climate, audio, phone and voice recognition systems
4-23
w
—
—
07/14/07—pattie
X
-------------------------------------------------------------------------------------------------------------------------------------------------------------
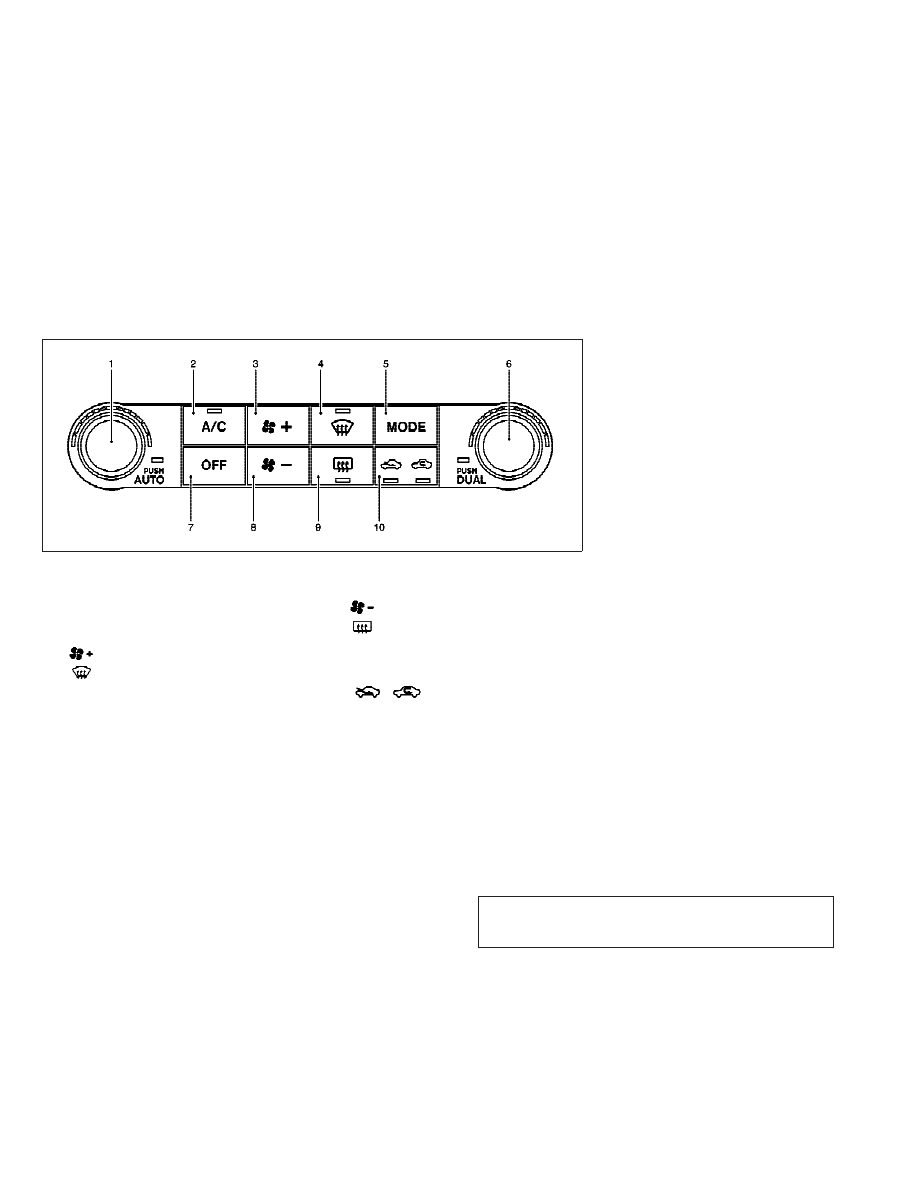
1. “AUTO” automatic climate control ON
button/Temperature control dial (driver
side)
2. “A/C” air conditioner ON/OFF button
3. “
” fan speed increase button
4. “
” front defroster button
5. “MODE” manual air flow control button
6. “DUAL”
zone
control
ON/OFF
button/Temperature control dial (passen-
ger side)
7. “OFF” button for climate control system
8. “
” fan speed decrease button
9. “
” rear window defroster button
(See “REAR WINDOW AND OUTSIDE MIR-
ROR DEFROSTER SWITCH” in the “2. In-
struments and controls” section.)
10. “
” intake air control button
AUTOMATIC CLIMATE CONTROL
(TYPE A)
Automatic operation
Cooling and/or dehumidified heating (AUTO)
This mode may be used all year round. The
system works automatically to control the in-
side temperature, air flow distribution and fan
speed after the preferred temperature is set
manually.
1. Push the “AUTO” button on. (The indicator
on the button will illuminate and AUTO will
be displayed.)
2. Turn the temperature control dial (driver
side) to set the desired temperature.
Adjust the temperature to about 75°C (24°F)
for normal operation.
● The temperature of the passenger com-
partment will be maintained automati-
cally. Air flow distribution and fan speed
will also be controlled automatically.
Type A
SAA1527
4-24
Monitor, climate, audio, phone and voice recognition systems
w
—
—
07/14/07—pattie
X
-------------------------------------------------------------------------------------------------------------------------------------------------------------
3. You can individually set driver and front
passenger side temperature using each
temperature control button. When the
“DUAL” button is pushed or the passen-
ger side temperature control button is
turned, the DUAL indicator will come on.
To turn off the passenger side tempera-
ture control, push the “DUAL” button.
4. To turn off the climate control system,
push the “OFF” button.
A visible mist may be seen coming from the
ventilators in hot, humid conditions as the air is
cooled rapidly. This does not indicate a mal-
function.
Heating (A/C OFF)
The air conditioner does not activate in this
mode. When you need to heat only, use this
mode.
1. Push the “A/C” button. (The A/C indicator
will turn off.)
2. Turn the temperature control dial to set
the desired temperature.
● The temperature of the passenger compart-
ment will be maintained automatically. Air
flow distribution and fan speed are also
controlled automatically.
● Do not set the temperature lower than the
outside air temperature. Otherwise the sys-
tem may not work properly.
● Not recommended if windows fog up.
Dehumidified defrosting or defogging
1. Push the “
” front defroster button.
(The indicator light on the button will
come on.)
2. Turn the temperature control dial to set
the desired temperature.
● To quickly remove ice from the outside of the
windows, push the fan speed increase but-
ton “
” and set it to the maximum
position.
● As soon as possible after the windshield is
clean, push the “AUTO” button to return to
the auto mode.
● When the “
” front defroster button is
pushed, the air conditioner will automati-
cally be turned on at outside temperatures
above 23°C (
25°F) to defog the windshield,
and the air recirculate mode will automati-
cally be turned off.
Outside air is drawn into the passenger
compartment to improve the defogging per-
formance.
Manual operation
Fan speed control
Push the fan speed increase “
” or de-
crease “
” buttons to manually control the
fan speed.
Push the “AUTO” button to return to automatic
control of the fan speed.
Air recirculation
Push
the
intake
air
control
button
“
” to recirculate interior air inside
the vehicle. The indicator light on the “
”
side will come on.
The air recirculation mode cannot be activated
when the air conditioner is in the front defrost-
ing mode “
”.
Outside air circulation
Push
the
intake
air
control
button
“
” to draw outside air into the
passenger compartment. The indicator light on
the “
” side will come on.
Automatic intake air control
In the AUTO mode, the intake air will be con-
trolled automatically. To manually control the
intake air, push the intake air control button
“
”. To return to the automatic con-
trol mode, push the intake air control button
Monitor, climate, audio, phone and voice recognition systems
4-25
w
—
—
07/14/07—pattie
X
-------------------------------------------------------------------------------------------------------------------------------------------------------------
“
” for about 2 seconds. The indi-
cator lights (both air recirculation and outside
air circulation sides) will flash twice, and then
the intake air will be controlled automatically.
Air flow control
Pushing the “MODE” manual air flow control
button selects the air outlet to:
: Air flows from center and side ventila-
tors.
: Air flows from center and side ventila-
tors and foot outlets.
: Air flows mainly from foot outlets.
: Air flows from defroster and foot outlets.
To turn the system off
Push the OFF button.
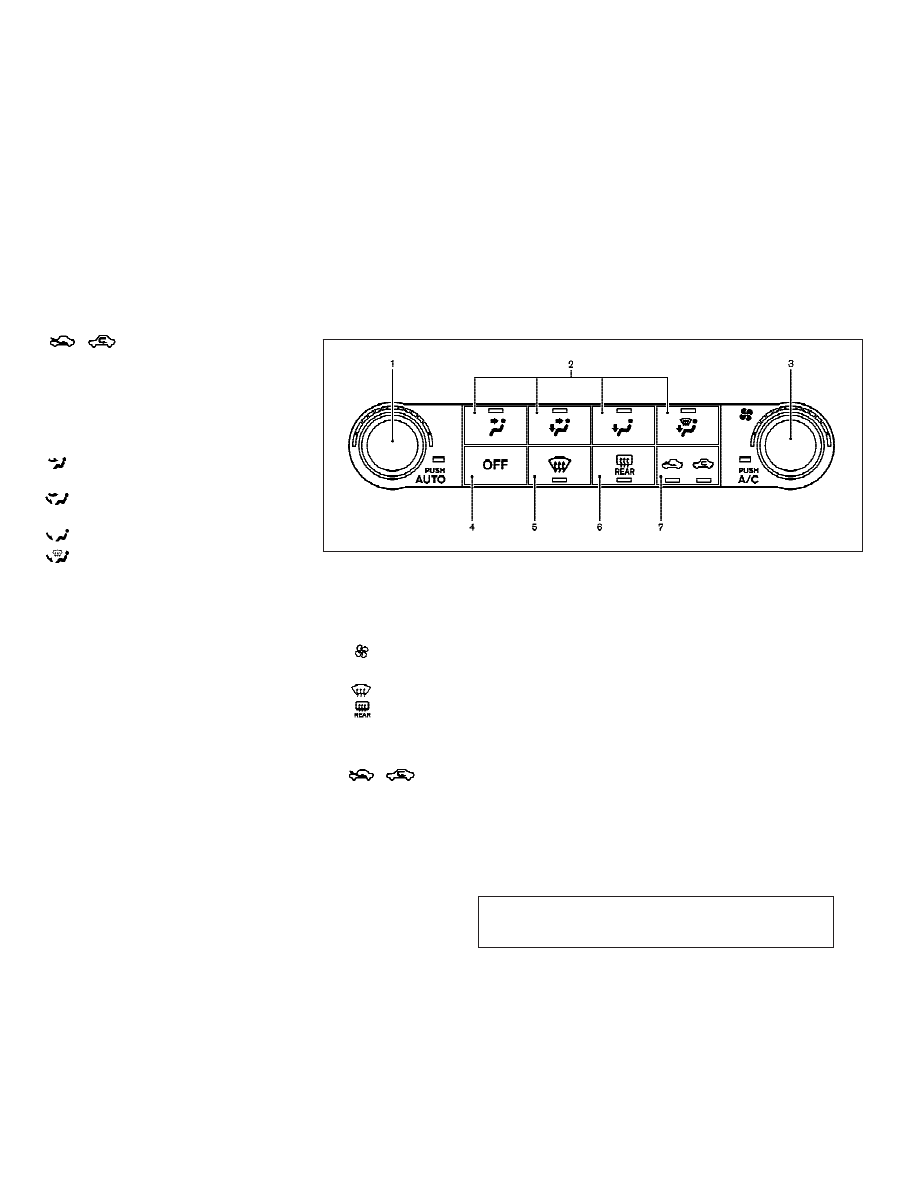
1. “AUTO” automatic climate control ON
button/Temperature control dial
2. Air flow control button
3. “
” Fan speed control dial
4. “OFF” button
5. “
” front defroster button
6. “
” rear window defroster button
(See “REAR WINDOW AND OUTSIDE MIR-
ROR DEFROSTER SWITCH” in the “2. In-
struments and controls” section.)
7. “
” intake air control button
AUTOMATIC CLIMATE CONTROL
(TYPE B)
Automatic operation
Cooling and/or dehumidified heating (AUTO)
This mode may be used all year round. The
system works automatically to control the in-
side temperature, air flow distribution and fan
speed after the preferred temperature is set
manually.
Type B
SAA1526
4-26
Monitor, climate, audio, phone and voice recognition systems
w
—
—
07/14/07—pattie
X
-------------------------------------------------------------------------------------------------------------------------------------------------------------
1. Push the “AUTO” button on. (The indicator
on the button will illuminate and AUTO will
be displayed.)
2. Use the temperature control dial to set
the desired temperature.
Adjust the temperature to about 75°C (24°F)
for normal operation.
● The temperature of the passenger com-
partment will be maintained automati-
cally. Air flow distribution and fan speed
will also be controlled automatically.
3. To turn off the climate control system,
push the “OFF” button.
A visible mist may be seen coming from the
ventilators in hot, humid conditions as the air is
cooled rapidly. This does not indicate a mal-
function.
Heating (A/C OFF)
The air conditioner does not activate in this
mode. When you need to heat only, use this
mode.
1. Push the “A/C” button. (The A/C indicator
will turn off.)
2. Turn the temperature control dial to set
the desired temperature.
● The temperature of the passenger compart-
ment will be maintained automatically. Air
flow distribution and fan speed are also
controlled automatically.
● Do not set the temperature lower than the
outside air temperature. Otherwise the sys-
tem may not work properly.
● Not recommended if windows fog up.
Dehumidified defrosting or defogging
1. Push the “
” front defroster button.
(The indicator light on the button will
come on.)
2. Turn the temperature control dial to set
the desired temperature.
● To quickly remove ice from the outside of the
windows, turn the “
” fan speed con-
trol dial and set it to the maximum position.
● As soon as possible after the windshield is
clean, push the “AUTO” button to return to
the auto mode.
● When the “
” front defroster button is
pushed, the air conditioner will automati-
cally be turned on at outside temperatures
above 23°C (
25°F) to defog the windshield,
and the air recirculate mode will automati-
cally be turned off.
Outside air is drawn into the passenger
compartment to improve the defogging per-
formance.
Manual operation
Fan speed control
Turn the “
” fan speed control dial to
manually control the fan speed.
Push the “AUTO” button to return to automatic
control of the fan speed.
Air recirculation
Push
the
intake
air
control
button
“
” to recirculate interior air inside
the vehicle. The indicator light on the “
”
side will come on.
The air recirculation mode cannot be activated
when the air conditioner is in the front defrost-
ing mode “
”.
Outside air circulation
Push
the
intake
air
control
button
“
” to draw outside air into the
passenger compartment. The indicator light on
the “
” side will come on.
Automatic intake air control
In the AUTO mode, the intake air will be con-
trolled automatically. To manually control the
intake air, push the intake air control button
Monitor, climate, audio, phone and voice recognition systems
4-27
w
—
—
07/17/07—tbrooks
X
-------------------------------------------------------------------------------------------------------------------------------------------------------------

“
”. To return to the automatic con-
trol mode, push the intake air control button
“
” for about 2 seconds. The indi-
cator lights (both air recirculation and outside
air circulation sides) will flash twice, and then
the intake air will be controlled automatically.
Air flow control
Pushing an air flow control button manually
controls the air flow and selects the air outlet to
the following settings.
: Air flows from center and side ventila-
tors.
: Air flows from center and side ventila-
tors and foot outlets.
: Air flows mainly from foot outlets.
: Air flows from defroster and foot outlets.
To turn the system off
Push the OFF button.
The sunload sensor
s
A
on the instrument panel
helps maintain a constant temperature. Do not
put anything on or around this sensor.
IN-CABIN MICROFILTER
The climate control system is equipped with an
in-cabin microfilter which collects dirt, pollen,
dust, etc. To make sure the air conditioner
heats, defogs, and ventilates efficiently, replace
the filter in accordance with the maintenance
schedule in the INFINITI Service and Mainte-
nance Guide. To replace the filter, contact an
INFINITI dealer.
The filter should be replaced if air flow is ex-
tremely decreased or when windows fog up eas-
ily when operating heater or air conditioning
system.
SERVICING CLIMATE CONTROL
The climate control system in your INFINITI is
charged with a refrigerant designed with the
environment in mind.
This refrigerant will not
harm the earth’s ozone layer. However, special
charging equipment and lubricant are required
when servicing your INFINITI air conditioner.
Using improper refrigerants or lubricants will
cause severe damage to your climate control
system. (See “CAPACITIES AND RECOMMENDED
FUEL/LUBRICANTS” in the “9. Technical and
consumer information” section for climate con-
trol system refrigerant and lubricant recommen-
dations.)
Your INFINITI dealer will be able to service your
environmentally friendly climate control sys-
tem.
WARNING
The system contains refrigerant under high
pressure. To avoid personal injury, any air con-
ditioner service should be done only by an ex-
perienced
technician
with
the
proper
equipment.
SIC2768
4-28
Monitor, climate, audio, phone and voice recognition systems
w
—
—
07/14/07—pattie
X
-------------------------------------------------------------------------------------------------------------------------------------------------------------
AUDIO OPERATION PRECAUTIONS
Radio
Push the ignition switch to the ACC or ON
position and push the “
RADIO ” button to turn
on the radio. If you listen to the radio with the
engine not running, the ignition switch should
be pushed to the ACC position.
Radio reception is affected by station signal
strength, distance from radio transmitter, build-
ings, bridges, mountains and other external
influences. Intermittent changes in reception
quality normally are caused by these external
influences.
Using a cellular phone in or near the vehicle may
influence radio reception quality.
Radio reception
Your INFINITI radio system is equipped with
state-of-the-art electronic circuits to enhance
radio reception. These circuits are designed to
extend reception range, and to enhance the
quality of that reception.
However there are some general characteristics
of both FM and AM radio signals that can affect
radio reception quality in a moving vehicle,
even when the finest equipment is used. These
characteristics are completely normal in a given
reception area, and do not indicate any mal-
function in your INFINITI radio system.
Reception conditions will constantly change
because of vehicle movement. Buildings, ter-
rain, signal distance and interference from
other vehicles can work against ideal reception.
Described below are some of the factors that
can affect your radio reception.
Some cellular phones and other devices may
cause interference or a buzzing noise to come
from the audio system speakers. Storing the
device in a different location may reduce or
eliminate the noise.
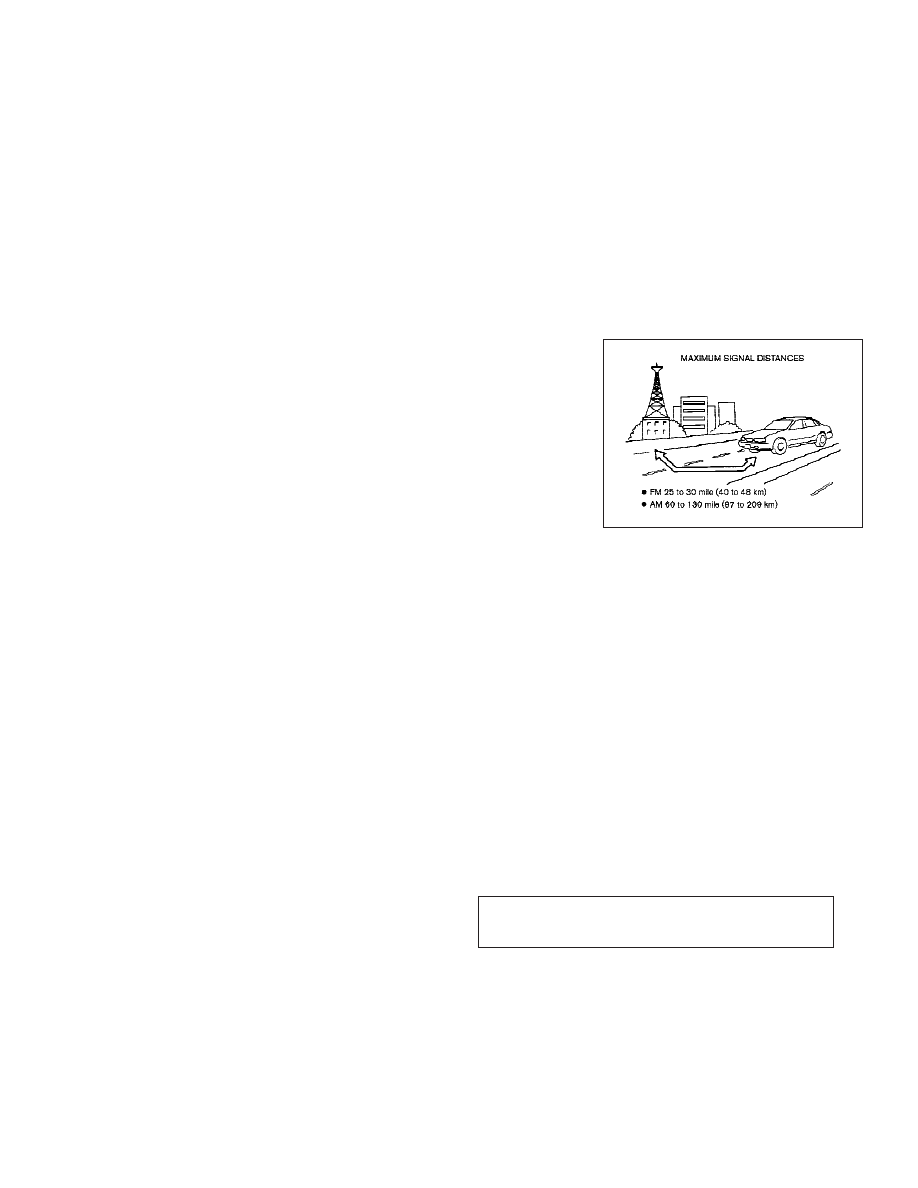
FM radio reception
Range: FM range is normally limited to 25 to 30
miles (40 to 48 km), with monaural (single
channel) FM having slightly more range than
stereo FM. External influences may sometimes
interfere with FM station reception even if the
FM station is within 25 miles (40 km). The
strength of the FM signal is directly related to
the distance between the transmitter and re-
ceiver. FM signals follow a line-of-sight path,
exhibiting many of the same characteristics as
light. For example they will reflect off objects.
Fade and drift: As your vehicle moves away from
a station transmitter, the signals will tend to
fade and/or drift.
SAA0306
AUDIO SYSTEM
Monitor, climate, audio, phone and voice recognition systems
4-29
w
—
—
07/14/07—pattie
X
-------------------------------------------------------------------------------------------------------------------------------------------------------------
Static and flutter: During signal interference
from buildings, large hills or due to antenna
position, usually in conjunction with increased
distance from the station transmitter, static or
flutter can be heard. This can be reduced by
lowering the treble setting to reduce the treble
response.
Multipath reception: Because of the reflective
characteristics of FM signals, direct and re-
flected signals reach the receiver at the same
time. The signals may cancel each other, result-
ing in momentary flutter or loss of sound.
AM radio reception
AM signals, because of their low frequency, can
bend around objects and skip along the ground.
In addition, the signals can be bounced off the
ionosphere and bent back to earth. Because of
these characteristics. AM signals are also sub-
ject to interference as they travel from transmit-
ter to receiver.
Fading: Occurs while the vehicle is passing
through freeway underpasses or in areas with
many tall buildings. It can also occur for several
seconds during ionospheric turbulence even in
areas where no obstacles exist.
Static: Caused by thunderstorms, electrical
power lines, electric signs and even traffic
lights.
Satellite radio reception
When the satellite radio is first installed or the
battery has been replaced, the satellite radio
may not work properly. This is not a malfunc-
tion. Wait more than 10 minutes with satellite
radio ON for satellite radio to receive all of the
necessary data.
The satellite radio mode requires an active XM
T
satellite radio service subscription. Satellite
radio is not available in Alaska, Hawaii and
Guam.
Satellite radio performance may be affected if
cargo carried on the roof blocks the satellite
radio signal.
If possible, do not put cargo near the satellite
antenna.
A build up of ice on the satellite radio antenna
can affect satellite radio performance. Remove
the ice to restore satellite radio reception.
Compact Disc (CD) player
● Do not force a compact disc into the CD insert
slot. This could damage the CD and/or CD
changer/player.
SAA0480
4-30
Monitor, climate, audio, phone and voice recognition systems
w
—
—
07/14/07—pattie
X
-------------------------------------------------------------------------------------------------------------------------------------------------------------
● Trying to load a CD with the CD door closed
could damage the CD and/or CD changer.
● During cold weather or rainy days, the player
may malfunction due to the humidity. If this
occurs, remove the CD and dehumidify or ven-
tilate the player completely.
● The player may skip while driving on rough
roads.
● The CD player sometimes cannot function
when the passenger compartment tempera-
ture is extremely high. Decrease the tem-
perature before use.
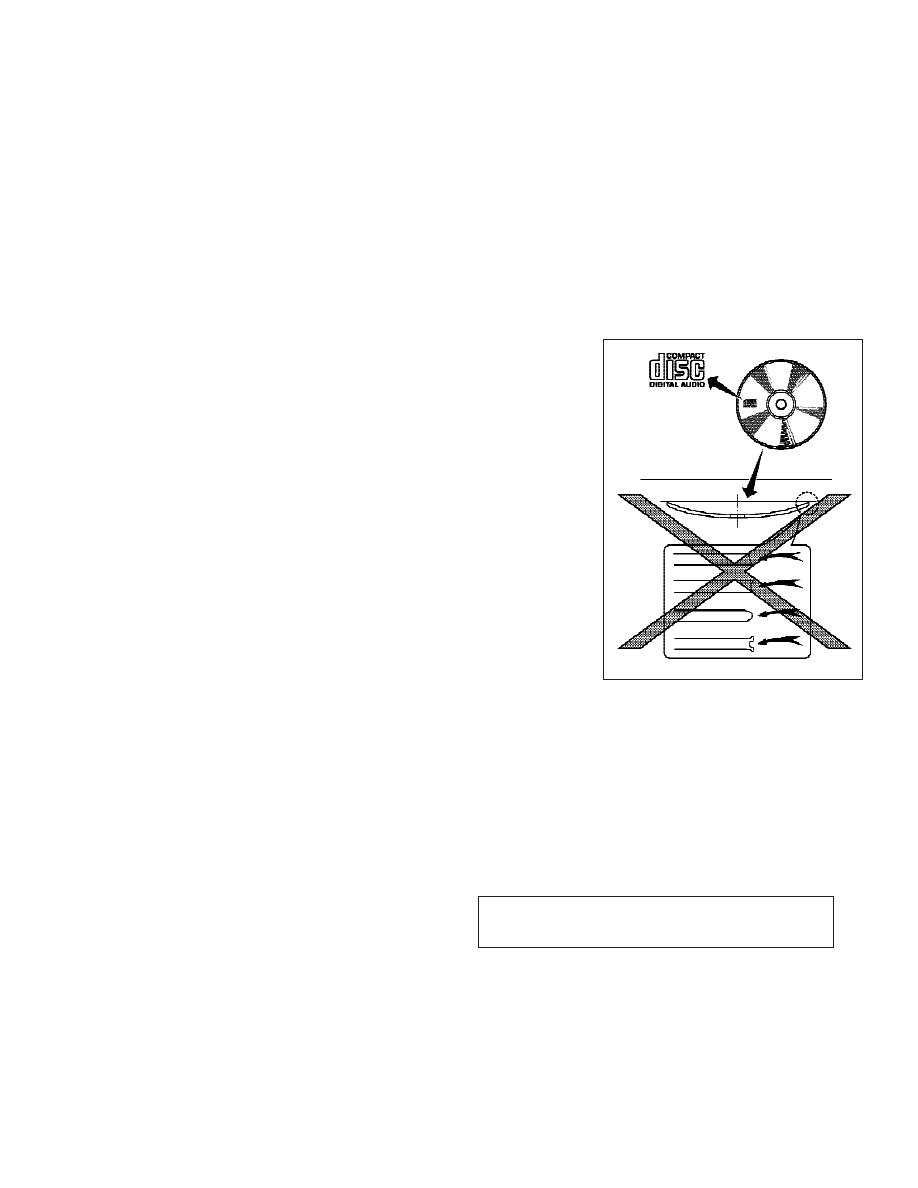
● Only use high quality 4.7 in (12 cm) round
discs that have the “COMPACT disc DIGITAL
AUDIO” logo on the disc or packaging.
● Do not expose the CD to direct sunlight.
● CDs that are of poor quality, dirty, scratched,
covered with fingerprints, or that have pin
holes may not work properly.
● The following CDs may not work properly:
–
Copy control compact discs (CCCD)
–
Recordable compact discs (CD-R)
–
Rewritable compact discs (CD-RW)
● Do not use the following CDs as they may
cause the CD player to malfunction.
–
3.1 in (8 cm) discs
–
CDs that are not round
–
CDs with a paper label
–
CDs that are warped, scratched, or have
abnormal edges
● This audio system can only play prerecorded
CDs. It has no capabilities to record or burn
CDs.
● If the CD cannot be played, one of the follow-
ing messages will be displayed.
CHECK DISC:
–
Confirm that the CD is inserted correctly
(the label side is facing up, etc.).
–
Confirm that the CD is not bent or warped
and it is free of scratches.
PUSH EJECT:
This is an error due to the temperature inside
the player is too high. Remove the CD by
pushing the EJECT button, and after a short
time reinsert the CD. The CD can be played
when the temperature of the player returns to
normal.
UNPLAYABLE:
The file is unplayable in this audio system
(only MP3 or WMA CD).
CompactFlash (CF) player
● Do not force a CF card into the slot. This could
damage the CF card and/or player.
● During cold weather or rainy days, the player
may malfunction due to the humidity. If this
occurs, remove the CF card and dehumidify or
ventilate the player completely.
● The CF player sometimes cannot function
when the passenger compartment tempera-
ture is extremely high. Decrease the tem-
perature before use.
● Do not expose a CF card to direct sunlight.
● Confirm that a CF card is inserted correctly.
Monitor, climate, audio, phone and voice recognition systems
4-31
w
—
—
07/14/07—pattie
X
-------------------------------------------------------------------------------------------------------------------------------------------------------------
Нет комментариевНе стесняйтесь поделиться с нами вашим ценным мнением.
Текст