Infiniti I35 (A33). Manual — part 584
Part
SRS is activated
SRS is NOT activated
Spiral cable
1. Visually check spiral cable and combination switch for damage.
2. Check connectors and protective tape for damage.
3. Check steering wheel for noise, binding or heavy operation.
4. If no damage is found, reinstall with bolts.
5. If damaged—REPLACE.
Harness and Connec-
tors
1. Check connectors for poor connection, damage, and terminals for deformation.
2. Check harness for binding, chafing, cuts, or deformities.
3. If no damage is found, reinstall the harness and connectors.
4. Damaged—REPLACE damaged section of harness. Do not attempt to repair, splice or modify any SRS
harness.
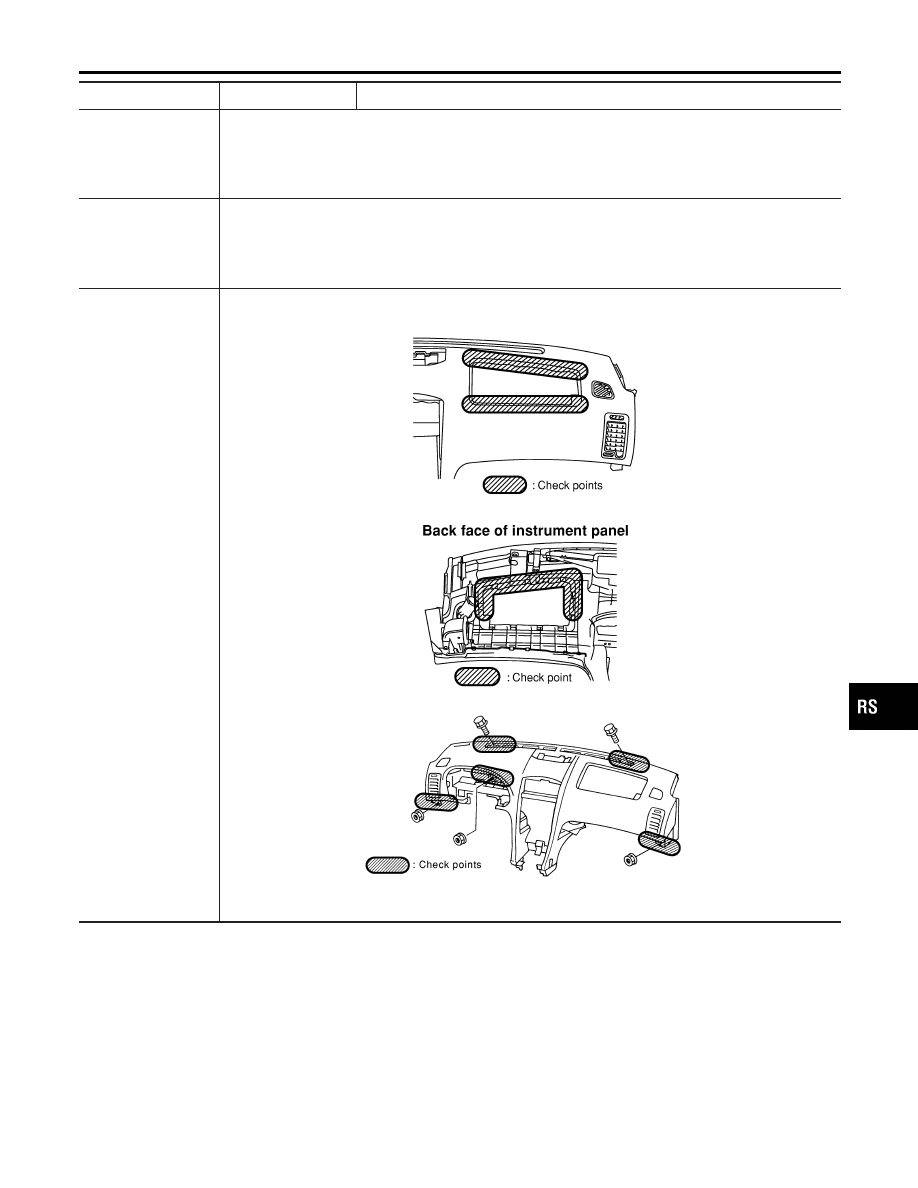
Instrument panel
1. When passenger air bag inflates, check the following points for bending, deformation or cracks.
I
Opening portion for passenger air bag
SRS794
I
Passenger air bag module brackets
SRS795-A
I
The portions securing the instrument panel
SRS796
2. If no damage is found, reinstall the instrument panel.
3. If damaged—REPLACE the instrument panel with bolts.
GI
MA
EM
LC
EC
FE
AT
AX
SU
BR
ST
BT
HA
SC
EL
IDX
SUPPLEMENTAL RESTRAINT SYSTEM (SRS)
Collision Diagnosis (Cont’d)
RS-63
FOR SIDE COLLISION
=NHRS0033S08
To repair the SRS for a side collision, perform the following steps.
When the side air bag is activated in the side collision:
1) Replace the following component:
−
All parts of seatback (including seatback frame) with side air bag module (on the side on which side air
bag is activated)
−
Diagnosis sensor unit
−
Satellite sensor
2) Check the SRS components and the related parts using the table shown below.
I
Replace any SRS components and the related parts showing visible signs of damage (dents, cracks,
deformation).
3) Conduct self-diagnosis using CONSULT-II or “AIR BAG” warning lamp. Refer to “SRS Operation Check”
for details (RS-41). Ensure entire SRS operation properly.
When SRS is not activated in the side collision or when only one air bag module is activated in a col-
lision.
1) Check the SRS components and the related parts using the table shown below.
I
Replace any SRS components and the related parts showing visible signs of damage (dents, cracks,
deformation).
2) Conduct self-diagnosis using CONSULT-II or “AIR BAG” warning lamp. Refer to “SRS Operation Check”
for details (RS-41). Ensure entire SRS operation properly.
Only one front air bag my inflate in a crash, depending on the crash severity and whether the front occupants
are belted or unbelted. This does not indicate improper performance of the system. Conduct self-diagnosis to
make sure the entire SRS system operates properly.
SRS Inspection (For side collision)
NHRS0033S0801
Part
Side air bag is acti-
vated
SRS is NOT activated
Side air bags module
(LH or RH)
REPLACE all parts of
seat back with
deployed side air bag
module.
1. Check for visible signs of damage (dents, tears, deformation) of the seat back
on the collision side.
2. If damaged—REPLACE the damaged seat parts with new bolts and remove
the side air bag module.
3. Check for visible signs of damaged (tesrs etc.) of the side air bag module.
4. Check harness and connectors for damage, and terminals for deformities.
5. If no damaged is found, reinstall the side air bag module with new torx nuts
coated with bonding agent.
6. If damaged—REPLACE the side air bag module with new torx nuts coated with
bonding agent. Air bag must be deployed before disposal.
LH or RH side air bag
(Satellite) sensor
REPLACE the satel-
lite sensor on the col-
lision side with new
nuts coated with
bonding agent.
(Repair the center
pillar inner, etc. before
installing new one if
damaged.)
1. Remove the LH or RH side air bag (Satellite) sensor on the collision side.
Check harness connectors for damage, terminals for deformation, and harness
for binding.
2. Check for visible signs of damage (dents, cracks, deformation) of the satellite
sensor.
3. Install the LH or RH side air bag (Satellite) sensor to check fit.
4. If no damage is found, reinstall the LH or RH side air bag (Satellite) sensor
with new nuts coated with bonding agent.
5. If damaged—REPLACE the LH or RH side air bag (Satellite) sensor with new
nuts coated with bonding agent.
Diagnosis sensor unit
REPLACE the diag-
nosis sensor unit with
the new bolts.
1. Check case and bracket for dents, cracks or deformation.
2. Check connectors for damage, and terminals for deformation.
3. If no damage is found, reinstall the diagnosis sensor unit with new bolts and
ground bolt.
4. If damaged—REPLACE. Install the diagnosis sensor unit with new bolts and
ground bolt.
SUPPLEMENTAL RESTRAINT SYSTEM (SRS)
Collision Diagnosis (Cont’d)
RS-64
Part
Side air bag is acti-
vated
SRS is NOT activated
Seat belt pre-ten-
sioner assembly
1. Check if the seat belt can be extended smoothly.
If the seat belt cannot be extended smoothly.
–
Check for deformities of the center pillar inner.
–
If the center pillar inner has no damage, REPLACE the seat belt pre-tensioner assembly.
2. Remove the seat belt pre-tensioner assembly on the collision side. Check harness cover and connec-
tors for damage, terminals for deformities, and harness for binding.
3. Check for visible signs of damage (dents, cracks, deformation) of the seat belt pre-tensioner assembly.
4. If no damage is found, reinstall the seat belt pre-tensioner assembly.
5. If damaged—REPLACE the seat belt pre-tensioner assembly with new bolts coated with bonding
agent. The seat belt pre-tensioner assembly must be activated before disposal.
Seat with side air bag
REPLACE front seat-
back assembly
1. Visually check the seat on the collision side.
2. Remove the seat on the collision side and check the following for damage and
deformities.
I
Harness, connectors and terminals
I
Frame and recliner (for front and rear seat), and also adjuster and slides (for
front seat)
3. If no damage is found, reinstall the seat.
4. If damaged—REPLACE the damaged seat parts with new bolts.
Center pillar inner
1. Check the center pillar inner on the collision side for damage (dents, cracks, deformation).
2. If damaged—REPAIR the center pillar inner.
Trim
1. Check for visible signs of damage (dents, cracks, deformation) of the interior trim on the collision side.
2. If damaged—REPLACE the damaged trim parts.
GI
MA
EM
LC
EC
FE
AT
AX
SU
BR
ST
BT
HA
SC
EL
IDX
SUPPLEMENTAL RESTRAINT SYSTEM (SRS)
Collision Diagnosis (Cont’d)
RS-65
NOTES
Нет комментариевНе стесняйтесь поделиться с нами вашим ценным мнением.
Текст