Infiniti G37 Coupe. Manual — part 700
EXT-14
< ON-VEHICLE REPAIR >
FRONT BUMPER
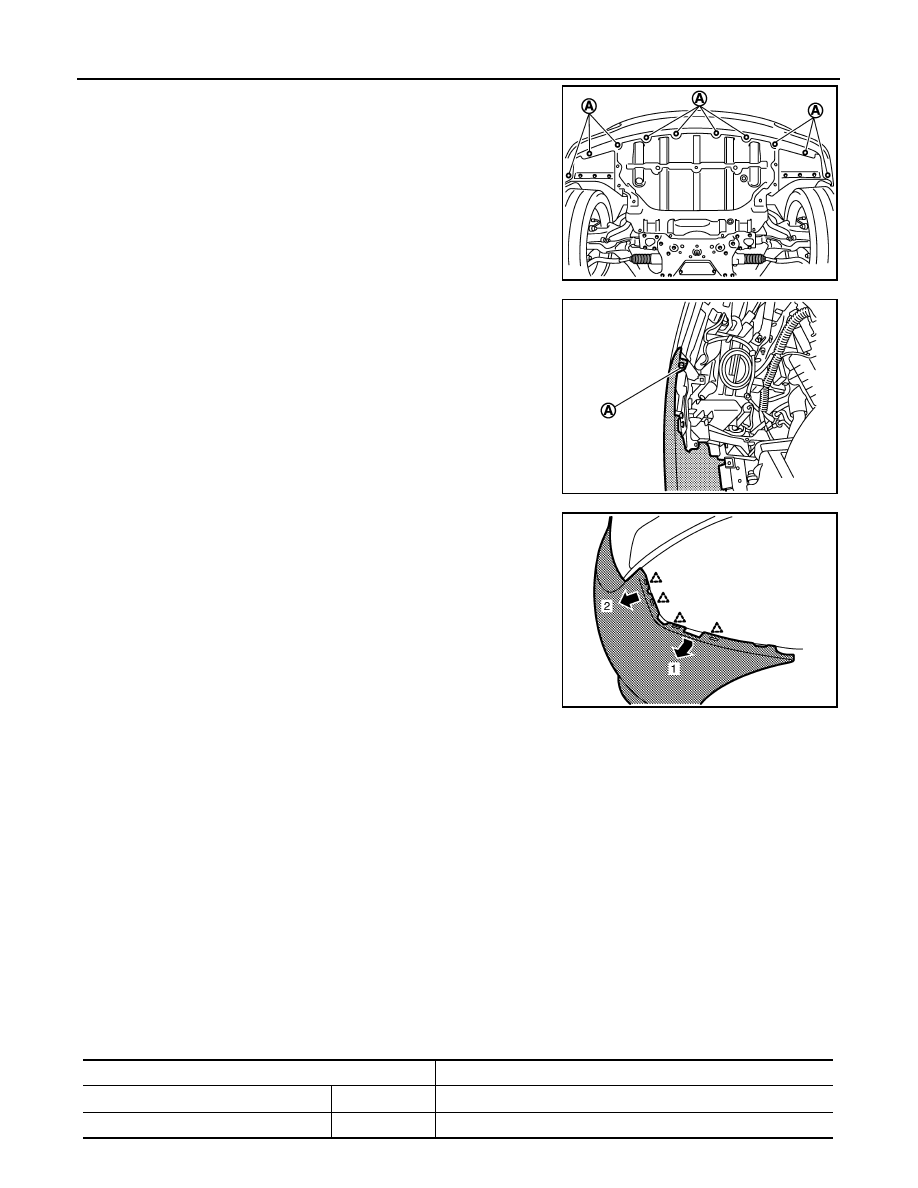
6.
Remove bolts (A) of fixing engine lower cover and front fender
protector.
7.
Remove fender protector (front) mounting bolts and clips, and
then remove screw (A) of fixing bumper fascia left and right side.
8.
Pull the bumper fascia side toward the vehicle side to disengage
the fitting of bumper side bracket and bumper fascia side.
9.
Remove bumper fascia assembly.
CAUTION:
When removing bumper fascia, 2 workers are required so as to prevent it from dropping.
10. Remove the following parts after removing bumper fascia.
• Front grille
• Hood seal assembly (front)
• License plate bracket
• Front bumper side bracket (LH/RH)
• Front bumper side stiffener (LH/RH)
• Front bumper finisher
11. Remove bumper energy absorber.
12. Remove bumper reinforcement mounting nuts and bolts, and then remove bumper reinforcement with
power tool.
INSTALLATION
Install in the reverse order of removal.
NOTE:
After installing, perform fitting adjustment.
JMKIA1229ZZ
JMKIA1230ZZ
JMKIA1231ZZ
Portion
Clearance
Front bumper – Hood assembly
A – A
2.0 – 4.5 mm (0.079 – 0.177 in)
Front bumper – Front grille
B – B
0.2 – 2.8 mm (0.008 – 0.110 in)

FRONT BUMPER
EXT-15
< ON-VEHICLE REPAIR >
C
D
E
F
G
H
I
J
L
M
A
B
EXT
N
O
P
Front bumper – Headlamp
C – C
0.5 – 3.2 mm (0.020 – 0.126 in)
Front bumper – Front fender
D – D
0.0 – 0.7 mm (0.000 – 0.028 in)
Front bumper – Headlamp
E – E
0.3 – 3.2 mm (0.012 – 0.126 in)
Front bumper – Front fender
F – F
0.0 – 0.7 mm (0.000 – 0.028 in)
Front bumper – Front fender
G – G
0.0 – 0.8 mm (0.000 – 0.031 in)
Portion
Clearance

EXT-16
< ON-VEHICLE REPAIR >
REAR BUMPER
REAR BUMPER
Exploded View
INFOID:0000000001677478
1.
Bumper side bracket RH
2.
Bumper stay RH
3.
Bumper lower retainer
4.
Bumper stay LH
5.
Rivet
6.
Bumper side bracket LH
7.
Bumper energy absorber
8.
Bumper fascia assembly
9.
Rear license plate bracket
10. Grommet
11.
License lamp bracket
12. Bumper reinforcement
: Clip
: Pawl
JMKIA1232ZZ
REAR BUMPER
EXT-17
< ON-VEHICLE REPAIR >
C
D
E
F
G
H
I
J
L
M
A
B
EXT
N
O
P
Refer to
for symbols in the figure.
Removal and Installation
INFOID:0000000001677479
REMOVAL
CAUTION:
Bumper fascia is made of resin. Do not apply strong force to it, and be careful to prevent contact with
oil.
1.
Fully open trunk lid assembly.
2.
Remove rear combination lamp (LH/RH). Refer to
EXL-200, "Removal and Installation"
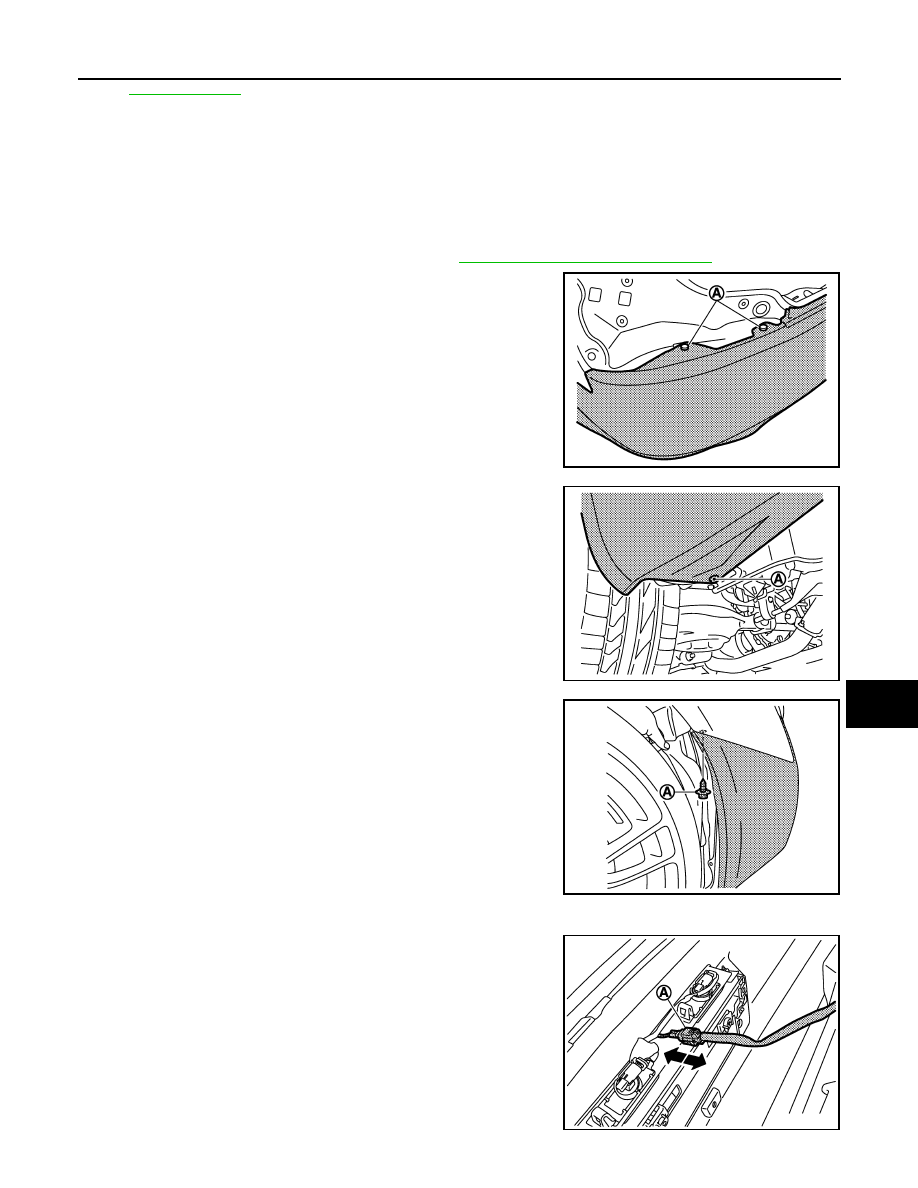
3.
Remove clips (A) located under rear combination lamp (LH/RH).
4.
Remove bolts (A) of bumper fascia underside (LH/RH).
5.
Remove screws (A) of bumper fascia front end upper (LH/RH).
6.
Remove clips of bumper fascia underside, and then pull out bumper fascia toward rear of vehicle.
7.
Disconnect license plate lamp connector (A).
JMKIA1233ZZ
JMKIA1234ZZ
JMKIA0095GB
JMKIA0096GB
Нет комментариевНе стесняйтесь поделиться с нами вашим ценным мнением.
Текст