Infiniti Q45 (FY33). Manual — part 63

SAT893A
ASSEMBLY
1.
Install needle bearing in forward clutch drum.
2.
Install snap ring onto forward clutch drum.
SAT450B
3.
Install low one-way clutch onto forward clutch drum by push-
ing the roller in evenly.
SAT895A
I
Install low one-way clutch with flange facing rearward.
SAT459B
4.
Install side plate onto forward clutch drum.
GI
MA
EM
LC
EC
FE
PD
FA
RA
BR
ST
RS
BT
HA
EL
IDX
REPAIR FOR COMPONENT PARTS
Forward Clutch Drum Assembly (Cont’d)
AT-249
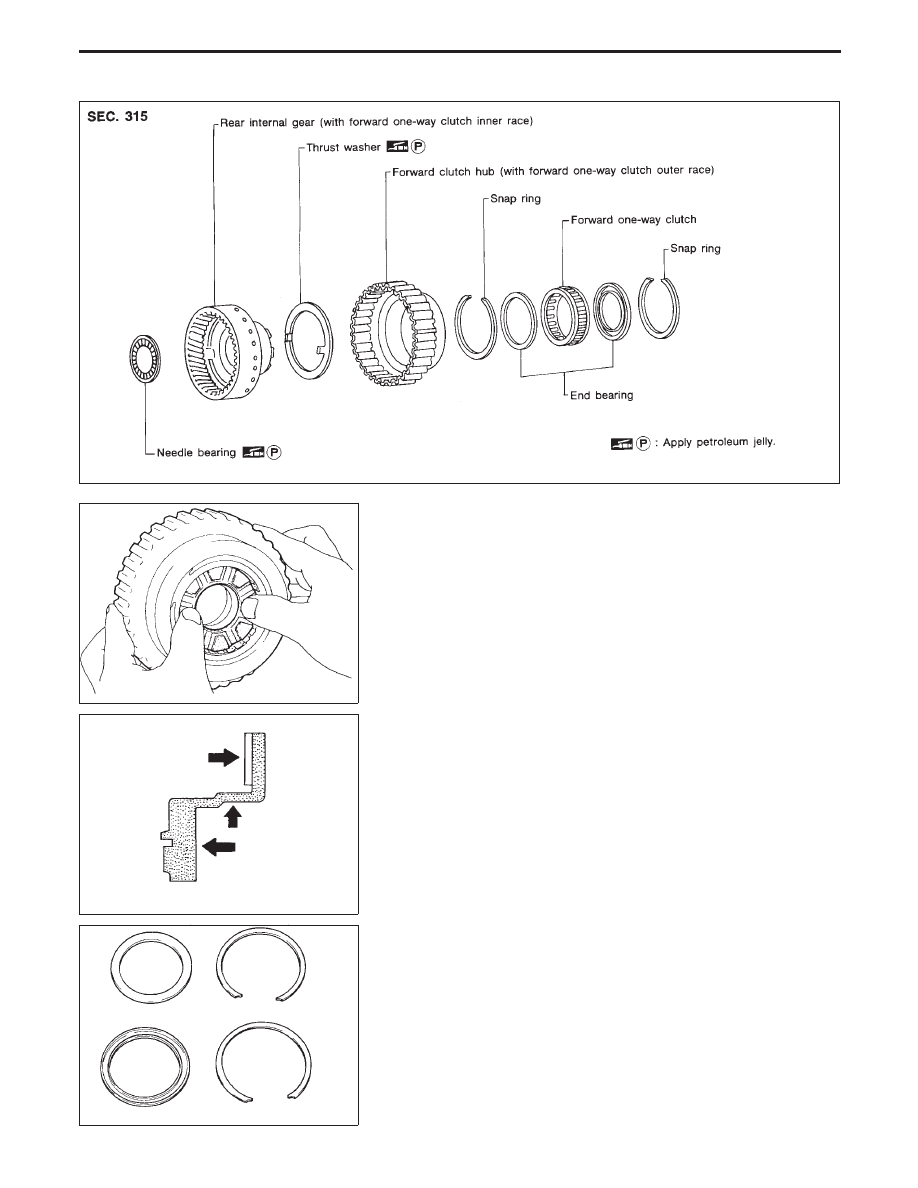
Rear Internal Gear and Forward Clutch Hub
SAT909GA
SAT897A
DISASSEMBLY
1.
Remove needle bearing from rear internal gear.
2.
Remove rear internal gear by pushing forward clutch hub for-
ward.
3.
Remove thrust washer from rear internal gear.
4.
Remove snap ring from forward clutch hub.
5.
Remove end bearing.
6.
Remove forward one-way clutch and end bearing as a unit
from forward clutch hub.
7.
Remove snap ring from forward clutch hub.
SAT902A
INSPECTION
Rear internal gear and forward clutch hub
I
Check gear for excessive wear, chips or cracks.
I
Check frictional surfaces of forward one-way clutch and thrust
washer for wear or damage.
I
Check spline for wear or damage.
SAT903A
Snap ring and end bearing
I
Check for deformation or damage.
REPAIR FOR COMPONENT PARTS
AT-250

SAT901A
ASSEMBLY
1.
Install snap ring onto forward clutch hub.
2.
Install end bearing.
SAT904A
3.
Install forward one-way clutch onto clutch hub.
I
Install forward one-way clutch with flange facing rearward.
4.
Install end bearing.
5.
Install snap ring onto forward clutch hub.
SAT906A
6.
Install thrust washer onto rear internal gear.
I
Apply petroleum jelly to thrust washer.
I
Securely insert pawls of thrust washer into holes in rear
internal gear.
SAT907A
7.
Position forward clutch hub in rear internal gear.
SAT905A
8.
After installing, check to assure that forward clutch hub rotates
clockwise.
GI
MA
EM
LC
EC
FE
PD
FA
RA
BR
ST
RS
BT
HA
EL
IDX
REPAIR FOR COMPONENT PARTS
Rear Internal Gear and Forward Clutch Hub
(Cont’d)
AT-251

Band Servo Piston Assembly
SAT709HA
SAT909A
DISASSEMBLY
1.
Block one oil hole in OD servo piston retainer and the center
hole in OD band servo piston.
2.
Apply compressed air to the other oil hole in piston retainer to
remove OD band servo piston from retainer.
3.
Remove D-ring from OD band servo piston.
SAT910A
4.
Remove band servo piston assembly from servo piston
retainer by pushing it forward.
SAT911A
5.
Place piston stem end on a wooden block. While pushing
servo piston spring retainer down, remove E-ring.
REPAIR FOR COMPONENT PARTS
AT-252
Нет комментариевНе стесняйтесь поделиться с нами вашим ценным мнением.
Текст