2017 Infiniti QX60/JX (2017 year). Manual — part 14

Language Setting
This changes the display language used in the
system.
Step
Setting item
Action
1. Push the SETTING button.
2. Touch the “Other” key.
3. Touch the “Language” key.
“System Language” key
Selects the language of the display.
INFO:
Do not push the ignition switch while changing the language.
4-16
Monitor, climate, audio, phone and voice recognition systems
-------------------------------------------------------------------------------------------------------------------------------------------------------------
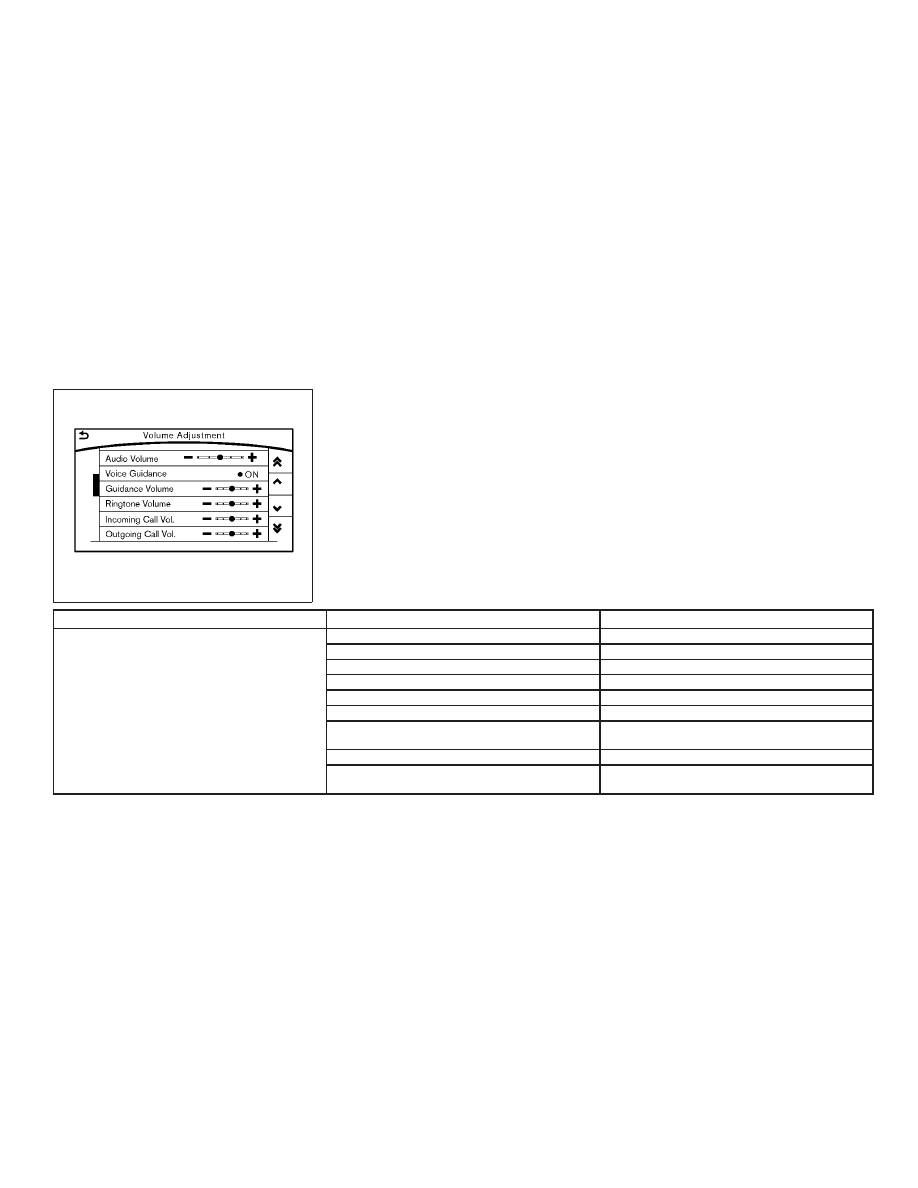
Volume Settings
This turns on and off, as well as adjusts, the
volume for various functions including audio,
phone (ringer, incoming, and outgoing volumes),
navigation voice guidance, and system beeps.
Step
Setting item
Action
1. Push the SETTING button
2. Touch the “Volume Adjustment” key
“Audio Volume” key
Adjusts the volume of the audio system.
“Voice Guidance” key
Toggles the voice guidance on and off.
“Guidance Volume” key
Adjusts the volume level of guidance volume .
“Ringtone Volume” key
Adjusts the volume level of the ringtone.
“Incoming Call Vol.” key
Adjusts the incoming call volume.
“Outgoing Call Vol.” key
Adjusts the outgoing call volume.
“InTouch Services Vol.” key
Adjusts the volume level of the Infiniti InTouch
TM
Services
information channel.
“Sonar Volume” key
Adjusts the volume level of the sonar warning volume.
“Button Beep sound” key
Toggles the button beep sound and alarm for a prohibited
operation to on and off.
JVH1500M
Monitor, climate, audio, phone and voice recognition systems
4-17
-------------------------------------------------------------------------------------------------------------------------------------------------------------

Screen Settings
This menu turns the display on and off and ad-
justs the image quality of the display.
Step
Setting item
Action
1. Push the SETTING button.
2. Touch the “Screen” key.
“Display Settings” key
“Brightness” key
Adjusts the brightness.
“Contrast” key
Adjusts the contrast.
“Black Level” key
Adjusts the black level.
“Display OFF” key
Turns the screen on or off.
Push and hold the CAMERA or
button for more than 2 seconds to turn the
display on.
“Day/Night” key
Adjusts the display brightness. Toggle the
map color between the day screen and the
night screen.
“Change Map Color” key
Toggle the map color between the day
screen and the night screen.
“Reset Settings” key
This restores the display settings to the
default settings.
4-18
Monitor, climate, audio, phone and voice recognition systems
-------------------------------------------------------------------------------------------------------------------------------------------------------------

SHORTCUT MENU
Push the ENTER button on the steering wheel
while the status, audio, climate or current location
map (models with navigation system) screen is
displayed to display the shortcut menu screen.
The items on the shortcut menu can be custom-
ized to your preference
Available items:
● Audio Source
● Audio List
● Call History
● Phonebook
● Cancel Route*
● Nearby Places*
● Store Location*
● View Settings*
● Select Add/Edit
● (Blank)
*: Models with navigation system.
Edit shortcut menu
The following procedure can edit or sort the
shortcut menu.
1. Touch the “Select Add/Edit” key to register a
new item to the menu, or to change an
existing menu item.
2. Select a preferred setting.
● “Change Order” key
Change the order in which shortcut menu
items are shown. Touch and hold the “
”
key displayed next to the item you wish to
relocate. Drag the icon to the position in the
list where you wish to insert the item.
● “Edit Shortcut Items” key
Select items to be displayed in the shortcut
menu.
Monitor, climate, audio, phone and voice recognition systems
4-19
-------------------------------------------------------------------------------------------------------------------------------------------------------------

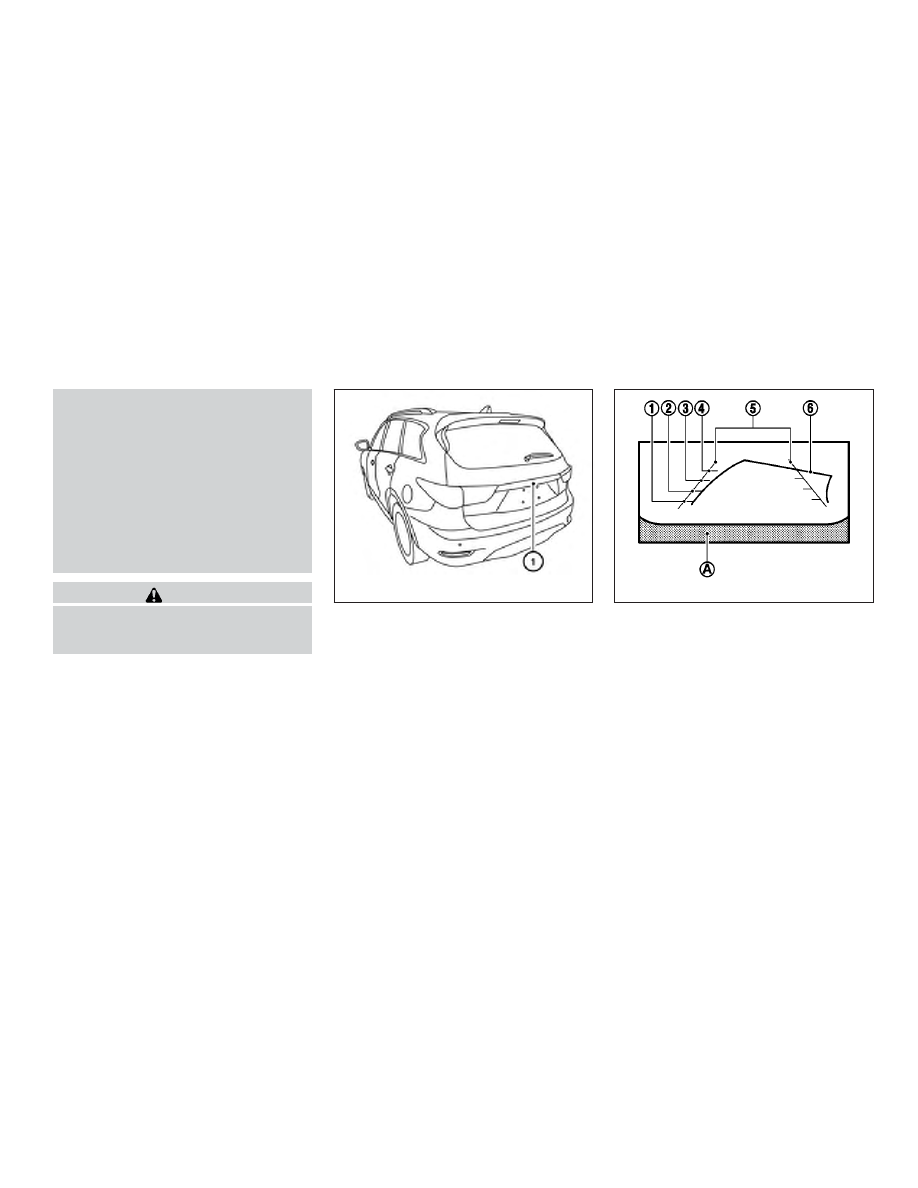
1. CAMERA button (if so equipped)
WARNING
● Failure to follow the warnings and in-
structions for proper use of the Rear-
View Monitor system could result in se-
rious injury or death.
● RearView Monitor is a convenience fea-
ture and is not a substitute for proper
backing. Always turn and look out the
windows and check mirrors to be sure
that it is safe to move before operating
the vehicle. Always back up slowly.
LHA3874
REARVIEW MONITOR (if so
equipped)
4-20
Monitor, climate, audio, phone and voice recognition systems
-------------------------------------------------------------------------------------------------------------------------------------------------------------
● The system is designed as an aid to the
driver in showing large stationary ob-
jects directly behind the vehicle, to help
avoid damaging the vehicle.
● The distance guide line and the vehicle
width line should be used as a reference
only when the vehicle is on a level
paved surface. The distance viewed on
the monitor is for reference only and
may be different than the actual dis-
tance between the vehicle and dis-
played objects.
CAUTION
Do not scratch the camera lens when
cleaning dirt or snow from the front of the
camera.
The RearView Monitor system automatically
shows a rear view of the vehicle when the shift
lever is shifted into the R (Reverse) position or
when the CAMERA button (if so equipped) is
pressed. The radio can still be heard while the
RearView Monitor is active.
To display the rear view, the RearView Monitor
system uses a camera located just above the
vehicle’s license plate
䊊
1
.
REARVIEW MONITOR SYSTEM
OPERATION
With the ignition switch in the ON position, move
the shift lever to the R (Reverse) position or press
the CAMERA button to operate the RearView
Monitor.
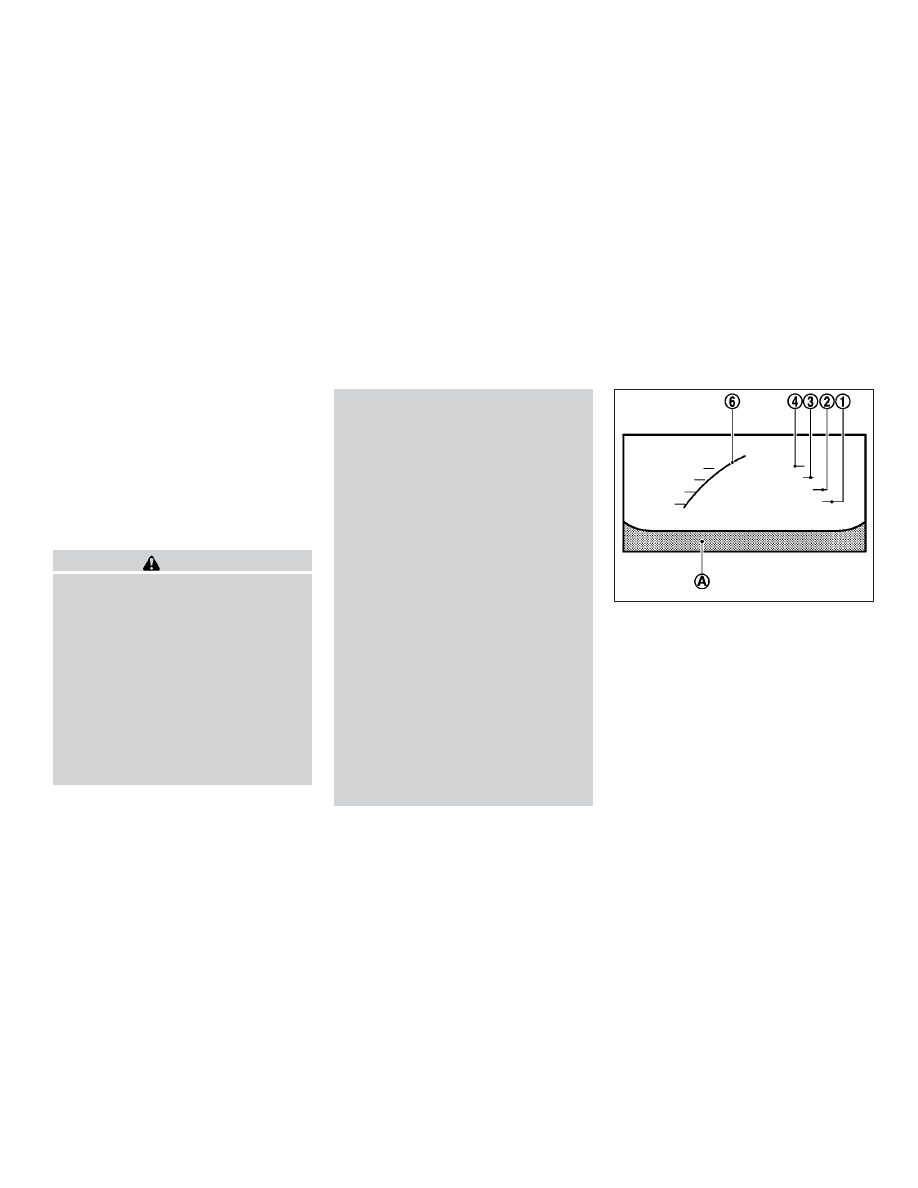
HOW TO READ THE DISPLAYED
LINES
Guiding lines which indicate the vehicle width
and distances to objects with reference to the
vehicle body line
䊊
A
are displayed on the monitor.
Distance guide lines
Indicate distances from the vehicle body.
● Red line
䊊
1
: approx. 1.5 ft (0.5 m)
● Yellow line
䊊
2
: approx. 3 ft (1 m)
● Green line
䊊
3
: approx. 7 ft (2 m)
● Green line
䊊
4
: approx. 10 ft (3 m)
LHA4293
LHA1196
Monitor, climate, audio, phone and voice recognition systems
4-21
-------------------------------------------------------------------------------------------------------------------------------------------------------------
Vehicle width guide lines
䊊
5
Indicate the vehicle width when backing up.
Predicted course lines
䊊
6
Indicate the predicted course when backing up.
The predicted course lines will be displayed on
the monitor when the shift lever is in the R (Re-
verse) position and the steering wheel is turned.
The predicted course lines will move depending
on how much the steering wheel is turned and
will not be displayed while the steering wheel is in
the straight-ahead position.
The vehicle width guide lines and the width of the
predicted course lines are wider than the actual
width and course.
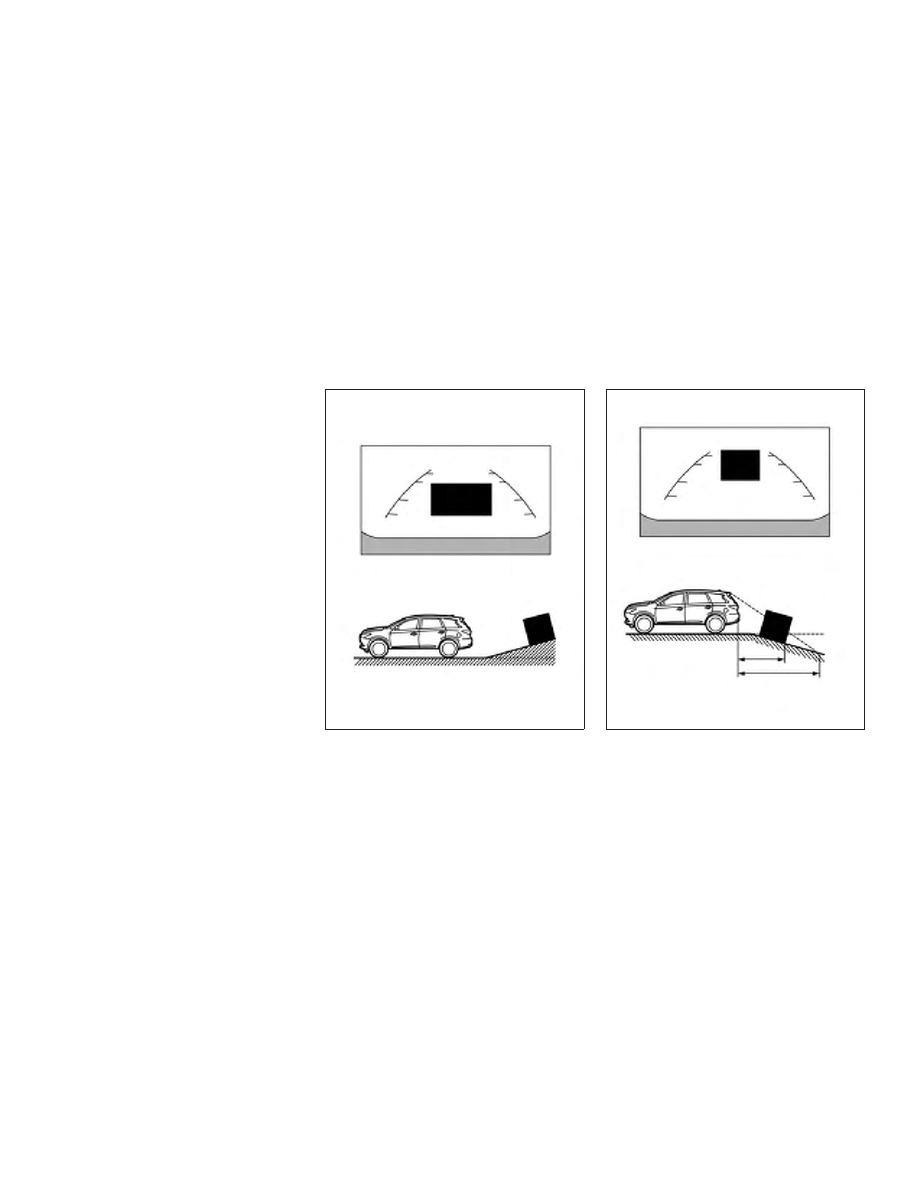
DIFFERENCE BETWEEN
PREDICTED AND ACTUAL
DISTANCES
The displayed guidelines and their locations on
the ground are for approximate reference only.
Objects on uphill or downhill surfaces or project-
ing objects will be actually located at distances
different from those displayed in the monitor rela-
tive to the guidelines (refer to illustrations). When
in doubt, turn around and view the objects as you
are backing up, or park and exit the vehicle to
view the positioning of objects behind the ve-
hicle.
Backing up on a steep uphill
When backing up the vehicle up a hill, the dis-
tance guide lines and the vehicle width guide
lines are shown closer than the actual distance.
Note that any object on the hill is further than it
appears on the monitor.
Backing up on a steep downhill
When backing up the vehicle down a hill, the
distance guide lines and the vehicle width guide
lines are shown farther than the actual distance.
Note that any object on the hill is closer than it
appears on the monitor.
LHA4216
LHA4217
4-22
Monitor, climate, audio, phone and voice recognition systems
-------------------------------------------------------------------------------------------------------------------------------------------------------------
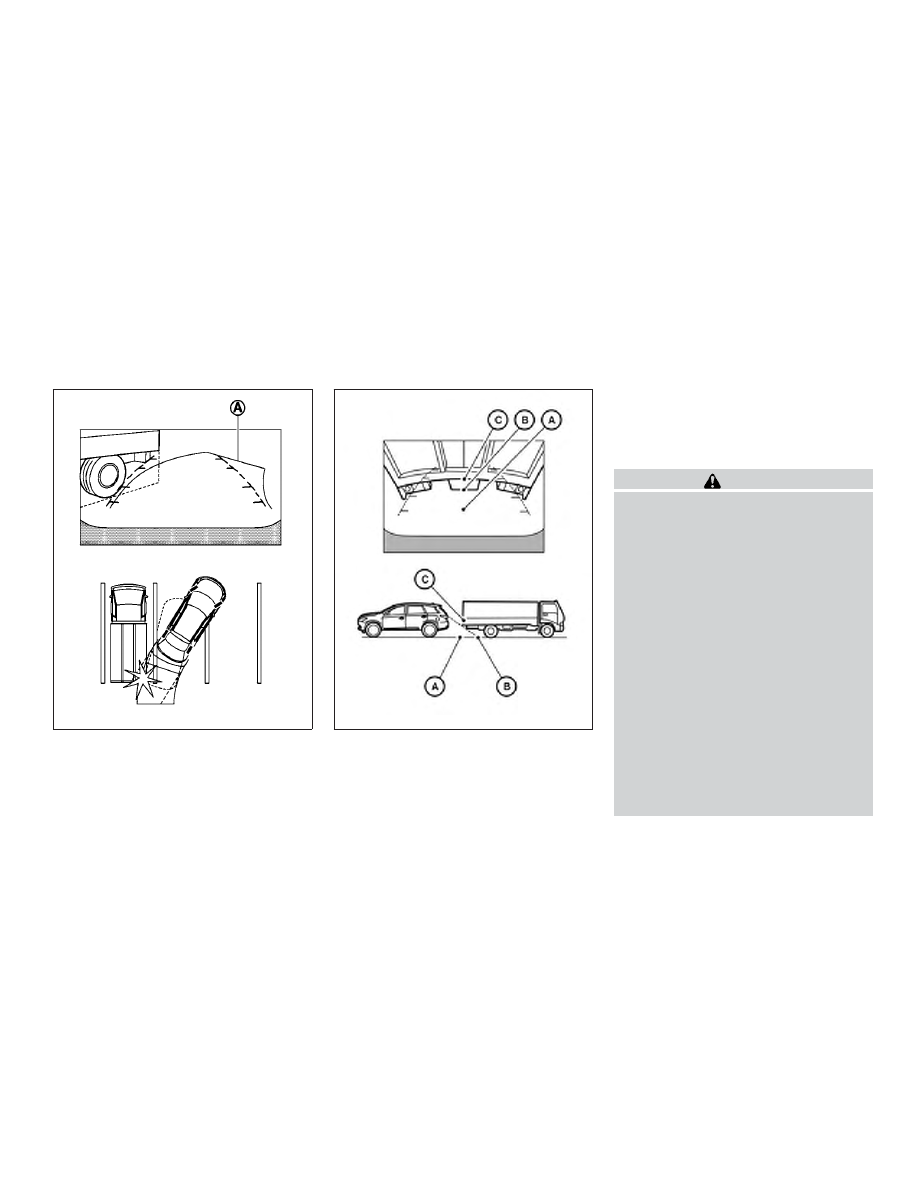
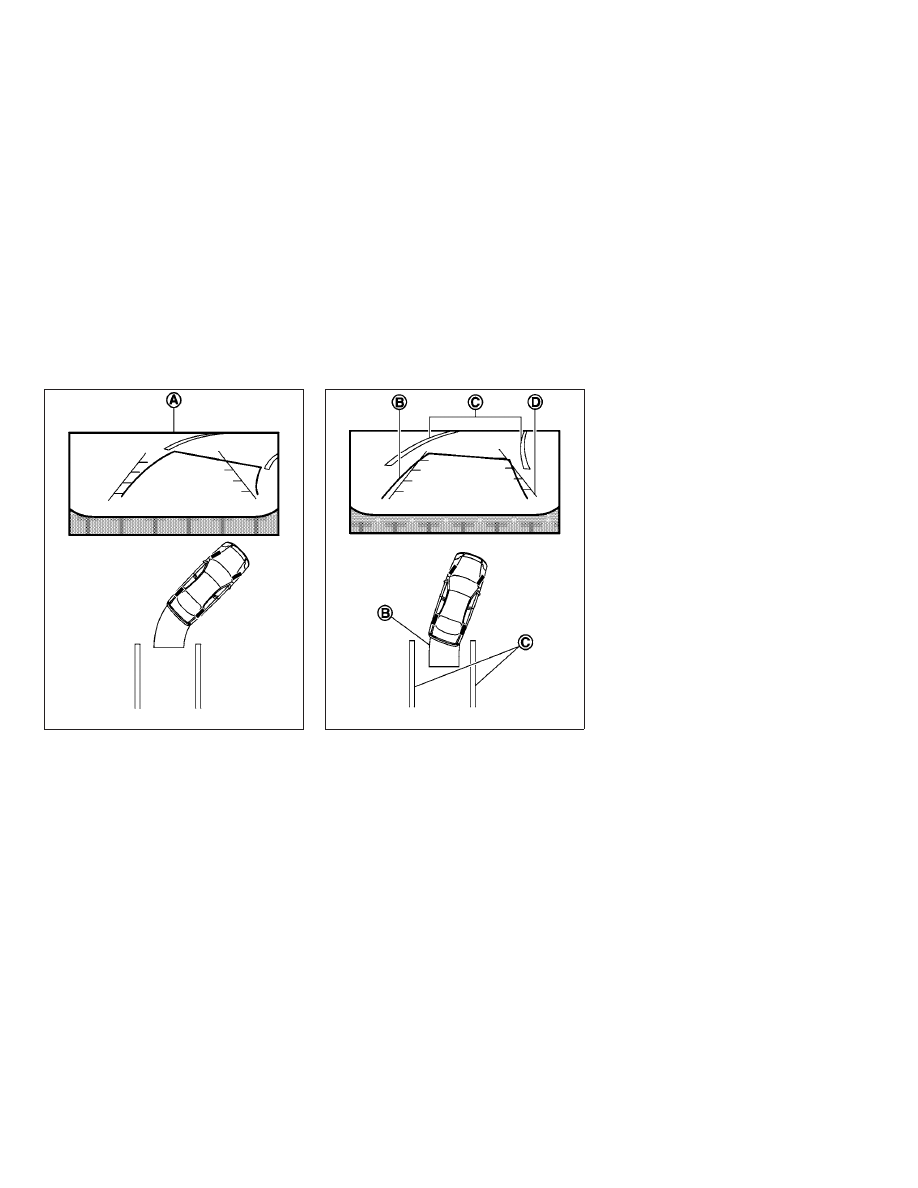
Backing up near a projecting object
The predicted course lines
䊊
A
do not touch the
object in the display. However, the vehicle may hit
the object if it projects over the actual backing up
course.
Backing up behind a projecting object
The position
䊊
C
is shown farther than the position
䊊
B
in the display. However, the position
䊊
C
is
actually at the same distance as the position
䊊
A
.
The vehicle may hit the object when backing up to
the position
䊊
A
if the object projects over the
actual backing up course.
HOW TO PARK WITH PREDICTED
COURSE LINES
WARNING
● If the tires are replaced with different
sized tires, the predicted course lines
may be displayed incorrectly.
● On a snow-covered or slippery road,
there may be a difference between the
predicted course line and the actual
course line.
● If the battery is disconnected or be-
comes discharged, the predicted course
lines may be displayed incorrectly. If
this occurs, please perform the follow-
ing procedures:
– Turn the steering wheel from lock to
lock while the engine is running.
– Drive the vehicle on a straight road
for more than 5 minutes.
● When the steering wheel is turned with
the ignition switch in the ACC position,
the predicted course lines may be dis-
played incorrectly.
LHA1201
LHA4218
Monitor, climate, audio, phone and voice recognition systems
4-23
-------------------------------------------------------------------------------------------------------------------------------------------------------------
1. Visually check that the parking space is safe
before parking your vehicle.
2. The rear view of the vehicle is displayed on
the screen
䊊
A
when the shift lever is moved
to the R (Reverse) position.
3. Slowly back up the vehicle adjusting the
steering wheel so that the predicted course
lines
䊊
B
enter the parking space
䊊
C
.
4. Maneuver the steering wheel to make the
vehicle width guide lines
䊊
D
parallel to the
parking space
䊊
C
while referring to the pre-
dicted course lines.
5. When the vehicle is parked in the space
completely, move the shift lever to the P
(Park) position and apply the parking brake.
LHA1197
LHA1198
4-24
Monitor, climate, audio, phone and voice recognition systems
-------------------------------------------------------------------------------------------------------------------------------------------------------------
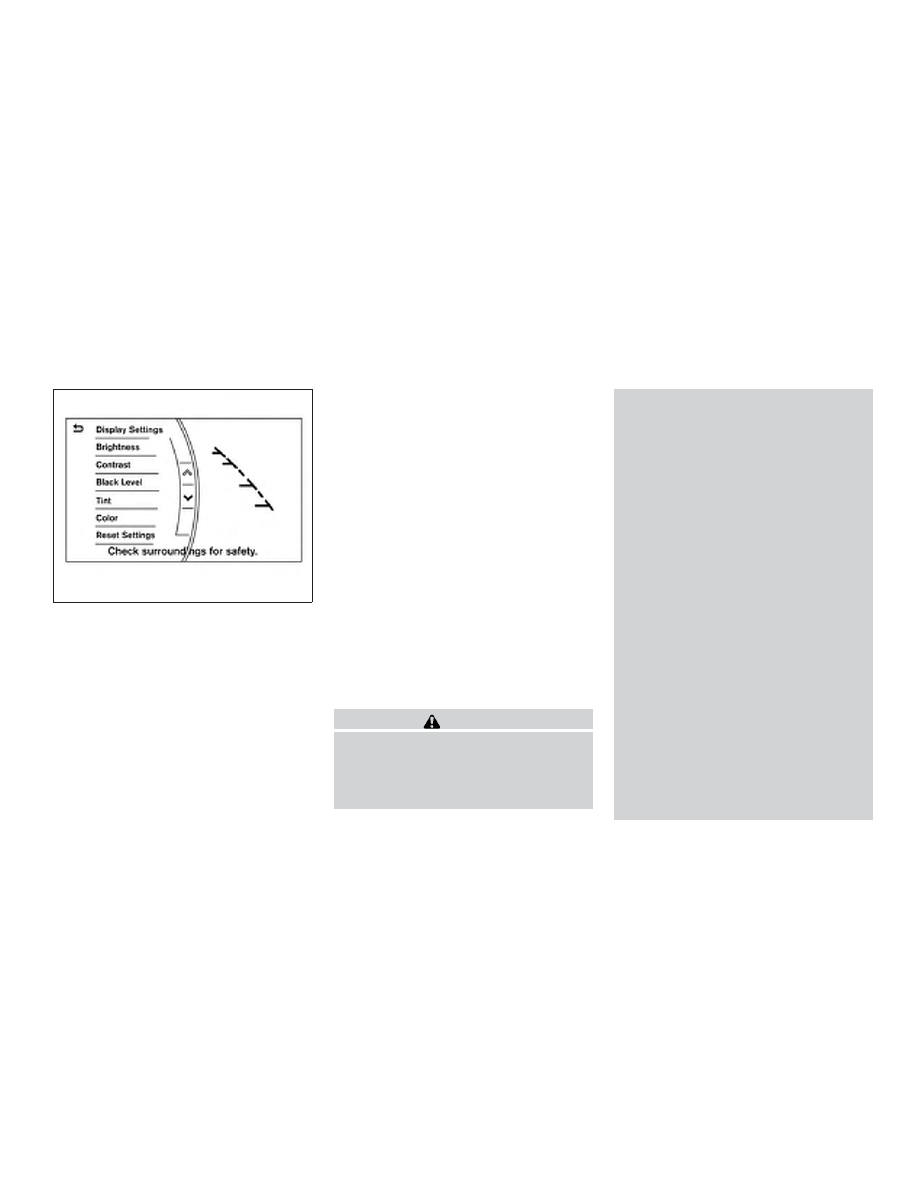
ADJUSTING THE SCREEN
To adjust the Display ON/OFF, Brightness, Tint,
Color, Contrast and Black Level of the RearView
Monitor, press the SETTING button with the
RearView Monitor on, touch the Camera or
Camera/Sonar key and then select the “Display”
key. Select one of the items and change the value
by touching the “+” or “-” key or by turning the
INFINITI controller.
NOTE:
Do not adjust the Brightness, Tint, Color,
Contrast and Black Level of the RearView
Monitor while the vehicle is moving. Make
sure the parking brake is firmly applied.
HOW TO TURN ON AND OFF
PREDICTED COURSE LINES
To toggle on and off the predicted course lines
while in the P (Park) position:
1. Press the SETTING button.
2. Touch the Camera or Camera/Sonar key.
3. Touch the Camera key.
4. Touch the Predicted Course Lines key to
turn the feature on or off.
REARVIEW MONITOR SYSTEM
LIMITATIONS
WARNING
Listed below are the system limitations for
RearView Monitor. Failure to operate the
vehicle in accordance with these system
limitations could result in serious injury or
death.
● The system cannot completely elimi-
nate blind spots and may not show ev-
ery object.
● Underneath the bumper and the corner
areas of the bumper cannot be viewed
on the RearView Monitor because of its
monitoring range limitation. The system
will not show small objects below the
bumper, and may not show objects
close to the bumper or on the ground.
● Objects viewed in the RearView Moni-
tor differ from actual distance because
a wide-angle lens is used.
● Objects in the RearView Monitor will
appear visually opposite compared to
when viewed in the rearview and out-
side mirrors.
● Use the displayed lines as a reference.
The lines are highly affected by the
number of occupants, fuel level, vehicle
position, road conditions and road
grade.
● Make sure that the trunk is securely
closed when backing up.
● Do not put anything on the rearview
camera. The rearview camera is in-
stalled above the license plate.
LHA4243
Monitor, climate, audio, phone and voice recognition systems
4-25
-------------------------------------------------------------------------------------------------------------------------------------------------------------

● When washing the vehicle with high
pressure water, be sure not to spray it
around the camera. Otherwise, water
may enter the camera unit causing wa-
ter condensation on the lens, a mal-
function, fire or an electric shock.
● Do not strike the camera. It is a preci-
sion instrument. Otherwise, it may mal-
function or cause damage resulting in a
fire or an electric shock.
The following are operating limitations and do not
represent a system malfunction:
● When the temperature is extremely high or
low, the screen may not clearly display ob-
jects.
● When strong light directly shines on the
camera, objects may not be displayed
clearly.
● Vertical lines may be seen in objects on the
screen. This is due to strong reflected light
from the bumper.
● The screen may flicker under fluorescent
light.
● The colors of objects on the RearView Moni-
tor may differ somewhat from the actual
color of objects.
● Objects on the monitor may not be clear in a
dark environment.
● There may be a delay when switching be-
tween views.
● If dirt, rain or snow accumulate on the cam-
era, the RearView Monitor may not display
objects clearly. Clean the camera.
● Do not use wax on the camera lens. Wipe off
any wax with a clean cloth dampened with a
diluted mild cleaning agent, then wipe with a
dry cloth.
SYSTEM MAINTENANCE
CAUTION
● Do not use alcohol, benzine or thinner
to clean the camera. This will cause
discoloration.
● Do not damage the camera as the moni-
tor screen may be adversely affected.
If dirt, rain or snow accumulates on the camera
䊊
1
, the RearView Monitor may not display ob-
jects clearly. Clean the camera by wiping it with a
cloth dampened with a diluted mild cleaning
agent and then wiping it with a dry cloth.
LHA4293
4-26
Monitor, climate, audio, phone and voice recognition systems
-------------------------------------------------------------------------------------------------------------------------------------------------------------
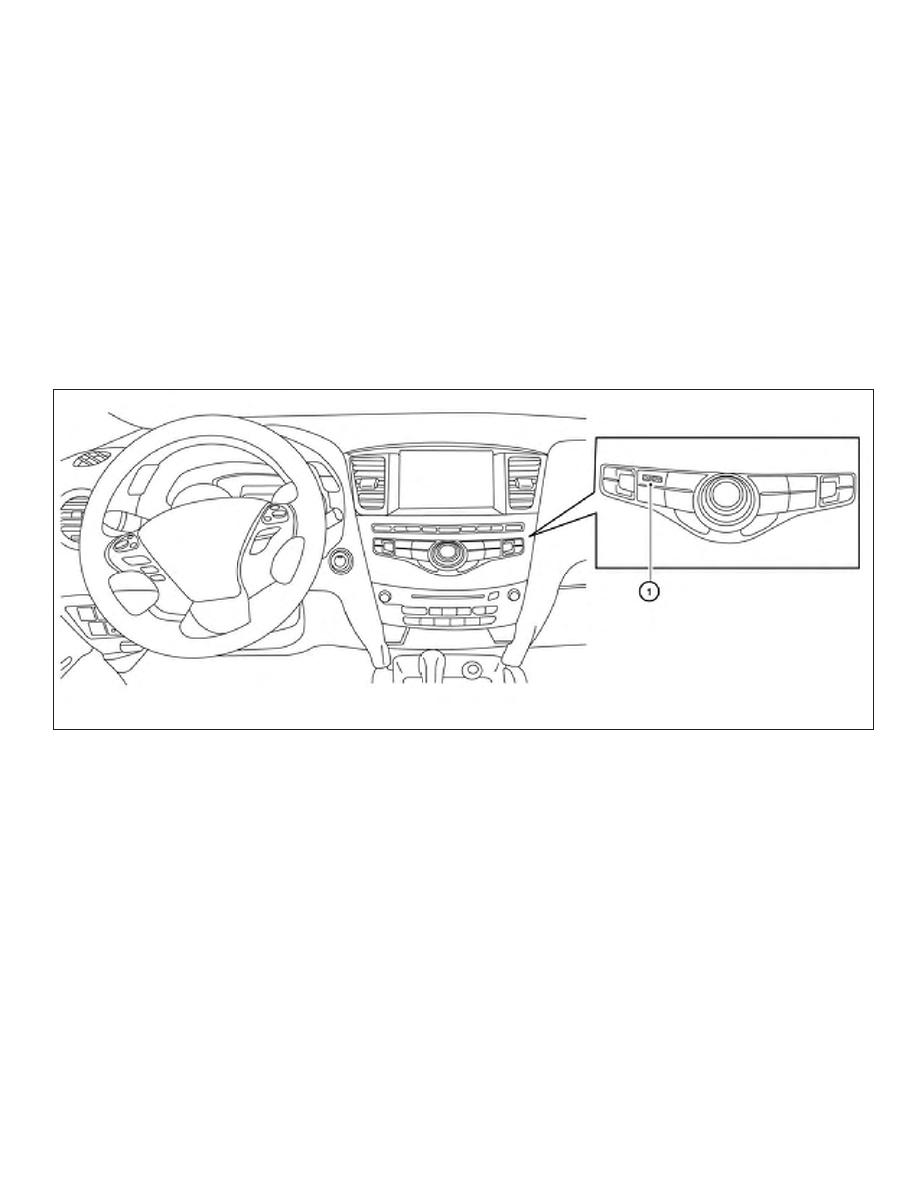
1. CAMERA button
LHA3874
AROUND VIEW® MONITOR (if so
equipped)
Monitor, climate, audio, phone and voice recognition systems
4-27
-------------------------------------------------------------------------------------------------------------------------------------------------------------

WARNING
● Failure to follow the warnings and in-
structions for the proper use of the
Around View® Monitor system could
result in serious injury or death.
● The Around View® Monitor is a conve-
nience feature and is not a substitute
for proper vehicle operation because it
has areas where objects cannot be
viewed. The four corners of the vehicle
in particular, are areas where objects do
not always appear in the bird’s-eye,
front, or rear views. Always check your
surroundings to be sure that it is safe to
move before operating the vehicle. Al-
ways operate the vehicle slowly.
● The driver is always responsible for
safety
during
parking
and
other
maneuvers.
CAUTION
Do not scratch the camera lens when
cleaning dirt or snow from the front of the
camera.
The Around View® Monitor system is designed
as an aid to the driver in situations such as slot
parking or parallel parking.
The monitor displays various views of the position
of the vehicle in a split screen format. Not all
views are available at all times.
Available views:
● Front View
An approximately 150–degree view of the
front of the vehicle.
● Rear View
An approximately 150–degree view of the
rear of the vehicle.
● Bird’s-Eye View
The surrounding views of the vehicle from
above.
● Front-Side View
The view around and ahead of the front
passenger’s side wheel.
● Front-Wide View
An approximately 180–degree view of the
front the vehicle.
● Rear-Wide View
An approximately 180–degree view of the
rear of the vehicle.
To display the multiple views, the Around View®
Monitor system uses cameras located in the front
grille, on the vehicle’s outside mirrors and one
just above the vehicle’s license plate
䊊
1
.
AROUND VIEW® MONITOR
SYSTEM OPERATION
With the ignition switch in the ON position, move
the shift lever to the R (Reverse) position or press
the CAMERA button to operate the Around
View® Monitor.
When the camera is first activated with the bird’s-
eye view in the display, a red icon will flash on the
screen. This indicates that the sonar system is
activated. For additional information on the front
LHA4347
4-28
Monitor, climate, audio, phone and voice recognition systems
-------------------------------------------------------------------------------------------------------------------------------------------------------------
and rear sonar system (if so equipped), refer to
“Front and rear sonar system” in the “Starting and
driving” section of this manual.
The screen displayed on the Around View®
Monitor will automatically return to the previous
screen 3 minutes after the CAMERA button has
been pressed with the shift lever in a position
other than the R (Reverse) position.
Available views
WARNING
● The distance guide lines and the vehicle
width lines should be used as a refer-
ence only when the vehicle is on a
paved, level surface. The apparent dis-
tance viewed on the monitor may be
different than the actual distance be-
tween
the
vehicle
and
displayed
objects.
● Use the displayed lines and the bird’s-
eye view as a reference. The lines and
the bird’s-eye view are greatly affected
by the number of occupants, cargo, fuel
level, vehicle position, road condition
and road grade.
● If the tires are replaced with different
sized tires, the predicted course lines
and the bird’s-eye view may be dis-
played incorrectly.
● When driving the vehicle up a hill, ob-
jects viewed in the monitor are further
than they appear. When driving the ve-
hicle down a hill, objects viewed in the
monitor are closer than they appear.
● Objects in the rear view will appear vi-
sually opposite compared to when
viewed in the monitor and outside
mirrors.
● Use the mirrors or actually look to prop-
erly judge distances to other objects.
● On a snow-covered or slippery road,
there may be a difference between the
predicted course lines and the actual
course line.
● The vehicle width and predicted course
lines are wider than the actual width
and course.
● The displayed lines will appear slightly
off to the right, because the rearview
camera is not installed in the rear center
of the vehicle.
Front and rear view
Guiding lines that indicate the approximate ve-
hicle width and distance to objects with refer-
ence to the vehicle body line
䊊
A
are displayed on
the monitor.
Distance guide lines
Indicate distances from the vehicle body:
● Red line
䊊
1
: approximately 1.5 ft (0.5 m)
● Yellow line
䊊
2
: approximately 3 ft (1 m)
● Green line
䊊
3
: approximately 7 ft (2 m)
● Green line
䊊
4
: approximately 10 ft (3 m)
Front view
SAA1840
Monitor, climate, audio, phone and voice recognition systems
4-29
-------------------------------------------------------------------------------------------------------------------------------------------------------------
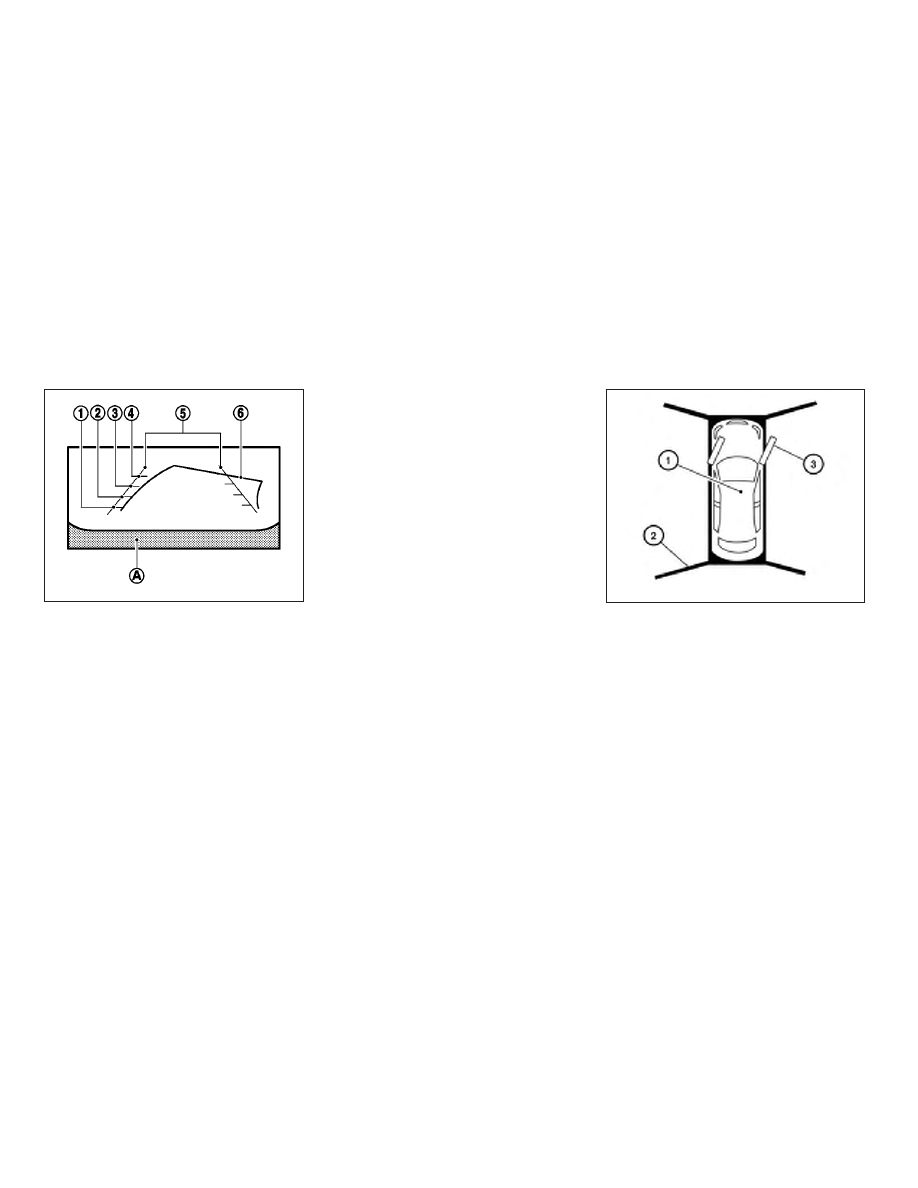
Vehicle width guide lines
䊊
5
:
Indicate the approximate vehicle width when
backing up.
Predicted course lines
䊊
6
:
Indicate the predicted course when operating the
vehicle. The predicted course lines will be dis-
played on the monitor when the steering wheel is
turned. The predicted course lines will move de-
pending on how much the steering wheel is
turned and will not be displayed while the steer-
ing wheel is in the straight-ahead position.
The front view will not be displayed when the
vehicle speed is above 6 mph (10 km/h).
NOTE:
When the monitor displays the front view
and the steering wheel turns about 90 de-
grees or less from the straight-ahead posi-
tion, both the right and left predicted
course lines
䊊
6
are displayed. When the
steering wheel turns about 90 degrees or
more, a line is displayed only on the oppo-
site side of the turn.
Bird’s-eye view
The bird’s-eye view shows the overhead view of
the vehicle, which helps confirm the vehicle po-
sition and the predicted course to a parking
space.
The vehicle icon
䊊
1
shows the position of the
vehicle. Note that the apparent distance between
objects viewed in the bird’s-eye view may differ
somewhat from the actual distance to the vehicle.
The areas that the cameras cannot cover
䊊
2
are
indicated in black.
Rear view
SAA1896
LHA3730
4-30
Monitor, climate, audio, phone and voice recognition systems
-------------------------------------------------------------------------------------------------------------------------------------------------------------
The non-viewable area
䊊
2
is highlighted in yellow
for several seconds after the bird’s-eye view is
displayed. It will be shown only the first time after
the ignition switch is placed in the ON position.
The driver can check the approximate direction
and angle of the tire on the display by the tire icon
䊊
3
when driving the vehicle forward or backward.
WARNING
● Objects in the bird’s-eye view will ap-
pear further than the actual distance.
● Tall objects, such as a curb or vehicle,
may be misaligned or not displayed at
the seam of the views.
● Objects that are above the camera can-
not be displayed.
● The view of the bird’s-eye view may be
misaligned when the camera position
alters.
● A line on the ground may be misaligned
and is not seen as being straight at the
seam of the views. The misalignment
will increase as the line proceeds away
from the vehicle.
● Tire angle display does not indicate the
actual tire angle.
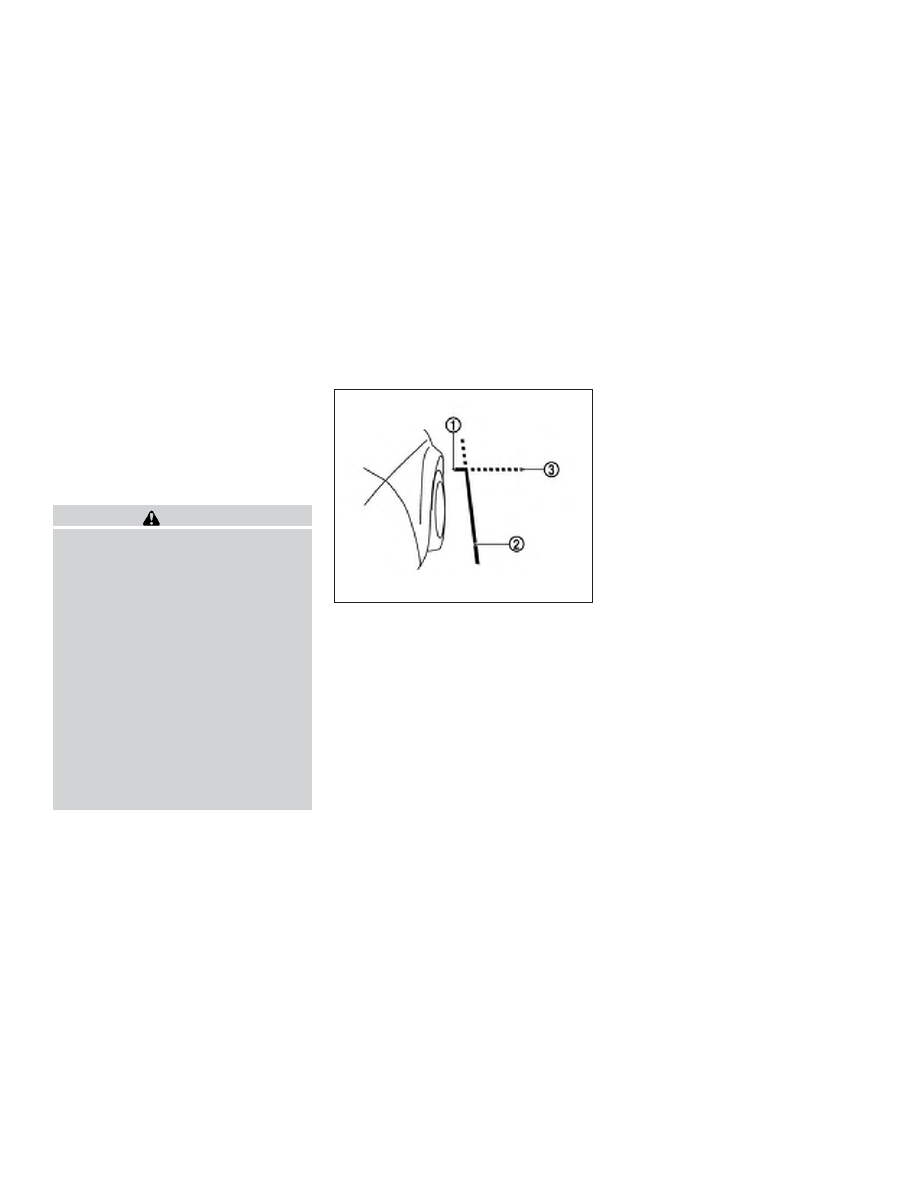
Front-side view
Guiding lines
Guiding lines that indicate the approximate width
and the front end of the vehicle are displayed on
the monitor.
The front-of-vehicle line
䊊
1
shows the front part
of the vehicle.
The side-of-vehicle line
䊊
2
shows the approxi-
mate vehicle width including the outside mirrors.
The extensions
䊊
3
of both the front
䊊
1
and side
䊊
2
lines are shown with a green dotted line.
DIFFERENCE BETWEEN
PREDICTED AND ACTUAL
DISTANCES
The displayed guidelines and their locations on
the ground are for approximate reference only.
Objects on uphill or downhill surfaces or project-
ing objects will be actually located at distances
different from those displayed in the monitor rela-
tive to the guidelines (refer to illustrations). When
in doubt, turn around and view the objects as you
are backing up, or park and exit the vehicle to
view the positioning of objects behind the ve-
hicle.
LHA2652
Monitor, climate, audio, phone and voice recognition systems
4-31
-------------------------------------------------------------------------------------------------------------------------------------------------------------
Нет комментариевНе стесняйтесь поделиться с нами вашим ценным мнением.
Текст