2017 Infiniti QX60/JX (2017 year). Manual — part 13

Restarting the entry/exit function
If the battery cable is disconnected, or if the fuse
opens, the stored memory positions will be lost
and some of the functions will be restricted:
1. Drive the vehicle over 25 mph (40 km/h).
OR
2. Open and close the driver’s door more than
two times with the ignition switch in the OFF
position.
The entry/exit function should now work properly.
SETTING MEMORY FUNCTION
The position of the following settings can be
linked to the Intelligent Key and the memorized
settings can be available for each Intelligent Key.
● Climate control system
● Navigation system (if so equipped)
● Audio system
To use the memory function, set the climate,
navigation and audio systems to the driver’s pre-
ferred settings. Lock the doors with the Intelligent
Key. Each Intelligent Key may be set with the
driver’s individual preferences. When a new In-
telligent Key is used, “Connection with the key
has been done” will be displayed on the screen
and the memorized settings are available.
To engage the memorized settings, perform the
following:
1. Carry the Intelligent Key that is linked to the
memorized settings.
2. Unlock the doors by pushing the driver’s
door
handle
request
switch
or
the
UNLOCK
button on the Intelligent
Key.
3. Place the ignition switch in the ON position.
The settings linked to the Intelligent Key will
start.
For additional information on using the Climate
control system, refer to “Heater and air condi-
tioner (automatic)” in the “Monitor, climate, audio,
phone and voice recognition systems” section of
this manual.
For additional information on using the Naviga-
tion System, refer to the separate Navigation
System Owner’s Manual.
For additional information on using the Audio
system, refer to “Audio system” in the “Monitor,
climate, audio, phone and voice recognition sys-
tems” section of this manual.
SYSTEM OPERATION
The automatic drive positioner system will not
work or will stop operating under the following
conditions:
● When the vehicle speed is above 0 mph
(0 km/h) or 4 mph (7km/h) for some limited
functions such as linking a key fob to the
meter when the power source is turned on
from off or during the Exit function.
● When any of the memory switches are
pushed while the automatic drive positioner
is operating.
● When the adjusting switch for the driver’s
seat and steering column is turned on while
the automatic drive positioner is operating.
● When the seat has already been moved to
the memorized position.
● When no seat position is stored in the
memory switch.
● When the shift lever is moved from P (Park)
to any other position.
3-38
Pre-driving checks and adjustments
-------------------------------------------------------------------------------------------------------------------------------------------------------------
4 Monitor, climate, audio, phone and voice
recognition systems
Center Multi-Function Control Panel . . . . . . . . . . . . . . . . . 4-5
Steering wheel switch. . . . . . . . . . . . . . . . . . . . . . . . . . . 4-7
Touch panel operation . . . . . . . . . . . . . . . . . . . . . . . . . . 4-8
Operating menu screens . . . . . . . . . . . . . . . . . . . . . . . 4-10
Scrolling list or message . . . . . . . . . . . . . . . . . . . . . . . 4-10
Selecting item. . . . . . . . . . . . . . . . . . . . . . . . . . . . . . . . . 4-11
Adjusting settings . . . . . . . . . . . . . . . . . . . . . . . . . . . . . 4-11
How to input letters and numbers . . . . . . . . . . . . . . . 4-11
System status screen . . . . . . . . . . . . . . . . . . . . . . . . . . . . . 4-12
Information and Settings . . . . . . . . . . . . . . . . . . . . . . . . . . 4-13
Information screen . . . . . . . . . . . . . . . . . . . . . . . . . . . . . 4-13
Settings screen . . . . . . . . . . . . . . . . . . . . . . . . . . . . . . . 4-14
Shortcut menu . . . . . . . . . . . . . . . . . . . . . . . . . . . . . . . . 4-19
RearView Monitor (if so equipped). . . . . . . . . . . . . . . . . . 4-20
RearView Monitor system operation . . . . . . . . . . . . . 4-21
How to read the displayed lines . . . . . . . . . . . . . . . . . 4-21
Difference between predicted and actual
distances . . . . . . . . . . . . . . . . . . . . . . . . . . . . . . . . . . . . . 4-22
How to park with predicted course lines. . . . . . . . . . 4-23
Adjusting the screen . . . . . . . . . . . . . . . . . . . . . . . . . . . 4-25
How to turn on and off predicted course
lines . . . . . . . . . . . . . . . . . . . . . . . . . . . . . . . . . . . . . . . . . 4-25
RearView Monitor system limitations . . . . . . . . . . . . . 4-25
System maintenance . . . . . . . . . . . . . . . . . . . . . . . . . . . 4-26
Around View® Monitor (if so equipped) . . . . . . . . . . . . . 4-27
Around View® Monitor system operation . . . . . . . . . 4-28
Difference between predicted and actual
distances . . . . . . . . . . . . . . . . . . . . . . . . . . . . . . . . . . . . . 4-31
How to park with predicted course lines. . . . . . . . . . 4-33
How to switch the display . . . . . . . . . . . . . . . . . . . . . . 4-34
Around View® Monitor settings . . . . . . . . . . . . . . . . . 4-35
Adjusting the screen . . . . . . . . . . . . . . . . . . . . . . . . . . . 4-36
Around View® Monitor system limitations . . . . . . . . 4-36
System maintenance . . . . . . . . . . . . . . . . . . . . . . . . . . . 4-38
Sonar System Operation . . . . . . . . . . . . . . . . . . . . . . . 4-40
Turning ON and OFF the sonar function . . . . . . . . . . 4-40
Sonar System Limitations. . . . . . . . . . . . . . . . . . . . . . . 4-41
System Maintenance. . . . . . . . . . . . . . . . . . . . . . . . . . . 4-42
Moving Object Detection (MOD) (if so equipped) . . . . 4-43
MOD system operation. . . . . . . . . . . . . . . . . . . . . . . . . 4-44
Turning MOD on and off. . . . . . . . . . . . . . . . . . . . . . . . 4-46
-------------------------------------------------------------------------------------------------------------------------------------------------------------
MOD system limitations . . . . . . . . . . . . . . . . . . . . . . . . 4-46
System maintenance . . . . . . . . . . . . . . . . . . . . . . . . . . . 4-47
Vents . . . . . . . . . . . . . . . . . . . . . . . . . . . . . . . . . . . . . . . . . . . 4-47
Heater and air conditioner (automatic) . . . . . . . . . . . . . . 4-48
Automatic operation . . . . . . . . . . . . . . . . . . . . . . . . . . . 4-49
Manual operation . . . . . . . . . . . . . . . . . . . . . . . . . . . . . . 4-50
Operating tips. . . . . . . . . . . . . . . . . . . . . . . . . . . . . . . . . 4-50
CLIMATE setting screen. . . . . . . . . . . . . . . . . . . . . . . . 4-51
Rear automatic air conditioning system. . . . . . . . . . . 4-53
Audio operation precautions . . . . . . . . . . . . . . . . . . . . 4-56
Names and functions of audio control
buttons. . . . . . . . . . . . . . . . . . . . . . . . . . . . . . . . . . . . . . . 4-70
Antenna . . . . . . . . . . . . . . . . . . . . . . . . . . . . . . . . . . . . . . 4-72
Audio main operation . . . . . . . . . . . . . . . . . . . . . . . . . . 4-72
Radio . . . . . . . . . . . . . . . . . . . . . . . . . . . . . . . . . . . . . . . . 4-74
Compact Disc (CD) player . . . . . . . . . . . . . . . . . . . . . 4-78
USB (Universal Serial Bus) connection port . . . . . . 4-79
iPod® player. . . . . . . . . . . . . . . . . . . . . . . . . . . . . . . . . . 4-82
USB/iPod® Charging Ports . . . . . . . . . . . . . . . . . . . . 4-85
Bluetooth® streaming audio . . . . . . . . . . . . . . . . . . . . 4-86
Digital Versatile Disc (DVD) player
(if so equipped) . . . . . . . . . . . . . . . . . . . . . . . . . . . . . . . 4-89
Auxiliary (AUX) devices. . . . . . . . . . . . . . . . . . . . . . . . . 4-90
Audio settings. . . . . . . . . . . . . . . . . . . . . . . . . . . . . . . . . 4-91
Disc/USB memory device care and cleaning. . . . . . 4-95
Precautions . . . . . . . . . . . . . . . . . . . . . . . . . . . . . . . . . . . 4-96
Technical information . . . . . . . . . . . . . . . . . . . . . . . . . . 4-96
Connecting rear media interface. . . . . . . . . . . . . . . .4-104
Remote controller and headphones . . . . . . . . . . . . .4-105
Activating rear displays. . . . . . . . . . . . . . . . . . . . . . . .4-109
Operations on rear displays. . . . . . . . . . . . . . . . . . . .4-110
Settings and information. . . . . . . . . . . . . . . . . . . . . . .4-111
Controlling the rear system on the front
display . . . . . . . . . . . . . . . . . . . . . . . . . . . . . . . . . . . . . .4-113
Operating tips. . . . . . . . . . . . . . . . . . . . . . . . . . . . . . . .4-114
Care and maintenance . . . . . . . . . . . . . . . . . . . . . . . .4-115
Car phone or CB radio . . . . . . . . . . . . . . . . . . . . . . . . . . .4-115
Bluetooth® Hands-Free Phone System . . . . . . . . . . . .4-116
Regulatory information . . . . . . . . . . . . . . . . . . . . . . . .4-118
Phone . . . . . . . . . . . . . . . . . . . . . . . . . . . . . . . . . . . . . . .4-119
-------------------------------------------------------------------------------------------------------------------------------------------------------------
Hands-free text messaging assistant. . . . . . . . . . . .4-122
Phone and text message settings. . . . . . . . . . . . . . .4-126
Bluetooth® information . . . . . . . . . . . . . . . . . . . . . . .4-130
Apps . . . . . . . . . . . . . . . . . . . . . . . . . . .4-131
Apps overview. . . . . . . . . . . . . . . .4-131
Using applications . . . . . . . . . . . . . . . . . . . . . . . . . . . .4-131
Vehicle Apps. . . . . . . . . . . . . . . . . . . . . . . . . . . . . . . . .4-131
Mobile Apps (if so equipped) . . . . . . . . . . . . . . . . . .4-138
Infiniti Voice Recognition System . . . . . . . . . . . . . . . . . .4-140
Giving voice commands . . . . . . . . . . . . . . . . . . . . . . .4-140
Voice recognition settings . . . . . . . . . . . . . . . . . . . . .4-149
Troubleshooting guide . . . . . . . . . . . . . . . . . . . . . . . . . . .4-149
Customer assistance . . . . . . . . . . . . . . . . . . . . . . . . .4-149
System unit . . . . . . . . . . . . . . . . . . . . . . . . . . . . . . . . . .4-150
Audio system . . . . . . . . . . . . . . . . . . . . . . . . . . . . . . . .4-151
Bluetooth® hands-free phone system. . . . . . . . . . .4-156
Voice Recognition . . . . . . . . . . . . . . . . . . . . . . . . . . . .4-158
Additional system information . . . . . . . . . . . . . . . . . . . . .4-160
Additional help . . . . . . . . . . . . . . . . . . . . . . . . . . . . . . .4-161
-------------------------------------------------------------------------------------------------------------------------------------------------------------
WARNING
● Do not adjust the heater and the air
conditioner controls or audio controls
while driving so that full attention may
be given to vehicle operation.
● Do not use this system if you notice any
abnormality, such as a frozen screen or
lack of sound. Continued use of the
system may result in accident, fire or
electric shock.
● If you notice any foreign objects enter-
ing the system hardware, spilled liquid
on the system, or notice smoke or
fumes coming out from the system, or
any other unusual operation is ob-
served, stop using the system immedi-
ately. It is recommended that you con-
tact an INFINITI retailer for service.
Ignoring such conditions may lead to an
accident, fire or electric shock.
● Do not disassemble or modify this sys-
tem. If you do, it may lead to an acci-
dent, fire, or electric shock.
● Park the vehicle in a safe location and
apply the parking brake to view the im-
ages on the front center display screen.
CAUTION
Do not use the system when the engine is
not running for extended periods of time
to prevent battery discharge.
The system starts when the ignition switch is
placed in the ACC or ON position.
START-UP WARNING (models with
navigation system)
For this system, when the ignition switch is
placed in the ACC or ON position, the start-up
screen is displayed.
Touch the “OK” key after reading and agreeing to
the message, if you do not agree to the message,
some Infiniti InTouch
TM
functions will be disabled.
NOTE:
● Do not keep the Infiniti InTouch
TM
system
turned on with the engine stopped. Doing so
may discharge the vehicle battery. When you
use Infiniti InTouch
TM
, always keep the en-
gine running.
● Once you select the “Decline” key on the
start-up screen, the “OK/Decline” key
screen will not be displayed for 30 days.
SAFETY PRECAUTIONS
STARTING SYSTEM
4-4
Monitor, climate, audio, phone and voice recognition systems
-------------------------------------------------------------------------------------------------------------------------------------------------------------
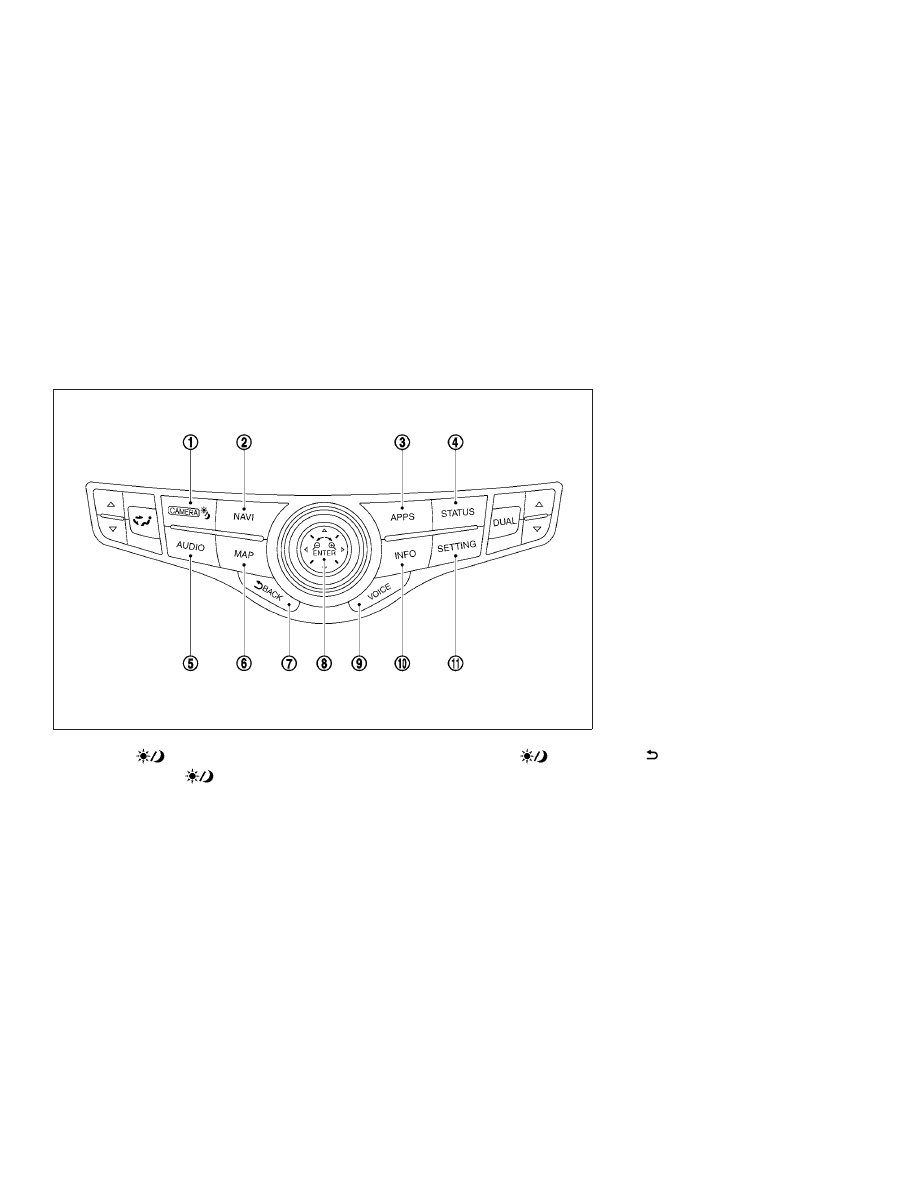
䊊
1
CAMERA
button
Push the CAMERA
button to display
the Around View® Monitor.
For additional information, refer to “Around
View® Monitor” in this section.
Push and hold the CAMERA
button
to switch the display brightness to the day-
time mode or the nighttime mode, and to
adjust the display brightness level using the
center dial.
䊊
2
NAVI button
Push to display the navigation menu.
For additional information, refer to the Navi-
gation System Owner’s Manual.
䊊
3
APPS button
For additional information, refer to “Infiniti
InTouch
TM
Apps” in this section.
䊊
4
STATUS button
Push to display the current setting of the
vehicle information, air conditioner, audio
and navigation route information.
䊊
5
AUDIO button
Push to operate the audio system.
For additional information, refer to “Audio
main operation” in this section.
䊊
6
MAP button
For additional information, refer to the Navi-
gation System Owner’s Manual.
䊊
7
BACK button
Push to return to the previous screen. In a
settings screen, this button is also used to
apply the setting.
Models with navigation system
JVH1410X
CENTER MULTI-FUNCTION CONTROL
PANEL
Monitor, climate, audio, phone and voice recognition systems
4-5
-------------------------------------------------------------------------------------------------------------------------------------------------------------
䊊
8
ENTER button/Center dial/Slide switch
Push to select the highlighted item on the
screen. If this button is pushed while a map
is displayed, the map menu screen or short-
cut menu is displayed.
Turn to highlight an item on the screen or
adjust a setting. The center dial can also be
used to adjust the map scale.
Slide (push upward/ downward/ leftward/
rightward) to select an item on the screen or
to adjust a setting (volume, brightness, etc.).
The map can be scrolled in 8 directions by
sliding this switch.
䊊
9
VOICE button
For additional information, refer to the Navi-
gation System Owner’s Manual.
䊊
10
INFO button
Push to display the information menu. For
additional information, refer to “Information
screen” in this section.
䊊
11
SETTING button
Push to access the system settings.
䊊
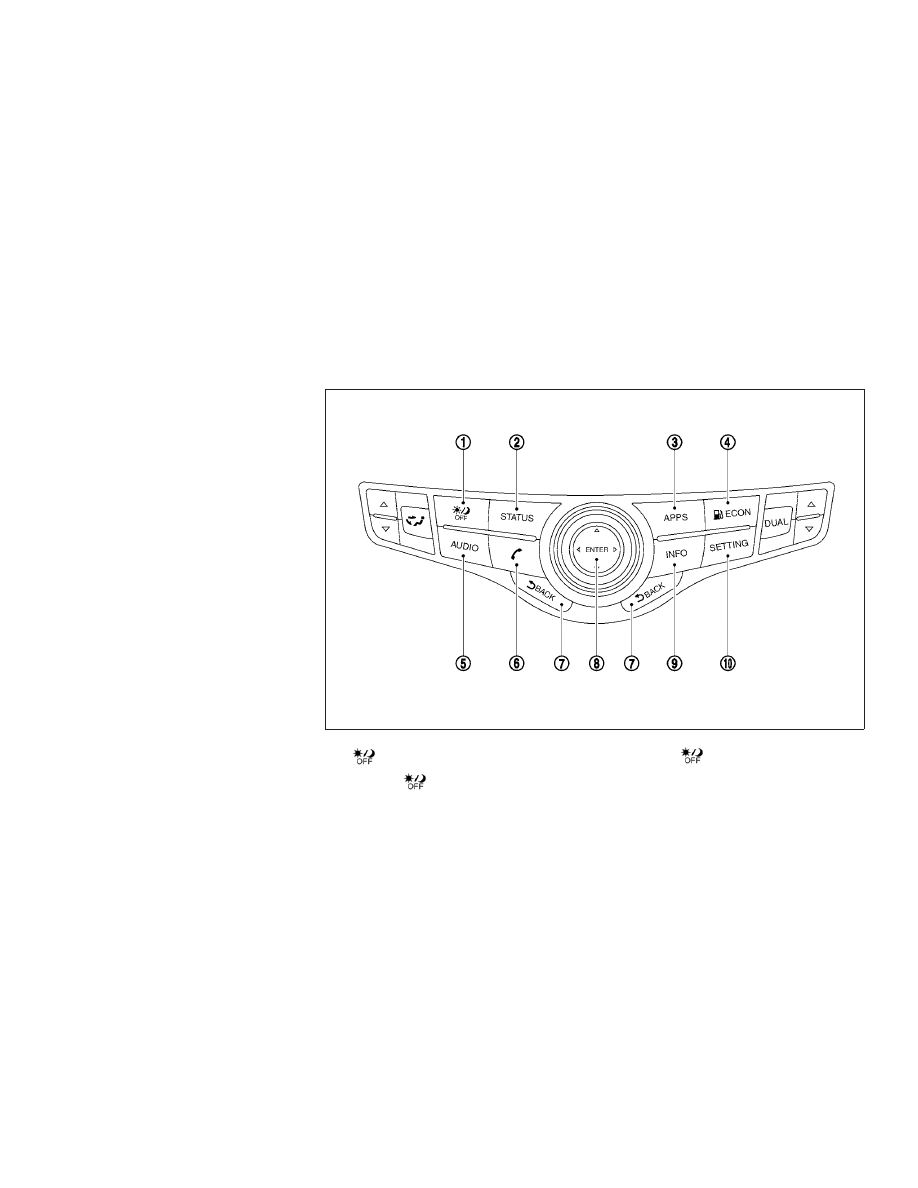
1
button
Push the
button to switch the display
brightness to the daytime mode or the night-
time mode, and to adjust the display bright-
ness level using the center dial. Push and
hold the
button to turn the display on
and off.
Models without navigation system
JVH1411X
4-6
Monitor, climate, audio, phone and voice recognition systems
-------------------------------------------------------------------------------------------------------------------------------------------------------------

䊊
2
STATUS button
Push to display the current setting of the
vehicle information, air conditioner or audio.
䊊
3
APPS button
For additional information, refer to “Infiniti
InTouch
TM
Apps” in this section.
䊊
4
ECON button
Push the
ECON button to display the
Fuel Economy screen.
䊊
5
AUDIO button
Push to operate the audio system.
For additional information, refer to “Audio
main operation” in this section.
䊊
6
button
Push to operate Hands-Free Phone.
For
additional
information,
refer
to
“Bluetooth® hands-free phone system” in
this section.
䊊
7
BACK button
Push to return to the previous screen. In a
settings screen, this button is also used to
apply the setting.
䊊
8
ENTER button/Center dial/Slide switch
Push to select the highlighted item on the
screen.
Turn to highlight an item on the screen or
adjust a setting.
Slide (push upward/ downward/ leftward/
rightward) to select an item on the screen or
to adjust a setting (volume, brightness, etc.).
䊊
9
INFO button
Push to display the information menu.
For additional information, refer to “Informa-
tion screen” in this section.
䊊
10
SETTING button
Push to access the system setting.
STEERING WHEEL SWITCH
䊊
1
ENTER button
Tilt to highlight an item on the screen or
adjust a setting. Push to select the high-
lighted item.
If this button is tilted up while the audio
function is activated and the map or status
screen is displayed, that audio system can
be operated.
If this button is pushed while the status,
audio, climate or map (if so equipped)
screen is displayed, the shortcut menu is
displayed.
JNB0462X
Monitor, climate, audio, phone and voice recognition systems
4-7
-------------------------------------------------------------------------------------------------------------------------------------------------------------

䊊
2
button
Push this switch to go back to the previous
screen or cancel the selection if it is not
completed.
NOTE:
You are unable to operate the display of
Infiniti InTouch
TM
using the buttons on the
steering wheel switch whenever the meter
shows the setting display.
䊊
3
+
- button
Use to adjust the volume. These buttons
have the same function as that of the
VOL/ON•OFF knob on the audio system.
For additional information, refer to “Steering
wheel switch for audio control” in this sec-
tion.
䊊
4
SOURCE button
Use to switch the audio mode (source).
For additional information, refer to “Steering
wheel switch for audio control” in this sec-
tion.
䊊
5
(TALK) button
Push to start a voice recognition session.
During a voice recognition session, pushing
this button cancels the voice guidance and
you can speak a voice command immedi-
ately.
Push and hold this button to end a voice
recognition session.
䊊
6
button
Push to display the phone mode screen.
For
additional
information,
refer
to
“Bluetooth® hands-free phone system” in
this section.
䊊
7
button
This button is used for the vehicle informa-
tion display operation.
For additional information, refer to “Vehicle
information display
⬙ in the ⬙Instruments and
controls
⬙ section of this manual.
TOUCH PANEL OPERATION
This system is mainly operated with the touch
panel screen.
CAUTION
● The glass screen on the display screen
may break if it is hit with a hard or sharp
object. If the glass screen breaks, do
not touch it. Doing so could result in an
injury.
● To clean the display, use a soft, dry
cloth. If additional cleaning is neces-
sary, use a small amount of neutral de-
tergent with a soft cloth. Never use a
rough cloth, alcohol, benzine, thinner or
any kind of solvent or paper towel with
a chemical cleaning agent. They will
scratch or deteriorate the panel.
● Do not splash any liquid such as water
or car fragrance on the display. Contact
with liquid will cause the system to
malfunction.
WARNING
● ALWAYS give your full attention to
driving.
● Avoid using vehicle features that could
distract you. If distracted, you could
lose control of your vehicle and cause
an accident.
4-8
Monitor, climate, audio, phone and voice recognition systems
-------------------------------------------------------------------------------------------------------------------------------------------------------------
Screen illustrations
WARNING
● The illustrations in this manual are rep-
resentatives of various models and may
not be identical with the design and
specifications of your vehicle.
● Icons and menu items displayed on the
screen may be abbreviated or omitted
from the screen illustrations when ap-
propriate. The omitted icons and menu
items are described as dotted lines as
illustrated.
How to use the touch screen
● Touch
Select and execute the selected key on the
screen.
● Swipe
Menu screen pages will skip to the next page.
JNB0463X
JNB0464X
Monitor, climate, audio, phone and voice recognition systems
4-9
-------------------------------------------------------------------------------------------------------------------------------------------------------------
● Drag
Drag scroll bar up or down to scroll the menu
screen.
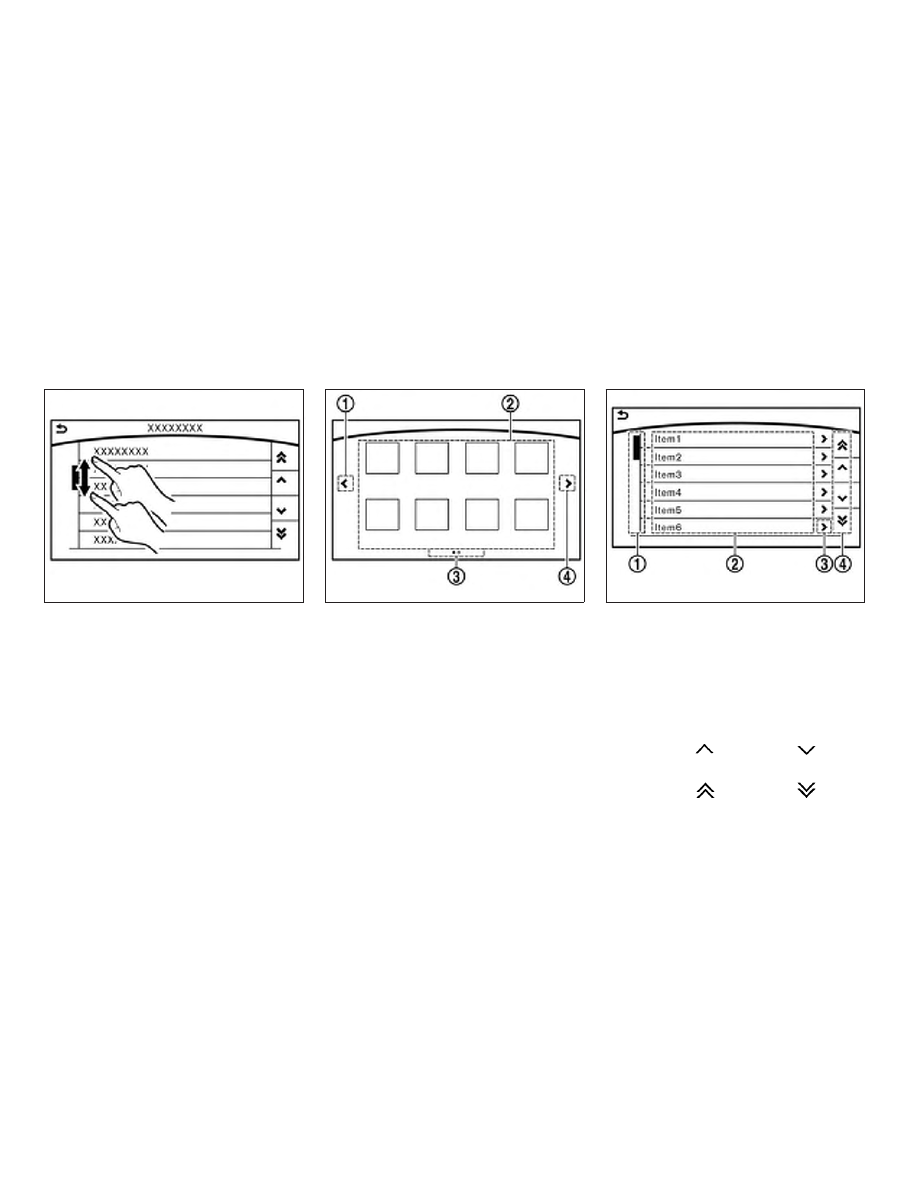
OPERATING MENU SCREENS
䊊
1
Touch the “<” key to scroll to the previous
page.
䊊
2
Touch the preferred icon to execute a func-
tion and display the next screen.
䊊
3
Indicates the position of the currently dis-
played page out of the total number of avail-
able pages.
䊊
4
Touch the “>” key to scroll to the next page.
A swipe gesture can also be used to move
quickly between pages.
SCROLLING LIST OR MESSAGE
䊊
1
Drag the scroll bar up or down to scroll the
message or list up or down.
䊊
2
Touch the preferred item.
䊊
3
If a listed item name is not completely dis-
played (due to length), touch the “>” key to
display the hidden part of the name.
䊊
4
Touch the “
” key or the “
” key to
scroll the message or list one item at a time.
Touch the “
” key or the “
” key to
skip to the next page.
JNB0465X
JNB0439X
JNB0451X
4-10
Monitor, climate, audio, phone and voice recognition systems
-------------------------------------------------------------------------------------------------------------------------------------------------------------
SELECTING ITEM
When an item is touched, it is executed and the
next screen is displayed.
Touch the “
” key to return to the previous
screen.
ADJUSTING SETTINGS
Level of volume, brightness, etc. can be adjusted.
Touch the adjustment keys, such as the “+/-”
keys or the “L/R” keys, etc., to adjust each item.
Each time a key is touched, the indicator moves
along the bar.
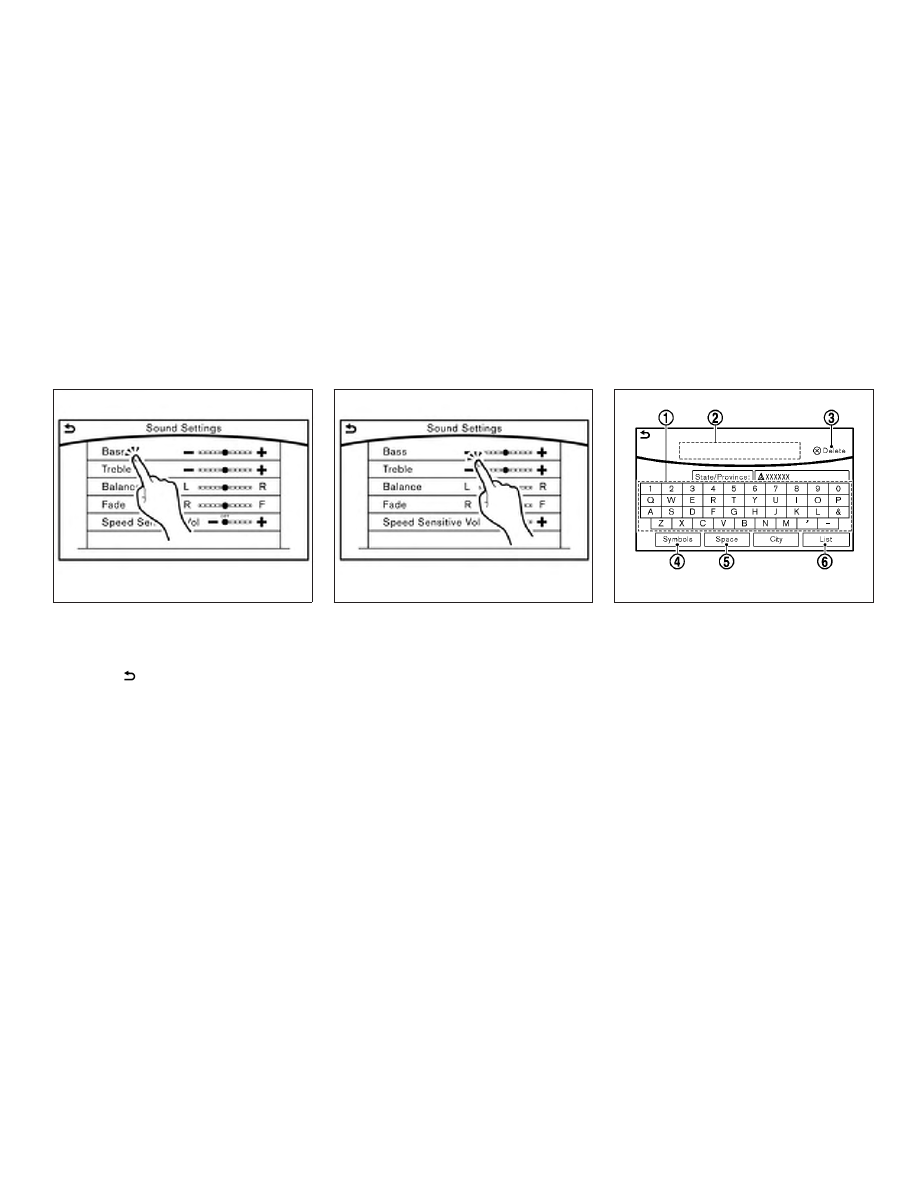
HOW TO INPUT LETTERS AND
NUMBERS
Character (letters and numbers) input
screen
Alphanumeric characters are entered using the
keyboard screen.
䊊
1
Touch a character on the displayed key-
board. The selected character is entered.
䊊
2
Entered characters are displayed here.
JNB0466X
JNB0467X
JVH1498M
Monitor, climate, audio, phone and voice recognition systems
4-11
-------------------------------------------------------------------------------------------------------------------------------------------------------------
䊊
3
Touch the “Delete” key to delete the last
character entered.
Touch and hold the “Delete” key to delete all
the characters entered.
䊊
4
The symbol keys are displayed by touching
the “Symbols” key. The alphabet keys are
displayed by touching the “A-Z” keys.
䊊
5
Touch the “Space” key to enter a space.
䊊
6
Touch the “OK” key or “List” key to finalize
your input.
INFO:
● Touch the “CAPS” key to toggle uppercase
and lowercase characters on the keyboard
screen.
● Touch the “
” key or the “
”
key to move the character input position.
By pushing the STATUS button, the current sta-
tus of the system can be displayed.
INFO:
There are different status screens displayed de-
pending on various factors, such as the currently
active mode, whether a destination has been set
or not, etc.
When a route to the destination is set and the
audio system is on, a screen similar to the one
above appears.
Touching the “</>” keys can switch the display
among fuel economy information, navigation
route information (if so equipped) and air condi-
tioner status.
When no route is set, a compass and the direc-
tion of travel is displayed instead of the route
information.
JVH1429M
SYSTEM STATUS SCREEN
4-12
Monitor, climate, audio, phone and voice recognition systems
-------------------------------------------------------------------------------------------------------------------------------------------------------------

INFORMATION SCREEN
The information screen sets or displays various
information that is helpful for using the vehicle.
Available items include the vehicle information,
traffic information, current location information
and navigation software version.
Push the INFO button to display the information
menu.
The displayed items vary depending on the ve-
hicle model.
Menu item
Result
“Fuel Economy” key
Displays the Fuel Economy screen.
The current and average fuel economy and the distance to empty (“Range” key) can be confirmed.
“History” key
The Fuel Economy history screen can be scrolled.
Displays the Fuel Economy history screen. Touch the “</>” keys to display an older history or the newest history.
“Reset” key
Resets the average Fuel Economy.
The average for the Reset-to-Reset period is stored as a fuel economy history.
When reset average Fuel Economy is on the screen, the average fuel consumption on the trip computer is also reset
at the same time.
“Eco Drive Report” key
Displays the Eco Drive Report for “Start”/“Cruise”/“Deceleration”.
“History” key
The Eco Drive Report History screen can be scrolled.
Displays the Eco Drive Report History screen. Touch the “</>” keys to display an older history or the newest history.
“Reset” key
Resets the Eco Drive Report screen.
The average for the Reset-to-Reset period is stored as an Eco Drive Report history.
“Traffic Information” key
Allows traffic information setup.
For additional information, refer to the Navigation System Owner’s Manual.
“Map Information” key
Displays the map version, software version and Navi ID.
“InTouch Services” key
Displays the Infiniti InTouch
TM
Services menu.
For additional information, refer to the Navigation System Owner’s Manual.
“SXM Info” key
Displays the SiriusXM Travel Link Information menu.
For additional information, refer to the Navigation System Owner’s Manual.
INFO:
● A SiriusXM Travel Link or SiriusXM Traffic subscription is necessary to receive SiriusXM information services.
● Use of Infiniti InTouch
TM
Services features is dependent upon a valid subscription and the telematics device being in operative condition, as well as
cellular connectivity, navigation map data and GPS satellite signal reception being available.
INFORMATION AND SETTINGS
Monitor, climate, audio, phone and voice recognition systems
4-13
-------------------------------------------------------------------------------------------------------------------------------------------------------------

SETTINGS SCREEN
The system can be customized to make it easier
for you to use.
The displayed items vary depending on the
equipped options.
The order of the displayed items can be sorted.
Step
Menu Item
Result
Push the SETTING
button.
“Bluetooth” key
Sets the Bluetooth® Audio and Phone.
For additional information, refer to “Bluetooth® settings” in this section.
“Phone/Mail” key
Displays the Phone/Mail setting screen.
For additional information, refer to “Phone and text message settings” in this
section.
“Navigation” key
Displays the Navigation setting screen.
For additional information, refer to the Navigation System Owner’s Manual.
“Audio” key
Displays the Audio setting screen.
For additional information, refer to “Audio settings” in this section.
“Screen” key
Sets the Screen display to the preferred settings.
For additional information, refer to “Screen settings” in this section.
“Volume Adjustment” key
Sets the Volume Adjustment.
For additional information, refer to “Volume settings” in this section.
“Clock” key
Sets the Clock to your preferred settings.
For additional information, refer to “Clock settings” in this section.
“InTouch Services” key
Sets Infiniti InTouch
TM
Services to your preferred settings.
For additional information, refer to the Navigation System Owner’s Manual.
“Voice Recognition” key
Sets Minimize Voice Feedback to on/off and the audio setting for voice recognition
use.
“Camera/Sonar” key
Sets the Camera/Sonar to your preferred settings.
For additional information, refer to “Camera/Sonar settings” in this section.
“Other” key
“Language” key
Sets the language to your preferred settings.
For additional information, refer to “Language setting” in this section.
“Keyboard Type” key
Sets the Keyboard Type to “ABC” key or “QWERTY” key.
“Low on Fuel Alert” key
Sets the fuel low notification to on/off.
“Software Information”
key
Displays the Software Information.
4-14
Monitor, climate, audio, phone and voice recognition systems
-------------------------------------------------------------------------------------------------------------------------------------------------------------
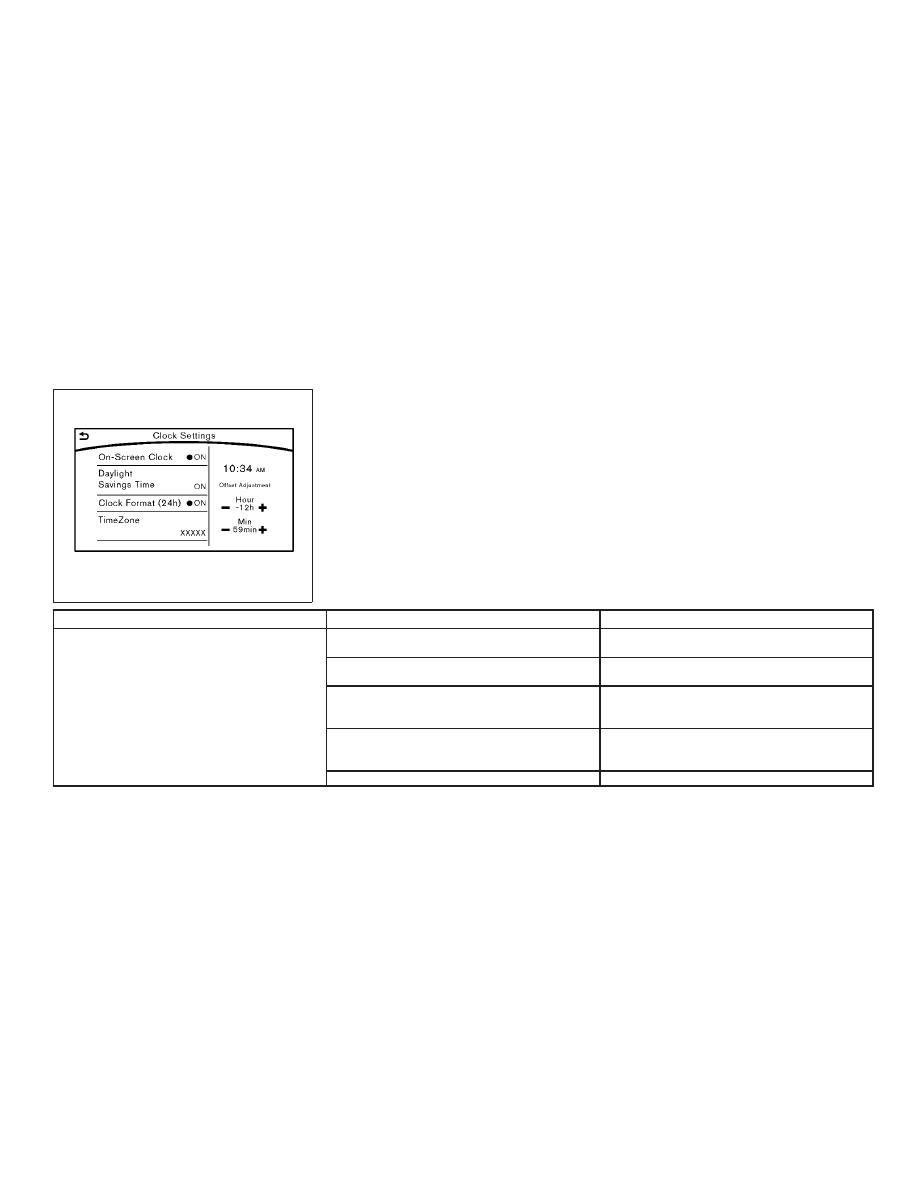
Clock Settings
This changes the clock settings.
Step
Menu item
Action
1. Push the SETTING button.
2. Touch the “Clock” key.
“On-Screen Clock” key
Sets the clock display on/off. When this item is on, the
clock display appears.
“Daylight Savings Time” key
Toggles the setting for daylight saving time between ON or
OFF.
“Clock Format (24h)” key
Toggles the clock format between 12–hour and 24–hour
times. When the indicator light illuminates, the clock is set
to the 24–hour format.
“Time Zone” key
Selects an appropriate time zone from the list. When se-
lecting the “AUTO” key, the system selects the time zone
automatically.
“Offset Adjustment” key
Adjusts the offset value (hour and minutes).
JVH1499M
Monitor, climate, audio, phone and voice recognition systems
4-15
-------------------------------------------------------------------------------------------------------------------------------------------------------------
Нет комментариевНе стесняйтесь поделиться с нами вашим ценным мнением.
Текст