Infiniti M35/M45 Y50. Manual — part 1017

SUNROOF
RF-23
C
D
E
F
G
H
J
K
L
M
A
B
RF
3.
CHECK DOOR SWITCH
Check continuity between door switches and ground part of door switch.
OK or NG
OK
>> GO TO 4.
NG
>> Replace malfunction door switch.
4.
CHECK BCM OUTPUT SIGNAL
1.
Connect BCM connector.
2.
Check voltage between BCM connector and ground.
OK or NG
OK
>> Check the condition of the harness and the connector.
NG
>> Replace BCM.
Terminal
Door switch
Continuity
2
Ground part of
door switch
Pushed
No
Released
Yes
PIIB5914E
Terminals
Voltage (V)
(Approx.)
(+)
(-)
BCM
connector
Item
Terminal
M3
Driver side
62
Ground
Battery voltage
M1
Passenger side
12
PIIB5915E

RF-24
SUNROOF
Fitting Adjustment
NIS00242
RID WEATHERSTRIP OVERLAP ADJUSTMENT AND SURFACE MISMATCH ADJUSTMENT
1.
Tilt up glass lid then remove side trim.
2.
After loosening glass lid from bolts (left and right), tilt down glass lid.
3.
Adjust glass lid from outside of vehicle so it resembles “A–A” “B–B” “C–C” as shown in the figure.
4.
To prevent glass lid from moving after adjustment, first tighten the bolts of front left, and then tighten the
bolts of rear right.
5.
Tighten remaining bolts, being careful to prevent glass lid from moving.
6.
Tilt glass lid up and down several times to check that it moves smoothly.
Removal and Installation
NIS00243
●
After any adjustment, check sunroof operation and glass lid alignment.
●
Handle finisher plate and glass lid with care so not to cause damage.
●
It is desirable for easy installation to mark each point before removal.
CAUTION:
●
Always work with a helper.
●
Fully close the glass lid assembly, before removal, then do not operate sunroof motor assembly
after removal.
PIIB3117J
a
b
A–A
1.4
±
0.8 mm (0.055
±
0.031 in)
0
±
1.5 mm (0
±
0.059 in)
B–B
1.2
±
0.8 mm (0.047
±
0.031 in)
0
±
1.5 mm (0
±
0.059 in)
C–C
1.4
±
0.8 mm (0.055
±
0.031 in)
0
±
1.5 mm (0
±
0.059 in)
SUNROOF
RF-25
C
D
E
F
G
H
J
K
L
M
A
B
RF
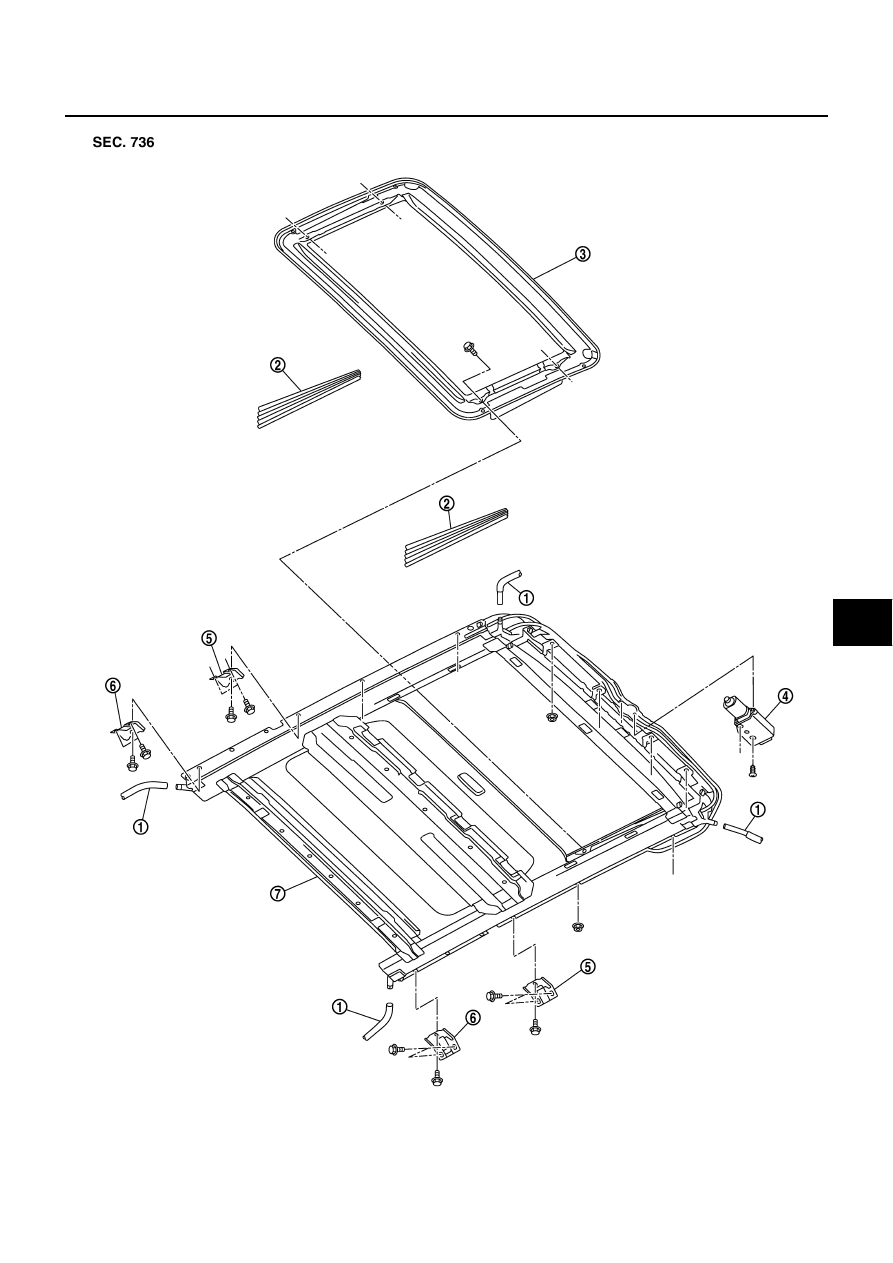
1.
Drain hose
2.
Side trim (LH/RH)
3.
Glass lid
PIIB3115E
RF-26
SUNROOF
SUNROOF UNIT
Removal
CAUTION:
●
Always work with a helper.
●
When taking sunroof unit out, use clothes to protect the seats and trim from damage.
●
After installing the sunroof unit and glass lid, be sure to carry out the leak test and check that
there is no malfunction.
1.
Remove the headlining. Refer to
2.
Disconnect drain hoses.
3.
Tilt up glass lid, and then remove glass lid.
4.
Remove sunroof motor assembly mounting screws. Disconnect connector from sunroof motor assembly
and then remove sunroof motor assembly.
CAUTION:
●
Before removing sunroof motor, make sure that sunroof lid is fully closed.
●
After removing sunroof motor, do not attempt to rotate sunroof motor assembly as a single unit.
5.
Remove nuts from the front end and side rail.
6.
Remove front sunroof bracket bolts.
7.
Remove rear sunroof bracket bolts, and then remove sunroof unit assembly from roof panel.
8.
Remove sunroof unit assembly through the passenger compartment while being careful not to damage
the seats and trim.
Installation
1.
Temporarily tighten the mounting bolts to the rear sunroof brackets (RH/LH).
2.
Bring sunroof unit into passenger compartment, and then place the rear end of the rail onto the rear sun-
roof brackets.
3.
Temporarily tighten the mounting nuts to the front end of sunroof unit assembly.
4.
Tighten the installation points diagonally excluding the installation point of the sunroof bracket around the
roof opening.
5.
Tighten the front sunroof bracket bolts of the vehicle side, and then tighten the bolt of the rail side.
6.
Tighten the rear sunroof bracket bolts of the vehicle side, and then tighten the bolt of the rail side.
7.
Tighten the mounting nuts to the front end and side rail.
8.
Move the sunroof motor assembly laterally by little by little so that the gear is completely engaged into the
wire on the sunroof unit assembly and mounting surface becomes parallel. Then secure the sunroof motor
assembly with screws.
CAUTION:
Before installing the sunroof motor assembly, be sure to the place the link and wire assembly in
the symmetrical and fully closed position.
9.
Install glass lid.
NOTE:
After installation, carry out fitting adjustment.
10. Connect drain hoses.
11. Install headlining. Refer to
4.
Sunroof motor assembly
5.
Front sunroof bracket (LH/RH)
6.
Rear sunroof bracket (LH/RH)
7.
Sunroof unit assembly
Нет комментариевНе стесняйтесь поделиться с нами вашим ценным мнением.
Текст