Infiniti M35/M45 Y50. Manual — part 1018
SUNROOF
RF-27
C
D
E
F
G
H
J
K
L
M
A
B
RF
Disassembly and Assembly
NIS00244
PIIB3116J
RF-28
SUNROOF
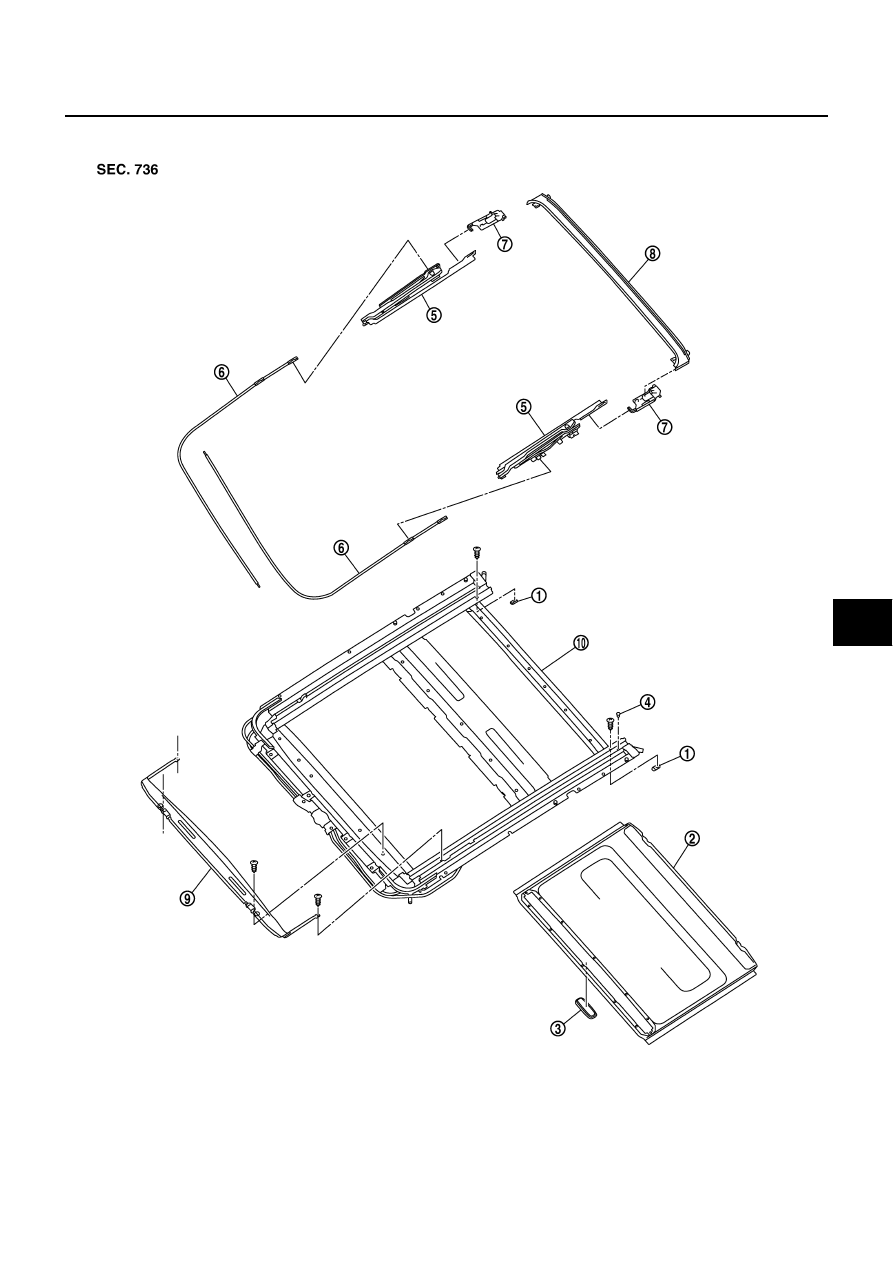
DISASSEMBLY
1.
Remove sunshade stopper mounting screws from the rear end of sunroof frame, and then remove sun-
shade stopper.
2.
Remove sunshade from the rear end of sunroof frame.
NOTE:
Removing is possible even by the on vehicle.
3.
Remove sunshade knob from the sunshade.
4.
Remove guide stopper from the rear end of sunroof frame.
5.
Remove sunroof guide assembly from the rear end of sunroof frame.
6.
Remove guide wire assembly from sunroof guide assembly.
7.
Remove rear drain assembly and drain guide from sunroof guide assembly.
8.
Remove screws from left and right sides of each wind deflector holder. Extract pawls through rail holes,
then remove left and right sides of wind deflector holder.
9.
Remove screws from front end of sunroof unit. Extract pawls through frame holes, then remove wind
deflector from frame assembly.
NOTE:
Removing is possible even by the on vehicle.
ASSEMBLY
Assemble in the reverse order of disassembly.
CAUTION:
Be sure to place the sunroof guide assembly in the symmetrical and fully close position.
1.
Sunshade stopper
2.
Sunshade
3.
Sunshade knob
4.
Guide stopper
5.
Sunroof guide assembly (LH/RH)
6.
Guide wire assembly (LH/RH)
7.
Drain guide (LH/RH)
8.
Rear drain assembly
9.
Wind deflector assembly
10. Sunroof frame
RFD-1
REAR FINAL DRIVE
D DRIVELINE/AXLE
CONTENTS
C
E
F
G
H
I
J
K
L
M
SECTION
RFD
A
B
RFD
REAR FINAL DRIVE
PRECAUTIONS . . . . . . . . . . . . . . .. 2
Service Notice or Precautions . . . . . . . . .. 2
PREPARATION . . . . . . . . . . . . . . ... 3
Special Service Tools . . . . . . . . . . . ... 3
Commercial Service Tools . . . . . . . . . . 6
NOISE, VIBRATION AND HARSHNESS (NVH)
TROUBLESHOOTING . . . . . . . . . . . . 7
NVH Troubleshooting Chart . . . . . . . . . . 7
DESCRIPTION . . . . . . . . . . . . . . . 8
Cross-Sectional View . . . . . . . . . . . ... 8
DIFFERENTIAL GEAR OIL . . . . . . . . . . 9
Changing Differential Gear Oil . . . . . . . . . 9
DRAINING . . . . . . . . . . . . . . . . 9
FILLING . . . . . . . . . . . . . . . . . 9
Checking Differential Gear Oil . . . . . . . . .. 9
OIL LEAKAGE AND OIL LEVEL . . . . . . ... 9
FRONT OIL SEAL . . . . . . . . . . . . . 10
Removal and Installation . . . . . . . . . . 10
SIDE OIL SEAL . . . . . . . . . . . . . . 14
Removal and Installation . . . . . . . . . . 14
REMOVAL . . . . . . . . . . . . . . ... 14
INSTALLATION . . . . . . . . . . . . ... 14
REAR FINAL DRIVE ASSEMBLY . . . . . . . 16
Removal and Installation . . . . . . . . . . 16
Disassembly and Assembly . . . . . . . . . 18
SERVICE DATA AND SPECIFICATIONS (SDS) . .. 37
General Specifications . . . . . . . . . . . 37
Inspection and Adjustment . . . . . . . . . . 37
RFD-2
PRECAUTIONS
PRECAUTIONS
PFP:00001
Service Notice or Precautions
NDS000EY
●
Check for the correct installation status prior to removal or disassembly. If matching marks are required,
be certain they do not interfere with the function of the parts when applied.
●
Overhaul should be done in a clean work area, it is preferable to work in dustproof area.
●
Before disassembly, using steam or white gasoline, completely remove sand and mud from the exterior of
the unit, preventing them from entering into the unit during disassembly or assembly.
●
Check appearance of the disassembled parts for damage, deformation, and unusual wear. Replace them
with a new ones if necessary.
●
Gaskets, seals and O-rings should be replaced any time when the unit is disassembled.
●
In principle, tighten bolts or nuts gradually in several steps working diagonally from inside to outside. If
tightening sequence is specified, observe it.
●
Clean and flush the parts sufficiently and blow-dry them.
●
Be careful not to damage sliding surfaces and mating surfaces.
●
When applying sealant, remove the old sealant from the mounting surface; then remove any moisture, oil,
and foreign materials from the application and mounting surfaces.
●
Always use shop paper for cleaning the inside of components.
●
Avoid using cotton gloves or shop rags to prevent entering of lint.
●
During assembly, observe the specified tightening torque, and apply new gear oil, petroleum jelly, or multi-
purpose grease as specified for each vehicle, if necessary.
Нет комментариевНе стесняйтесь поделиться с нами вашим ценным мнением.
Текст