Skoda Superb (2019 year). Manual — part 6
Storage compartments in the doors
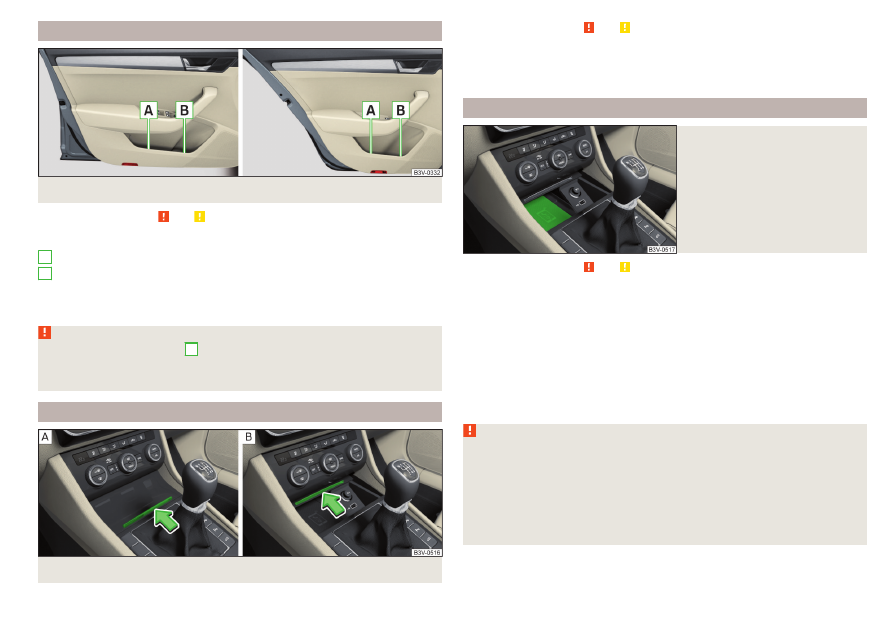
Fig. 107 Storage compartments: in the front door/in the rear door
Read and observe and on page 92 first.
Storage compartments
Storage compartment
Bottle holder with a capacity of max. 1.5 l
The reflective vest can be stowed in the storage compartments in the door
WARNING
The storage compartment
A
n the front door is to be used exclu-
sively for storing objects which do not protrude - there is the danger of
limiting the operating range of the side airbags.
Storage compartment in the front centre console
Fig. 108 Storage compartment: Open/close
A
B
Read and observe and on page 92 first.
›
To open, press the ridge in the direction of arrow
- .
›
To close, press the ridge in the direction of arrow
- . The lid
closes automatically.
Phonebox
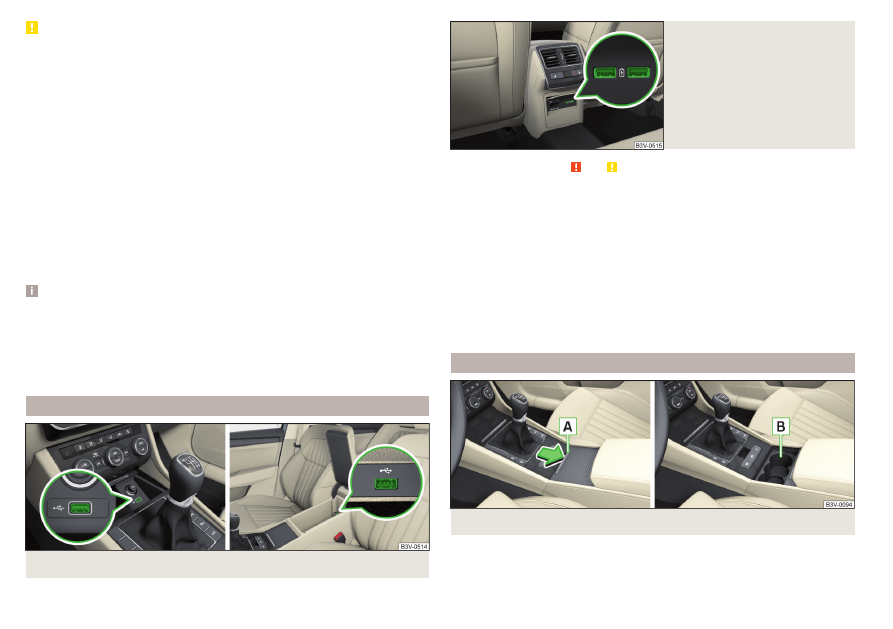
Fig. 109
Phonebox
Read and observe and on page 92 first.
The storage compartment in the front centre console can be equipped with
the Phonebox function.
If a phone is placed face up on the pad in the storage compartment
the phone signal is amplified by the roof antenna.
Telephones that support the standard for wireless Qi charging can be charged
wirelessly in the storage compartment.
While wireless charging is taking place, no objects may be between the pad
and the telephone being charged.
WARNING
■
The telephone may become warm during wireless charging, so this should
be removed carefully from the tray.
■
Metal objects between the pad and the telephone to be charged can get
hot due to the action of the induction field - There is a risk of injury. If there
is a metal object in the storage compartment that has become hot, then
take out the telephone and let the object cook in the storage compart-
ment!
93
Practical features
-------------------------------------------------------------------------------------------------------------------------------------------------------------
CAUTION
■
Metal objects between the pad and the telephone to be charged can get hot
due to the action of the induction field - There is a risk damage to the tele-
phone.
■
With some telephones, the charging process may be interrupted or the tele-
phone may switch off due to getting hot.
■
No electronic or magnetic storage media (e.g. SD cards, USB sticks, cards
with magnetic strips or chip) may be placed between the support and tele-
phone to be charged - there is a risk of data loss and damage to this data carri-
er.
■
If a message appears in Infotainment that the telephone can not be charged,
then proceed as follows.
■
Check that no objects are between the pad and the telephone being charg-
ed. If this is the case, then take out the object and the telephone. Place the
telephone on the pad centrally on the telephone symbol.
■
Check if the position of the telephone to be charged has not changed dur-
ing the journey. If this is the case, then take out the telephone and place it
back on the pad centrally on the telephone symbol.
Note
■
At the start of the wireless charging process, the appropriate message ap-
pears on the Infotainment screen.
■
For the optimum telephone signal strength and uninterrupted wireless
charging, we recommend position the telephone in the storage compartment
without the protective sleeve, if possible.
■
Place a max. 146x80 telephone in the storage compartment.
USB inputs
Fig. 110 Front USB input / USB input under the armrest
Fig. 111
Rear USB inputs
Read and observe and on page 92 first.
The USB input is located in the storage compartment in the center console
and also depending on the equipment fitted, in the storage compartment un-
der the front armrest
The USB inputs are also in the rear centre console depending on the equip-
ment fitted
The USB input in the storage compartment in the front centre console and in
the storage compartment under the front armrest can be used for charging
and data transfer. The USB inputs in the rear centre console can be used only
for charging.
Information for use
Cup holders
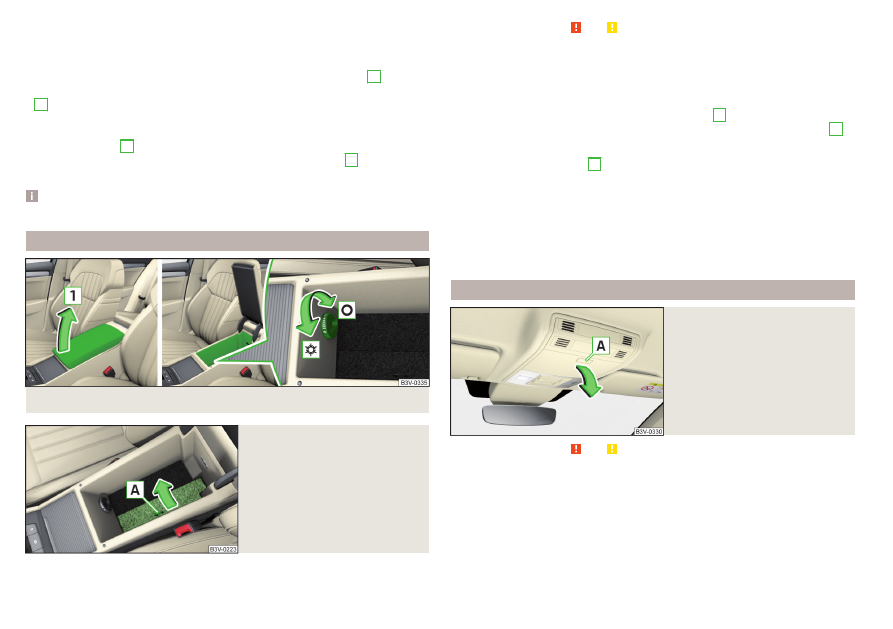
Fig. 112 Open front cup holders/ front cup holders
94
Using the system
-------------------------------------------------------------------------------------------------------------------------------------------------------------
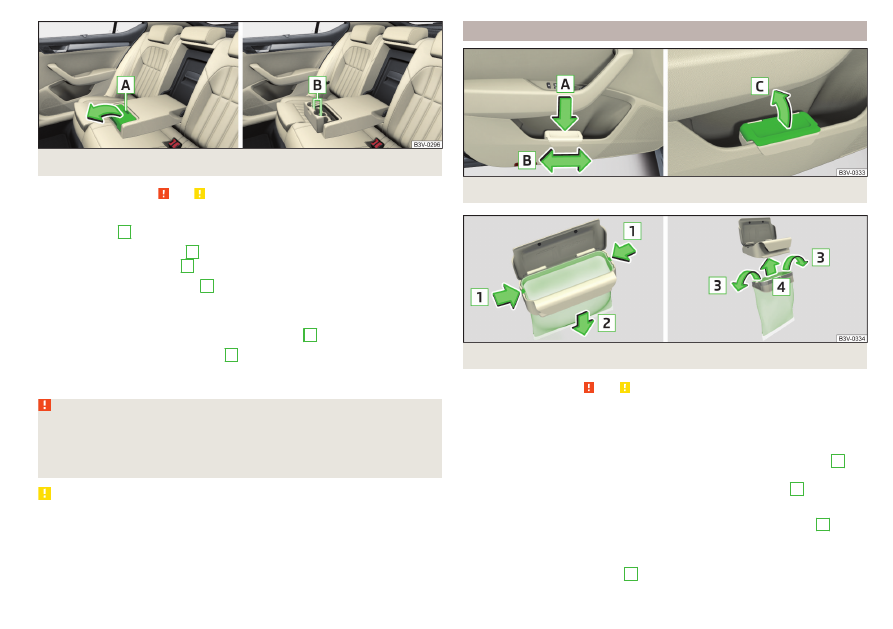
Fig. 113 Open rear cup holders/ rear cup holders
Read and observe and on page 92 first.
Front cup holder
The cup holder
B
is located in the front centre console
›
To open, push on the ridge
A
in the direction of the arrow.
›
To close, pull on the ridge
A
against the direction of the arrow.
In the centre area of the holder
B
, a beverage container can be opened with
one hand by pushing the container into the holder and turning the lid.
Rear cup holder
Two cup containers can be placed in the cup holder
B
›
To open, hold the lid on the recess
A
and fold in the direction of arrow until
the stop.
›
To close, push the cover against the direction of the arrow.
WARNING
■
Do not use any cups or beakers which are made of brittle material (e.g.
glass, porcelain). This could lead to injuries in the event of an accident.
■
Never put hot beverage containers in the cup holder. If the vehicle moves,
they may spill – risk of scalding!
CAUTION
Do not leave open beverage containers in the cup holder during the journey.
There is a risk of spilling e.g. when braking which may cause damage to the
electrical components or seat upholstery.
Waste container
Fig. 114 Waste container: inserting and moving/opening
Fig. 115 Replace bags
Read and observe and on page 92 first.
The waste container can be inserted into the slot in the door.
Insert waste container
›
Position the waste container at the front edge of the slot.
›
Push the waste container in the rear area in the direction of the arrow
A
›
If required, push the waste container in the direction of arrow
B
.
Remove the waste container
›
Remove the waste container in the opposite direction to the arrow
A
Open/close waste container
›
Lift the cover in the direction
C
95
Practical features
-------------------------------------------------------------------------------------------------------------------------------------------------------------
Closing takes place in reverse order.
Replace bags
›
Remove the waste container from the slot.
›
Press the two locking lugs on the frame in the direction of arrow
1
›
Pull the bag together with the frame downwards in the direction of arrow
2
.
›
Remove the bag from the frame.
›
Pull the new bag through the frame and pull it over the bag frame in the di-
rection of arrow
3
.
›
Insert the bag containing the frame in the direction of arrow
4
into the con-
tainer body, so that the two lugs engage audibly with the frame.
Note
We recommend that you use 20 x 30 cm bags.
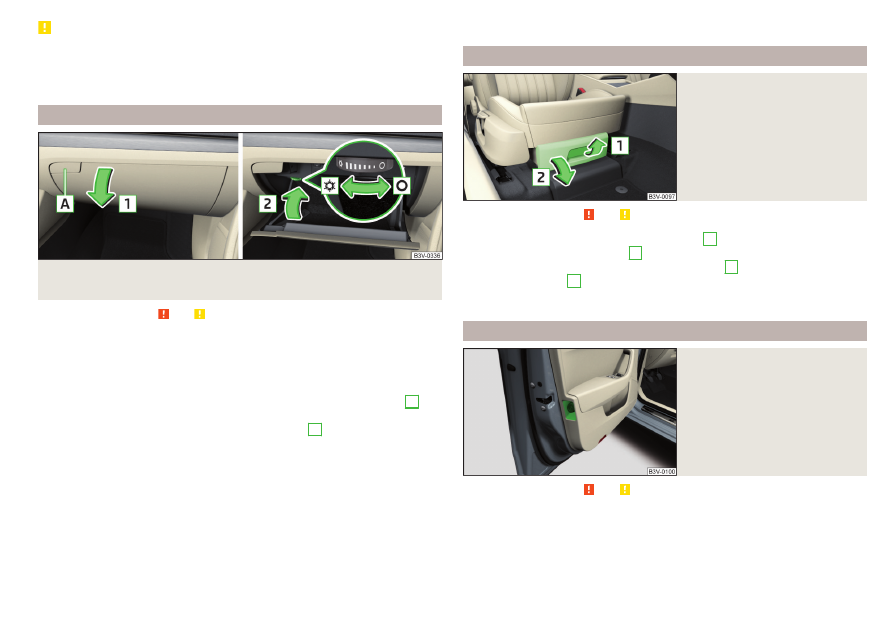
Storage compartment underneath the front armrest
Fig. 116 Open tray / control air supply
Fig. 117
Open storage compartment for
the tablet
Read and observe and on page 92 first.
The storage compartment is equipped with an interior light (this is illuminated
when the parking lights / low beam are switched on), a stowage compartment
for the tablet and an air outlet.
Storage compartment
›
To open, lift the armrest in the direction of arrow
1
» Fig. 116
until it stops.
›
To close, fold the armrest down again against the direction of the arrow
1
.
Storage compartment for the tablet
›
To open, pull on the loop
A
in the direction of arrow
» Fig. 117
.
›
Place the tablet carefully to avoid damage to any connected cables.
Air supply
›
To open, turn the rotary switch until it stops in the position
.
›
To close, turn the rotary switch until it stops in the position .
The temperature of the storage compartment supplied with air is dependent
on the setting in the air conditioning.
Glasses storage box
Fig. 118
Opening the glasses storage box
Read and observe and on page 92 first.
›
To open, press the -- button. The compartment folds in the direction of the
arrow
.
›
To close, swivel the compartment against the direction of the arrow until it
audibly clicks into place.
The maximum permissible load of the glasses compartment is 250 g.
96
Using the system
-------------------------------------------------------------------------------------------------------------------------------------------------------------
CAUTION
■
Do not put any heat-sensitive objects in the glasses storage box - with high
temperatures there is risk of damage.
■
The box must be closed before leaving and locking the vehicle – risk of im-
pairment to the functions of the anti-theft alarm system.
Storage compartment on the front passenger side
Fig. 119 Open storage compartment / close storage compartment and
open air supply
Read and observe and on page 92 first.
The storage compartment is equipped with an interior light (this is illuminated
when the parking lights / low beam are switched on), a pen holder and an air
outlet.
Storage compartment
›
To open, press the -- button. The cover folds in the direction of arrow
1
›
To close, swivel the cover in the direction of arrow
2
until it audibly clicks
into place.
Air supply
›
To open, turn the rotary switch until it stops in the position
›
To close, turn the rotary switch until it stops in the position .
Opening the air supply when the air conditioning system is switched on allows
cooled air to flow into the storage compartment.
Opening the air inlet when the air conditioning system is on causes fresh or in-
terior air to flow into the storage compartment.
The maximum permissible load of the storage compartment is 3 kg.
Storage compartment under the front passenger’s seat
Fig. 120
Opening the storage compart-
ment
Read and observe and on page 92 first.
›
To open, pull the handle in direction of arrow
1
pull and open the compart-
ment in the direction of arrow
2
›
To close, pull the handle in the direction of arrow
1
and hold this against the
direction of arrow
2
until the storage compartment closes.
The maximum permissible load of the storage compartment is 1.5 kg.
Storage compartments for umbrellas
Fig. 121
Storage compartment for an
umbrella - view example in the
left door
Read and observe and on page 92 first.
The storage compartments in the front doors
umbrella.
97
Practical features
-------------------------------------------------------------------------------------------------------------------------------------------------------------
Clothes hook
Fig. 122
Clothes hooks
Read and observe and on page 92 first.
The clothes hooks are located on the middle door pillars of the vehicle and on
the handle of the headliner above each of the rear doors
.
The maximum permissible load of each of the hooks is 2 kg.
WARNING
■
Never leave any heavy or sharp-edged objects in the pockets of the items
of clothing hung up.
■
To hang the clothes do not use hangers - there is a risk of limiting the ef-
fectiveness of head airbags.
■
Ensure that any clothes hanging from the hooks do not impair your vision
to the outside.
Storage pockets on the backs of the front seats
Fig. 123
Map pockets
Read and observe and on page 92 first.
The map pockets are intended for storage of maps, magazines, etc.
Storage pockets at the inner sides of the front seats
Fig. 124
Storage pocket
Read and observe and on page 92 first.
The storage pockets are located on the inside of the driver, if necessary, also
the front passenger seat
and are used to store small and light objects
(e.g. mobile telephones).
The maximum permissible load of each of the pockets is 200 g.
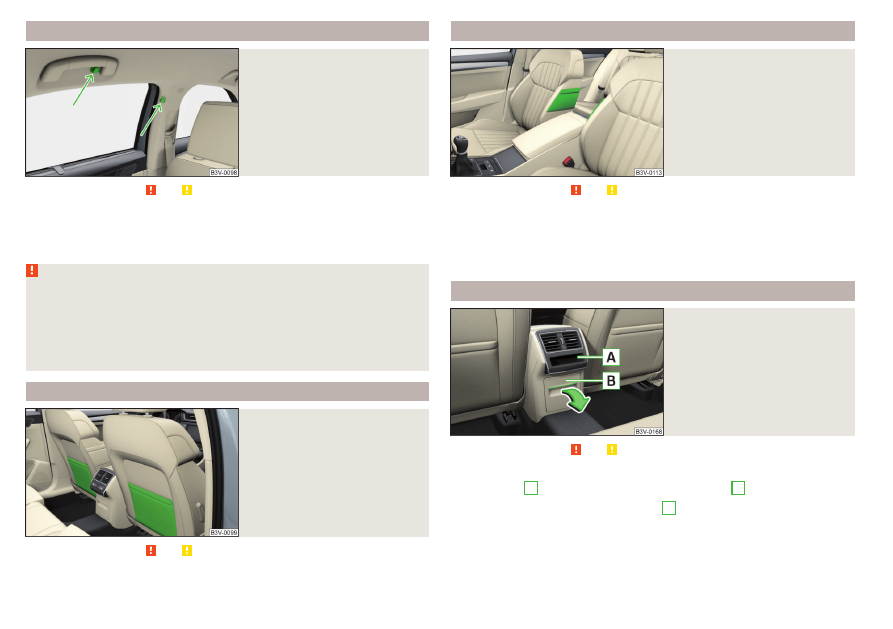
Storage compartment in rear centre console
Fig. 125
Open storage compartment,
open lockable storage compart-
ments
Read and observe and on page 92 first.
In the rear centre console there is an equipment-dependent open storage
compartment
A
and a lockable storage compartment
B
›
To open, pull the storage compartment
B
on the upper part of the recess
and fold down the compartment in the direction of arrow
.
›
To close, swivel the compartment against the direction of the arrow.
There is a cushioned insert in the storage compartment. This can be removed
if the storage compartment is opened to the stop.
98
Using the system
-------------------------------------------------------------------------------------------------------------------------------------------------------------
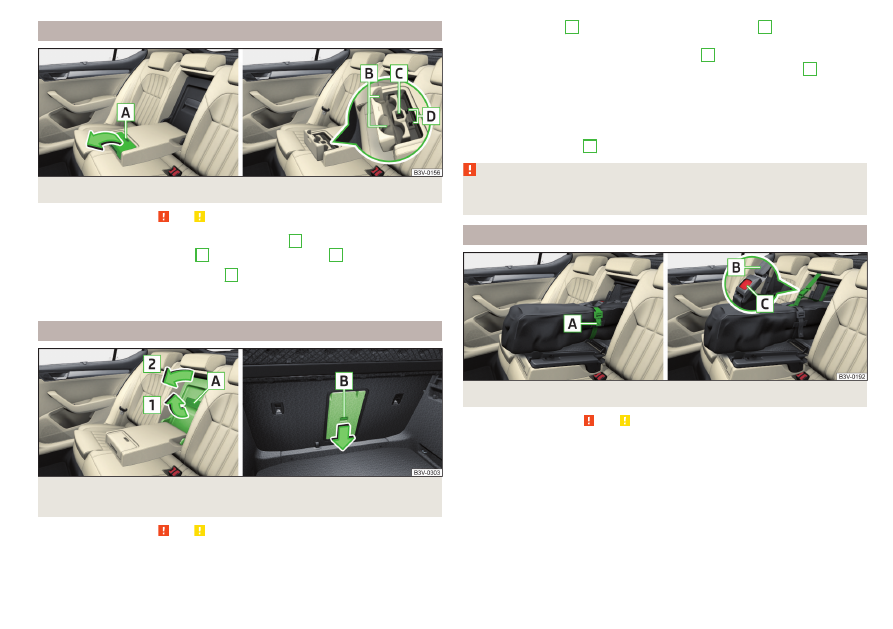
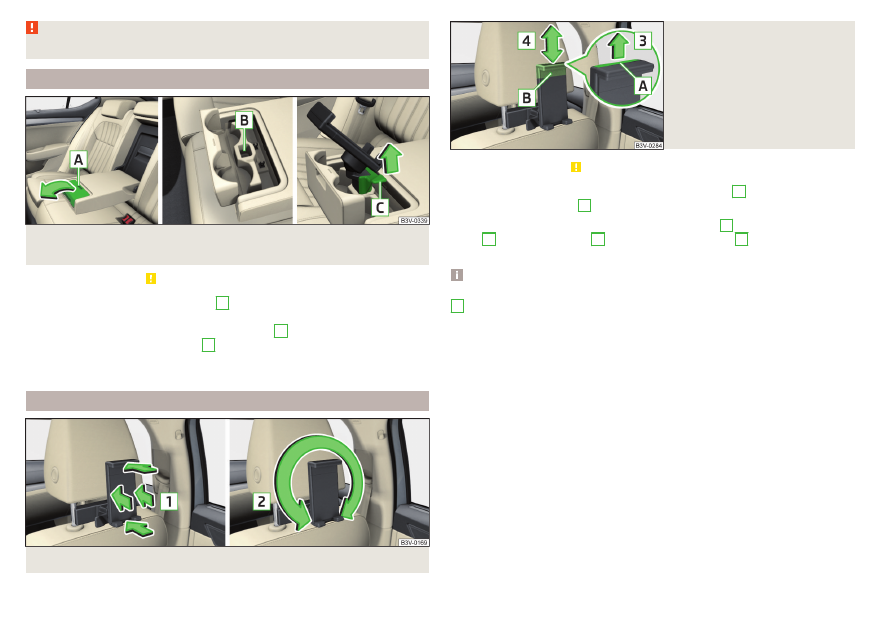
Storage compartment in the rear armrest
Fig. 126 Open storage compartment / interior of the compartment
Read and observe and on page 92 first.
The storage compartment provides a cup holder
B
, a stowage compartment
for attaching the tablet holder
C
as well as a pen holder
D
.
›
To open, hold the lid on the recess
A
and fold in the direction of arrow until
the stop.
›
To close, push the cover against the direction of the arrow.
Long cargo channel
Fig. 127 Open lid: from the passenger compartment / from the luggage
compartment
Read and observe and on page 92 first.
›
To open from the passenger compartment, fold down the rear armrest
slightly
.
›
Pull opening lever
A
1
until it stops. The
catches on the cover must engage completely in the lid and click into place.
›
Open the cover in the direction of the arrow
2
.
›
To open from the luggage compartment, push the securing tab
B
in the di-
rection of the arrow and fold the cover with the armrest forwards.
›
To close, fold the cover and the rear armrest upwards until the stop. This
should audibly click into place.
The cover must be secured after the closing process. Ensure that the red field
above the securing tab
B
is not visible.
WARNING
The through-loading channel is only intended for transporting skis in a
properly secured, through-loading bag.
Removable through-loading bag
Fig. 128 Tighten ribbon / secure bag
Read and observe and on page 92 first.
The removable through-loading bag (hereinafter referred to as bag) is used ex-
clusively for transporting skis and poles (max. 4 pairs).
Stowing bag and skis
›
Fold the rear armrest and the cover in the seat backrest downwards
›
Place the empty bag in the opening in such a way that the end of the bag
with the zip is in the boot.
›
Place the skis with the tips facing to the front and the sticks with the tips
facing to the rear into the bag and close the bag.
99
Practical features
-------------------------------------------------------------------------------------------------------------------------------------------------------------

Securing bag and skis
›
Tighten the strap
A
around the skis in front of the bindings
» Fig. 128
strap must hold the skis tight.
›
Partially fold the middle seat backrest forward
.
›
Guide the securing strap
B
through the opening in the seat backrest around
the upper part of the seat backrest.
›
Then, fold the seat backrests back until the locking button clicks into place.
Check this by pulling on the seat backrest.
›
Insert the securing strap
B
into the lock
C
until it clicks into place.
WARNING
■
The total weight of the skis which are transported must not exceed 17 kg.
■
Always stow and secure the skis and the bag securely - otherwise there is
a risk of injury or accident!
Blanket
Read and observe and on page 92 first.
To increase comfort for the occupants, the vehicle may be equipped with a
blanket.
The blanket is in a bag that can be attached to one of the following locations.
▶
On the guide rods of the front headrests.
▶
In the storage pockets on the backs of the front seats.
Electrical sockets
Introduction
WARNING
■
Do not place anything on the dashboard. These objects might slide or fall
down when driving and may distract you from concentrating on the traffic
– risk of accident!
■
Make sure that while driving no objects can enter the driver's footwell -
cause an accident!
■
Safely stow all devices during the journey to prevent them from being
thrown around the interior in the event of a sudden braking manoeuvre or
an accident – risk of death!
■
The devices may warm up during operation – risk of injury or fire!
WARNING (Continued)
■
Improper use of the power sockets and the electrical accessories can
cause fires, burns and other serious injuries.
■
The 12-Volt sockets also work if the ignition is switched off. When leaving
the vehicle, never leave persons who are not completely independent, such
as children, unattended in the vehicle.
CAUTION
When using the 12 volt power outlets the following notes are to be observed.
■
The sockets can only be used for the connection of approved electrical ac-
cessories with a total power consumption of up to 120 watts, otherwise the
electrical system of the vehicle may be damaged.
■
Connecting appliances when the engine is not running will drain the battery
of the vehicle!
■
Before switching the ignition on / off or before starting the engine, switch
off the devices which are connected to the sockets - there is a risk of damage
to the equipment due to voltage fluctuations.
12-volt socket in the front centre console
Fig. 129
Cover of the 12 volt power out-
let
Read and observe and on page 100 first.
›
To use, open the storage compartment, remove the cover of the socket
and plug the electrical appliance plug into the socket.
100
Using the system
-------------------------------------------------------------------------------------------------------------------------------------------------------------
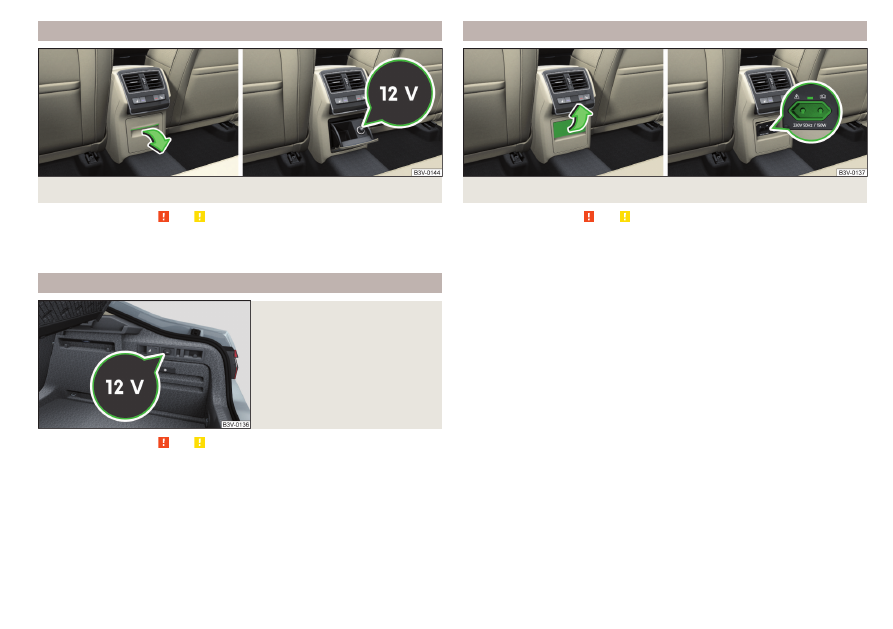
12 volt socket in the rear centre console
Fig. 130 Open storage compartment / cover of the 12 volt power outlet
Read and observe and on page 100 first.
›
To use, open the storage compartment, remove the cover of the socket
and plug the electrical appliance plug into the socket.
12 volt socket in luggage compartment
Fig. 131
Cover of the 12 volt power out-
let
Read and observe and on page 100 first.
›
To use, open the cover of the socket
and plug the electrical appli-
ance plug into the socket.
230-volt socket in the rear centre console
Fig. 132 Open the cover of the 230 volt outlet / 230 volt outlet
Read and observe and on page 100 first.
The 230-volt socket has a child safety lock. When inserting the plug, the fuse
is released, the socket is activated and the warning light above the socket is
illuminates green (if this flashes red, then the socket is deactivated).
The socket works with the engine running (in STOP mode in vehicles with the
START-STOP system) and for about 10 minutes after the engine is switched
off, provided an appliance was still connected prior to switching off the engine
(the warning light flashes green)).
›
To use, fold up the cover of the socket in the direction of arrow
and plug the electrical appliance plug into the socket.
An automatic deactivation of the socket can take place, for example, for
the following reasons.
▶
Excessive current.
▶
Low state of charge of the battery.
▶
High outlet temperature.
If disabling reasons no longer exist, the automatic activation of the socket can
be done.
Should no automatic activation of the socket take place, the connected devi-
ces must be disconnected from the power outlet and reconnect after a short
time.
101
Practical features
-------------------------------------------------------------------------------------------------------------------------------------------------------------
WARNING
■
Make sure that no liquid or moisture enters into the socket - it can be fa-
tal! If fluid does manage to get into the power socket, completely dry out
the socket before reuse.
■
The child lock on the power socket is unlocked when using adapters and
extension cables which carry volts – risk of injury!
■
Do no insert any objects (e.g. knitting needles) into the contacts of the
power socket – risk of death!
CAUTION
■
The power socket can only be used for connecting approved electrical ac-
cessories with a two-pin 230V plug, with a total power uptake of up to
150 watt.
■
The plug of the electrical appliance must be plugged in up to the stop, other-
wise the child safety lock can be unlocked and the socket may be activated
but the electric appliance is still not receiving power.
■
Do not connect bulbs with neon tubes in the socket - there is a risk of dam-
aging the lamp.
■
For appliances with an independent power source (e.g. such as notebooks),
first connect the power source itself and only after that connect the appliance.
Ashtray and cigarette lighter
Introduction
The ashtray can be used for ash, cigarettes, cigars and the like.
WARNING
Never place hot or flammable objects in the ashtray – risk of fire!
Ashtray
Fig. 133 Remove front ashtray / remove front ashtray insert / remove
rear ashtray insert
Read and observe on page 102 first.
Removable ashtray
›
Hold the ashtray
A
(not by the lid) remove it in the direction of the arrow
To insert, proceed in reverse order.
Ashtray with removable insert
›
To remove the insert, open the ashtray fully, hold the insert in area
B
and
remove in the direction of the arrow
.
To insert, proceed in reverse order.
102
Using the system
-------------------------------------------------------------------------------------------------------------------------------------------------------------
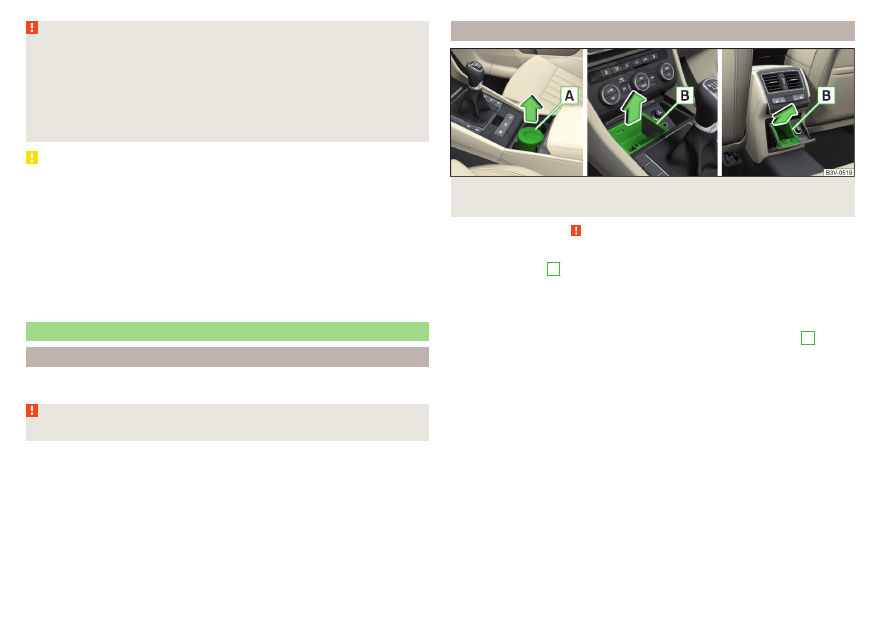
Cigarette lighter
Fig. 134 Cigarette lighter: in the front centre console/in the rear centre
console
Read and observe on page 102 first.
›
To use, open the respective storage compartment and push in the lighter un-
til it stops
.
›
Wait until the glowing lighter protrudes, remove it immediately and use.
›
Put the lighter back in the socket and close the storage compartment.
WARNING
■
The cigarette lighter also works if the ignition is switched off. When leav-
ing the vehicle, never leave people who are not completely independent,
such as children, unattended in the vehicle - there is a risk of burning, fire or
damage to the vehicle interior.
■
Be careful when using the cigarette lighter - it can cause burns.
Note
The cigarette lighter socket can also be used as a 12 volt socket.
Tablet holder
Introduction
External devices (e.g. tablet, smartphone etc.) measuring min. 122 mm and
max. 195 mm can be secured in the holder.
The maximum permissible load of the compartment is 750 g.
CAUTION
Never exceed the maximum permissible load of the holder - there is a risk of
damage or functional impairment.
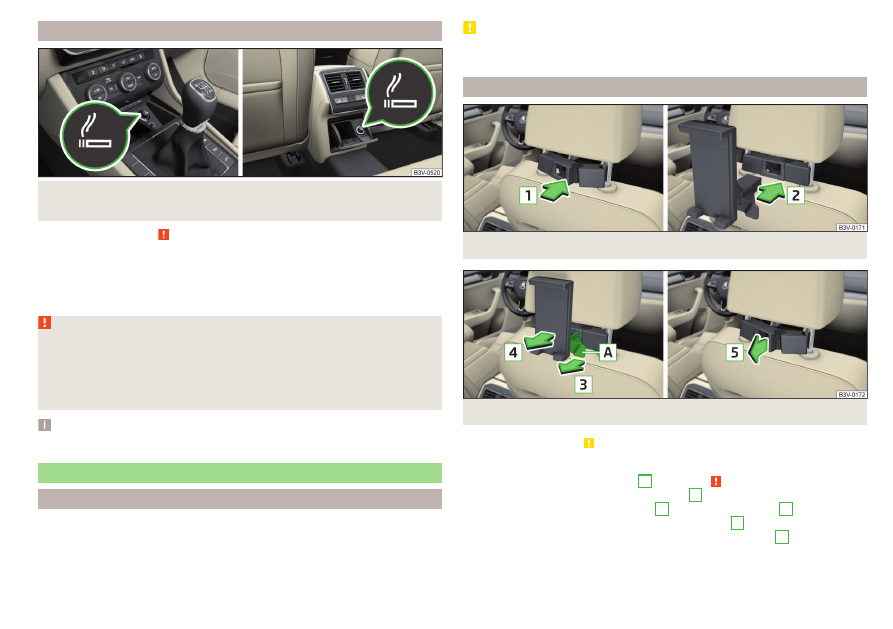
Attaching the rear headrests
Fig. 135 Inserting: Adapter/Holder
Fig. 136 Removal: Holder/Adapter
Read and observe on page 103 first.
›
Toinsert, attach the opened adapter to the guide rods of the front headrest
and clip in the direction of arrow
1
»
.
›
Clip in the holder in the direction of arrow
2
into the adapter.
›
To remove, pull on the securing tab
A
in direction of arrow
3
and take the
holder out of the adapter in the direction of arrow
4
›
Press the adapter and remove in the direction of the arrow
5
from the
guide rods of the headrest.
103
Practical features
-------------------------------------------------------------------------------------------------------------------------------------------------------------
WARNING
Be care with the adapter - otherwise there is a risk of finger injury.
Attach to the storage compartment in the rear armrest
Fig. 137 Open storage compartment / stowage compartment for hold-
er / remove holder
Read and observe on page 103 first.
›
To insert, hold the lid on the recess
A
and fold open in the direction of arrow
›
Insert the holder in the stowage compartment
B
until it stops.
›
To remove, pull the securing tab
C
in direction of arrow and take the holder
in direction of arrow out of the adapter.
›
Fold the cover closed against the direction of the arrow.
Handling the holder
Fig. 138 Tilting and rotating the holder
Fig. 139
Adjusting the holder size
Read and observe on page 103 first.
The holder may be by 30° in the direction of the arrow
1
tipped and by 360°
in the direction of arrow
2
turned
.
›
To adjust the holder size, pull out the securing tab
A
in the direction of ar-
row
3
and push the part
B
in the direction of arrow
4
to the desired posi-
tion
Note
If there is no external device in the holder, then we recommend that the part
B
is moved fully down. Otherwise, irritating noises may occur at certain
speeds.
104
Using the system
-------------------------------------------------------------------------------------------------------------------------------------------------------------
Transport of cargo
Luggage compartment
Introduction
When transporting heavy objects, the driving characteristics change due to
the shift in centre-of-gravity. Therefore, adjust the speed and driving mode ac-
cordingly.
When transporting cargo the following the instructions must be adhered to
▶
Distribute the load evenly in the luggage compartment and secure it with
suitable lashing straps to the lashing eyes or securing nets so that they can-
not slip.
▶
Place heavy objects as far forward in the luggage compartment as possible.
▶
Tyre pressure is to match the load.
In the event of an accident, even small and light objects gain so much kinetic
energy that they can cause severe injuries.
The magnitude of the kinetic energy is dependent on the speed at which the
vehicle is travelling and the weight of the object.
Luggage compartment light
The light switches on/off when the boot lid is opened or closed.
If the boot lid is open and the ignition switched off, the light will extinguish au-
tomatically after around 10 minutes.
WARNING
■
Never exceed the maximum permissible load of the respective fasteners,
nets, hooks etc. Heavy objects were not secured sufficiently – risk of injury!
■
An unfixed or improperly fixed load can slip during a sudden manoeuvre or
an accident - danger of injury!
■
Loose cargo could hit a deployed airbag and injure occupants – danger of
death!
■
When transporting loads in the luggage compartment that has been en-
larged by folding the rear seats forward, ensure the safety of the passen-
gers transported on the other rear seats .
CAUTION
■
Never exceed the maximum permissible load of the respective fasteners,
nets, hooks etc. - these could be damaged.
■
Make sure that the heating elements of the rear window heater, the ele-
ments of the integrated aerial in the rear window or in the rear side windows
are not damaged by abrasive items.
■
Do not place sharp objects in the nets and storage compartments in the lug-
gage compartment - there is a risk of damage to the net as well as the com-
partments.
■
Put the items in the storage compartments carefully and not load these
punctiform - there is a risk of damage to the compartments.
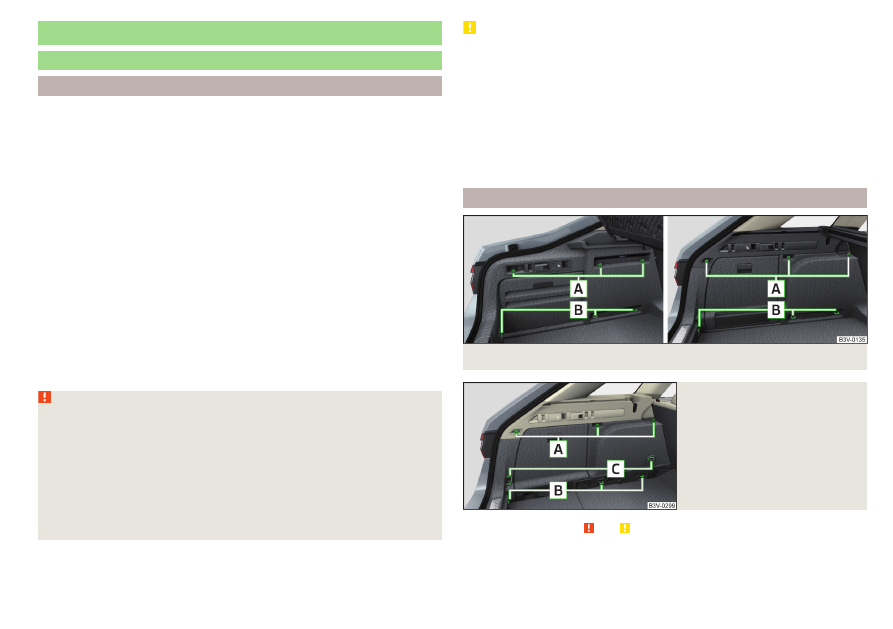
Fastening elements
Fig. 140 Fastening elements: Version 1/version 2
Fig. 141
Fastening elements: Variant 3
Read and observe and on page 105 first.
The fasteners are located on both sides of the luggage compartment.
105
Transport of cargo
-------------------------------------------------------------------------------------------------------------------------------------------------------------
Overview of the fastening elements
and
Fastening elements only for fastening fixing nets
Lashing eyes for fastening cargo and securing nets
Lashing eyes for fastening cargo and securing nets
The maximum permissible static load for the individual lashing eyes
B
and
C
is 350 kg.
Fixing nets
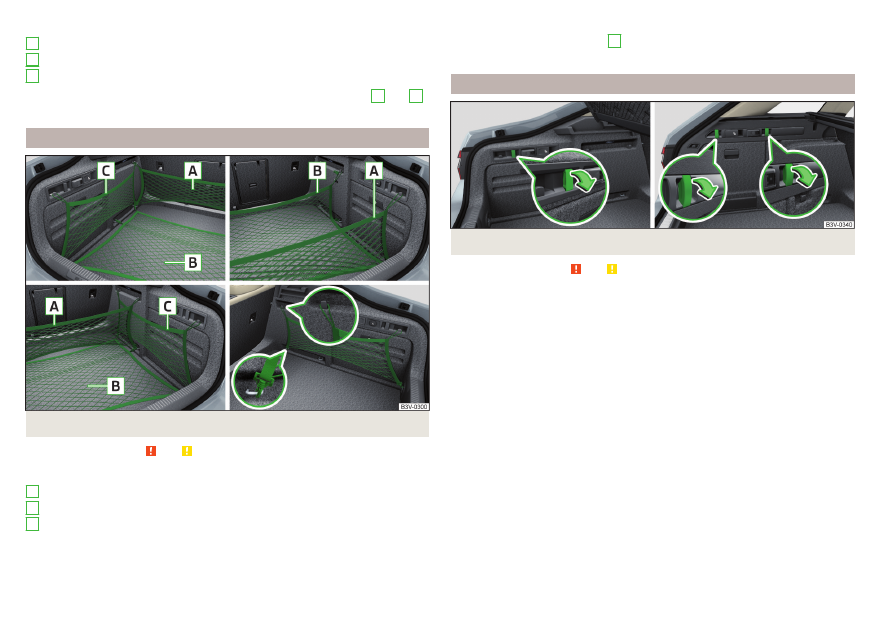
Fig. 142 Fastening examples for nets / side pocket fastening
Read and observe and on page 105 first.
Fastening examples for nets
Horizontal pocket
Floor net
Vertical pocket
The maximum permissible load of each of the nets is 1.5 kg.
A
B
C
A
B
C
If the vehicle is equipped with the variable loading floor and this is in the upper
position, then the lashing eyes
C
on page 105 can be used to attach
the nets.
Foldable hook
Fig. 143 Fold down the hook: Version 1/version 2
Read and observe and on page 105 first.
Foldable hooks for hanging small items of luggage, such as bags, etc., are pro-
vided on both sides of the luggage compartment.
›
To use it, pull down the hook in the direction of the arrow
.
The maximum permissible load of the hook is 7.5 kg.
106
Using the system
-------------------------------------------------------------------------------------------------------------------------------------------------------------
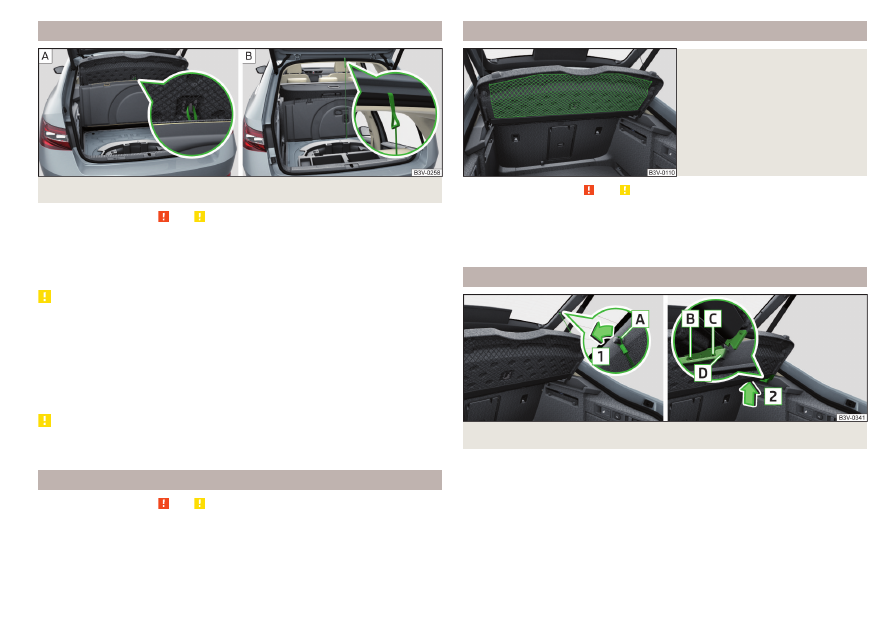
Fasten the flooring
Fig. 144 Fixing the floor covering: Version 1/version 2
Read and observe and on page 105 first.
Fastening options for the flooring
With the loop on a hook on the luggage compartment cover
With the hook on the frame of the luggage compartment lid
CAUTION
For version 1, the following information applies.
■
The hook on the luggage compartment cover is only provided for the fixing
of the floor covering, do not hang objects on it - there is a risk of damage to
hook.
■
The flooring covering can be fixed to the hook only with the boot open. Be-
fore closing the lid, check that the flooring is not attached to the hook - there
is a risk of damage to the hook.
CAUTION
The floor covering can be fixed with Version 2 only if the variable loading floor
is folded in the upper position
Floor covering on both sides
Read and observe and on page 105 first.
A double-sided floor covering can be fitted in the luggage compartment. One
side is made of fabric, the other side is washable (suitable for transporting wet
or dirty items ).
Net on the luggage compartment cover
Fig. 145
Net on the luggage compart-
ment cover
Read and observe and on page 105 first.
The net at the bottom of the luggage compartment cover
ded for transporting light and soft items.
The maximum permissible load of the net is 1.5 kg.
Luggage compartment cover
Fig. 146 Remove the luggage compartment cover
107
Transport of cargo
-------------------------------------------------------------------------------------------------------------------------------------------------------------
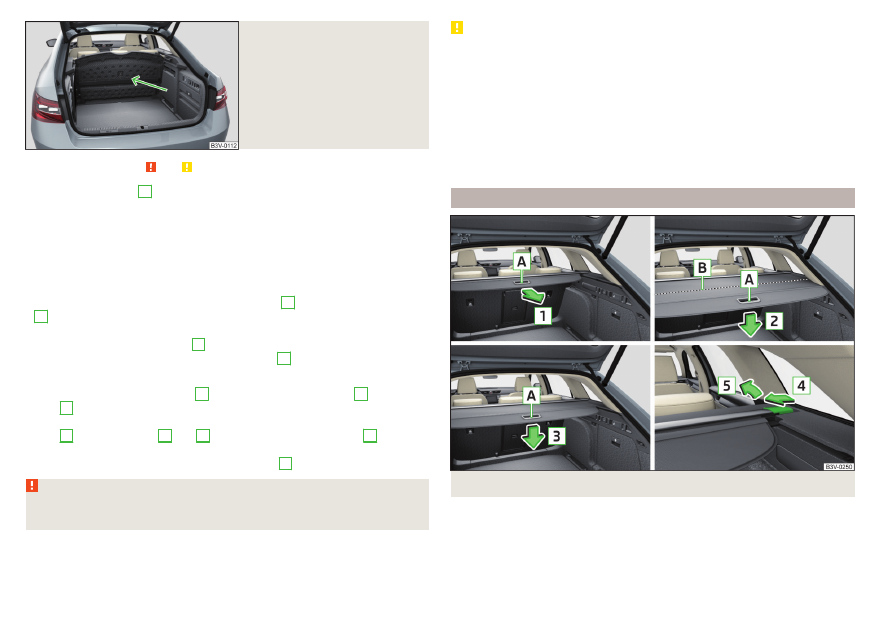
Fig. 147
Luggage compartment cover
stowed behind the rear seats
Read and observe and on page 105 first.
If the retaining straps
A
are attached to the boot lid, then opening
the lid will also raise the luggage compartment cover (hereafter only referred
to as "cover").
The cover can be removed from the vehicle and stowed behind the rear seat
backrests if required
. Before removing the cover, the sunshade at
the back must be rolled up
Removing
›
On both sides of the boot lid, unhook the straps
A
in the direction of arrow
1
›
Hold the raised cover and press on the two sides on the underside of the
cover in the area of the recess
C
.
›
Remove the cover in the direction of the arrow
2
.
Fitting
›
First, insert the front mounting
B
and then the rear mounting
C
in the re-
cess
D
.
›
Press on the two sides on the upper side of the cover in the area of the re-
cess
D
. The mountings
B
and
C
must engage with the recess
D
on both
sides of the luggage compartment.
›
On both sides of the boot lid unhook the straps
A
.
WARNING
During the trip there must be no objects on the cover - risk of injury in the
event of sudden braking or a vehicle collision!
CAUTION
■
Observe the following instructions to avoid canting and the subsequent
damage to the cover or the side trim.
■
The cover must be inserted properly and the load must not exceed the
height of the cover.
■
The cover must not be jammed in the surrounding seal of the luggage com-
partment lid when it is in the raised position.
■
There must be no object in the gap between the cover in the raise position
and the rear backrest.
■
Never fold the raised cover forwards to the rear seats - there is a risk of
damaging the cover and the boot lid.
Roll-up cover
Fig. 148 Roll-up cover: pull out/roll up/intermediate position/remove
108
Using the system
-------------------------------------------------------------------------------------------------------------------------------------------------------------
Нет комментариевНе стесняйтесь поделиться с нами вашим ценным мнением.
Текст