Lincoln Corsair (2022 year). Manual in english — page 14
•
An open or pinched sensor hose.
•
Incorrect engine oil level.
•
Incorrect fuel for climatic conditions.
•
Incorrect engine oil viscosity for climactic
conditions.
Note: Some vehicles have a lifetime fuel filter
that is integrated with the fuel tank. Regular
maintenance or replacement is not needed.
Note: If these checks do not help you correct
the concern, have your vehicle checked as
soon as possible.
Noise Emissions Warranty, Prohibited
Tampering Acts and Maintenance
On January 1, 1978, Federal regulation
became effective governing the noise
emission on trucks over 10,000 lb (4,536 kg)
Gross Vehicle Weight Rating (GVWR). The
preceding statements concerning prohibited
tampering acts and maintenance, and the
noise warranty found in the Warranty Guide,
are applicable to complete chassis cabs over
10,000 lb (4,536 kg) GVWR.
CATALYTIC CONVERTER
WARNING: Do not park, idle or drive
your vehicle on dry grass or other dry
ground cover. The emission system heats
up the engine compartment and exhaust
system, creating the risk of fire.
WARNING: The normal operating
temperature of the exhaust system is very
high. Never work around or attempt to
repair any part of the exhaust system until
it has cooled. Use special care when
working around the catalytic converter.
The catalytic converter heats up to a very
high temperature after only a short period
of engine operation and stays hot after the
engine is switched off.
WARNING: Exhaust leaks may result
in entry of harmful and potentially lethal
fumes into the passenger compartment. If
you smell exhaust fumes inside your
vehicle, have your vehicle inspected
immediately. Do not drive if you smell
exhaust fumes.
Your vehicle has various emission control
components and a catalytic converter that
enables it to comply with applicable exhaust
emission standards.
To make sure that the catalytic converter and
other emission control components continue
to work properly:
•
Do not crank the engine for more than
10 seconds at a time.
•
Do not run the engine with a spark plug
lead disconnected.
•
Do not push-start or tow-start your
vehicle. Use booster cables. See Jump
Starting the Vehicle (page 364).
•
Use only the specified fuel listed.
•
Do not switch the ignition off when your
vehicle is moving.
•
Avoid running out of fuel.
•
Have the items listed in scheduled
maintenance information performed
according to the specified schedule.
Note: Resulting component damage may
not be covered by the vehicle Warranty.
232
Engine Emission Control
-------------------------------------------------------------------------------------------------------------------------------------------------------------

The scheduled maintenance items listed in
scheduled maintenance information are
essential to the life and performance of your
vehicle and to its emissions system.
If you use anything other than Ford,
Motorcraft or Ford-authorized parts for
maintenance replacements or for service of
components affecting emission control, such
non-Ford parts should be equivalent to
genuine Ford Motor Company parts in
performance and durability.
Illumination of the service engine soon
indicator, charging system warning light or
the temperature warning light, fluid leaks,
strange odors, smoke or loss of engine
power could indicate that the emission
control system is not working properly.
An improperly operating or damaged exhaust
system may allow exhaust to enter the
vehicle. Have a damaged or improperly
operating exhaust system inspected and
repaired immediately.
Do not make any unauthorized changes to
your vehicle or engine. By law, vehicle
owners and anyone who manufactures,
repairs, services, sells, leases, trades
vehicles, or supervises a fleet of vehicles are
not permitted to intentionally remove an
emission control device or prevent it from
working. Information about your vehicle’s
emission system is on the Vehicle Emission
Control Information Decal located on or near
the engine. This decal also lists engine
displacement.
Please consult your warranty information for
complete details.
On-Board Diagnostics (OBD-II)
Your vehicle has a computer known as the
on-board diagnostics system (OBD-II) that
monitors the engine’s emission control
system. The system protects the environment
by making sure that your vehicle continues
to meet government emission standards. The
OBD-II system also assists a service
technician in properly servicing your vehicle.
When the service engine soon
indicator illuminates, the OBD-II
system has detected a malfunction.
Temporary malfunctions may cause the
service engine soon indicator to illuminate.
Examples are:
1. Your vehicle has run out of fuel—the
engine may misfire or run poorly.
2. Poor fuel quality or water in the fuel—the
engine may misfire or run poorly.
3. The fuel fill inlet may not have closed
properly. See Refueling (page 226).
4. Driving through deep water—the
electrical system may be wet.
You can correct these temporary
malfunctions by filling the fuel tank with good
quality fuel, properly closing the fuel fill inlet
or letting the electrical system dry out. After
three driving cycles without these or any
other temporary malfunctions present, the
service engine soon indicator should stay off
the next time you start the engine. A driving
cycle consists of a cold engine startup
followed by mixed city and highway driving.
No additional vehicle service is required.
233
Engine Emission Control
-------------------------------------------------------------------------------------------------------------------------------------------------------------

If the service engine soon indicator remains
on, have your vehicle serviced at the first
available opportunity. Although some
malfunctions detected by the OBD-II may not
have symptoms that are apparent, continued
driving with the service engine soon indicator
on can result in increased emissions, lower
fuel economy, reduced engine and
transmission smoothness and lead to more
costly repairs.
Readiness for Inspection and
Maintenance (I/M) Testing
Some state and provincial and local
governments may have
Inspection/Maintenance (I/M) programs to
inspect the emission control equipment on
your vehicle. Failure to pass this inspection
could prevent you from getting a vehicle
registration.
If the service engine soon indicator
is on or the bulb does not work,
your vehicle may need service.
See On-Board Diagnostics.
Your vehicle may not pass the I/M test if the
service engine soon indicator is on or not
working properly (bulb is burned out), or if
the OBD-II system has determined that some
of the emission control systems have not
been properly checked. In this case, the
vehicle is not ready for I/M testing.
If the vehicle’s engine or transmission has
just been serviced, or the battery has
recently run down or been replaced, the
OBD-II system may indicate that the vehicle
is not ready for I/M testing. To determine if
the vehicle is ready for I/M testing, turn the
ignition key to the on position for 15 seconds
without cranking the engine. If the service
engine soon indicator blinks eight times, it
means that the vehicle is not ready for I/M
testing; if the service engine soon indicator
stays on solid, it means that your vehicle is
ready for I/M testing.
The OBD-II system checks the emission
control system during normal driving. A
complete check may take several days.
If the vehicle is not ready for I/M testing, you
can perform the following driving cycle
consisting of mixed city and highway driving:
1. 15 minutes of steady driving on an
expressway or highway followed by 20
minutes of stop-and-go driving with at
least four 30-second idle periods.
2. Allow your vehicle to sit for at least eight
hours with the ignition off. Then, start the
vehicle and complete the above driving
cycle. The vehicle must warm up to its
normal operating temperature. Once
started, do not turn off the vehicle until
the above driving cycle is complete.
If the vehicle is still not ready for I/M testing,
you need to repeat the above driving cycle.
234
Engine Emission Control
-------------------------------------------------------------------------------------------------------------------------------------------------------------
GENERAL INFORMATION
WARNING: This battery pack should
only be serviced by an authorized electric
vehicle technician. Improper handling can
result in personal injury or death.
WARNING: Apply the parking brake,
shift into park (P), switch the ignition off
and remove the key before you open the
hood or have any service or repair work
completed. If you do not switch the ignition
off, the engine could restart at any time.
Failure to follow this instruction could result
in personal injury or death.
WARNING: Do not touch the
electronic ignition system parts after you
have switched the ignition on or when the
engine is running. The system operates at
high voltage. Failure to adhere to this
warning could result in serious personal
injury or death.
WARNING: Keep your hands and
clothing clear of the engine cooling fan.
Note: The high-voltage battery does not
require regular service maintenance.
Your vehicle consists of various high-voltage
components and wiring. All of the
high-voltage power flows through specific
wiring assemblies labeled as such or covered
with a solid orange convolute, or orange
striped tape, or both. Do not come in contact
with these components.
The high-voltage battery pack contains a
lithium-ion battery. The pack is underneath
the vehicle. The high-voltage battery system
uses an advanced liquid heating and cooling
system to regulate the high-voltage battery
temperature and help maximize high-voltage
battery life.
CHARGING THE HIGH VOLTAGE
BATTERY
There are two different style chargers that
could be used for charging your vehicle.
Refer to the illustrations below to identify the
charger, and the instructions for use with the
specific type charger.
Charging Solution One
IMPORTANT SAFETY INSTRUCTIONS
WARNING: Do not use the
dual-voltage charging cord in commercial
garages.
WARNING: This equipment has
arcing or sparking parts. Do not expose to
flammable vapors. Position this equipment
at least 18 in (450 mm) above the floor.
RISK OF FIRE or ELECTRIC SHOCK
WARNING: The AC wall plug must
fit firmly into the AC outlet. If the
connection feels loose, worn or the AC
outlet is damaged, please have a qualified
electrician replace the AC outlet. Using a
dual-voltage charging cord with a worn
outlet may cause burns, property damage
and increase the risk of electric shock or
fire.
235
High Voltage Battery
(If Equipped)
-------------------------------------------------------------------------------------------------------------------------------------------------------------

WARNING: Do not use the
dual-voltage charging cord with an
extension cord, two-prong adapter, surge
protector, timer or other adapter. Failure
to follow this instruction could result in
electric shock or fire.
WARNING: Do not allow charging
equipment to be immersed in water or
liquids. Failure to follow this warning could
result in fire, electric shock, or serious
personal injury or death.
WARNING: Do not attempt to open
the charging equipment. Failure to follow
this instruction could result in personal
injury, fire, electric shock, death or property
damage.
WARNING: Do not use the charging
equipment if it is faulty or has been
damaged. Failure to follow this instruction
could result in personal injury, fire, electric
shock, death or property damage.
WARNING: You risk death, fire, or
serious injury to yourself and others if you
do not follow the instruction highlighted
by the warning symbol.
WARNING: Install charging
equipment in compliance with local
regulations. Failure to follow this warning
could result in fire, electric shock, serious
personal injury or death.
WARNING: Do not use an
ungrounded wall outlet. The wall outlet
must be in good condition and meet
up-to-date local codes. Have a qualified
electrician check the wall outlet, if you
suspect that it is not properly grounded.
Failure to follow this instruction could result
in electric shock, personal injury, or death.
WARNING: Do not modify the
dual-voltage charging cord plug. If the
dual-voltage charging cord plug does not
properly fit into the wall outlet, have a
qualified electrician install the correct wall
outlet. Failure to follow this instruction
could result in personal injury, fire, electric
shock, or death.
OPERATION INSTRUCTIONS
•
Read all the instructions before using this
product.
•
Supervise this device when in use around
children.
•
Do not put fingers into the electric vehicle
connector.
•
Do not use this product if the flexible
power cord or electric vehicle cable has
broken insulation, or any other signs of
damage.
•
Do not use this product if the enclosure
or the electric vehicle connector is
broken, cracked, open, or shows any
other indication of damage.
236
High Voltage Battery
(If Equipped)
-------------------------------------------------------------------------------------------------------------------------------------------------------------
Note: Ground this product. If it malfunctions
or breaks down, grounding provides a path
of least resistance for electric current to
reduce the risk of electric shock. This product
comes with a cord having an equipment
grounding conductor and a grounding plug.
Make sure you plug it into an appropriate
outlet that is properly installed and grounded
in accordance with all local codes and
ordinances.
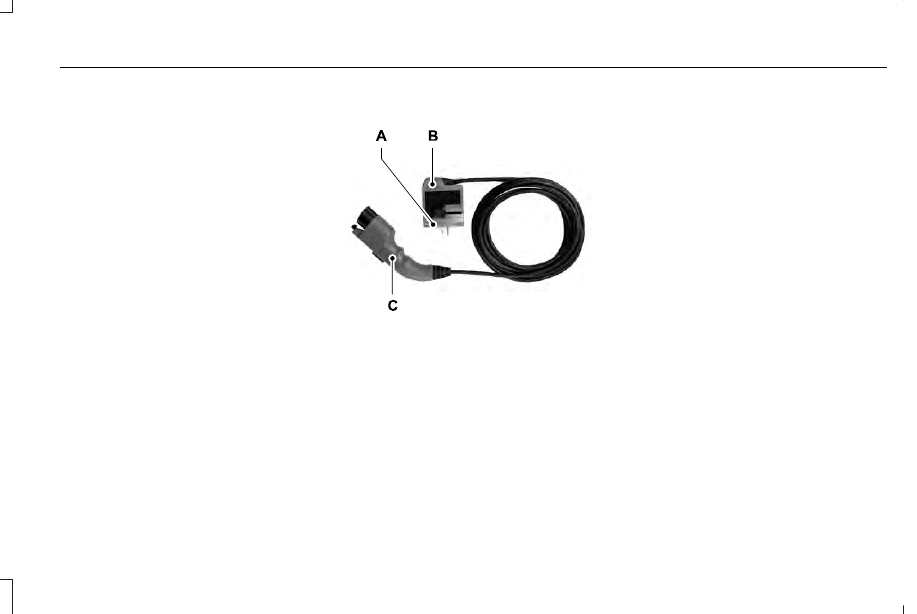
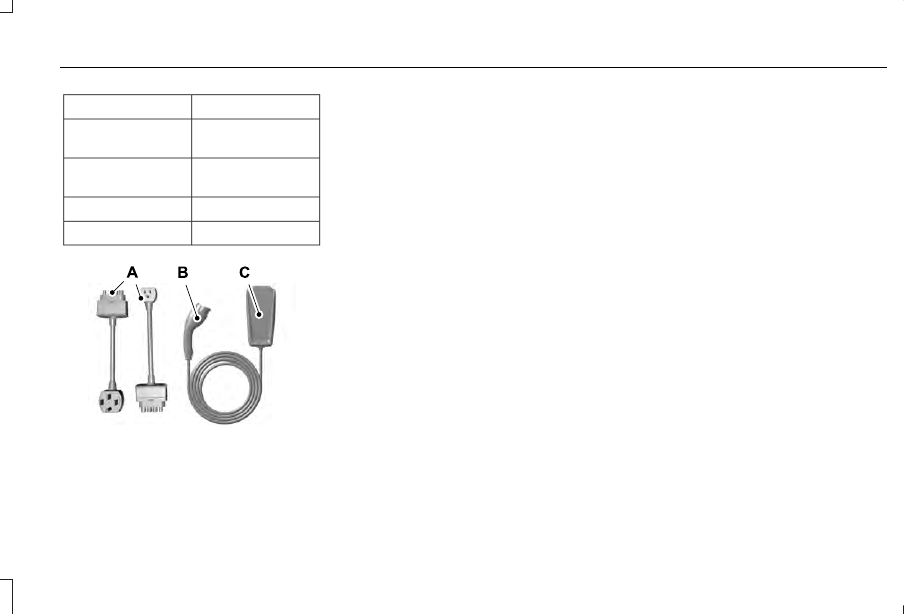
Charging Equipment
E366554
Wall Plug.
A
Control Box.
B
Coupler.
C
Your vehicle has a dual-voltage charging
cord in the luggage compartment.
Note: You need to plug the dual-voltage
charging cord into a dedicated outlet.
Note: Firmly fit the AC wall plug into the AC
outlet. If the connection feels loose, worn or
the AC outlet is damaged, please have a
qualified electrician replace the AC outlet.
Using a dual-voltage charging cord with a
worn outlet could cause burns, property
damage and increase the risk of electric
shock.
Note: Do not use the dual-voltage charging
cord with an extension cord, two-prong
adapter, surge protector, timer or other
adapter.
Note: If charging for your plug-in vehicle fails,
please call the Customer Relationship
Center, or click on Call for support or Live
Chat at our website.
CAUTION: TO REDUCE THE RISK OF FIRE-
Use a three-prong AC outlet that is properly
grounded, 15-20 amps or greater, and in
good condition. Use a dedicated line. You
cannot have other appliances connected to
the same circuit. If you do not use a
dedicated circuit, the circuit breaker could
trip or open. If you do not have a dedicated
circuit, contact a licensed professional
electrician for proper installation.
237
High Voltage Battery
(If Equipped)
-------------------------------------------------------------------------------------------------------------------------------------------------------------

Note: Make sure the electrical source meets
the requirements for the high-voltage
batteries to charge.
Make sure that the dual-voltage charging
cord is completely unwrapped before
charging. Always plug the cord into the AC
outlet before connecting the charged coupler
into the charge port on your vehicle.
Note: If the power indicator light is off after
plugging in the dual-voltage charging cord
and you cannot determine a charge status,
use a different outlet.
Note: Store the dual-voltage charging cord
in a clean dry place between the
temperature of -39.9–157.9°F (-40–70°C)
Note: For further information on the
dual-voltage charging cord, please refer to
the user manual provided with the
dual-voltage charging cord.
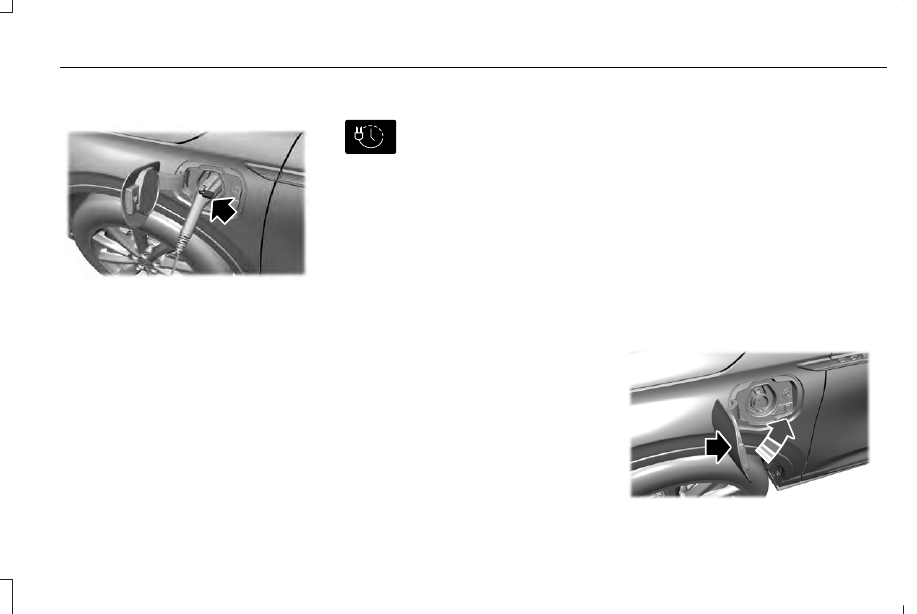
Charge Port
The charge port is between the front
left-hand side door and the front left-hand
wheel well. To open, press the center right
edge of the charge port door, and then
release.
E295258
Note: Do not force the charge port door
open or closed. Forcing the door open or
closed damages the charge port.
The charge status indicator around the
charge port indicates the charge status of
the high voltage battery in your vehicle.
Divided into five zones, the charge status
indicator displays the state of charge in 20
percent increments.
We use the color white as a courtesy light to
help with plugging in and to acknowledge
actions such as plugging in, unplugging or
pressing the charge times button.
Blue is used when you plug the vehicle in
and are either charging or waiting to charge.
Orange indicates charge faults.
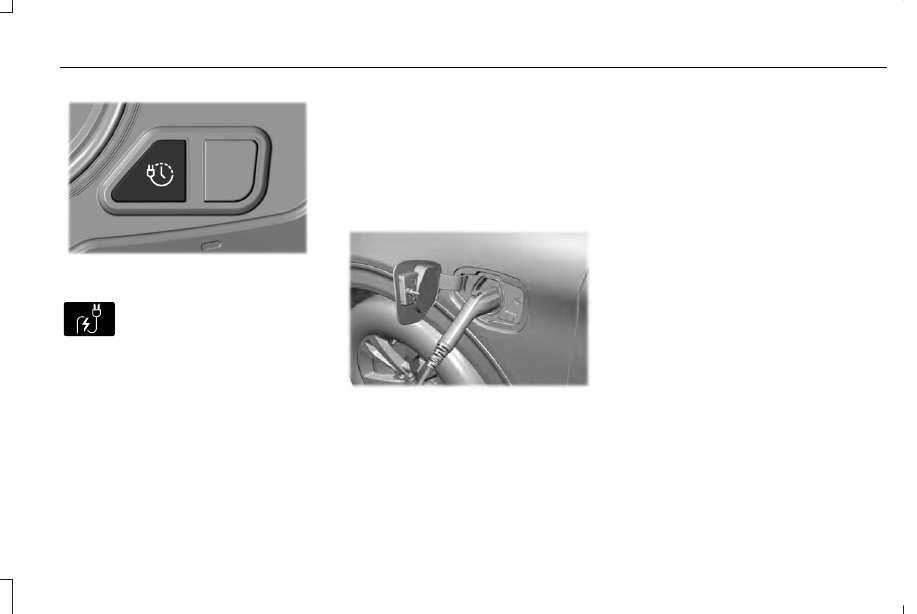
Charge Times Button
Use the charge times button to either turn
off or turn on your charge times settings for
this location. Select charge settings on the
home page of your touchscreen or under the
vehicle settings menu to access charge
preferences. See SYNC™ 3 (page 507).
238
High Voltage Battery
(If Equipped)
-------------------------------------------------------------------------------------------------------------------------------------------------------------
E301111
Charging
E306676
To charge the high-voltage battery:
1. Put the vehicle in park (P).
2. Press the center right edge of the charge
port door and then release to open the
door.
3. Plug the charging coupler into the charge
port receptacle on your vehicle. Make
sure the button clicks confirming that you
have completely engaged the coupler.
Note: Put your vehicle in park (P) to charge,
and for the charge status indicator to
illuminate.
Note: Pump and fan noise could be present
when charging the high voltage battery. The
pump and fan noise is normal as it circulates
liquid and keeps your high voltage battery
cool while charging.
E295257
4. Verify that the cord acknowledgment
feature activates. This indicates the
beginning of a normal charge cycle. The
charge status indicator lights up each
zone alternately from bottom to top and
from bottom to top again.
5. If using a charging station, follow the
instructions on the charge station to
begin the charging process.
The charge status indicator displays how far
along the charge is:
•
When the bottom zone is pulsing, the
charge is between 0-20 percent.
•
When the bottom zone illuminates and
the next is pulsing, the charge is between
20-40 percent.
•
When two zones illuminate and the next
is pulsing, the charge is between 40-60
percent.
•
When three zones illuminate and the next
is pulsing, the charge is between 60-80
percent.
•
When four zones illuminate and the top
zone is pulsing, the charge is between
80-100 percent.
•
When all zones illuminate, the charge is
100 percent.
239
High Voltage Battery
(If Equipped)
-------------------------------------------------------------------------------------------------------------------------------------------------------------
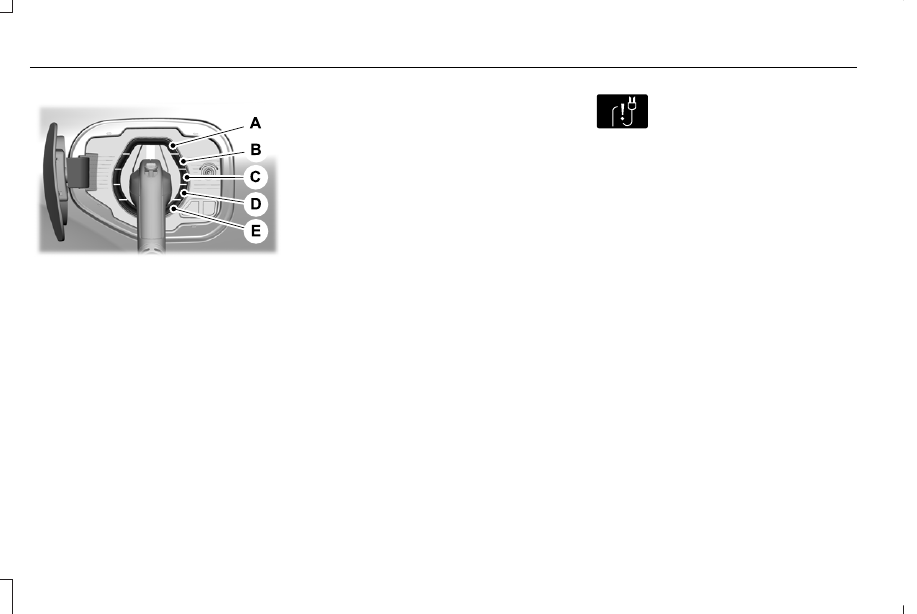
E301197
80%-100% state of charge.
A.
60%-80% state of charge.
B.
40%-60% state of charge.
C.
20%-40% state of charge.
D.
0%-20% state of charge.
E.
Note: When charging stops, the charge
status indicator shows all the completed
zones solidly lit up in a blue color for 30
seconds before turning off. For example, if
charging stops at 70 percent, then the
bottom three zones light up solidly to
indicate a battery charge level of at least 60
percent but less than 80 percent. Charging
stops when complete or when paused due
to preferred charge settings or charge
station actions.
Note: If the charge status indicator does not
light up or pulse after plugging in, please
verify that the charge port light setting is On.
If you do not wish to have the charge status
indicator light up at all while charging, then
you can switch it Off. See charge port light
under vehicle settings on your touchscreen.
See SYNC™ 3 (page 507).
E306677
Note: You can identify charging faults by the
color orange on the charge status indicator.
Faults can occur within the vehicle charging
system or outside the vehicle, such as with
the charge cord, charge station or electrical
supply.
Note: If the system detects a fault in the
vehicle charging system at any point in a
charge cycle, the entire charge status
indicator lights up solidly in an orange color
for 30 seconds and then turns off. If this
happens, unplug the charging coupler and
then plug it back into the charge port
receptacle. If the problem persists, have your
vehicle checked as soon as possible.
Note: If the system detects a fault outside
the vehicle, such as with the charge station
or charge cord, the entire charge status
indicator flashes continuously for 30 seconds
and then turns off. If this happens, check the
charge cord and the charge station or
electrical supply.
240
High Voltage Battery
(If Equipped)
-------------------------------------------------------------------------------------------------------------------------------------------------------------
Locking the Charging Coupler
E295451
Note: You need a padlock or a combination
lock with a shackle diameter of 0.2 in (5 mm)
or less, and the straight portion of the
shackle of 1.0 in (25.4 mm) of length or more.
1. Insert the lock through the hole in the
charging coupler button.
2. Lock the padlock or combination lock.
Waiting to Charge
E306678
Note: Select charge settings on the home
page of the touchscreen or under the vehicle
settings menu to access charge preferences.
See SYNC™ 3 (page 507).
Charging may not begin upon plugging in if
you have set up preferred charge times for
this vehicle location. Your vehicle could delay
charging to take advantage of off-peak
electricity rates. Your vehicle optimizes the
charge schedule to be complete by your next
departure time.
When waiting to charge, plugged in and not
currently charging, the charge status
indicator shows the present state of charge
of the high voltage battery by lighting up all
completed zones for 30 seconds before
turning off. For example, if the battery is at
70 percent charge then the bottom three
zones solidly light up to indicate a battery
charge level of at least 60 percent but less
than 80 percent. When the current state of
charge is less than 20 percent, none of the
zones light up.
Note: When your vehicle is waiting to
charge, the charge status indicator turns off
30 seconds after displaying the present state
of charge. When your vehicle begins
charging, the charge status indicator turns
on and displays the status of the charge, as
described above.
Disconnecting the Charging Coupler
1. If you have installed a padlock or
combination lock, then remove it.
2. Press the button on the charging coupler.
3. While holding the button, remove the
charging coupler from the charge port
receptacle.
E295444
241
High Voltage Battery
(If Equipped)
-------------------------------------------------------------------------------------------------------------------------------------------------------------
4. Press the center right edge of the charge
port door to close.
Note: Do not pull the wall plug from the wall
when your vehicle is charging. Doing so
could damage the outlet and the cord.
MOVING AND STORAGE
INSTRUCTIONS
Make sure that you completely wrap the
dual-voltage charging cord after charging.
When complete, replace the dual-voltage
charging cord in the luggage compartment.
Note: Do not hold the dual-voltage charging
cord by the flexible power cable.
Note: Store the dual-voltage charging cord
in a clean, dry place between the
temperature of -39.9–157.9°F (-40–70°C).
Charging Solution Two
There are two different style chargers that
could be used for charging your vehicle.
Refer to the illustration below to identify the
charger and the instructions for use with the
specific type charger.
WARNING: Do not allow charging
equipment to be immersed in water or
liquids. Failure to follow this warning could
result in fire, electric shock, or serious
personal injury or death.
WARNING: Do not attempt to open
the charging equipment. Failure to follow
this instruction could result in personal
injury, fire, electric shock, death or property
damage.
WARNING: Do not use the charging
equipment if it is faulty or has been
damaged. Failure to follow this instruction
could result in personal injury, fire, electric
shock, death or property damage.
WARNING: Install charging
equipment in compliance with local
regulations. Failure to follow this warning
could result in fire, electric shock, serious
personal injury or death.
WARNING: Do not use an
ungrounded wall outlet. The wall outlet
must be in good condition and meet
up-to-date local codes. Have a qualified
electrician check the wall outlet, if you
suspect that it is not properly grounded.
Failure to follow this instruction could result
in electric shock, personal injury, or death.
WARNING: It is recommended that
electrical outlets for use with your charging
equipment be installed by a licensed,
qualified electrician. Installations must
comply with the provisions of all local
codes. Failure to follow this warning could
result in personal injury or death.
WARNING: Do NOT DROP the
control box or coupler.
WARNING: Do NOT use if stored
outside temperature range specified.
WARNING: Do not attempt to repair
the charging equipment. Contact your local
dealer for assistance.
242
High Voltage Battery
(If Equipped)
-------------------------------------------------------------------------------------------------------------------------------------------------------------
WARNING: Read all warnings on the
charging equipment before using for the
first time.
WARNING: Read all instructions in
this publication before using the charging
equipment.
WARNING: To reduce the risk of fire,
connect only to a circuit provided with 40
amps maximum branch circuit overcurrent
protection installed in accordance with
NEC and local electrical code.
WARNING: Do not use the charging
equipment with an extension cord, surge
protector, timer or other adapter. Failure
to follow this instruction could result in
electric shock or fire.
WARNING: The wall plug must fit
firmly into the outlet. If the connection feels
loose, worn or the outlet is damaged, have
a qualified electrician replace the outlet.
Using charging equipment with a worn
outlet may cause burns, property damage
and increase the risk of electric shock.
WARNING: Fully insert the plug into
the wall outlet. Failure to follow this
instruction could result in electric shock.
WARNING: Children should be
supervised when in the vicinity of the
charging equipment while plugged in.
WARNING: Do not put fingers into
the electric charge coupler. Failure to
follow this instruction could result in
electric shock.
WARNING: This equipment has
arcing or sparking parts. Do not expose to
flammable vapors. Position this equipment
at least 18 in (450 mm) above the floor.
WARNING: Do not connect or
disconnect any pluggable components of
the charging equipment when in use or
charging. Failure to follow this instruct can
cause damage to the charging equipment.
WARNING: Do not use the charging
equipment in temperatures outside of the
operation range of -22°F (-30°C) to 122°F
(50°C).
WARNING: Store the charging
equipment in a clean dry place between
the temperatures of -22°F (-30°C) to 185°F
(85°C).
WARNING: Do not plug the charging
equipment into an electrical outlet that is
submerged in water or covered in snow.
WARNING: Do not use charging
equipment in severe rain, snow or
electrical storm.
243
High Voltage Battery
(If Equipped)
-------------------------------------------------------------------------------------------------------------------------------------------------------------
WARNING: Do not allow charging
equipment to be immersed in water or
liquids. Failure to follow this warning could
result in fire, electric shock, or serious
personal injury or death.
WARNING: When using the charging
equipment avoid moisture, water, snow
and foreign objects at all times.
WARNING: Do not replace the plug
on the connector. There are critical safety
devices in the plug, and the charging
equipment will not operate, if the plug is
replaced. Failure to follow this instruction
could result in electric shock, personal
injury, death, or fire.
WARNING: Charging equipment
contains no user modifiable or repairable
parts. If the charging equipment plug does
not properly fit into the wall outlet, have a
qualified electrician install the correct wall
outlet. Failure to follow this instruction
could result in personal injury or death.
WARNING: High voltage is present
in your electric meter housing and power
distribution service panel. Contact with
high voltage can cause death or serious
personal injury.
WARNING: Visually inspect the
charging equipment before each use. Do
not use the charging equipment if it is
damaged.
WARNING: Keep charging equipment
inside when not in use. Stow the control
box on the hanger or all the charging
equipment in the bag after use to prevent
damage to the charging equipment and
personal injury.
WARNING: Use the charger only to
supply power to electric vehicles equipped
with an SAE J1772 or IEC 62196-2
compliant vehicle receptacle.
Your vehicle comes with a mobile charger
that has a low power connector to use with
a 120V plug NEMA 5-15 and a high power
connector to use with a 240V plug NEMA
14-50. Other connectors, such as NEMA
6-20, are available as service parts at
authorized dealers.
Specification Value
Specification Type
SAE
Charger Model
120-240 VAC
Voltage
32 amps max
continuous
Maximum Current
60Hz
Frequency
< 2 Watts
Power draw when
idle
< 4 Watts
Power draw when
charging
Approximately 20 ft
(6.1 m)
Cable length
8.6 lb (3.9 kg)
Weight
244
High Voltage Battery
(If Equipped)
-------------------------------------------------------------------------------------------------------------------------------------------------------------
Specification Value
Specification Type
-22°F (-30°C) to 122°F
(50°C)
Operating temper-
ature
-22°F (-30°C) to 185°F
(85°C)
Storage temperature
IP67
CCID Environmental
Not required
Ventilation
E356986
Connector.
A
Coupler.
B
Control Box.
C
The mobile charger is in the rear luggage
compartment, and allows you to charge the
vehicle's battery using a standard household
outlet.
You must plug the connector into the control
box first. Then plug the connector into the
household outlet, and then plug the coupler
into the vehicle charge port.
The power indicator illuminates blue when
the connector is properly inserted into the
control box and dedicated wall outlet.
Note: To insert the connector, firmly grasp
the connector by the cable or plug and push
into the control box until and audible click is
heard. Make sure the connector is fully
inserted and flush with the control box
before inserting it into the outlet. Improper
insertion will cause a longer charge session.
Note: Follow the installation instructions
provided with the mobile charger.
Note: We recommend using the supplied
plugs and connectors.
Note: If you do not use a dedicated circuit,
the circuit breaker could trip or open. If a
dedicated circuit is not available, contact a
licensed professional electrician regarding
the installation of a dedicated outlet.
Note: Plug the connector for the mobile
charger directly into the wall plug receptacle.
Do not plug the mobile charger into any form
of extension cord.
245
High Voltage Battery
(If Equipped)
-------------------------------------------------------------------------------------------------------------------------------------------------------------
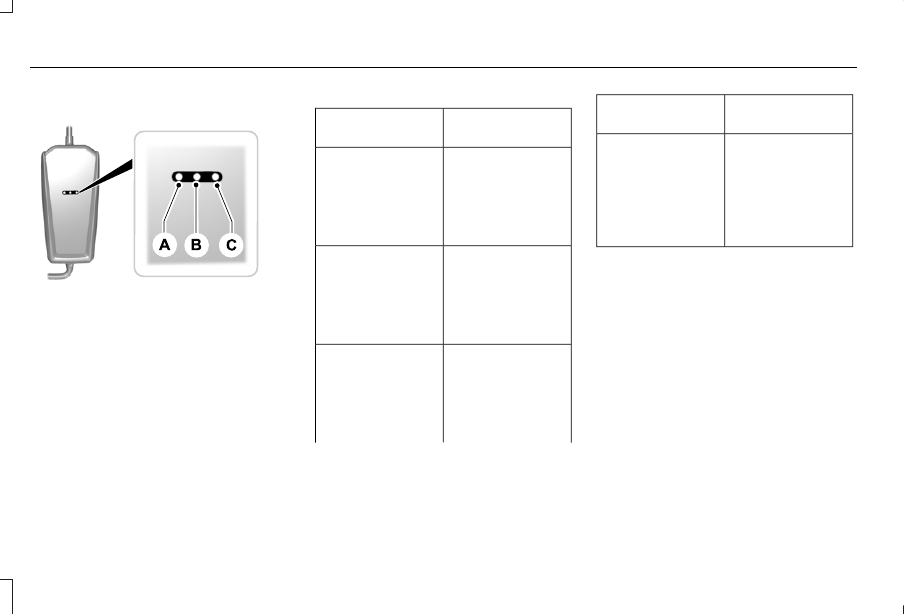
Mobile Charger Indicator Lights
E336515
Amber Fault Indicator Light.
A
Blue Status Indicator Light.
B
Red Trouble Indicator Light.
C
Indicator Description
Mobile Charger Fault
Indicator Type
The amber fault
indicator illuminates
to communicate that
the charger is
rebooting after an
error.
AMBER
When plugged into
the wall outlet, the
blue indicator illumin-
ates to communicate
that the charger is
ready to use.
BLUE
The red indicator
illuminates when the
charger has
detected an error. If
the red indicator is
illuminated, the
RED
Indicator Description
Mobile Charger Fault
Indicator Type
charger will not
deliver power to the
vehicle. The error
must be corrected
before a charging
cycle can begin or
continue.
Note: When first plugged into a wall outlet
the amber, blue and red indicators will blink
once. Then the blue indicator turns on,
followed by a blink of the red indicator. After,
the blue indicator turns off then back on. This
cycle will happen twice if a different
connector is used from a previous charge.
246
High Voltage Battery
(If Equipped)
-------------------------------------------------------------------------------------------------------------------------------------------------------------

ACTION
MODE
RED
BLUE
AMBER
Make sure the outlet is
operational, and the circuit
breaker is in the ON posi-
tion or try using another
outlet. Ensure the
connector is fully inserted
into mobile charger. Ensure
the plug is not severely
degraded. If the error
persists, contact us.
UNPOWERED;
The mobile charger is not
powered.
OFF
OFF
OFF
No action required.
CHARGING;
OFF
PULSING
OFF
The mobile charger is
charging.
If you expect the mobile
charger to be charging the
vehicle, make sure the
vehicle coupler is properly
inserted into the vehicle.
Check and adjust your
charging time preferences
in the on screen display. If
your vehicle is still not
charging, contact us.
STANDBY;
The mobile charger is
powered and ready to
charge. At the current time
the mobile charger is not
charging the vehicle.
OFF
ON
OFF
247
High Voltage Battery
(If Equipped)
-------------------------------------------------------------------------------------------------------------------------------------------------------------
Нет комментариевНе стесняйтесь поделиться с нами вашим ценным мнением.
Текст