Lincoln Corsair (2022 year). Manual in english — page 15

ACTION
MODE
RED
BLUE
AMBER
Wait for the mobile charger
to return to standby. If the
mobile charger cycles for
more than 2-3 minutes,
unplug the vehicle coupler.
Unplug and replug in the
connector. If the issue
persists, contact us.
REBOOTING;
The mobile charger is
recovering after encoun-
tering an error.
ON
ON
ON
Make sure the connector
and the control box are
properly connected.
Unplug and replug in the
connector. If the mobile
charger is warm or in a hot
CHARGING REDUCED;
The mobile charger is
charging at a reduced rate
due to overheating.
OFF
PULSING
ON
environment, try charging
in a cooler area. Try a
different outlet. Try a
different connector if you
have one available. If the
error persists, contact us.
248
High Voltage Battery
(If Equipped)
-------------------------------------------------------------------------------------------------------------------------------------------------------------

ACTION
MODE
RED
BLUE
AMBER
Make sure the connector
and control box are prop-
erly connected. Unplug
and replug in the
connector. If the mobile
charger is warm or in a hot
CHARGING REDUCED, AC
PLUG OR WALL OUTLET;
The mobile charger is
charging at a reduced rate
due to overheating of the
connector or the wall
outlet.
OFF
PULSING
1 FLASH
environment, try charging
in a cooler area. Try a
different outlet. Try a
different connector if you
have one available. If the
error persists, contact us.
Make sure the connector
and control box are prop-
erly connected. Unplug
and replug in the
connector. If the mobile
charger is warm or in a hot
USER
TROUBLESHOOTING;
The mobile charger has
encountered a fault that
requires troubleshooting.
OFF
OFF
ON
environment, try charging
in a cooler area. Try a
different outlet. Try a
different connector if you
have one available. If the
error persists, contact us.
249
High Voltage Battery
(If Equipped)
-------------------------------------------------------------------------------------------------------------------------------------------------------------

ACTION
MODE
RED
BLUE
AMBER
Try a different connector if
you have one available. If
error persists, contact us.
NON - RECOVERABLE
FAULT;
There is an internal fault in
the mobile charger that
cannot be recovered.
ON
OFF
OFF
Try using another
connector if you have one
available. If not, contact us
about obtaining a replace-
ment. If your warranty has
expired, you can order a
replacement from your ford
dealer.
NON - RECOVERABLE
FAULT;
There is an internal fault in
the connector that cannot
be recovered.
1 FLASH
OFF
OFF
Potential shock hazard -
immediately turn off circuit
breaker for the outlet
within home. Discontinue
use. Contact us about
obtaining a replacement.
GROUND LEAKAGE
FAULT;
Electrical current is leaking
through a potentially
unsafe path.
PULSING
OFF
OFF
250
High Voltage Battery
(If Equipped)
-------------------------------------------------------------------------------------------------------------------------------------------------------------
Note: When plugging into an unfamiliar wall
outlet, let the vehicle charge for several
minutes before leaving it unattended. The
red indicator will illuminate if not charging.
The unit will turn off if breaker or
infrastructure ground fault circuit interrupter
(GFCI) is tripped. You can view vehicle
charging status remotely via the Lincoln Way
App.
Mobile Charger Auto-Restart
Auto-restart helps to make sure that your
vehicle will be charged and ready for use
when needed. A charge could be interrupted
if errors are detected. Charging resumes
once the error is no longer detected. The
red indicator illuminates during an error
condition.
The exception to the immediate auto-restart
is when the interruption is due to a charger
ground fault circuit interrupter (GFCI) event.
The charger attempts to restart 15 minutes
after a ground fault circuit interrupter (GFCI)
event. After the fourth attempt to restart, the
charger shuts down and the red indicator
stays on.
If the fault persists, do not continue to try to
charge your vehicle. Contact your authorized
dealer.
CARE INSTRUCTIONS
Do not use cleaners or solvents as this could
damage your mobile charger. Do not place
stress on the charger cables. If unit
overheats, remove the mobile charger from
direct sunlight.
SAFETY FEATURES
The charger includes the following safety
features to protect against the risk of electric
shock:
•
Service Ground Check: The charger
constantly checks for the presence of a
service ground connection. If the service
ground ever fails, the charger red
indicator turns ON and shuts down power
to the vehicle.
•
Thermal Event Sensor: Charger module
senses out-of-ordinary thermal events
and decreases the charging current or
shuts the unit down if required.
•
Ground fault circuit interrupter (GFCI)
Protection: The charger has a ground
fault circuit interrupter (GFCI) reaction
system to protect against electric shock.
If the charger module detects an output
ground fault, it shuts down power to the
output cable and illuminates the red
indicator.
•
Insulation: The charger module,
connector, cable assembly, and charge
coupler are completely insulated. There
are no exposed live parts, to protect
against electric shock.
•
Unintentional Disconnection: The charge
coupler is designed to minimize
unintentional disconnection. A pilot signal
wire in the cable and charge coupler
eliminates the possibility of electric shock
when not connected to a vehicle or if an
unintended disconnect occurs during a
charge. Disconnection during charging
is safe.
251
High Voltage Battery
(If Equipped)
-------------------------------------------------------------------------------------------------------------------------------------------------------------
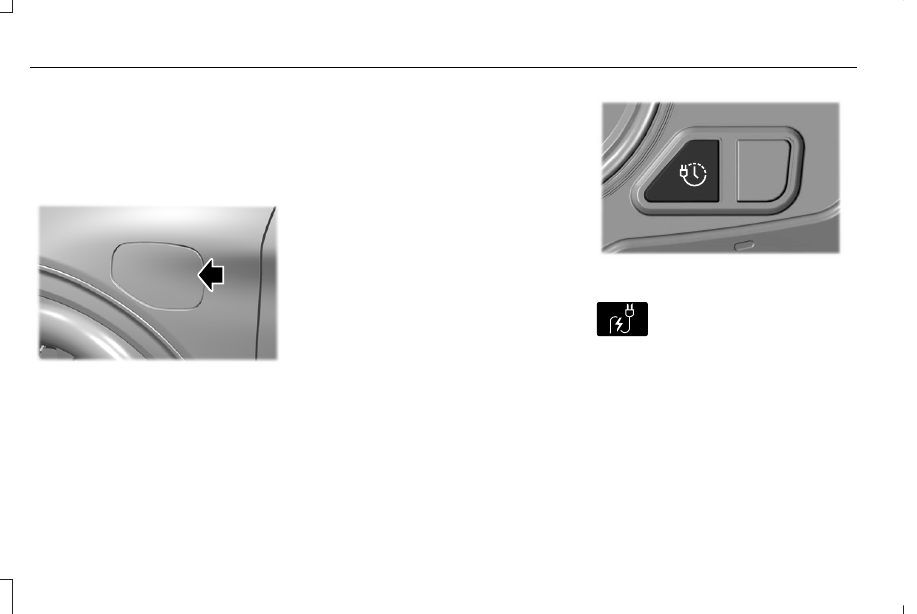
Charge Port
The charge port is between the front
left-hand side door and the front left-hand
wheel well. To open, press the center right
edge of the charge port door, and then
release.
E295258
Note: Do not force the charge port door
open or closed. Forcing the door open or
closed damages the charge port.
The charge status indicator around the
charge port indicates the charge status of
the high voltage battery in your vehicle.
Divided into five zones, the charge status
indicator displays the state of charge in 20
percent increments.
We use the color white as a courtesy light to
help with plugging in and to acknowledge
actions such as plugging in, unplugging or
pressing the charge times button.
Blue is used when you plug the vehicle in
and are either charging or waiting to charge.
Orange indicates charge faults.
Charge Times Button
Use the charge times button to either turn
off or turn on your charge times settings for
this location. Select charge settings on the
home page of your touchscreen or under the
vehicle settings menu to access charge
preferences.
E301111
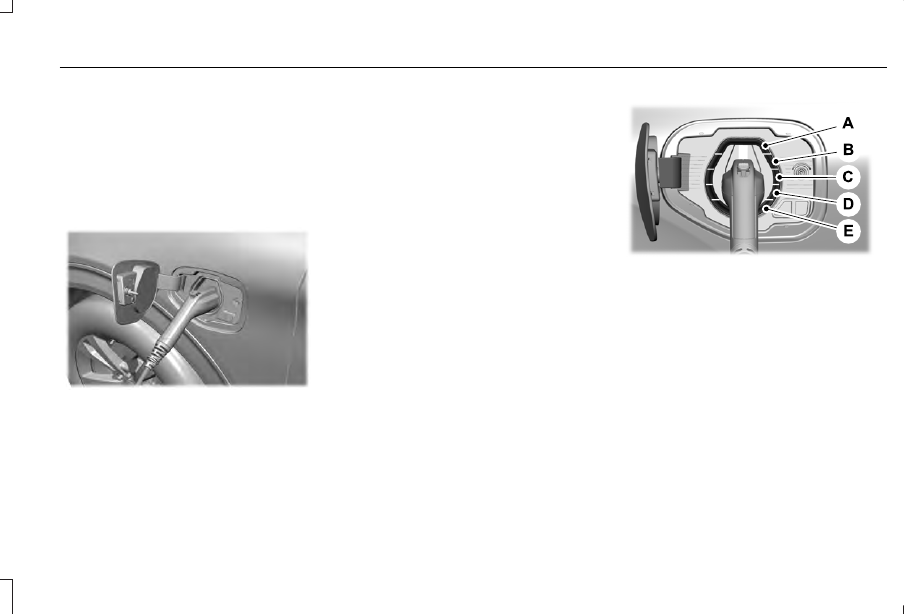
Charging
E306676
To charge the high-voltage battery:
1. Put the vehicle in park (P).
2. Press the center right edge of the charge
port door and then release to open the
door.
3. Plug the charging coupler into the charge
port receptacle on your vehicle. Make
sure the button clicks confirming that you
have completely engaged the coupler.
252
High Voltage Battery
(If Equipped)
-------------------------------------------------------------------------------------------------------------------------------------------------------------
Note: Put your vehicle in park (P) to charge,
and for the charge status indicator to
illuminate.
Note: Pump and fan noise could be present
when charging the high voltage battery. The
pump and fan noise is normal as it circulates
liquid and keeps your high voltage battery
cool while charging.
E295257
4. Verify that the cord acknowledgment
feature activates. This indicates the
beginning of a normal charge cycle. The
charge status indicator lights up each
zone alternately from bottom to top and
from bottom to top again.
5. If using a charging station, follow the
instructions on the charge station to
begin the charging process.
Charge Port Indicators
The charge status indicator displays how far
along the charge is:
•
When the bottom zone is pulsing, the
charge is between 0-20 percent.
•
When the bottom zone illuminates and
the next is pulsing, the charge is between
20-40 percent.
•
When two zones illuminate and the next
is pulsing, the charge is between 40-60
percent.
•
When three zones illuminate and the next
is pulsing, the charge is between 60-80
percent.
•
When four zones illuminate and the top
zone is pulsing, the charge is between
80-100 percent.
•
When all zones illuminate, the charge is
100 percent.
E301197
80%-100% state of charge.
A.
60%-80% state of charge.
B.
40%-60% state of charge.
C.
20%-40% state of charge.
D.
0%-20% state of charge.
E.
253
High Voltage Battery
(If Equipped)
-------------------------------------------------------------------------------------------------------------------------------------------------------------
Note: When charging stops, the charge
status indicator shows all the completed
zones solidly lit up in a blue color for 30
seconds before turning off. For example, if
charging stops at 70 percent, then the
bottom three zones light up solidly to
indicate a battery charge level of at least 60
percent but less than 80 percent. Charging
stops when complete or when paused due
to preferred charge settings or charge
station actions.
Note: If the charge status indicator does not
light up or pulse after plugging in, please
verify that the charge port light setting is On.
If you do not wish to have the charge status
indicator light up at all while charging, then
you can switch it Off. See charge port light
under vehicle settings on your touchscreen.
E306677
Note: You can identify charging faults by the
color orange on the charge status indicator.
Faults can occur within the vehicle charging
system or outside the vehicle, such as with
the charge cord, charge station or electrical
supply.
Note: If the system detects a fault in the
vehicle charging system at any point in a
charge cycle, the entire charge status
indicator lights up solidly in an orange color
for 30 seconds and then turns off. If this
happens, unplug the charging coupler and
then plug it back into the charge port
receptacle. If the problem persists, have your
vehicle checked as soon as possible.
Note: If the system detects a fault outside
the vehicle, such as with the charge station
or charge cord, the entire charge status
indicator flashes continuously for 30 seconds
and then turns off. If this happens, check the
charge cord and the charge station or
electrical supply.
Waiting to Charge
E306678
Note: Select charge settings on the home
page of the touchscreen or under the vehicle
settings menu to access charge preferences.
Charging may not begin upon plugging in if
you have set up preferred charge times for
this vehicle location. Your vehicle could delay
charging to take advantage of off-peak
electricity rates. Your vehicle optimizes the
charge schedule to be complete by your next
departure time.
When waiting to charge, plugged in and not
currently charging, the charge status
indicator shows the present state of charge
of the high voltage battery by lighting up all
completed zones for 30 seconds before
turning off. For example, if the battery is at
70 percent charge then the bottom three
zones solidly light up to indicate a battery
charge level of at least 60 percent but less
than 80 percent. When the current state of
charge is less than 20 percent, none of the
zones light up.
Note: When your vehicle is waiting to
charge, the charge status indicator turns off
30 seconds after displaying the present state
of charge. When your vehicle begins
charging, the charge status indicator turns
on and displays the status of the charge, as
described above.
254
High Voltage Battery
(If Equipped)
-------------------------------------------------------------------------------------------------------------------------------------------------------------

Disconnecting the Charging Coupler
1. If you have installed a padlock or
combination lock, then remove it.
2. Press the button on the charging coupler.
3. While holding the button, remove the
charging coupler from the charge port
receptacle.
E295444
4. Press the center right edge of the charge
port door to close.
Note: Do not pull the wall plug from the wall
when your vehicle is charging. Doing so
could damage the outlet and the cord.
MOVING AND STORAGE
INSTRUCTIONS
Make sure you wrap the mobile charger after
charging. Store the mobile charger in the
storage bag supplied with the mobile
charger.
When charging is complete, replace the
mobile charger in the rear luggage
compartment.
Note: Do not hold the mobile charger by the
power cable. Hold the complete unit and
carefully place back in the storage bag.
Note: To remove the connector, firmly grasp
the connector by the cable or plug and pull
away from the control box.
255
High Voltage Battery
(If Equipped)
-------------------------------------------------------------------------------------------------------------------------------------------------------------

AUTOMATIC TRANSMISSION -
EXCLUDING: PLUG-IN HYBRID
ELECTRIC VEHICLE (PHEV)
WARNING: Apply the parking brake,
shift into park (P), switch the ignition off
and remove the key before you leave your
vehicle. Failure to follow this instruction
could result in personal injury or death.
WARNING: When your vehicle is
stationary, keep the brake pedal fully
pressed when shifting gears. Failure to
follow this instruction could result in
personal injury, death or property damage.
WARNING: Do not apply the brake
pedal and accelerator pedal
simultaneously. Applying both pedals
simultaneously for more than a few
seconds will limit engine performance,
which may result in difficulty maintaining
speed in traffic and could lead to serious
injury.
Note: You may not be able to shift out of
park (P) unless the intelligent access key is
inside your vehicle.
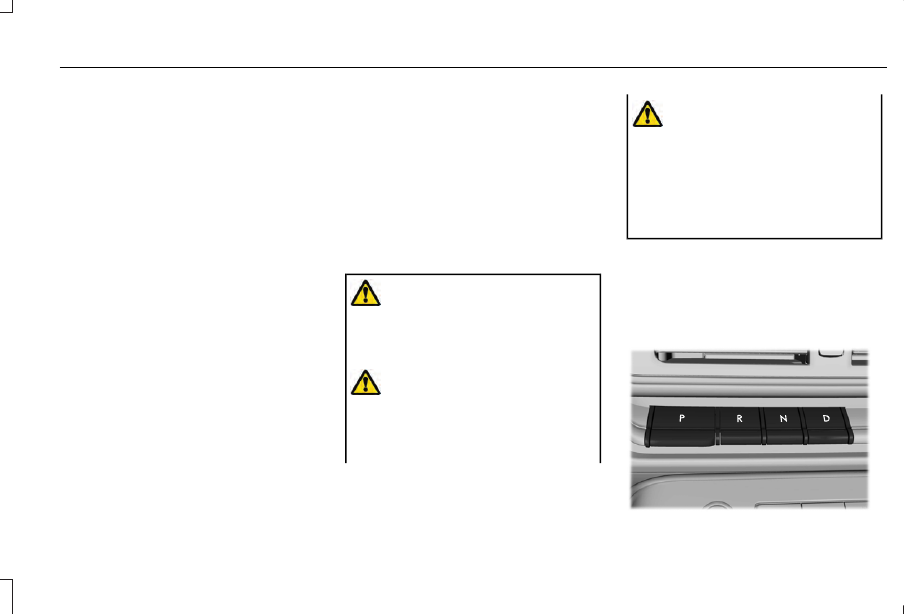
Understanding the Shift Positions of
Your Automatic Transmission
E247220
To place your vehicle in gear from park
(P):
1. Fully press and hold the brake pedal
when shifting out of park (P).
2. Press the desired gear on the
transmission selector.
3. When you finish driving, come to a
complete stop.
4. Press the park (P) button on the
transmission selector.
The instrument cluster displays the current
gear.
Park (P)
With the transmission in park (P), your vehicle
locks the transmission and prevents the
wheels from turning. Always come to a
complete stop before putting your vehicle
into and out of park (P). An audible tone
sounds once you select park (P).
The electric parking brake may apply when
you shift to park (P) without fully pressing the
brake pedal. The electric parking brake
applies when you shift to park (P) on large
slopes. The electric parking brake releases
with the drive away release operation. See
Electric Parking Brake (page 271).
Automatic Return to Park
What is Automatic Return to Park (P)
Your vehicle shifts into park (P) if you attempt
to exit your vehicle without the transmission
in park (P).
256
Transmission
-------------------------------------------------------------------------------------------------------------------------------------------------------------
How Does Automatic Return to Park (P)
Work
Your vehicle shifts into park (P) when your
vehicle is stationary and any of the following
occur:
•
You switch the vehicle off.
•
You open the driver door with your
seatbelt unlatched.
•
You unlatch the driver seatbelt when the
driver door is open.
Note: Do not use automatic return to park
(P) when your vehicle is moving, except in
an emergency.
Automatic Return to Park (P) Limitations
Automatic return to park (P) may not work if
the door ajar switch is malfunctioning.
See an authorized dealer if any of the
following occur:
•
Door ajar indicator does not illuminate
with the driver door open.
•
Door ajar indicator illuminates with the
driver door closed.
•
Transmission not in park message
appears with the driver door closed, after
you shift out of park (P).
Reverse (R)
With the selector in reverse (R), your vehicle
moves backward. Always come to a
complete stop before shifting into and out
of reverse (R).
Neutral (N)
WARNING: In neutral (N) your vehicle
is free to roll.
In neutral (N), power does not transmit to the
driven wheels, but the transmission does not
lock. You can start the engine with the
transmission in this position.
Temporary Neutral Mode
What is Temporary Neutral Mode
This mode keeps your vehicle in neutral (N)
when you switch your vehicle off. Use this
mode at an automatic car wash if you exit
your vehicle, or switch your vehicle off.
Note: Do not tow your vehicle in this mode.
Note: Automatic return to park (P) delays
when your vehicle is in this mode.
Temporary Neutral Mode Limitations
Your vehicle could shift to park (P) after 30
minutes, or when the vehicle battery charge
level is low. Prolonged use of this mode can
cause the vehicle battery to run out of
charge.
Do not tow your vehicle in this mode. Failure
to follow these instructions could result in
vehicle damage not covered by the vehicle
warranty.
Entering Temporary Neutral Mode
1. Power your vehicle on.
2. Bring your vehicle to a complete stop.
257
Transmission
-------------------------------------------------------------------------------------------------------------------------------------------------------------

3. Press and hold the brake pedal.
4. Press the neutral (N) button.
Note: A confirmation message appears
when your vehicle enters the mode.
5. Release the brake pedal.
Note: Your vehicle is free to roll.
6. Switch your vehicle off.
Note: Do not tow your vehicle in this mode.
Note: The neutral (N) indicator on the
transmission selector may flash in this mode.
Exiting Temporary Neutral Mode
1. Press the brake pedal.
2. Shift into park (P), or power your vehicle
on and shift into drive (D), or reverse (R).
Drive (D)
Drive (D) is the normal driving position for
the best fuel economy.
Transmission Not in Park (P) Audible
Warning
Sounds if you open the driver door before
shifting into park (P).
Park Selection Audible Warning
Sounds when you shift into park (P).
Manually Shifting Gears with Live in
Drive
Shifting Using Paddle Shifters
The instrument cluster displays the current
gear. The current gear flashes when your
vehicle cannot shift into the requested gear.
Your vehicle cannot shift if the requested
gear raises or lowers the engine speed
beyond the limit.
Your vehicle could shift when you fully press
the accelerator or brake pedal.
Note: Prolonged driving with high engine
speed could cause vehicle damage not
covered by the vehicle warranty.
Note: Shifting into the requested gear could
affect the drive modes.
E144821
Manually Shifting Gears in Drive (D)
Use this feature when overtaking another
vehicle, or to temporarily change gear.
•
Pull any paddle to switch the feature on.
•
Pull the right (+) paddle to upshift.
•
Pull the left (-) paddle to downshift.
•
Hold the (+) paddle for a few seconds to
switch the feature off.
Note: The feature switches off after a short
period of time if you do not pull either
paddle.
258
Transmission
-------------------------------------------------------------------------------------------------------------------------------------------------------------
Manual Park Release
WARNING: When doing this
procedure, you need to take the
transmission out of park (P) which means
your vehicle can roll freely. To avoid
unwanted vehicle movement, always fully
apply the parking brake prior to doing this
procedure. Use wheel chocks if
appropriate.
WARNING: If the parking brake is
fully released, but the brake warning lamp
remains illuminated, the brakes may not
be working properly. Have your vehicle
checked as soon as possible.
WARNING: Do not drive your vehicle
until you verify that the stoplamps are
working.
Use the manual park release to move your
transmission from the park (P) position in the
event of an electrical malfunction or
emergency.
Activating the Manual Park Release Cable
1. Apply the parking brake. See Electric
Note: If the vehicle battery runs out of
charge, use an external power source to
apply the parking brake.
2. Locate the Manual Park Release cable
access cover on the lower instrument
panel dash to the bottom left-hand side
of the steering column.
E307867
259
Transmission
-------------------------------------------------------------------------------------------------------------------------------------------------------------
3. Using a tool or the key blade, carefully
remove the access cover.
Note: Do not pull the tether until you are in
the driver seat.
4. Switch the ignition on.
Note: Do not activate the manual park
release when you start the engine.
5. Once in the driver seat, fully press the
brake pedal and hold. Do not release.
Pull the orange tether towards the driver
seat until it locks the tether in the
override position. Then leave the tether.
6. Keep the tether extended while in the
override position.
7. If done correctly, a message on the
instrument cluster displays Park Not
Available, Transmission Not in Park, or
Shift System Fault.
Note: Your vehicle is now out of the park (P)
position and is free to roll.
8. With your foot still fully applied on the
brake pedal, disengage the parking
brake. See Electric Parking Brake (page
271).
9. Switch off the ignition.
10.
Disconnect the negative battery cable
from the battery.
Note: If your vehicle detects wheel
movement before you disconnect the
battery, the electric parking brake could
apply.
Returning Your Vehicle to Normal Mode
1. Once it is safe to do so, reconnect the
negative, black, battery cable to the
battery.
2. Apply the parking brake. See Electric
Note: If your vehicle detects wheel
movement, the electric parking brake could
apply.
Note: If the vehicle battery runs out of
charge, use an external power source to
apply the parking brake.
3. Fully apply the brake pedal and hold, do
not release. Pull the orange tether
outward toward the driver seat to remove
it from the override position.
4. The cable releases and retracts back to
its original rest position.
5. Stow the manual park release cable
tether back inside the instrument panel
dash hole and install the access cover
by pressing it back in position.
6. With your foot fully applied on the brake
pedal, start your vehicle. Confirm that
your vehicle is in the park (P) position and
that the instrument cluster indicates park
(P).
7. If the instrument cluster is not displaying
the park (P) position or there is a
message stating Park Not Available,
Transmission Not In Park, or Shift System
Fault, apply the parking brake before
exiting your vehicle. Contact an
authorized dealer for service.
260
Transmission
-------------------------------------------------------------------------------------------------------------------------------------------------------------
Automatic Transmission Adaptive
Learning
This feature may increase durability and
provide consistent shift feel over the life of
your vehicle. A new vehicle or transmission
may have firm shifts, soft shifts or both. This
is normal and does not affect the operation
or durability of the transmission. Over time,
the adaptive learning process fully updates
transmission operation.
If Your Vehicle Gets Stuck in Mud or
Snow
If your vehicle gets stuck in mud or snow,
you can rock it out by shifting between
forward and reverse gears, stopping
between shifts in a steady pattern. Press
lightly on the accelerator in each gear.
Note: Do not rock your vehicle if the engine
is not at normal operating temperature or
damage to the transmission could occur.
Note: Do not rock your vehicle for more than
a minute or damage to the transmission and
tires could occur, or the engine may
overheat.
Note: If your vehicle has SelectShift™, you
can pull away in second (2) gear.
1. Shift into drive (D).
2. Pull the (+) paddle until 2 shows on the
instrument cluster.
AUTOMATIC TRANSMISSION -
PLUG-IN HYBRID ELECTRIC
VEHICLE (PHEV)
WARNING: Apply the parking brake,
shift into park (P), switch the ignition off
and remove the key before you leave your
vehicle. Failure to follow this instruction
could result in personal injury or death.
WARNING: When your vehicle is
stationary, keep the brake pedal fully
pressed when shifting gears. Failure to
follow this instruction could result in
personal injury, death or property damage.
WARNING: Do not apply the brake
pedal and accelerator pedal
simultaneously. Applying both pedals
simultaneously for more than a few
seconds will limit engine performance,
which may result in difficulty maintaining
speed in traffic and could lead to serious
injury.
Note: You may not be able to shift out of
park (P) unless the intelligent access key is
inside your vehicle.
Understanding the Shift Positions of
Your Automatic Transmission
E247220
261
Transmission
-------------------------------------------------------------------------------------------------------------------------------------------------------------
To place your vehicle in gear from park
(P):
1. Fully press and hold the brake pedal
when shifting out of park (P).
2. Press the desired gear on the
transmission selector.
3. When you finish driving, come to a
complete stop.
4. Press the park (P) button on the
transmission selector.
The instrument cluster displays the current
gear.
Park (P)
With the transmission in park (P), your vehicle
locks the transmission and prevents the
wheels from turning. Always come to a
complete stop before putting your vehicle
into and out of park (P). An audible tone
sounds once you select park (P).
The electric parking brake may apply when
you shift to park (P) without fully pressing the
brake pedal. The electric parking brake
applies when you shift to park (P) on large
slopes. The electric parking brake releases
with the drive away release operation. See
Electric Parking Brake (page 271).
Automatic Return to Park
What is Automatic Return to Park (P)
Your vehicle shifts into park (P) if you attempt
to exit your vehicle without the transmission
in park (P).
How Does Automatic Return to Park (P)
Work
Your vehicle shifts into park (P) when your
vehicle is stationary and any of the following
occur:
•
You switch the vehicle off.
•
You open the driver door with your
seatbelt unlatched.
•
You unlatch the driver seatbelt when the
driver door is open.
Note: Do not use automatic return to park
(P) when your vehicle is moving, except in
an emergency.
Automatic Return to Park (P) Limitations
Automatic return to park (P) may not work if
the door ajar switch is malfunctioning.
See an authorized dealer if any of the
following occur:
•
Door ajar indicator does not illuminate
with the driver door open.
•
Door ajar indicator illuminates with the
driver door closed.
•
Transmission not in park message
appears with the driver door closed, after
you shift out of park (P).
Reverse (R)
With the selector in reverse (R), your vehicle
moves backward. Always come to a
complete stop before shifting into and out
of reverse (R).
262
Transmission
-------------------------------------------------------------------------------------------------------------------------------------------------------------
Neutral (N)
WARNING: In neutral (N) your vehicle
is free to roll.
In neutral (N), power does not transmit to the
driven wheels, but the transmission does not
lock. You can start the engine with the
transmission in this position.
Temporary Neutral Mode
What is Temporary Neutral Mode
This mode keeps your vehicle in neutral (N)
when you switch your vehicle off. Use this
mode at an automatic car wash if you exit
your vehicle, or switch your vehicle off.
Note: Do not tow your vehicle in this mode.
Note: Automatic return to park (P) delays
when your vehicle is in this mode.
Temporary Neutral Mode Limitations
Your vehicle could shift to park (P) after 30
minutes, or when the vehicle battery charge
level is low. Prolonged use of this mode can
cause the vehicle battery to run out of
charge.
Do not tow your vehicle in this mode. Failure
to follow these instructions could result in
vehicle damage not covered by the vehicle
warranty.
Entering Temporary Neutral Mode
1. Power your vehicle on.
2. Bring your vehicle to a complete stop.
3. Press and hold the brake pedal.
4. Press the neutral (N) button.
Note: A confirmation message appears
when your vehicle enters the mode.
5. Release the brake pedal.
Note: Your vehicle is free to roll.
6. Switch your vehicle off.
Note: Do not tow your vehicle in this mode.
Note: The neutral (N) indicator on the
transmission selector may flash in this mode.
Exiting Temporary Neutral Mode
1. Press the brake pedal.
2. Shift into park (P), or power your vehicle
on and shift into drive (D), or reverse (R).
Drive (D)
Drive (D) is the normal driving position for
the best fuel economy.
Transmission Not in Park (P) Audible
Warning
Sounds if you open the driver door before
shifting into park (P).
Park Selection Audible Warning
Sounds when you shift into park (P).
263
Transmission
-------------------------------------------------------------------------------------------------------------------------------------------------------------
Нет комментариевНе стесняйтесь поделиться с нами вашим ценным мнением.
Текст