Mitsubishi Montero (1991+). Manual — part 22
77
F (25
C) resistance should be approximately 80,470 ohms. If
resistance deviates greatly, replace sensor.
RELAYS
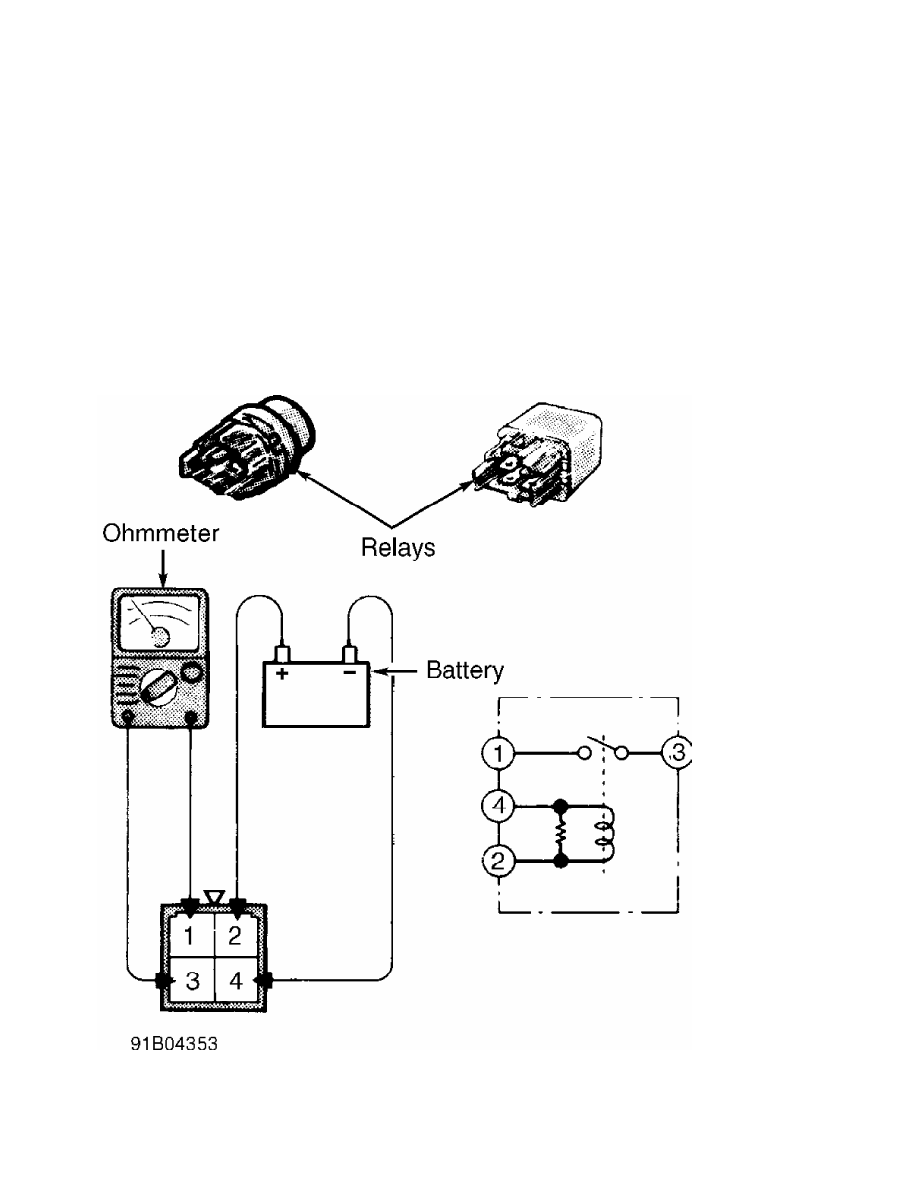
4-Terminal Relay
1) Either round or square relays may be used. Testing is same
for either relay. Remove relay from holder. Using an ohmmeter, ensure
continuity exists between terminals No. 2 and 4 and does not exist
between terminals No. 1 and 3. See Fig. 9.
2) Connect battery voltage to terminal No. 2, and ground
terminalNo. 4. Ensure continuity exists between terminals No. 1 and 3.
If continuity is not as specified, replace relay.
Fig. 9: Testing 4-Terminal Relays
Courtesy of Mitsubishi Motor Sales of America.
6-Terminal Relay
Remove relay from holder. Using an ohmmeter, ensure
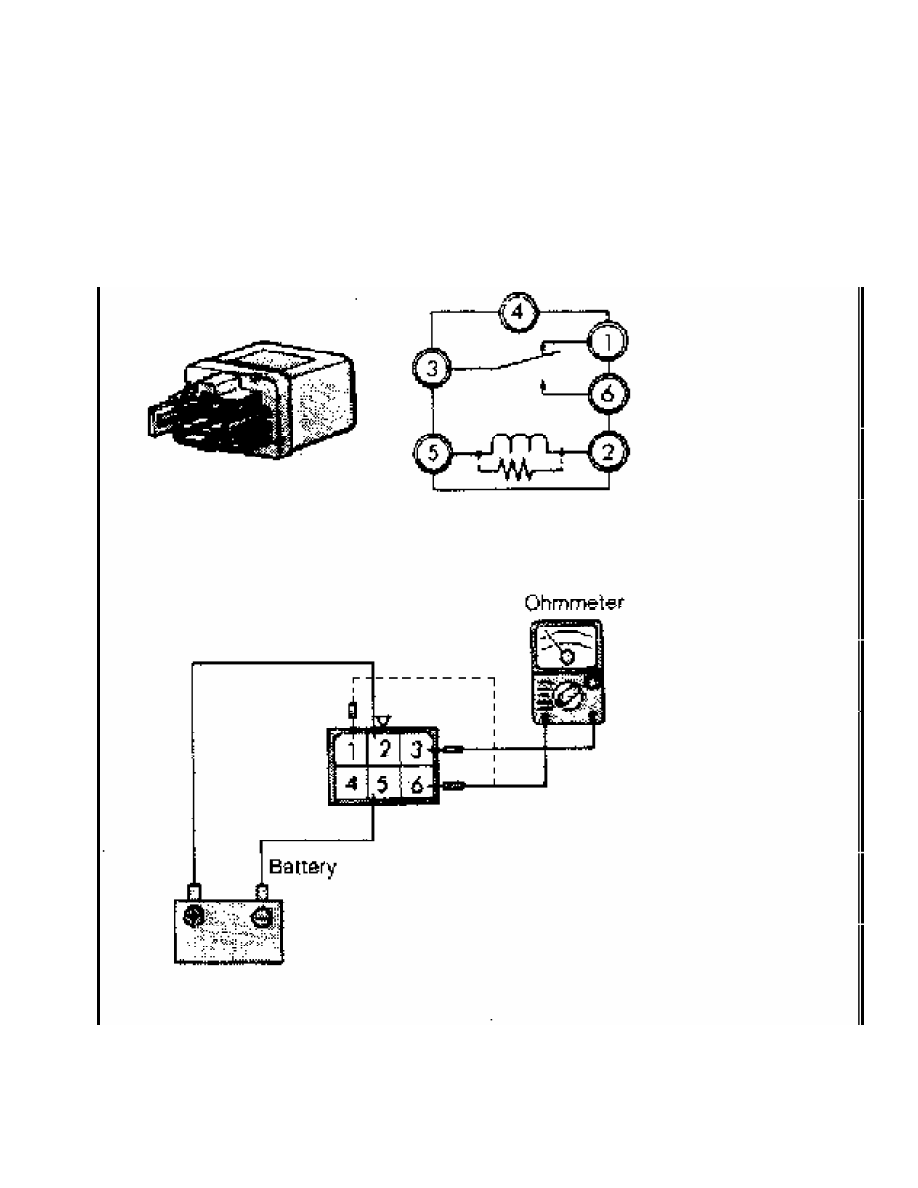
continuity exists between terminals No. 2 and 5 and terminals No. 1
and 3 and does not exist between terminals No. 3 and 6. Connect
battery voltage to terminal No. 2, and ground terminal No. 5. Ensure
continuity exists between terminals No. 3 and 6 and does not exist
between terminals No. 1 and 3. See Fig. 10. If continuity is not as
specified, replace relay.
Fig. 10: Testing 6-Terminal Relay
Courtesy of Mitsubishi Motor Sales of America.
REMOVAL & INSTALLATION
NOTE: For removal and installation procedures not covered in this
article, see appropriate HEATER SYSTEM article in the AIR
CONDITIONING & HEAT Section.
A/C SWITCH
Removal & Installation (Colt Vista)
From back side of control panel, push right control panel
clip right while pushing control panel out of dash panel. Allow
control panel to hang. Remove side bracket. Press temperature switch
control assembly left, and then remove A/C switch. To install, reverse
removal procedure.
Removal & Installation (Montero)
Remove lap heater duct. Remove glove box stoppers and glove
box. Remove heater control knobs. Remove center panel screw hole
plugs, and remove screws. Remove center panel. Disconnect center panel
wiring harness. Remove A/C switch. To install, reverse removal
procedure.
Removal & Installation (Pickup & Ram-50)
Remove heater control knobs. Remove glove box. Remove center
panel mounting screws. Use a trim stick to remove upper side of panel.
Remove A/C switch assembly mounting screws. Pull switch assembly
toward vehicle interior. Remove switch. To install, reverse removal
procedure.
COMPRESSOR
Removal & Installation (Colt Vista)
Discharge A/C system using approved refrigerant
recovery/recycling equipment. Disconnect high tension cable from
ignition coil. Remove distributor cap. Loosen idler pulley adjusting
bolt, and remove belt. Disconnect compressor electrical connector.
Remove high and low pressure lines and "O" rings from compressor.
Remove compressor mounting bolts. Remove compressor. To install,
reverse removal procedure.
Removal & Installation (Montero, Pickup & Ram-50)
DischargeA/C system using approved refrigerant
recovery/recycling equipment. Loosen idler pulley, and remove belt.
Disconnect compressor electrical connector. Disconnect high and low
pressure lines from compressor. Remove compressor mounting bolts.
Remove compressor. To install, reverse removal procedure.
CONDENSER
Removal & Installation (Colt Vista)
Discharge A/C system using approved refrigerant
recovery/recycling equipment. Remove front grille and grille brackets.
Remove front end cover and condenser harness. Disconnect electrical
fan connector. Slowly disconnect pressure lines from condenser. Remove
2 condenser mounting bolts. Lift up and remove condenser from vehicle.
To install, reverse removal procedure.
Removal & Installation (Montero)
Discharge A/C system using approved refrigerant
recovery/recycling equipment. Remove radiator grille. Slowly
disconnect pressure lines from condenser. Disconnect condenser fan
motor connector. Remove condenser fan mounting bolts and motor. Remove
condenser mounting bolts. Remove condenser from vehicle. To install,
reverse removal procedure.
Removal & Installation (Pickup & Ram-50)

Discharge A/C system using approved refrigerant
recovery/recycling equipment. Remove grille. Slowly disconnect
pressure lines at condenser. Remove upper condenser mounting bolts.
Remove condenser. To install, reverse removal procedure.
EVAPORATOR ASSEMBLY
Removal & Installation (Colt Vista)
1) Discharge A/C system using approved refrigerant
recovery/recycling equipment. Remove drain hose from evaporator.
Disconnect refrigerant line connections. Discard "O" ring seals.
2) Remove lower glove box and dash insert (or reinforcement).
See Fig. 11 Remove upper glove box and duct joint. Remove defroster
ducts and duct joints from right side of evaporator. Disconnect A/C
harness connector and main harness connector. Remove evaporator
assembly. To install, reverse removal procedure.
Fig. 11: Removing Evaporator Assembly (Colt Vista)
Courtesy of Mitsubishi Motor Sales of America.
Removal & Installation (Montero)
1) Discharge A/C system using approved refrigerant
Нет комментариевНе стесняйтесь поделиться с нами вашим ценным мнением.
Текст