Mitsubishi Montero (1991+). Manual — part 298
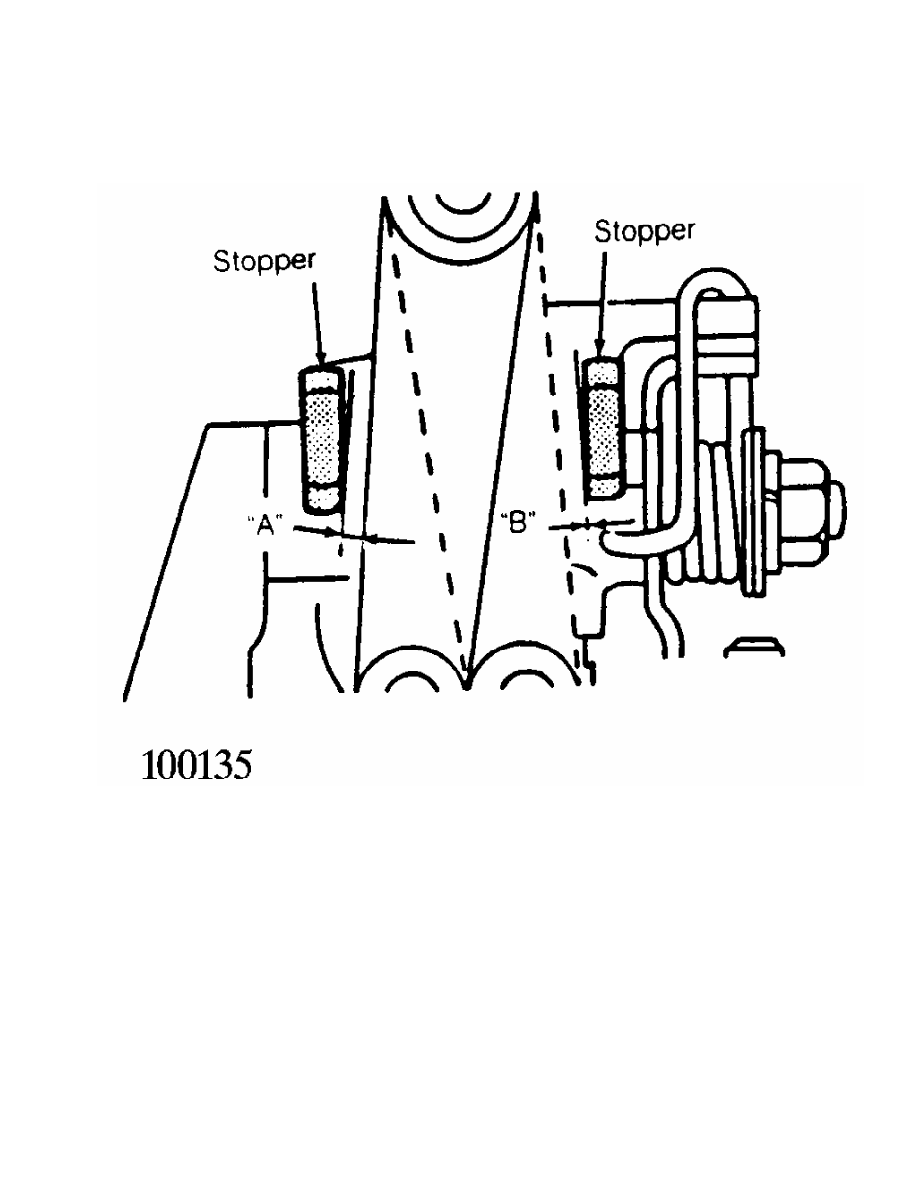
Fig. 3: Adjusting Shift Cable
Courtesy of Chrysler Motors.
TROUBLE SHOOTING - BASIC PROCEDURES
1991 Mitsubishi Montero
GENERAL TROUBLE SHOOTING
* PLEASE READ THIS FIRST *
NOTE: This is GENERAL information. This article is not intended
to be specific to any unique situation or individual vehicle
configuration. The purpose of this Trouble Shooting
information is to provide a list of common causes to
problem symptoms. For model-specific Trouble Shooting,
refer to SUBJECT, DIAGNOSTIC, or TESTING articles available
in the section(s) you are accessing.
ACCESSORIES & ELECTRICAL
CHARGING SYSTEM TROUBLE SHOOTING
NOTE: This is GENERAL information. This article is not intended
to be specific to any unique situation or individual vehicle
configuration. The purpose of this Trouble Shooting
information is to provide a list of common causes to
problem symptoms. For model-specific Trouble Shooting,
refer to SUBJECT, DIAGNOSTIC, or TESTING articles available
in the section(s) you are accessing.
BASIC CHARGING SYSTEM TROUBLE SHOOTING CHART
CONDITION POSSIBLE CAUSE CORRECTION
Vehicle Will Not Dead battery Check battery cells,
Start alternator belt
tension and alternator
output
Loose or corroded battery Check all charging
connections system connections
Ignition circuit or switch Check and replace as
malfunction necessary
Alternator Light Loose or worn alternator Check alternator drive
Stays On With drive belt tension and
Engine Running condition, See Belt
Adjustment in TUNE-UP
article in the
TUNE-UP section
Loose alternator wiring Check all charging
connections system connections
Short in alternator light See Indicator Warning
wiring Lights in STANDARD
INSTRUMENTS in the
ACCESSORIES &
EQUIPMENT section
Defective alternator stator See Bench Tests in
or diodes ALTERNATOR article
Defective regulator See Regulator Check in
ALTERNATOR article
Alternator Blown fuse See WIRING DIAGRAMS
Light Stays Off
With Ignition
Switch ON
Defective alternator See Testing in
ALTERNATOR article
Defective indicator light See Indicator Warning
bulb or socket Lights in STANDARD
INSTRUMENTS in the
ACCESSORIES &
EQUIPMENT section
Alternator Short in alternator wiring See On-Vehicle Tests
Light Stays OFF in ALTERNATOR article
With Ignition
Switch ON
Defective rectifier bridge See Bench Tests in
ALTERNATOR article
Lights or Fuses Defective alternator wiring See On-Vehicle Tests
Burn Out in ALTERNATOR article
Frequently
Defective regulator See Regulator Check in
ALTERNATOR article
Defective battery Check and replace as
necessary
Ammeter Gauge Loose or worn drive belt Check alternator drive
Shows Discharge belt tension and
condition. See Belt
Adjustment in TUNE-UP
article in the
TUNE-UP section
Defective wiring Check all wires and
wire connections
Defective alternator or See Bench Tests and
regulator On-Vehicle Tests in
ALTERNATOR article
Defective ammeter, or See Testing in
improper ammeter wiring STANDARD INSTRUMENTS
connection in the ACCESSORIES &
EQUIPMENT section
Noisy Loose drive pulley Tighten drive pulley
Alternator attaching nut
Loose mounting bolts Tighten all alternator
mounting bolts
Worn or dirty bearings See Bearing
Replacement
ALTERNATOR article
Defective diodes or stator See Bench Test in
ALTERNATOR article
Battery Does Loose or worn drive belt Check alternator drive
Stay Charged belt tension and
condition. See
Belt Adjustment in
appropriate TUNE-UP
article in the
TUNE-UP section
Loose or corroded battery Check all charging
connections system connections
Loose alternator connections Check all charging
system connections
Defective alternator or See On-Vehicle Tests
battery and Bench Tests in
ALTERNATOR article
Add-on electrical accessories Install larger
exceeding alternator capacity alternator
Battery Defective battery Check alternator
Overcharged- output and repair as
Uses Too Much necessary
Water
Defective alternator See On-Vehicle Test and
Bench Tests in
ALTERNATOR article
Excessive alternator voltage Check alternator output
and repair as necessary
IGNITION SYSTEM TROUBLE SHOOTING
NOTE: This is GENERAL information. This article is not intended
to be specific to any unique situation or individual vehicle
configuration. The purpose of this Trouble Shooting
information is to provide a list of common causes to
problem symptoms. For model-specific Trouble Shooting,
refer to SUBJECT, DIAGNOSTIC, or TESTING articles available
in the section(s) you are accessing.
Ignition Secondary Trouble Shooting Chart
START: Visually inspect Spark Plug Wires, Coil Wires,
Plug Wire Boots, Rotor, and Distributor Cap for
signs of damage.
OK
NOT OK
* To test secondary ignition
* Repair or replace
system, modify a Spark Plug
damaged components
by attaching a ground wire
as necessary
to the body of the plug and
Нет комментариевНе стесняйтесь поделиться с нами вашим ценным мнением.
Текст