Mitsubishi Eclipse / Eclipse Spyder (2000-2002). Service and repair manual — part 67

OIL PAN AND OIL PUMP
TSB Revision
ENGINE OVERHAUL <3.0L ENGINE>
11D-39
REMOVAL SERVICE POINT
<<A>> OIL PAN, LOWER REMOVAL
1. Remove the lower oil pan mounting bolts.
CAUTION
Do not use a scraper or special tool to remove the oil pan.
2. Remove the lower oil pan by tapping on the side wall with a
plastic hammer (mallet) through a wooden plank held
against it.
<<B>> OIL PAN, UPPER REMOVAL
1. Remove the long bolts "A" shown in the illustration first.
2. Remove all other bolts.
CAUTION
Do not use a scraper or special tool to remove the oil pan.
3. Screw M10 bolts into the two bolt holes in the oil pan to
break the joint and remove the oil pan.
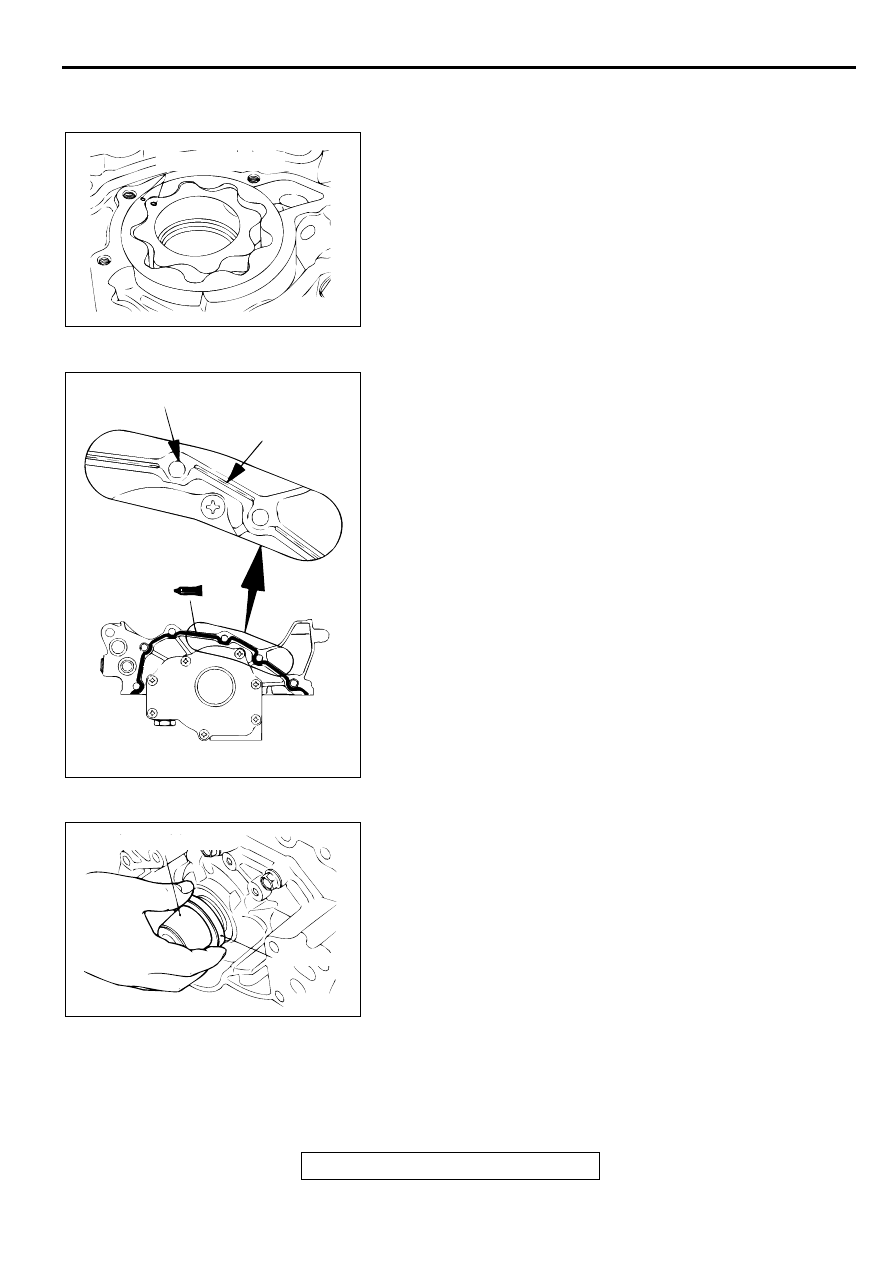
<<C>> OUTER ROTOR/INNER ROTOR REMOVAL
Make alignment dots on the outer and inner rotors for
assembly.
AKX00746
TIMING BELT SIDE
"A"
AB
AKX00658
AKX00742AB
ALIGNMENT DOTS
OIL PAN AND OIL PUMP
TSB Revision
ENGINE OVERHAUL <3.0L ENGINE>
11D-40
INSTALLATION SERVICE POINTS
>>A<< INNER ROTOR/OUTER ROTOR INSTALLATION
Apply engine oil to the rotors. Then, install the rotors ensuring
that the alignment dots made at disassembly are properly
aligned.
>>B<< OIL PUMP CASE ASSEMBLY INSTALLATION
1. Clean the gasket mating surfaces of oil pump case and
cylinder block.
2. Apply a 3-mm (0.1-inch) diameter bead of sealant
(Mitsubishi Genuine Parts number MD970389 or equivalent)
to the oil pump case.
Apply sealant as indicated by the broken line in the
illustration; the grooves must be traced and the bolt holes
must be surrounded with a bead of sealant.
3. Install the oil pump case assembly to the front of the cylinder
block.
NOTE: Be sure to install the oil pump case quickly while the
sealant is wet (within 15 minutes).
4. Tighten the oil pump case mounting bolts to the specified
torque.
Tightening torque:
14
±
1 N
⋅
m (122
±
9 in-lb) <M8 bolt>
41
±
8 N
⋅
m (30
±
6 ft-lb) <M10 bolt>
NOTE: After installation, keep the sealed area away from oil
and coolant for approximately one hour.
>>C<< CRANKSHAFT FRONT OIL SEAL INSTALLATION
1. Install the guide of special tool MD998717 to the front end of
the crankshaft.
2. Apply engine oil to the lip area of a new oil seal and push it
in until it contacts the oil pump case.
AKX00742AB
ALIGNMENT DOTS
AKX00674
BOLT HOLE
GROOVE
AB
AKX00659 AB
MD998717 (GUIDE)
OIL SEAL

OIL PAN AND OIL PUMP
TSB Revision
ENGINE OVERHAUL <3.0L ENGINE>
11D-41
3. Using special tool MD998717, press-fit the oil seal into the
oil pump case.
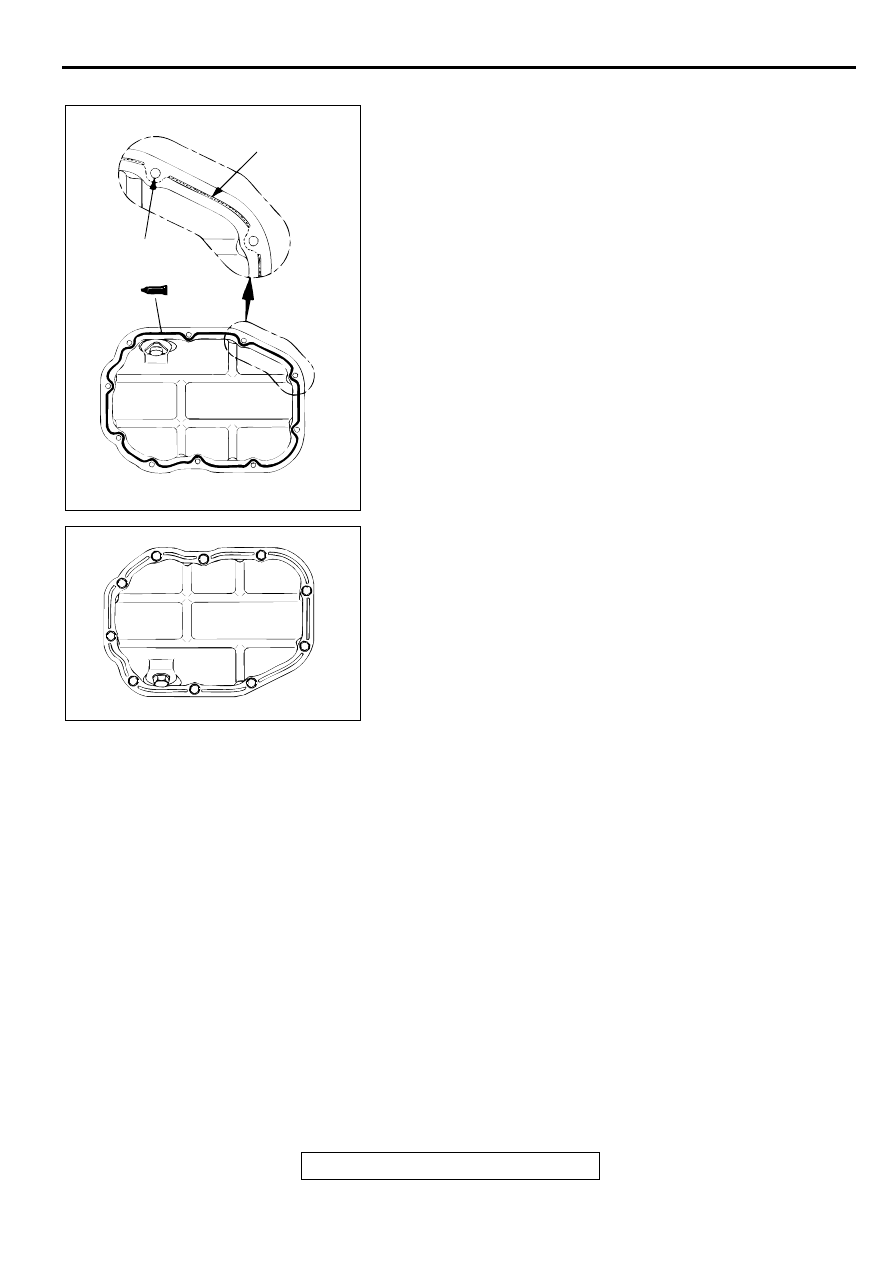
>>D<< OIL PAN, UPPER INSTALLATION
1. Clean both gasket surfaces of the upper oil pan and cylinder
block.
2. Apply a 4 mm (0.2 inch) diameter bead of sealant
(Mitsubishi Genuine Parts number MD970389 or equivalent)
to the upper oil pan.
Apply sealant as indicated by the broken line in the
illustration; the grooves must be traced and the bolt holes
must be surrounded with a bead of sealant.
CAUTION
When installing the upper oil pan, be sure not to expel the
sealant from the oil pan flange at portion A in the
illustration.
3. Install the oil pan to the bottom of the cylinder block.
NOTE: Be sure to install the oil pan quickly while the sealant
is wet (within 15 minutes).
4. Tighten the upper oil pan bolts in the sequence shown.
Tightening torque: 5.9
±
1 N
⋅
m (52
±
9 in-lb)
NOTE: After installation, keep the sealed area away from
the oil and coolant for approximately one hour.
AKX00660
MD998717
AB
AKX00675
BOLT HOLE
GROOVE
A
AB
AKX00676
9
5
1
4
8
12
16
15
11 7
3
2
6
10
14
13
AB
OIL PAN AND OIL PUMP
TSB Revision
ENGINE OVERHAUL <3.0L ENGINE>
11D-42
>>E<< OIL PAN, LOWER INSTALLATION
1. Clean both gasket surfaces of the upper and lower oil pans.
2. Apply a 4 mm (0.2 inch) diameter bead of sealant
(Mitsubishi Genuine Parts number MD970389 or equivalent)
to the lower oil pan.
Apply sealant as indicted by the broken line in the
illustration; the grooves must be traced and the bolt holes
must be surrounded with a bead of sealant.
3. Install the lower oil pan to the upper oil pan.
NOTE: Be sure to install the oil pan quickly while the sealant
is wet (within 15 minutes).
4. Tighten the lower oil pan bolts in the sequence shown.
Tightening torque: 11
±
1 N
⋅
m (95
±
9 in-lb)
NOTE: After installation, keep the sealed area away from oil
for approximately one hour.
AKX00677
GROOVE
BOLT HOLE
AB
AKX00678
4
9
7
3
1
5
8
10
6
2
AB
Нет комментариевНе стесняйтесь поделиться с нами вашим ценным мнением.
Текст