Mitsubishi Eclipse / Eclipse Spyder (2000-2002). Service and repair manual — part 619
WINDOW GLASS
TSB Revision
BODY
42-23
Required Special Tool:
•
MB990480: Glass Holder
•
MB990449: Window molding remover
AC000460
9
2
1
3
5
10
G
G
8
4
6
1
F
F
7
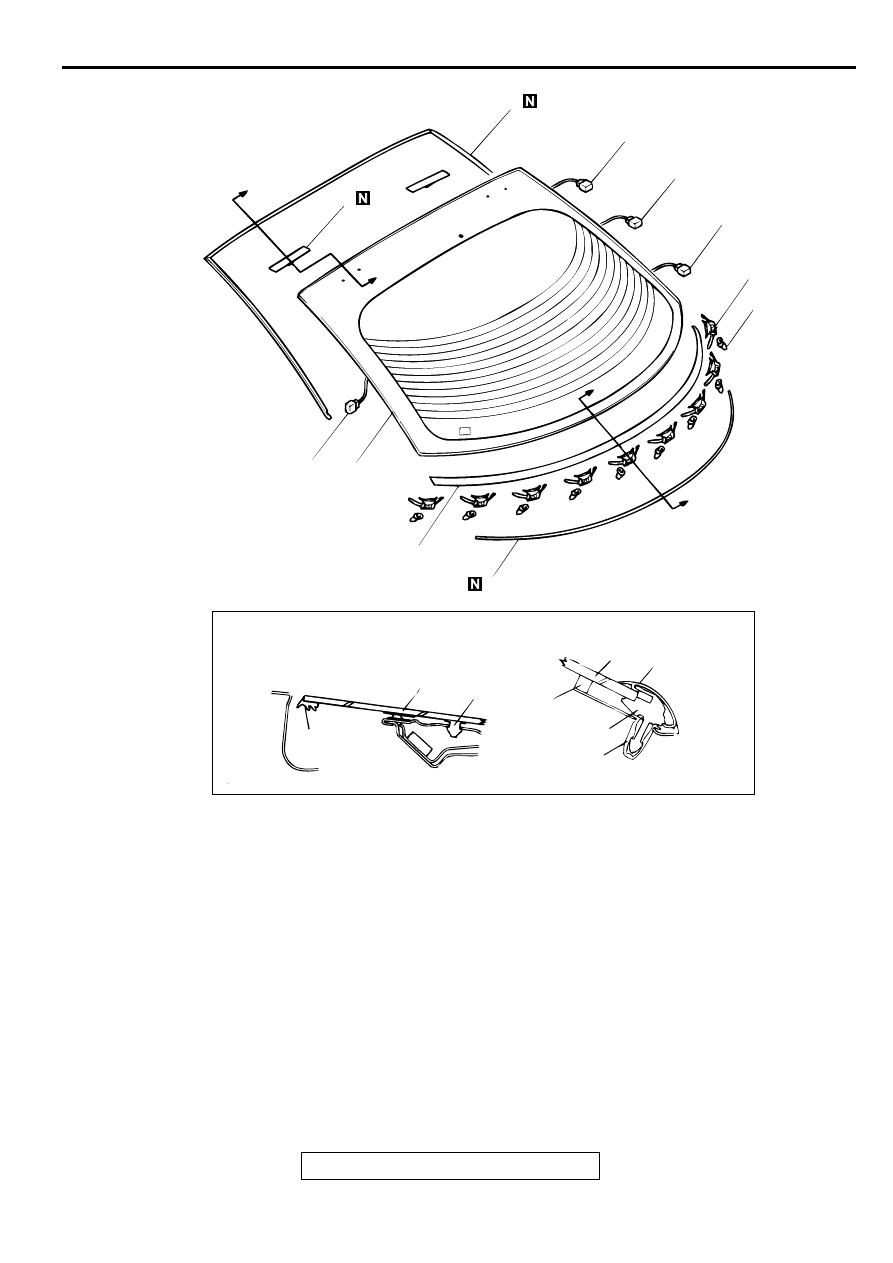
SECTION F – F
SECTION G – G
9
6
7
6
4
8
5
10
AB
REMOVAL STEPS
1. HARNESS CONNECTOR (FOR
LIFTGATE WINDOW DEFOGGER)
2. HARNESS CONNECTOR (FOR
MAIN GLASS ANTENNA)
3. HARNESS CONNECTOR (FOR SUB
GLASS ANTENNA)
<<A>>
4. LIFTGATE LOWER MOULDING
5. LIFTGATE MOULDING CLIP
<<B>> >>A<<
6. LIFTGATE WINDOW GLASS
>>A<<
7. GLASS STOPPER
>>A<<
8. WINDOW SPACER
9. LIFTGATE UPPER MOULDING
10. CLIP GROMMET A
REMOVAL STEPS (Continued)
WINDOW GLASS
TSB Revision
BODY
42-24
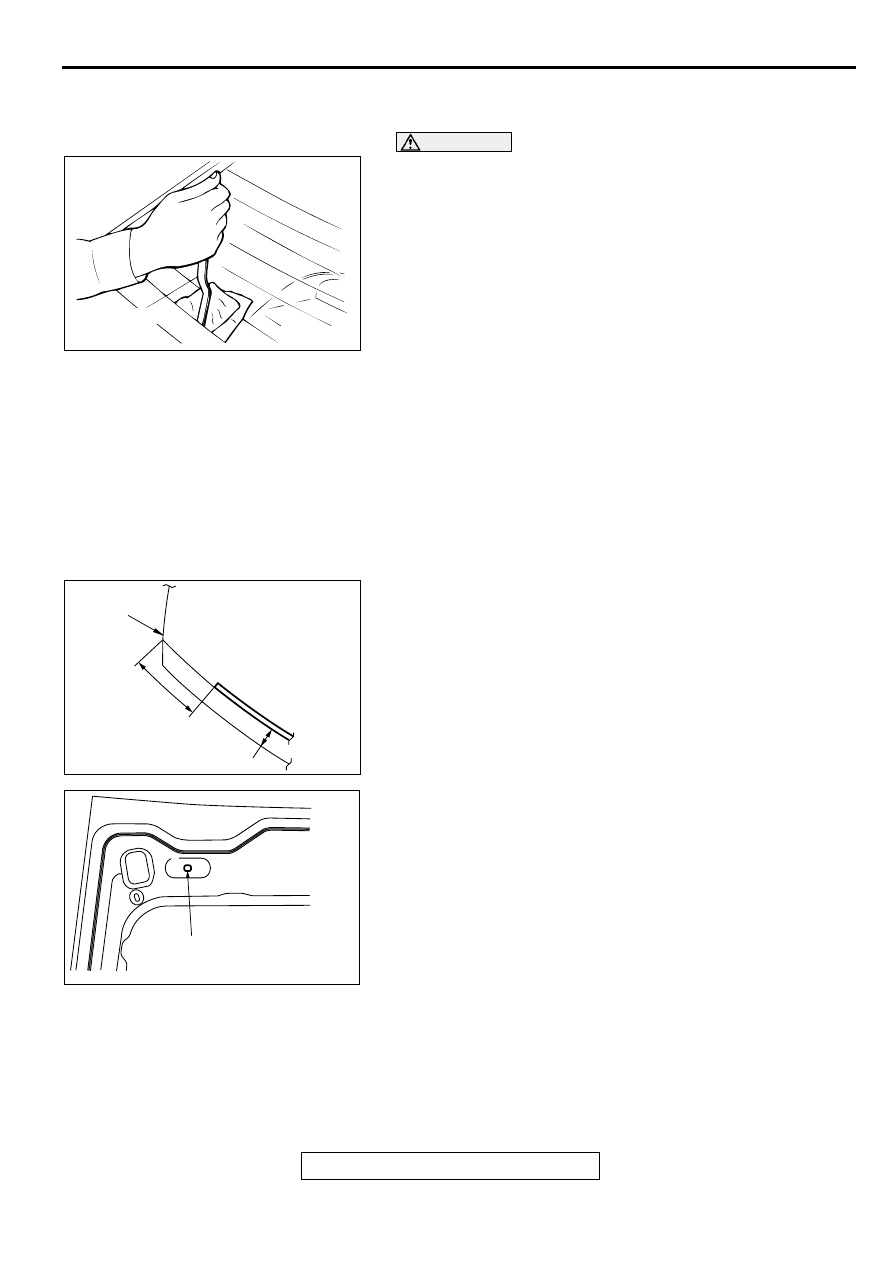
REMOVAL SERVICE POINTS
<<A>> LIFTGATE LOWER MOLDING REMOVAL
CAUTION
If liftgate lower molding has become warped, it should not
be reused.
Use special tool MB990449 to lever out the molding.
<<B>> LIFTGATE WINDOW GLASS REMOVAL
Remove the liftgate window glass using the same procedure as
for the windshield. (Refer to
INSTALLATION SERVICE POINT
>>A<< WINDOW SPACER/GLASS STOPPER/LIFTGATE
WINDOW GLASS INSTALLATION
1. Use 3M
AAD Part number 8906 or equivalent. to degrease
the inside and outside edges of the liftgate window glass
and the surface of the body flange.
2. Install glass stopper so that it is bent toward inside the
liftgate window glass and is firmly sticked.
3. Install glass stopper on liftgate window glass at the same
place as glass stopper is installed on body flange
4. Apply primer and adhesive.
5. Install the glass in the same way as for the windshield.
(Refer to
AC000461
MB990449
AB
AC001777
37 mm
(1.5 in)
16 mm
(0.6 in)
AC
GLASS END
LINE
AC003816AB
GLASS STOPPER
INSTALLATON HOLES
QUARTER WINDOW GLASS AND REGULATOR ASSEMBLY
TSB Revision
BODY
42-25
Q U A R TER W IN D O W G LA SS A N D R EG U LATO R A SSEM BLY
GENERAL DESCRIPTION
M1422000100094
POWER WINDOWS
Power windows are used in all vehicles. When the
power window main switch is operated, the quarter
windows will open or close. This system has the
following operations and features.
•
A timer function has been provided so that when
all doors are closed and ignition is turned off, the
power window can be operated for 30 seconds
from the time the ignition is turned off.
•
The power window main switch contains a one-
touch down switch that will automatically open
the quarter windows.
WINDOW GLASS DIAGNOSIS
INTRODUCTION TO WINDOW GLASS DIAGNOSIS
M1422006700102
If water leaks from the quarter window glass, causes
for these faults can include faults in the glass,
weatherstrip or drain hole.
WINDOW GLASS DIAGNOSTIC TROUBLESHOOTING STRATEGY
M1422006800109
Use these steps to plan your diagnostic strategy. If
you follow them carefully, you will be sure that you
have exhausted most of the possible ways to find a
window glass fault.
1. Gather information from the customer.
2. Verify that the condition described by the
customer exists.
3. Find the malfunction by following the Symptom
Chart.
4. Verify malfunction is eliminated.
SYMPTOM CHART
M1422006900117
SYMPTOM PROCEDURES
INSPECTION PROCEDURE 1: Quarter window glass water leak
DIAGNOSIS
STEP 1. Check if the seal is faulty.
Q: Is the seal faulty?
YES :
Repair it, then go to Step 3.
NO :
Go to Step 2.
STEP 2. Check if the body flange is deformed.
Q: Is the body flange deformed?
YES :
Repair or replace it, then go to Step 3.
NO :
Go to Step 3.
STEP 3. Check symptoms.
Q: Is any water leaking?
YES :
Return to Step 1.
NO :
This diagnosis complete.
SYMPTOMS
INSPECTION
PROCEDURE
REFERENCE PAGE
Quarter window glass water leak
1
Quarter window malfunction
2
Water leak around quarter window glass edge
3
Water leak from quarter trim
4
Wind noise around quarter window
5

QUARTER WINDOW GLASS AND REGULATOR ASSEMBLY
TSB Revision
BODY
42-26
INSPECTION PROCEDURE 2: Quarter window malfunction
DIAGNOSIS
STEP 1. Check the quarter window installation
condition.
Q: Is the quarter window installation condition good?
YES :
Go to Step 2.
NO :
Adjust it. (Refer to
.) Then go to
Step 3.
STEP 2. Inspect the window regulator assembly.
Q: Is the window regulator assembly in good
condition?
YES :
Go to Step 3.
NO :
Repair or replace it, then go to Step 3.
STEP 3. Check symptoms.
Q: Does the quarter window operate correctly?
YES :
This diagnosis is complete.
NO :
Return to Step 1.
INSPECTION PROCEDURE 3: Water leak around quarter window glass edge
DIAGNOSIS
STEP 1. Check the weatherstrip.
Q: Is the weatherstrip in good condition?
YES :
Go to Step 2.
NO :
Replace it, then go to Step 3.
STEP 2. Check quarter window glass fit
(alignment).
Q: Is the quarter window glass fit (alignment) correct?
YES :
Go to Step 3.
NO :
Adjust it. Refer to
. Then go to Step
STEP 3. Check symptoms.
Q: Is any water leaking?
YES :
Return to Step 1.
NO :
This diagnosis is complete.
INSPECTION PROCEDURE 4: Water leak from quarter trim
DIAGNOSIS
STEP 1. Check the drain hole.
Q: Is the drain hole clogged?
YES :
Replace it, then go to Step 3.
NO :
Go to Step 2.
STEP 2. Check the waterproof cover.
Q: Is the waterproof cover in good condition?
YES :
Go to Step 3.
NO :
Repair or replace it, then go to Step 3.
STEP 3. Check symptoms.
Q: Is any water leaking?
YES :
Return to Step 1.
NO :
This diagnosis is complete.
Нет комментариевНе стесняйтесь поделиться с нами вашим ценным мнением.
Текст