Mitsubishi Eclipse / Eclipse Spyder (2000-2002). Service and repair manual — part 640

SUNROOF ASSEMBLY
TSB Revision
BODY
42-107
12
Fully closed
Ignition switch: ON
1. Ignition switch: LOCK (OFF)
2. Sunroof switch: OPEN [Within 30 seconds after
the ignition switch is turned LOCK (OFF).]
The sunroof automatic
opens 30 seconds after
the ignition switch is
turned LOCK (OFF).
13Fully opened or
while closing
Ignition switch: ON
1. Sunroof switch: CLOSE
2. Ignition switch: LOCK (OFF)
3. Sunroof switch: TILT UP, OPEN or CLOSE
[Within 30 seconds after the ignition switch is
turned LOCK (OFF).]
The sunroof closes while
the sunroof switch is
pushed to the CLOSE
position. Then, the
sunroof does not move
when any switch is
pushed.
14
Fully closed (tilt
down)
Ignition switch: ON
1. Sunroof switch: TILT UP
2. Ignition switch: LOCK (OFF) [The ignition switch
is turned LOCK (OFF) while the sunroof switch
is automatically opening.]
The sunroof automatic
opens only 30 seconds
after the ignition switch is
turned LOCK (OFF).
15
Fully opened or
while closing
Ignition switch: ON
1. Sunroof switch: CLOSE
2. Ignition switch: LOCK (OFF) [The ignition switch
is turned LOCK (OFF) while the sunroof switch
is pushed to the CLOSE position.]
The sunroof closes while
the sunroof switch is
pushed to the CLOSE
position.
16
Fully closed
Ignition switch: ON
1. Ignition switch: LOCK (OFF)
2. Sunroof switch: OPEN [Within 30 seconds after
the ignition switch is turned LOCK (OFF).]
3. Door switch: ON [Within 30 seconds after the
ignition switch is turned LOCK (OFF).]
The sunroof automatic
opens and stops when
the door switch is LOCK
(OFF).
17
Fully closed
Ignition switch: ON
1. Ignition switch: LOCK (OFF)
2. Sunroof switch: OPEN [Within 30 seconds after
the ignition switch is turned LOCK (OFF).]
3. Door switch: ON [Within 30 seconds after the
ignition switch is turned LOCK (OFF).]
The sunroof closes while
the sunroof switch is
pushed to the CLOSE
position. Then, the
sunroof does not move
when the door switch is
ON.
18
Fully closed (tilt
down)
Ignition switch: ON
1. Ignition switch: LOCK (OFF)
2. Sunroof switch: TILT UP [Within 30 seconds
after the ignition switch is turned LOCK (OFF).]
3. Door switch: ON [Within 30 seconds after the
ignition switch is turned LOCK (OFF).]
The sunroof automatic
opens and stops when
the door switch is ON.
NO.
SUNROOF INITIAL
POSITION
SWITCH OPERATION
JUDGMENT
(NORMAL)
SUNROOF ASSEMBLY
TSB Revision
BODY
42-108
SUNROOF ASSEMBLY
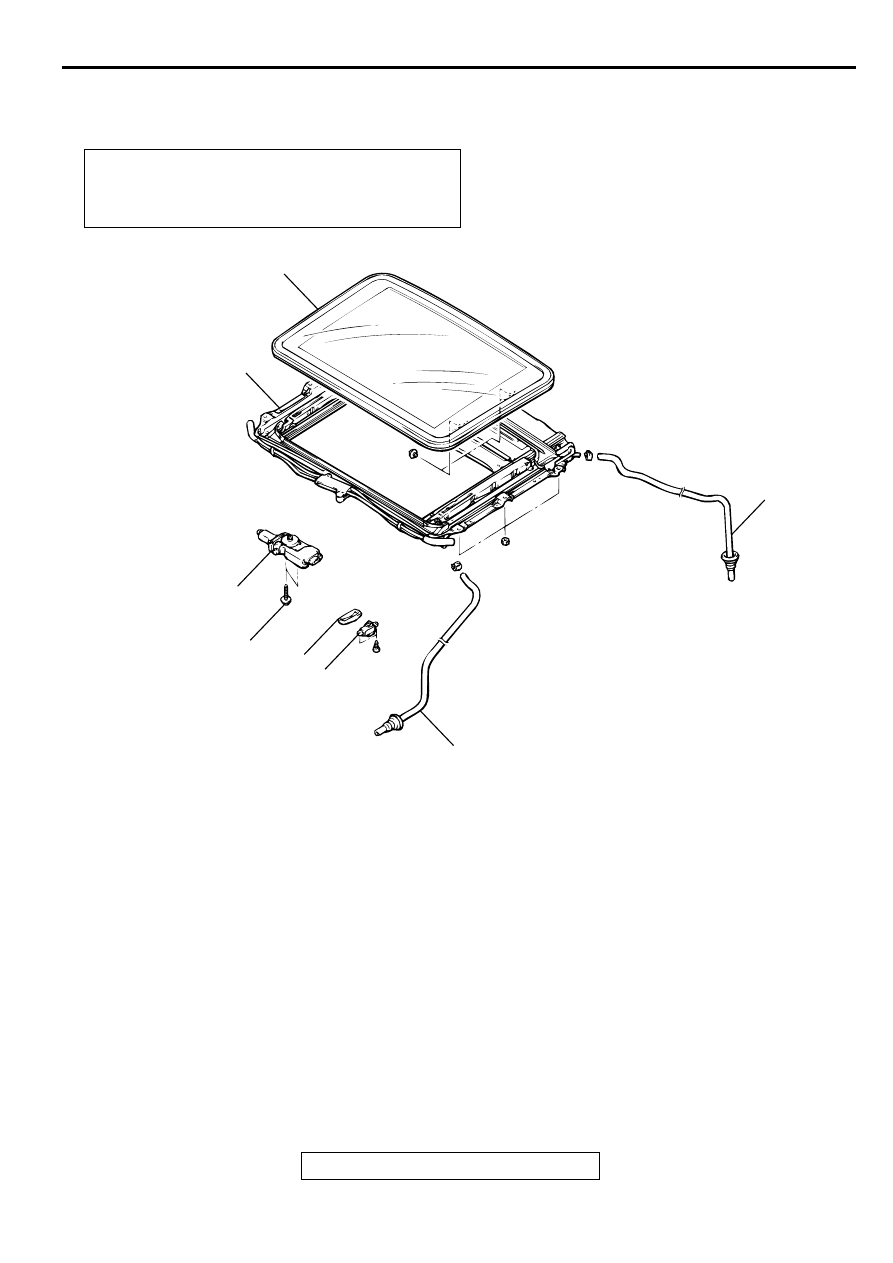
REMOVAL AND INSTALLATION
M1426001200063
Post-installation Operation <Roof lid glass assembly,
Sunroof assembly>
•
Sunroof Fit Adjustment (Refer to
•
Sunroof Water Test (Refer to
AC004739 AB
1
2
3
4
5
6
5.4 ± 1.5 N·m
48 ± 13 in-lb
5
1. ROOF LID GLASS ASSEMBLY
SUNROOF SWITCH REMOVAL
STEPS
2. SUNROOF SWITCH COVER
•
HEADLINING (REFER TO GROUP
52A
.)
3. SUNROOF SWITCH
SUNROOF MOTOR REMOVAL
STEPS
•
HEADLINING (REFER TO GROUP
52A
.)
<<A>> >>B<<
4. SUNROOF MOTOR ASSEMBLY
DRAIN HOSE REMOVAL STEPS
•
FRONT SIDE AIR DAM (FRONT
DRAIN HOSE.) (REFER TO
•
HEADLINING (REFER TO GROUP
52A
.)
•
SPLASH SHIELD (FRONT DRAIN
HOSE.) (REFER TO
<<B>> >>A<<
5. DRAIN HOSE
SUNROOF ASSEMBLY REMOVAL
STEPS
2. SUNROOF SWITCH COVER
•
HEADLINING (REFER TO GROUP
52A
.)
<<A>> >>B<<
4. SUNROOF MOTOR ASSEMBLY
5. DRAIN HOSE CONNECTION
6. SUNROOF ASSEMBLY
SUNROOF ASSEMBLY
TSB Revision
BODY
42-109
REMOVAL SERVICE POINTS
<<A>> SUNROOF MOTOR REMOVAL
CAUTION
Always close the roof lid glass fully before removing the
sunroof motor. If the fully-closed positions of the roof lid
glass and the sunroof motor are not the same, the sunroof
will not operate properly.
NOTE: If there is a problem with the sunroof motor so that the
roof lid glass cannot close fully, use an Allen wrench to turn the
gear section of the sunroof motor to fully close the roof lid
glass.
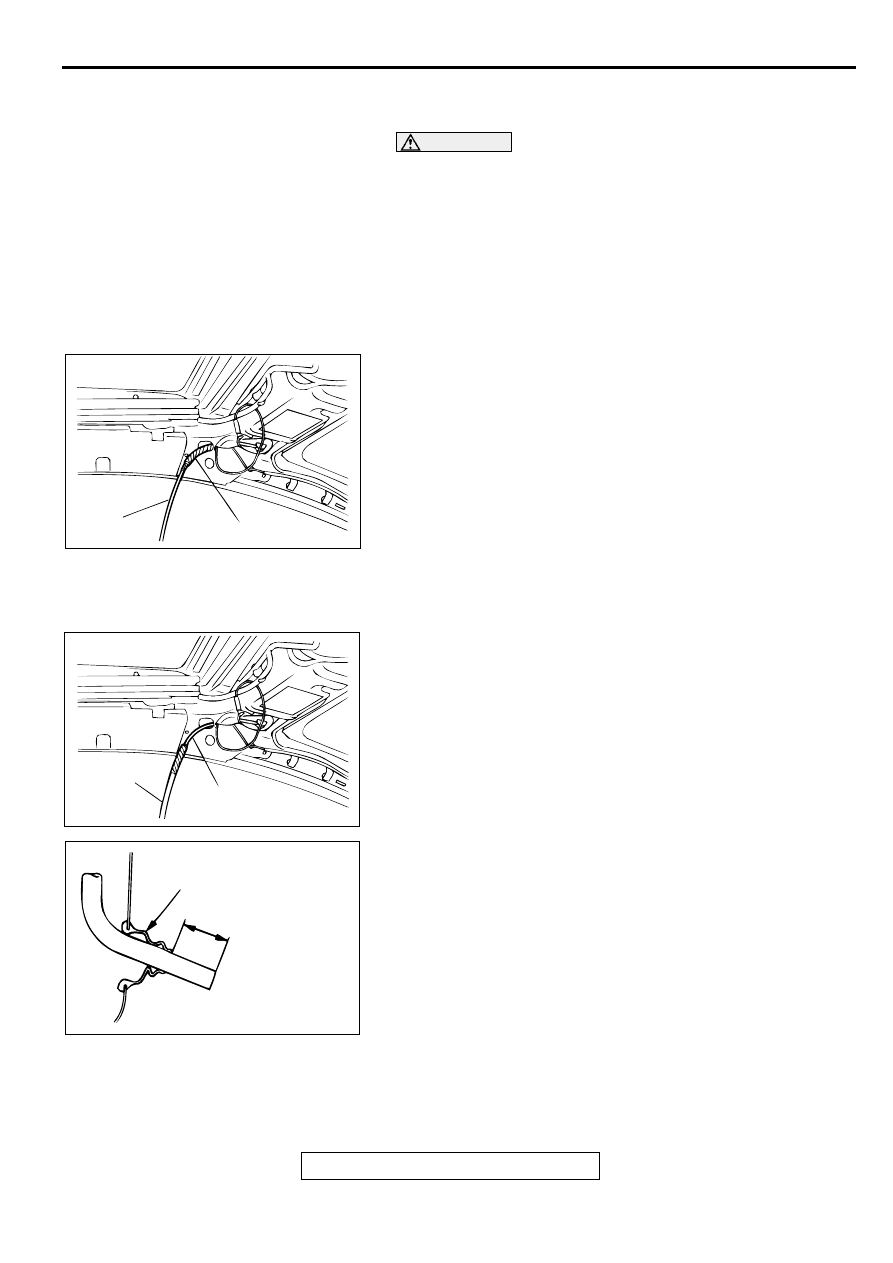
<<B>> DRAIN HOSE REMOVAL
Tie a cord to the end of the drain hose, and wind tape around
the tie until it is smooth. Then pull the drain hose out into the
wheel housing.
INSTALLATION SERVICE POINTS
>>A<< DRAIN HOSE INSTALLATION
1. Tie the cord that was used during removal to the end of the
drain hose, and wind tape around it until it is smooth.
2. Pull the cord to pull through the drain hose.
3. Install the grommet, and then position the drain hose so that
it protrudes from the grommet as shown in the illustration.
AC000513AB
CORD
DRAIN HOSE
AC000514
CORD
DRAIN HOSE
AB
AC002392
GROMMET
25 mm (1.0 in)
(FRONT SIDE, REAR SIDE RH)
25 ± 3 mm (1.0 ± 0.1 in)
(REAR SIDE LH)
AB
SUNROOF ASSEMBLY
TSB Revision
BODY
42-110
>>B<< SUNROOF MOTOR ASSEMBLY INSTALLATION
If the sunroof motor assembly is out of its fully closed position,
adjust the motor position by the following steps before
installment.
1. Remove the sunroof motor assembly without disconnecting
the sunroof motor assembly connector.
2. Close the sunroof lid glass fully.
3. Push the sunroof close switch until the sunroof motor
assembly stops turning. Repeat this operation until the
motor does not turn at all. Then install the motor assembly to
the roof.
NOTE: When the sunroof motor assembly does not turn at
all, the sunroof-ECU will return to its default condition.
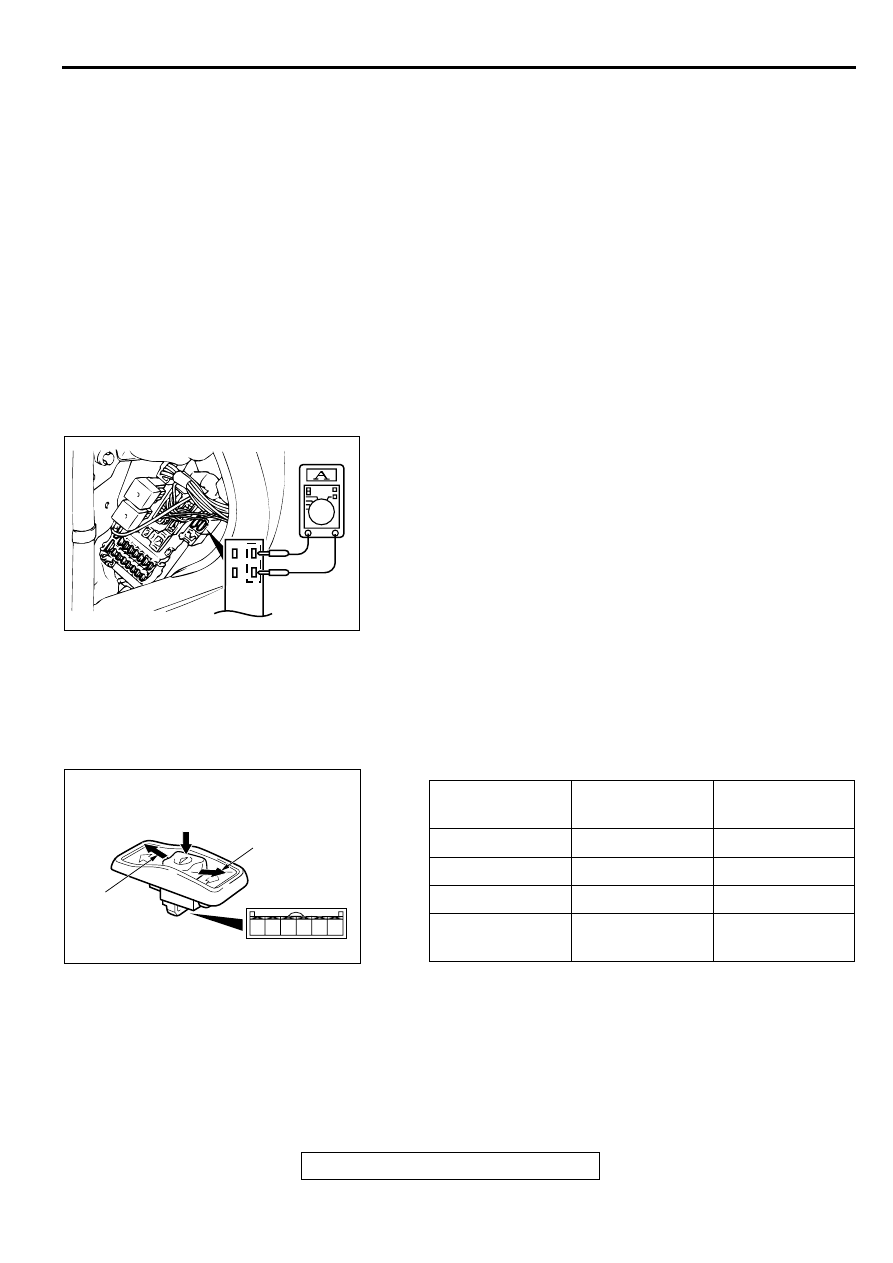
INSPECTION
M1426001300071
ROOF LID GLASS OPERATION CURRENT CHECK
1. Remove the sunroof fuse and connect an ammeter as
shown in the illustration.
2. Press the sunroof switch to operate the sunroof, and then
measure the operation current while the roof lid glass is
moving (except when the sunroof starts to operate, when it
is fully open, when it is fully closed and when it is fully tilted
up).
Standard value: 10 A or less [at 20
°
C (68
°
F)]
3. If the operation current is outside the standard value, check
the following points.
•
Installation condition, warping or jamming of sunroof
assembly
•
Sticking of drive cable
•
Tilt of roof lid glass
SUNROOF SWITCH CONTINUITY CHECK
AC002356AB
JUNCTION BLOCK
SWITCH
POSITION
TESTER
CONNECTION
SPECIFIED
CONDITION
Open
4
−
5
Continuity
Off
−
No Continuity
Tilt up
3
−
4
Continuity
Slide closed, Tilt
down
4
−
6
Continuity
6
5
4
3
2
1
ACX02402 AB
OPEN
UP
CLOSE/
DOWN
Нет комментариевНе стесняйтесь поделиться с нами вашим ценным мнением.
Текст